Z26688-02
Contents |
| Oracle Discoverer 3i Viewer Edition Installation and Administration Guide Z26688-02 |
|
Please read the release notes (Readme.wri) in conjunction with this guide. These contain the latest information and may affect instructions in this guide.
Oracle Discoverer 3i Viewer Edition does not require any downloads, plugins nor installation of any code on the client. The only client requirement is to be able to communicate via HTTP and render HTML or XML. See Section 2.1.3, "Software requirements" for the browser specification.
Before installing the components of Oracle Discoverer 3i Viewer Edition, Oracle Discoverer Server must first be fully installed and configured.
This chapter provides the information you need to install the necessary components to run Oracle Discoverer 3i Viewer Edition. The information covered in this chapter includes:
This section references the minimum hardware requirements and the software necessary to install and run Oracle Discoverer 3i Viewer Edition.
Oracle Discoverer 3i Viewer Edition is rendered in html and requires no extra hardware, only the ability to run a browser (See Section 2.1.3.1, "Client Web Browsers").
For servers running Discoverer Server sessions:
The following table list the RAM needed for each Discoverer Server component.
The software requirements for the environment are:
The following Web browsers support Oracle Discoverer 3i Viewer Edition:
| Operating System |
Microsoft Internet Explorer 3.02* 4.01 |
Netscape Navigator 3.0* 4.0X |
||
|---|---|---|---|---|
|
Windows NT 4.0 |
x |
x |
x |
x |
|
Windows 98 |
|
x |
x |
x |
|
Windows 95 |
x |
x |
x |
x |
|
Solaris/SPARC |
|
|
x |
x |
Although version 3.x browsers are supported for use with Oracle Discoverer 3i Viewer Edition (see Table 2-2), version 4.x (and above) browsers are recommended for optimum viewing.
Service pack 5 for NT is recommended.
Oracle Discoverer 3i Viewer Edition supports the following HTTP servers/servlet engines:
The HTTP servers must be able to handle global mime types for .exe files.
You also need the following information to install Discoverer 3i Application server:
The following table shows which components you can install, on which server, and the required types of server:
Refer to your Web Server documentation to find out whether you can install to NT Workstation or not.
The Locator, Session, and Preferences components must all be installed on the same subnet. If you plan to install multiple instances of Discoverer 3i Application server on the subnet, for example one instance for the Accounting Department and another for Engineering, install a Locator component and Preferences component for each instance, and be sure to give the instances unique names during the installation process.
The following illustration shows typical configurations of Discoverer Server.
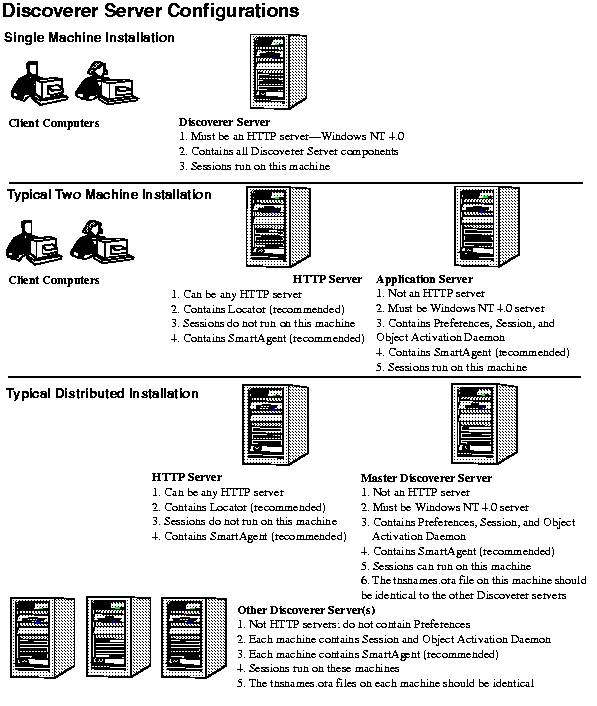
When installing Discoverer Server in a distributed mode, designate one machine as the Master Discoverer Server to host the Discoverer Preferences and Session component. Each machine that will run Oracle Discoverer 3i Viewer Edition sessions requires a Session component.
Because each concurrent active session can require 3.8 to 18 MB of RAM, you can estimate the number of concurrent sessions that each machine can support. To help you allocate machine resources for concurrent sessions, load balancing among the machines is part of the setup procedure. See Section 2.3.4.1.1, "Examples of Load Balancing" for a complete description of load balancing.
Step-by-step instructions explain how to install or remove the following:
The following section headings explain the process:
You can install Oracle Discoverer 3i Edition Server and Servlet software on a single computer or distributed over several servers. A distributed installation is recommended for wide use of Discoverer Server. A single-computer installation is typically for running a demonstration, evaluating Discoverer Server, or setting it up for a small group of users.
You can deploy Oracle Discoverer 3i Viewer Edition across a range of different Web Servers and Servlet Engines, these must be installed before you can install and configure the Oracle Discoverer 3i Viewer Edition Servlet component.
For a brief overview of servlets and servlet engines see Section 1.3.2.1, "What is a Servlet?" and Section 1.3.2.2, "What is a Servlet Engine?".
For step-by-step installation instructions for the servlet see the appropriate areas in Section 2.3.1.3, "Installing Discoverer 3i Server Distributed on Multiple Machines", Section 2.3.1.4, "Installing Oracle Discoverer 3i Viewer Edition Component and Master Server on a Single Machine" or Section 2.3.1.5, "Custom Installation".
For general web server and servlet configuration details see Section 2.3.5, "Common Configuration" .
Ensure that one of the following web servers is installed before continuing.
|
NOTE: An NT Server is required if you are installing Oracle Discoverer 3i Viewer Edition with Microsoft IIS. Installation with IIS on an NT WorkStation is NOT possible. : |
Any of the following can be used and must be installed before installing Oracle Discoverer 3i Viewer Edition.
|
NOTE: JDK/JRE 1.2.2 running with Java Hotspot (currently 1.0.1) is recommended as it gives significant performance gain over previous releases. |
| Web Server | Servlet Engine | |||
| JRun v2.3.3 | ServletExec v2.2c | JServ v1.0 | Built-in servlet engine | |
| MS IIS 4.x | x | x | ||
| MS PWS 4.x | x | x | ||
| Netscape ES 4.0* | x | |||
| Apache 1.3.6 | x | x | ||
| Apache 1.3.9 | x | x | x | |
| OAS 4.0.8 | x | |||
* Netscape ES 4.0 comes with its own built in servlet Engine, but you can also use other servlet engines
Any of the following can be used and must be installed before installing Oracle Discoverer 3i Viewer Edition.
Depending on what you have already installed a number of installation options are available. The installation options and the choices available for each option, are presented here as a guide.
Decide which of the following categories you fall into before installation:
Installing on multiple machines involves the following steps:
The HTTP server can be run on any platform:
The Oracle Installation Settings dialog box opens.
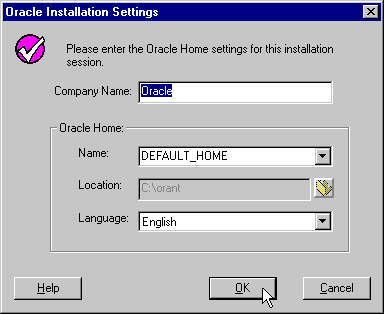
The View Installation and Administration Guide dialog appears.

When you return to the Oracle Installer, the Discoverer Server Installation Options dialog appears.
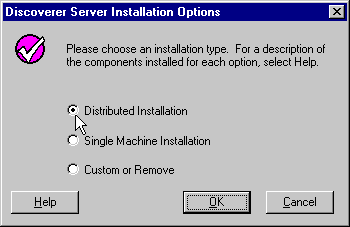
The Distributed Installation Options dialog box opens.
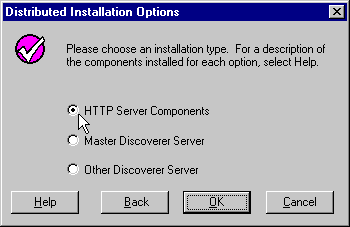
The Directory Selection dialog box opens.
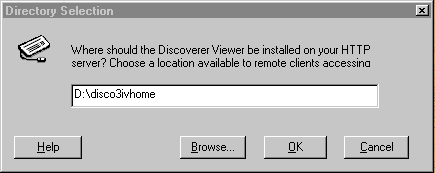
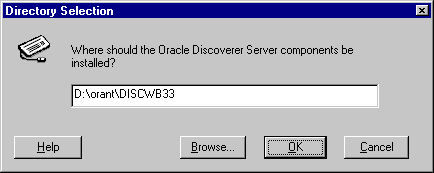
The Directory Selection dialog box opens. It lists the default Oracle Home directory. You can choose another directory if you want
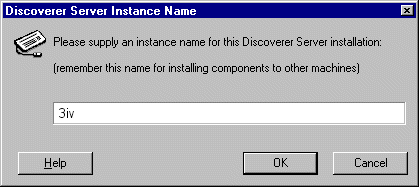
The Discoverer Server Instance Name dialog box opens.
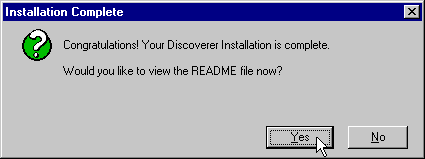
Installation begins. The installation on the HTTP server installs the Oracle Discoverer 3i Viewer Edition servlet files and the Discoverer Locator. When the installation is finished, the Installation Complete message appears.
Installation creates and installs an automatic NT Service named "OracleDiscoverer3i" which loads and starts the Locator component and CORBA services.
|
Note: The Locator will also detect the Preference component and Session component(s) that you will install later. |
You are now ready to install the software on the Master Discoverer Server (for more information, see Section 2.3.1.3.2, "To Install the Discoverer Server Components on the Master Discoverer Server").
If you are already running Discoverer Server services for this or any other Discoverer product, they must be shut down before continuing. To do this select `Services' from the Control Panel and stop the service "OracleDiscoverer3i".
The Master Discoverer Server must be a Windows NT 4.0 Server.
The Oracle Installation Settings dialog box opens.

Make sure to select the [DEFAULT_HOME] directory.
The View Installation and Administration Guide dialog appears.

When you return to the Oracle Installer, the Discoverer Server Installation Options dialog appears.

The Distributed Installation Options dialog box opens.
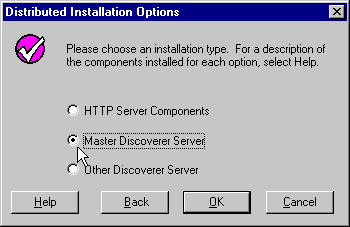
The Directory Selection dialog box opens. It shows the default Oracle home directory under your DEFAULT_HOME directory.
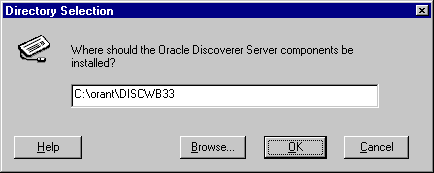
The Discoverer Server Instance Name dialog box opens.

It is very important that you set the same instance name when installing all the machines that will be running the Discoverer Server components. This name is used in the .XML file configuration (for more information, see Section 2.3.4.4, "Oracle Discoverer 3i Viewer Edition .XML File Configuration").
Important:
Installation begins. The installation for the Master Discoverer Server installs and registers two Oracle Discoverer components: Discoverer Preferences and Discoverer Session. When the installation is finished, the Installation Complete message appears.

Installation creates and installs an NT Service named "OracleDiscoverer3i" which automatically loads and starts the Locator and CORBA services. To stop and restart this service from the Windows Start menu, select Setting | Control Panel | Services.
You do not need to register the Preferences and Session components with the Locator because the OracleDiscoverer3i service automatically does this for you. However, if for any reason your components are not properly registered with the Locator, see Section 2.3.4.3, "Registering Server Components".
Installation on the Master Discoverer Server also creates two Program Groups: Oracle Discoverer 3i Server and Oracle Discoverer 3i Server Setup
If you're installing on additional machines, continue with Section 2.3.1.3.3, "To Install Discoverer Server Components on Additional Machines".
If you are not installing on additional machines and the database is on the same machine as the Master Discoverer Server, continue with Section 2.3.4.4, "Oracle Discoverer 3i Viewer Edition .XML File Configuration".
If you are not installing on additional machines and the database is on a different machine to the Master Discoverer Server, you will need to add an entry to the tnsnames.ora file (for more information, see Section 2.3.4.2, "Editing the tnsnames.ora Files"). When you have modified the tnsnames.ora file, continue with Section 2.3.4.4, "Oracle Discoverer 3i Viewer Edition .XML File Configuration".
|
Note: You do not have to install on the additional machines at this time. Instead you could configure Discoverer Server first, and then install on the additional machines later. See Section 2.3.4.3, "Registering Server Components" for details about configuration. |
If you are already running Discoverer Server services for this or any other Discoverer product, they must be shut down before continuing. To do this select `Services' from the Control Panel and stop the service "OracleDiscoverer3i".
Installing on additional machines installs the Discoverer Session component on each one. The additional machines must be Windows NT 4.0 servers. Install Discoverer Session components on each additional machine to support more users. This is how the system scales. A reminder: These machines are not the same machines you used for the HTTP and Master Discoverer Server.
The Oracle Installation Settings dialog box opens.

Make sure to select the [DEFAULT_HOME] directory.
The View Installation and Administration Guide dialog appears.

When you return to the Oracle Installer, the Discoverer Server Installation Options dialog appears.

The Distributed Installation Options dialog box opens.
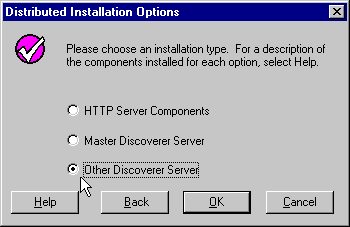
The Directory Selection dialog box opens. It shows the default Oracle home directory under your DEFAULT_HOME directory.

The Discoverer Server Instance Name dialog box opens.

It is very important that you set the same instance name on all the machines that will be running sessions. This name is used in the .XML file configuration, (See Section 2.3.4.4, "Oracle Discoverer 3i Viewer Edition .XML File Configuration").
Note:
Installation begins. The installation for the Other Discoverer Server installs and registers the Discoverer Session component. When the installation is finished, the Installation Complete message appears.

Installation creates and installs an NT Service named "OracleDiscoverer3i" which automatically loads and starts the Locator and CORBA services. To stop and restart this service from the Windows Start menu, select Setting | Control Panel | Services.
You do not need to register the Session component with the Locator because the OracleDiscoverer3i service automatically does this for you. However, if for any reason your components are not properly registered with the Locator, see Section 2.3.4.3, "Registering Server Components".
See Section 2.3.2, "The Installed Directories" for a listing of the directories installed on the server.
Each additional machine can run multiple sessions; therefore, the number of additional machines you choose to use for sessions depends on how many concurrent sessions the users need, the amount of memory available, the speed of the hardware, and so forth. Add the list of machine IP addresses to the Pref.txt file and the tnsnames.ora file. For more information, see Section 2.3.4.1, "Editing the Discoverer Server Preferences" and Section 2.3.4.2, "Editing the tnsnames.ora Files".
To complete the installation see Section 2.3.4.4, "Oracle Discoverer 3i Viewer Edition .XML File Configuration".
The Discoverer HTTP server software can be installed on machines running Solaris. Installation on an HTTP server running Solaris requires four steps:
Install the software while you are logged in with the appropriate privileges (typically `root').
The VisiBroker utilities are Java applications that require the JRE to run. The VisiBroker utilities are required to activate the Locator component and also to support communication among Discoverer 3i components located on other machines.
The Locator component must be running for the Oracle Discoverer 3i Viewer Edition servlet to connect to an available session. You can activate the Locator automatically during system initialization or from a user account.
The instructions to install on a Solaris system use the following filenames, but you would replace these filenames with the filenames you choose for your installation:
Installing JRE 1.1.6.04
The VisiBroker utilities require a compatible Java Runtime Environment (JRE). Oracle Discoverer 3i Viewer Edition includes JRE version 1.1.7.28o or higher, which can be installed without conflicting with other JRE or JDK versions currently on the server.
/Solaris directory of the Discoverer 3i CD-ROM.
/Solaris/jre116Sparc.tar to the <temp> directory.
tar xvf ./jre11728oSparc.tar
This will extract three files:
Solaris_JRE_1.1.6_04_sparc.bin
sparc_jdk_patches.tar.Z
readme
The JRE files are installed into a subdirectory of the current directory.
/bin/sh <temp>/Solaris_JRE_1.1.6_04_sparc.bin
The following new directory is created:
<jre>/Solaris_JRE_1.1.6_04/
where <jre> is the name of the directory where you want the JRE directory tree installed.
That completes installation of JRE 1.1.6.04.
Installing VisiBroker for Java 3.3.4.0 for Java
/Solaris/vbroker34.tar from the Discoverer 3i CD-ROM to /usr/local.
/usr/local/ and unarchive vbroker34.tar using the following command:
tar xvf /usr/local/vbroker/vbroker34.tar
| Environment Variable | Value |
|---|---|
|
VBROKER_ADM |
/usr/local/vbroker/adm |
|
VBROKER_JAVAVM |
<jre>/Solaris_JRE_1.1.6_04/bin/jre |
|
path (append to existing value) |
/usr/local/vbroker/bin |
That completes installation of VisiBroker 3.3.4.0 for Java.
Activating the Locator Component
Before activating the Locator component, the OAD and CORBA services must be running on the Discoverer Server machine. Also, you must set the Solaris OS parameter named File Descriptors to 1024 or less (as Solaris has a limitation of 1024 descriptors per process). See your Solaris OS documentation for instructions to set this parameter.
tar xvf <temp>/3iviewer.tar
start_locator from the Discoverer 3i CD-ROM to <dis_root>/disco3iv/DISCWB33/applet.
chmod 744 start_locator
| Current Value | New Value |
|---|---|
| OracleDiscovererPreference3.3 | <iname>OracleDiscovererPreference3.3 |
| OracleDiscovererLocator3.3 | <iname>OracleDiscovererLocator3.3 |
For example, the following is the original code in the file:
vbj oracle.disco.locator.Locator -preference OracleDiscovererPreferences3.3 -locator OracleDiscovererLocator3.3
If the instance name is 3iv, edit the file as follows:
vbj oracle.disco.locator.Locator -preference 3ivOracleDiscovererPreferences3.3 -locator 3ivOracleDiscovererLocator3.3
osagent -p 14000&
to start the VisiBroker SmartAgent.
The VisiBroker SmartAgent must be running before you can activate the Locator component. You can start the SmartAgent from any directory because the path for osagent was added to the environment path when the VisiBroker files for Java 3.4 were installed earlier. An "&" at the end of the command is optional, but is recommended because the SmartAgent must be running whenever the Locator is running.
start_locator&
The "&" is optional but is also recommended.
You can now delete the temporary installation files located in <temp>.
To complete the installation see Section 2.3.1.3.2, "To Install the Discoverer Server Components on the Master Discoverer Server".
If you are already running Discoverer Server services for this or any other Discoverer product, they must be shut down before continuing. To do this select `Services' from the Control Panel and stop the service "OracleDiscoverer3i".
In this configuration the Locator component runs on a Windows NT machine, which can be one of the Discoverer Servers. You must first install the Discoverer 3i Viewer Edition component on a Windows NT machine, and then copy (or FTP) the files and downloadables to the non-NT machine. After the files are on the non-NT HTTP server, you install the Locator on a Windows NT machine that will run a Discoverer session. The Discoverer 3i Viewer Edition component can then be deinstalled from the Windows NT machine later if not required.
You will need the above Visibroker files when configuring the servlet engine.
The rest of this section describes how to install the Locator component. If you want to run the Locator on the same Windows NT machine as in step 1, the Locator component is already installed. You can therefore ignore the rest of this section and go straight to Section 2.3.1.3.2, "To Install the Discoverer Server Components on the Master Discoverer Server".
The Oracle Installation Settings dialog box opens.

The View Installation and Administration Guide dialog appears.

When you return to the Oracle Installer, the Discoverer Server Installation Options dialog appears.
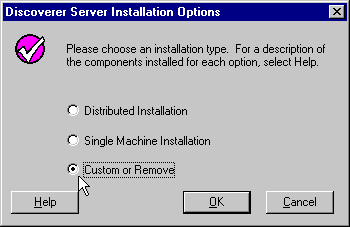
The Software Asset Manager appears.
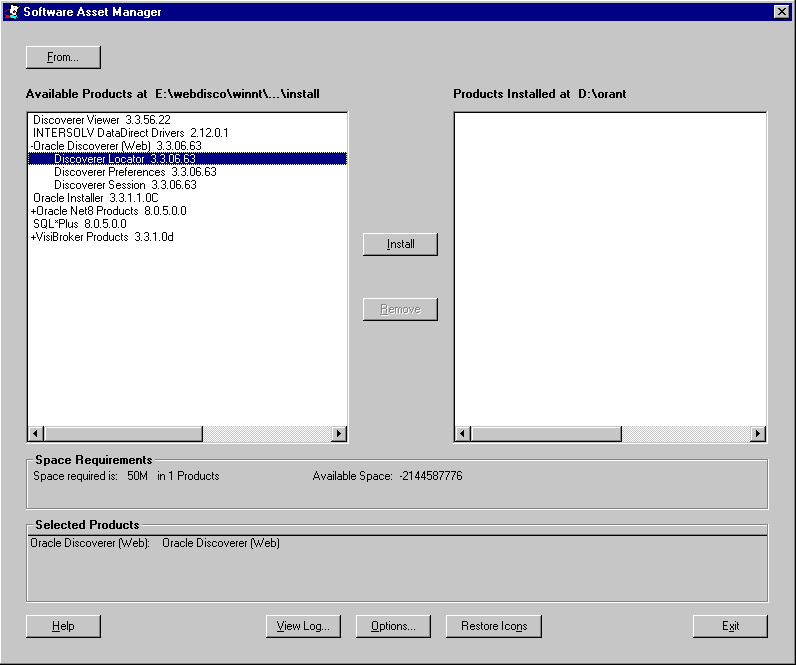
The Discoverer Server Instance Name dialog box opens.

It is very important that you set the same Instance name on all the machines that will be running sessions. This name is used in the .XML file configuration, (See Section 2.3.4.4, "Oracle Discoverer 3i Viewer Edition .XML File Configuration").
Note:
Installation begins. When the installation is finished, the Installation Complete message appears.

Installation creates and installs an NT Service named "OracleDiscoverer3i" which automatically loads and starts the Locator and CORBA services. To stop and restart this service from the Windows Start menu, select Setting | Control Panel | Services.
You are now ready to install (i.e. on the NT machine) the Discoverer software on the Master Discoverer Server and on Other Discoverer Servers. See Section 2.3.1.3.2, "To Install the Discoverer Server Components on the Master Discoverer Server"and Section 2.3.1.3.3, "To Install Discoverer Server Components on Additional Machines".
If you are already running Discoverer Server services for this or any other Discoverer product, they must be shut down before continuing. To do this select `Services' from the Control Panel and stop the service "OracleDiscoverer3i".
If you already have Oracle Discoverer 3i Server installed then go to Section 2.3.1.5, "Custom Installation".
A single machine installation must be on a Windows NT 4.0 machine with an HTTP server.
The Oracle Installation Settings dialog box opens.

The View Installation and Administration Guide dialog appears.

When you return to the Oracle Installer, the Discoverer Server Installation Options dialog appears.
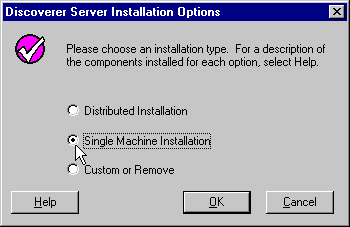
The Directory Selection dialog box opens.

The Directory Selection dialog box opens. It shows the default Oracle home directory under your DEFAULT_HOME directory. You can choose another directory if you want.

The Discoverer Server Instance Name dialog box opens.

You may need this Instance name if installing the Discoverer Server components on other machines later, so you may want to write it down. This name is used in the .XML file configuration, (See Section 2.3.4.4, "Oracle Discoverer 3i Viewer Edition .XML File Configuration").
Installation begins. All of the necessary files are installed on the machine. When the installation is finished, the Installation Complete message appears.

All the Discoverer 3i Viewer Edition components are installed and registered on the server. Installation creates and installs an automatic NT Service named "OracleDiscoverer3i" that loads and starts the Locator component and CORBA services. To stop and restart this service from the Windows Start menu, select Setting | Control Panel | Services.
You do not need to register the Preferences and Session components with the Locator because the OracleDiscoverer3i service automatically does this for you. However, if for any reason your components are not properly registered with the Locator, see Section 2.3.4.3, "Registering Server Components".
If the database is on the same machine, continue with Section 2.3.4.4, "Oracle Discoverer 3i Viewer Edition .XML File Configuration".
If the database is on a different machine, you will need to add an entry to the tnsnames.ora file (for more information, see Section 2.3.4.2, "Editing the tnsnames.ora Files"). When you have modified the tnsnames.ora file, continue with Section 2.3.4.4, "Oracle Discoverer 3i Viewer Edition .XML File Configuration"
If you are already running Discoverer Server services for this or any other Discoverer product, they must be shut down before continuing. To do this select `Services' from the Control Panel and stop the service "OracleDiscoverer3i".
If you already have Oracle Discoverer 3i server installed, you will need only install the Oracle Discoverer 3i Viewer Edition component.
Use the Custom Installation option to install the Oracle Discoverer 3i Viewer Edition component if you have previously installed the Discoverer Server distributed on multiple machines. However, the same server requirements apply as with a distributed installation:
The Oracle Installation Settings dialog box opens.

The View Installation and Administration Guide dialog appears.

When you return to the Oracle Installer, the Discoverer Server Installation Options dialog appears.

The Software Asset Manager appears.
To complete the installation see Section 2.3.4.4, "Oracle Discoverer 3i Viewer Edition .XML File Configuration".
Table 2-6, shows the directories installed for the HTTP server and the Discoverer Master server:
| HTTP Server Directories | Discoverer Master Server Directories | ||||||
|---|---|---|---|---|---|---|---|
|
Root/Alias |
Oracle_Home |
||||||
|
|
\disco3iv |
|
\Discwb33 |
||||
|
|
|
\html |
|
|
\classes |
||
|
|
|
|
|
\help |
|
|
\util |
|
|
|
|
|
\images |
|
|
|
|
|
|
\doc |
|
|
|
||
The directory, Discwb33, on the Discoverer Master Server contains the dlls and binary files for the Preference and Session components.
The executable files for the Discoverer Server components are located in the directory, <Oracle_Home>\Discwb33. The executables are:
The executable dis33srv.exe launches the OracleDiscoverer3i service.
The Locator component produces the Locator.ior file.
If you are already running Discoverer Server services for this or any other Discoverer product, they must be shut down before continuing. To do this select `Services' from the Control Panel and stop the service "OracleDiscoverer3i".
You can remove some or all of the Discoverer Server components from each machine.
The Oracle Installation Settings dialog box opens.

The View Installation and Administration Guide dialog appears.

When you return to the Oracle Installer, the Discoverer Server Installation Options dialog appears.

The Software Asset Manager appears.
There are a number of additional configuration tasks that you might have to perform. Depending on how you have installed Discoverer, some of these tasks are optional and some of them are mandatory. Use the following table to decide which tasks to perform and the suggested sequence in which to perform them.
The Discoverer Preferences component is located on the Master Discoverer Server for a distributed install, and on the HTTP server (the only machine) for a single machine install.
The Preferences must contain either the IP address or machine name of each machine that will run Discoverer 3i sessions. However, the order of the IP addresses listed in the Preferences determines the order in which sessions are started on each machine that has a Session component installed. Therefore, you can effectively balance the load placed on the servers by listing the machines in a particular order.
This section contains the following topics:
The Locator uses the list of IP addresses or machine names in the Preferences based on the round-robin method to determine which machine starts the next requested session. The Locator requests a session on each machine, in order, until it reaches the end of the list of IP addresses. When the Locator reaches the end of the list, it returns to the beginning of the list and starts over.
Consequently, to determine the machine to start the first session, second session, third session, and so on, you should consider the speed and performance of each server machine. For planning purposes, you can estimate that each session requires approximately 3.8 to 18 MB of memory.
For example, you may also want one machine to handle five sessions before the next machine is used. If so, you type the first machine's IP address five times before the next machine's address.
Because load balancing can greatly affect performance, we recommend you plan the balancing before editing the Preferences file.
Example #1 Load balancing - equal machines
You have Discoverer Sessions installed on two Application servers. Each machine has the same processor speed and RAM. The IP addresses for these two machines are:
| Server | Name | IP address |
|---|---|---|
|
Application Server #1 |
disco1 |
123.456.789.1 |
|
Application Server #2 |
disco2 |
123.456.789.2 |
You want Application server #1 to handle the first request, Application server #2 to handle the next, Application server #1 the next, and so on.
The Preferences file entry would look like this:
Entries in the Preferences file are comma space delimited (i.e. entries are separated by a comma followed by a space). Enclose the entries in "double quotes."
Example #2 Load balancing - one fast machine plus two other machines
You have Discoverer Sessions installed on three Application servers. The first Application server has faster processors and more RAM. The second and third Application servers are equal to each other in processor speed and RAM.
The IP addresses for these three machines are:
| Server | Name | IP address |
|---|---|---|
|
Application Server #1 |
serve1 |
123.456.789.1 |
|
Application Server #2 |
serve2 |
123.456.789.2 |
|
Application Server #3 |
serve3 |
123.456.789.3 |
You want Application server #1 to handle the first three requests, Application server #2 to handle next one, Application server #3 the next one, then back to Application sever #1 for the next three requests.
The Preferences file entry would look like this:
Machine IPs="serve1, serve1,serve1, serve2, serve3"
or
Machine IPs="123.456.789.1,123.456.789.1,123.456.789.1, 123.456.789.2, 123.456.789.3"
The only information required in the Preferences file is the IP addresses or machine names of the servers used for Discoverer 3i. The other items in the Preferences file can be edited to suit your network or user requirements. See Section 3.3, "Editing the End User Preferences" for more information.
The Preferences file is named Prefs.txt. A backup copy of Prefs.txt is located at <orahome>\Discwb33\util\defaults.txt (or at the location where you installed the Master Discoverer Server, specifically, the Preferences component). If you make a mistake when editing, lose, or corrupt the Prefs.txt file, you can restore the file to its default values from the backup copy.
To edit the Preferences file, edit it on the machine where you installed the Preferences component:
The file, Prefs.txt, opens in the Notepad application.
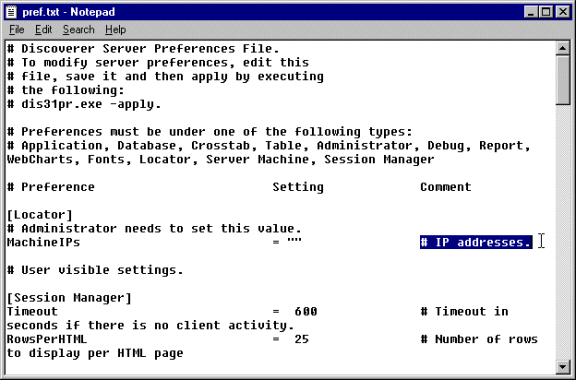
From the Windows Start menu, choose Programs | Oracle Discoverer Server 3i Setup | Apply Preferences.
A confirmation window shows that the new preferences have been saved. If you suspect that the file contains errors, check the error.txt file in the current directory.

To continue, press any key.
The preferences are updated in the Windows NT Registry. Preferences are now set for the Discoverer Server Instance.
The tnsnames.ora file should be identical on each machine that will run a session. The tnsnames.ora file contains the names and aliases of all the databases that users can access using Discoverer 3i or any other Oracle product. To make sure the tnsnames.ora file is correct, enter the SID(s) for each database in your tnsnames.ora file.
One way to edit the tnsanmes.ora file:
A program then runs so you can edit the Net8 configuration.
If the Discoverer Session component is installed on several machines, you can copy the correct tnsnames.ora file to the other machines.
For information on unregistering components or registering from the command line, see Section 3.4, "Registering and Unregistering components" .
To register the Session and Preferences components:
A confirmation screen appears.
A confirmation screen appears.
A confirmation screen appears.
If you used the default installation options with a single Oracle Discoverer Server instance called `3iv' then you do not need to edit this file.
If you have multiple Discoverer Servers or used a different name, then follow the instructions below.
The Oracle Discoverer 3i Viewer Edition Servlet component has one file that needs to be configured:
disco3iv.xml
Before editing this file, we strongly recommend you take a copy of the file for future reference.
When you have made the changes to the disco3iv.xml file, continue with Section 2.3.5, "Common Configuration".
Oracle Discoverer 3i Viewer Edition needs to find the Oracle Discoverer 3i server, it does this using the disco3iv.xml file. Edit this file using Notepad.
You will need to set the correct Discoverer server instance name entered during installation. (See Section 2.3.1, "Installing Discoverer 3i Server and Servlet Software" ). This value can be obtained from your administrator. This must be typed with correct capitalization, exactly as it was entered earlier. For single machine installs or for multiple machines on the same network subnet, this is the only change required.
For multiple machines that use a different subnet mask to the Discoverer Server (or when you are installing onto a non-NT HTTP server), you will need to edit a further section in this file to specify a different network submask.
If in doubt, edit the section assuming a different network subnet mask since this will work even if the computers actually have the same subnet mask.
The following excerpt is from the D:\disco3ivhome\disco3iv\html\disco3iv.xml file. The text that needs to be configured is indicated in the file:
.
You can set up the Connect dialog to enable an Oracle Applications user to log on using an Applications `Responsibility' by displaying the Applications User checkbox.
To set up the Connect dialog to display (or hide) the Applications User checkbox, access the configuration file located in D:\disco3ivhome\disco3iv\html\disco3iv.xml and set the "show_login_method_control" argument to true or false as required.
This section highlights common aspects of configuration applying to naming conventions, web servers, servlet engines and the Java Virtual Machine (JVM).
When you have read this section, continue by configuring one of the following:
Naming conventions may vary from machine to machine. The directories and machine names shown here may be different for your machine but are used in examples in the rest of this installation.
This is full path to the Oracle Home directory. We shall use the example D:\orant
This is the virtual path to the web server directory where the Discoverer 3i Viewer Edition component is installed. This can be any name you want. We shall use the example disco3ivfiles.
This is the physical directory where the directory disco3iv is installed. This was the directory chosen during the installation in response to the question "Where should the Discoverer Viewer be installed on your HTTP server?". We will use the example D:\disco3ivhome
This is the machine name that the HTTP server is installed on. You must include a fully qualified host name.
We will use the example mywebserver.company.com
Certain items need to be configured the same regardless of which web server is used.
All the Web servers need to be configured so that a `directory alias' maps to the installation directory for Oracle Discoverer 3i Viewer Edition.
Certain items need to be configured the same regardless of which servlet is used. This section describes them.
The naming conventions used vary depending on location and naming preferences.
This means registering a name that will be used to invoke the servlet. For default purposes set this to `discoservlet'
The servlet engine needs to know the name of the class that is used to start the servlet.
This is always `oracle.disco3iv.Disco3iv'
Servlet engines differ in that some look in default directories whilst other can be pointed to an explicit class or .jar (Java Archive) file.
This will always refer to the `disco3iv.jar' file although the location of the file may differ.
The servlet engine must be configured so that when the Discoverer servlet is launched a parameter is passed in.
The parameter name is `config' and its value is `http://mywebserver.company.com/disco3ivfiles/html/disco3iv.xml'
JVM's are referenced in Servlet engines and need to be configured in order to run smoothly.
There are two extra .jar files that need to be added to the classpath for servlet engines.
These are vbjorb.jar and vbjapp.jar
Most servlet engines have a classpath setting option so that these can be appended to the classpath.
There are two parameters that need to be passed into the JVM, so that instead of using Sun's default ORB, Visibroker's ORB is used instead.
The parameters and their values are shown below:
org.omg.CORBA.ORBClass=com.visigenic.vbroker.orb.ORB
org.omg.CORBA.ORBSingletonClass=com.visigenic.vbroker.orb.ORB
It is also recommended to increase the maximum Java heap size that the Java Virtual Machine (JVM) will use.
E.g. For Apache, add -mx256m to increase the memory to 256MB. (See Section 2.3.6.3.1, "Add the JVM parameters").
How these are passed in will vary from one Servlet Engine to another.
The recommended suite of software for use with Apache is:
Apache should be installed as a service on Windows NT to avoid problems closing the JVM when it is stopped and restarted as a console application.
To check your Apache Server is running use a web browser and enter the fully qualified machine name as the URL E.g.:
mywebserver.company.com
To check your Apache JServ is running, enter the following URL:
mywebserver.company.com/servlets/IsItWorking
On Solaris this should read:
mywebserver.company.com/example/Hello
You should verify that Apache Server and Apache JServ are running before continuing.
In the event of errors, check the Apache log files located in the directory:
On Windows NT this is Apache\logs and Apache JServ\logs
On Solaris this is in one location /usr/local/apache/logs).
This section includes the following topics:
Edit the httpd.conf file in your Apache directory.
For example:
On Windows NT if D:\Apache was where you installed Apache then D:\Apache\conf directory is where you will find httpd.conf file.
On Solaris if /usr/local/apache was where you installed Apache then /usr/local/apache/conf directory is where you will find httpd.conf file
Add the following line in the `Aliases' section:
For Windows NT
Alias /disco3ivfiles/ "D:/disco3ivhome/disco3iv/"
For Solaris
Alias /disco3ivfiles/ "/usr/local/disco3ivhome/
disco3iv/"
Where disco3ivfiles can be any name you want and the directory in which the file disco3iv.jar is installed is:
NOTE: Be sure to enter this line carefully, including the trailing slashes after each section.
Below is an excerpt from a httpd.conf file showing the above line inserted (for Windows NT).
# Aliases: Add here as many aliases as you need (with no limit). The format is
# Alias fakename realname
#
# Note that if you include a trailing / on fakename then the server will
# require it to be present in the URL.  So "/icons" isn't aliased in this
# example, only "/icons/"..
#
Alias /icons/ "D:/apache/icons/"

Alias /disco3ivfiles/ "D:/disco3ivhome/disco3iv/"
NOTE: These are forward slashes not back slashes.
(For Solaris : Alias /icons/ "/usr/local/apache/icons" )
(For Solaris : Alias /disco3ivfiles/ "/usr/local/disco3ivhome/disco3iv/" )
Stop and restart Apache.
Start a web browser and type mywebserver.company.com/disco3ivfiles/
Where mywebserver.company.com/ is the machine name that the HTTP server is installed on.
You should see a directory with the disco3iv.jar file present as shown below.
NOTE: Make sure you append a `/' at the end of the address otherwise you will not see the contents of the directory.
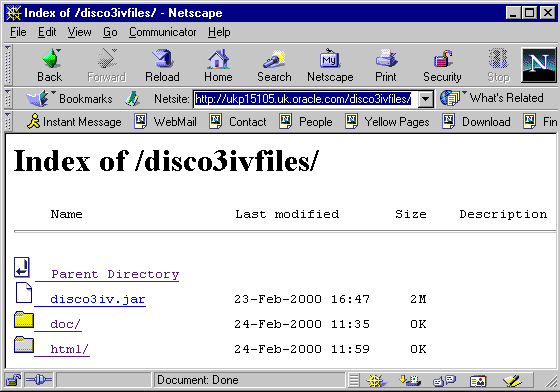
The above image shows what you can expect to see.
This can be found where you installed Apache JServ
If you installed Apache JServ in the \JServ directory ( /usr/local/jerv on Solaris ), the file will be in the \JServ\conf directory
( /usr/local/jserv/conf on Solaris ). If JServe is Version 1.1 or above, the zone.properties file will be found in the \JServ\servlets directory (Or /usr/local/jserv/servlets on Solaris ).
This means telling JServ where to find the disco3iv.jar file
Append the path for the file to the end of the `repositories' line
E.g. Before appending line:
For Windows NT

repositories=D:\JServ\servlets
For Solaris

repositories=/usr/local/jserv/servlets (For Solaris)
After appending line:
For Windows NT:

repositories=D:\JServ\servlets,D:\disco3ivhome\disco3iv\disco3iv.jar

(where D:\disco3ivhome\disco3iv is the full path for disco3iv.jar)

For Solaris:

repositories=/usr/local/jserv/servlets,/usr/local/disco3ivhome/disco3iv/
disco3iv.jar

(where /usr/local/disco3ivhome/disco3iv/ is the full path for disco3iv.jar)
Add the following line in the `Startup Servlets' section
servlets.startup=discoservlet
Add the following line to the `Servlet Aliases' section
servlet.discoservlet.code=oracle.disco3iv.Disco3iv
Add the following line to the `Aliased Servlet Init Parameters' section
servlet.discoservlet.initArgs=config=http://mywebserver.company.com/
disco3ivfiles/html/disco3iv.xml

(Note: the above line must be a single unbroken line with no manual line break
or carriage return)
Where mywebserver.company.com is the machine name that the HTTP Server is
installed on. Remember to change this if you copy and paste this text.
This can be found where you installed Apache JServ
eg If you installed Apache JServ in the \JServ directory ( /usr/local/jserv for Solaris) the file can be found in the \JServ\conf sub directory ( /usr/local/jserv/conf for Solaris).
Add the following line to the `Arguments passed to Java interpreter (optional)' section
wrapper.bin.parameters=-Dorg.omg.CORBA.ORBClass=

com.visigenic.vbroker.orb.ORB -Dorg.omg.CORBA.ORBSingletonClass=
com.visigenic.vbroker.orb.ORB

(Note: There is a space between `.orb.ORB' and `-Dorg' above. Also, the above
line must be a single unbroken line with no manual line break or carriage
return).

(Note: It is also recommended to increase the maximum memory available to the
JVM i.e. "wrapper.bin.parameters=-mx256m -Dorg.omg.CORBA.ORBClass=

com.visigenic.vbroker.orb.ORB -Dorg.omg.CORBA.ORBSingletonClass=
com.visigenic.vbroker.orb.ORB" to increase this to 256mbytes)
Add the following line to the `CLASSPATH environment value passed to the JVM' section
For Windows NT:
wrapper.classpath=

D:\orant\vbroker\lib\vbjorb.jar;D:\orant\vbroker\lib\vbjapp.jar
Where D:\orant is the location of the Oracle Home directory. (NOTE: Also, the
above line must be a single unbroken line with no manual line break or carriage
return)

For Solaris:
wrapper.classpath=

/usr/local/vbroker/lib/vbjorb.jar;/usr/local/vbroker/lib/vbjapp.jar

Where /usr/local/vbroker is the directory where you installed Visibroker. (NOTE:
Also, the above line must be a single unbroken line with no manual line break or
carriage return)
For Windows NT:
mywebserver.company.com/servlets/discoservlet
For Solaris:
mywebserver.company.com/servlets/discoservlet
This should start Oracle Discoverer 3i Viewer and you should see the login screen:

Your installation is now complete.
This section includes the following topics:
NES4.0 has its own built in servlet engine. Use the following instructions to configure the servlet engine. Note that the instructions apply to both NT and Solaris unless specified otherwise.
Start a browser and type the following:
mywebserver.company.com:8888
Where mywebserver.company.com is the machine name the HTTP server is installed on.
You will get a login prompt.
Enter the user id and password (These were entered during the Netscape ES installation).
The default is admin for both user id and password.
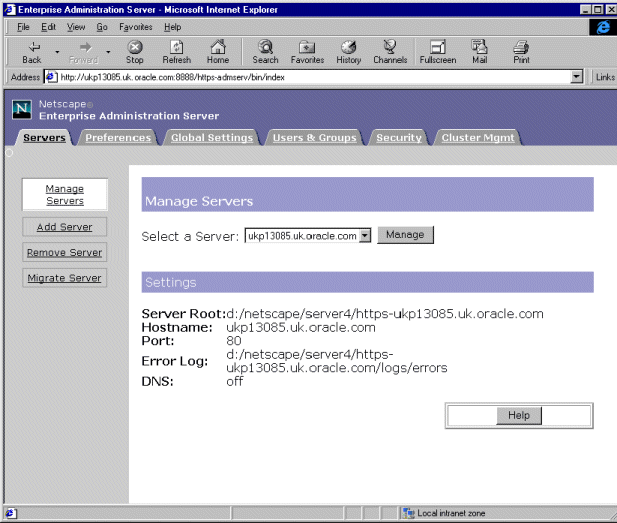
Click the `Manage' button in the above window.
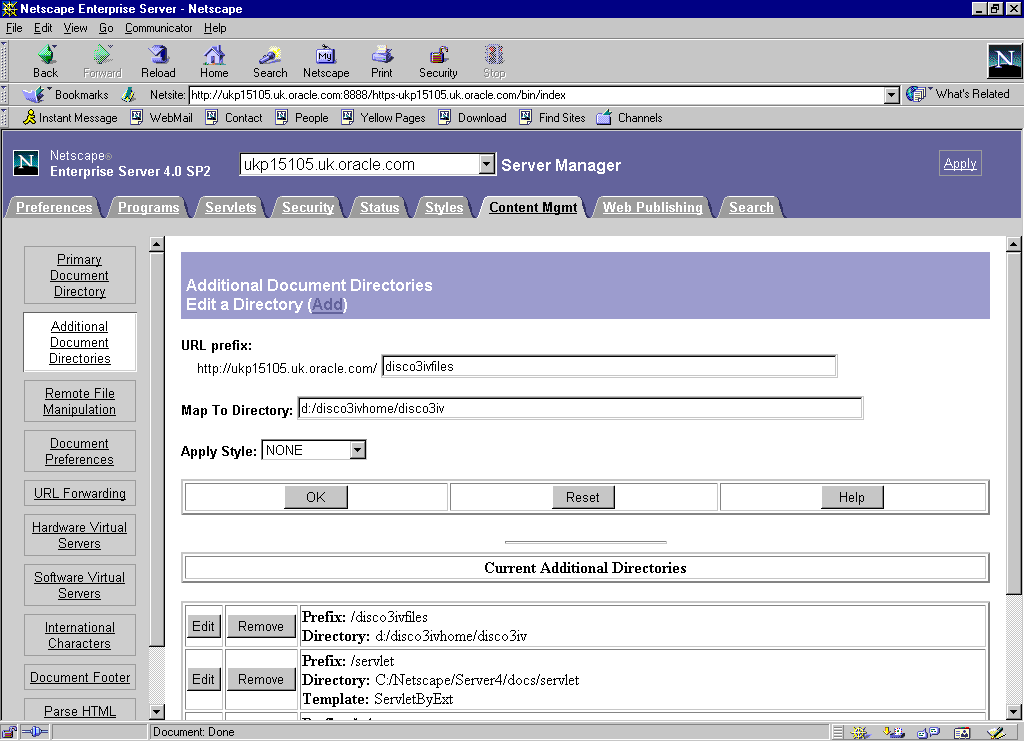
Start a new browser and enter the following as a URL address:
mywebserver.company.com/disco3ivfiles/
Where mywebserver.company.com is the machine name the HTTP server is installed on.

You should be presented with the above contents
Start NES Admin and select the Servlets tab
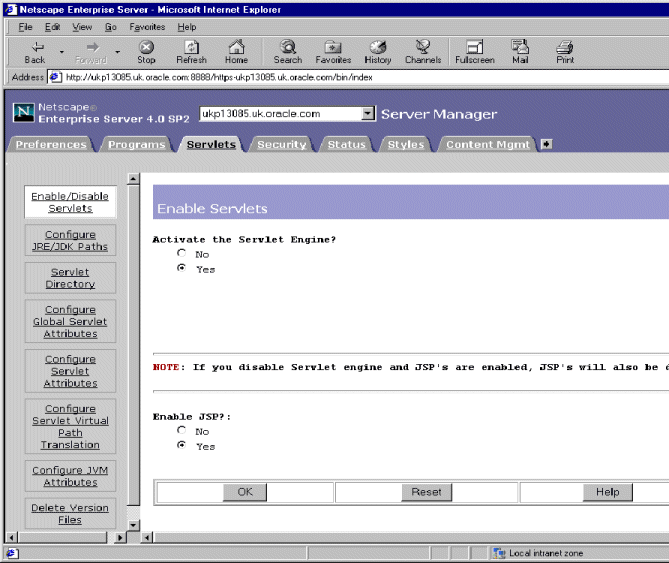
Select the `Enable/Disable Servlets' tab and ensure that the `Activate the Servlet Engine' and `Enable JSP?' options are set to `Yes'.
Edit the servlets.properties file.
This can be found in the NES installation directory. For example:
where mywebserver is the name of the machine the Server has been installed on.
Append three lines to the end of the file as follows:
servlet.discoservlet.classpath=D:/disco3ivhome/disco3iv/disco3iv.jar
servlet.discoservlet.code=oracle.disco3iv.Disco3iv
servlet.discoservlet.initArgs=config=http://mywebserver.company.com/
disco3ivfiles/html/disco3iv.xml
where D:/disco3ivhome is the full path for the disco3iv.jar
servlet.discoservlet.classpath=/usr/local/disco3ivhome/disco3iv/disco3iv.jar
servlet.discoservlet.code=oracle.disco3iv.Disco3iv
servlet.discoservlet.initArgs=config=http://mywebserver.company.com/
disco3ivfiles/html/disco3iv.xml
where /usr/local/disco3ivhome is the full path for the disco3iv.jar
Save and exit.
Edit the rules.properties file.
This can be found in the NES installation directory. For example:
where mywebserver is the name of the machine the Server has been installed on.
Append the following line to the end of the file
/discoservlet=discoservlet
Save and exit.
Edit jvm12.conf
This can be found in the NES installation directory. For example:
where mywebserver is the name of the machine the Server has been installed on.
To make sure that vbjorb.jar and vbjapp.jar are loaded first, modify the `jvm.classpath' line as follows:
D:/orant/vbroker/lib/vbjorb.jar;D:/orant/vbroker/lib/vbjapp.jar;
Before you add the text, the line looks like this:
jvm.classpath=D:/Netscape/Server4/plugins/samples/servlets/beans/
SDKBeans.jar;D:/Netscape/Server4/bin/https/jar/xml4j_1_1_9.jar;D:/Netscape/
Server4/bin/https/jar/Bugbase.jar;D:/Netscape/Server4/bin/https/jar/
Calljsac.jar
After you add the text, the line looks like this:
jvm.classpath=D:/orant/vbroker/lib/vbjorb.jar;D:/orant/vbroker/lib/
vbjapp.jar;D:/Netscape/Server4/plugins/samples/servlets/beans/
SDKBeans.jar;D:/Netscape/Server4/bin/https/jar/xml4j_1_1_9.jar;D:/Netscape/
Server4/bin/https/jar/Bugbase.jar;D:/Netscape/Server4/bin/https/jar/
Calljsac.jar
where D:/orant is the directory where you installed Visibroker.
/usr/local/vbroker/lib/vbjorb.jar;/usr/local/vbroker/lib/vbjapp.jar;
Before you add the text, the line looks like this:
jvm.classpath=/usr/local/netscape/server4/plugins/samples/servlets/beans/
SDKBeans.jar;/usr/local/netscape/server4/bin/https/jar/xml4j_1_1_9.jar;/usr/
local/netscape/server4/bin/https/jar/Bugbase.jar;/usr/local/netscape/
server4/bin/https/jar/Calljsac.jar
After you add the text, the line looks like this:
jvm.classpath=/usr/local/vbroker/lib/vbjorb.jar;/usr/local/vbroker/lib/
vbjapp.jar;/usr/local/netscape/server4/plugins/samples/servlets/beans/
SDKBeans.jar;/usr/local/netscape/server4/bin/https/jar/xml4j_1_1_9.jar;/usr/
local/netscape/server4/bin/https/jar/Bugbase.jar;/usr/local/netscape/
server4/bin/https/jar/Calljsac.jar
where /usr/local/vbroker is the directory where you installed Visibroker.
Note that in both cases, the classpath must not include a manual line break or carriage return.
Append the following 2 lines at the bottom of the file
org.omg.CORBA.ORBClass=com.visigenic.vbroker.orb.ORB
org.omg.CORBA.ORBSingletonClass=com.visigenic.vbroker.orb.ORB
Save the file and exit.
Edit the start-jre file.
This can be found in the NES installation directory. For example:
To include the location of the disco3iv.jar file and to make sure that vbjorb.jar and vbjapp.jar are loaded first , modify the `NSES_classpath' line as follows:
D:/disco3ivhome/disco3iv/disco3ivjar;D:/orant/vbroker/lib/vbjorb.jar;D:/orant/
vbroker/lib/vbjapp.jar;
Before you add the text, the line looks like this:
NSES_classpath=D:/Netscape/Server4/plugins/samples/servlets/beans/
SDKBeans.jar;D:/Netscape/Server4/bin/https/jar/xml4j_1_1_9.jar;D:/Netscape/
Server4/bin/https/jar/Bugbase.jar;D:/Netscape/Server4/bin/https/jar/
Calljsac.jar
After you add the text, the line looks like this:
NSES_classpath=D:/disco3ivhome/disco3iv/disco3ivjar;D:/orant/vbroker/lib/
vbjorb.jar;D:/orant/vbroker/lib/vbjapp.jar;D:/Netscape/Server4/plugins/
samples/servlets/beans/SDKBeans.jar;D:/Netscape/Server4/bin/https/jar/
xml4j_1_1_9.jar;D:/Netscape/Server4/bin/https/jar/Bugbase.jar;D:/Netscape/
Server4/bin/https/jar/Calljsac.jar
where D:/disco3ivhome is the location of /disco3iv/disco3ivjar, and D:/orant is the directory where you installed Visibroker.
/usr/local/disco3ivhome/disco3iv/disco3iv.jar;/usr/local/vbroker/lib/
vbjorb.jar;/usr/local/vbroker/lib/vbjapp.jar;
Before you add the text, the line looks like this:
NSES_classpath=/usr/local/netscape/server4/plugins/samples/servlets/beans/
SDKBeans.jar;/usr/local/netscape/server4/bin/https/jar/xml4j_1_1_9.jar;/usr/
local/netscape/server4/bin/https/jar/Bugbase.jar;/usr/local/netscape/
server4/bin/https/jar/Calljsac.jar
After you add the text, the line looks like this:
NSES_classpath=/usr/local/disco3ivhome/disco3iv/disco3iv.jar;/usr/local/
vbroker/lib/vbjorb.jar;/usr/local/vbroker/lib/ vbjapp.jar;/usr/local/
netscape/server4/plugins/samples/servlets/beans/ SDKBeans.jar;/usr/local/
netscape/server4/bin/https/jar/xml4j_1_1_9.jar;/usr/local/netscape/server4/
bin/https/jar/Bugbase.jar;/usr/local/netscape/server4/bin/https/jar/
Calljsac.jar
where /usr/local/disco3ivhome is the location of /disco3iv/disco3iv.jar and /usr/local/vbroker is the directory where you installed Visibroker.
Note that in both cases, the classpath must not include a manual line break or carriage return.
Before you start the servlet go to Section 2.3.4.4, "Oracle Discoverer 3i Viewer Edition .XML File Configuration" and follow the instructions there for updating the .xml file with the correct value for the Discoverer session name.
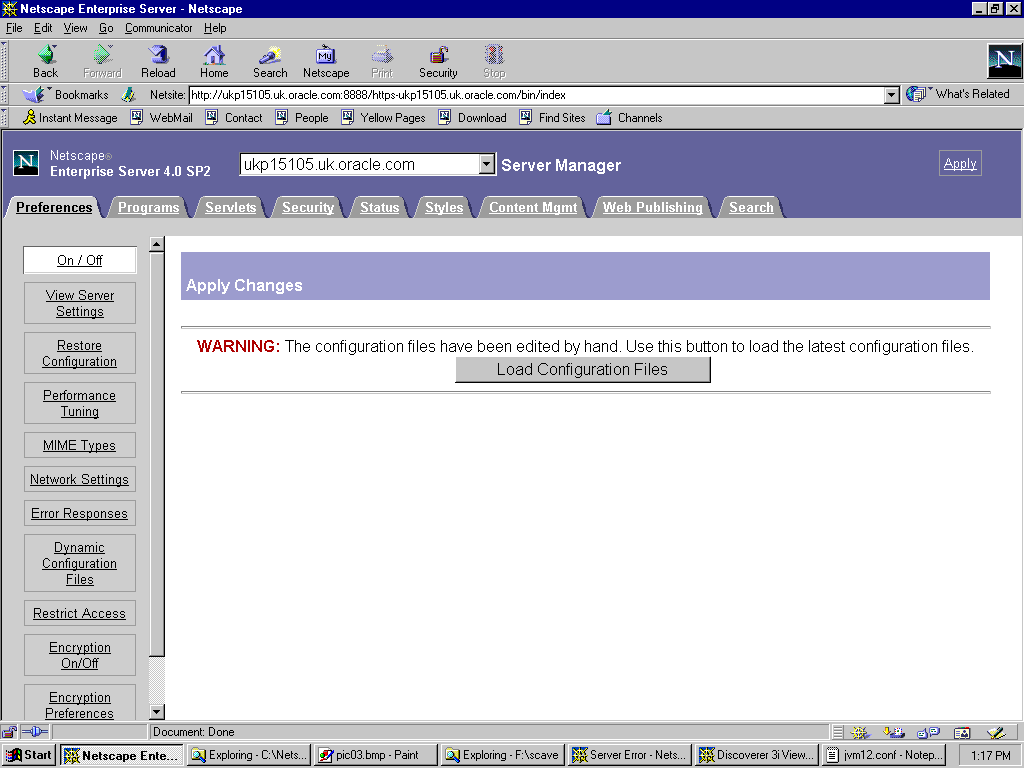
To restart the Web Server do the following:
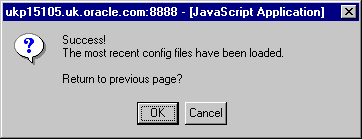
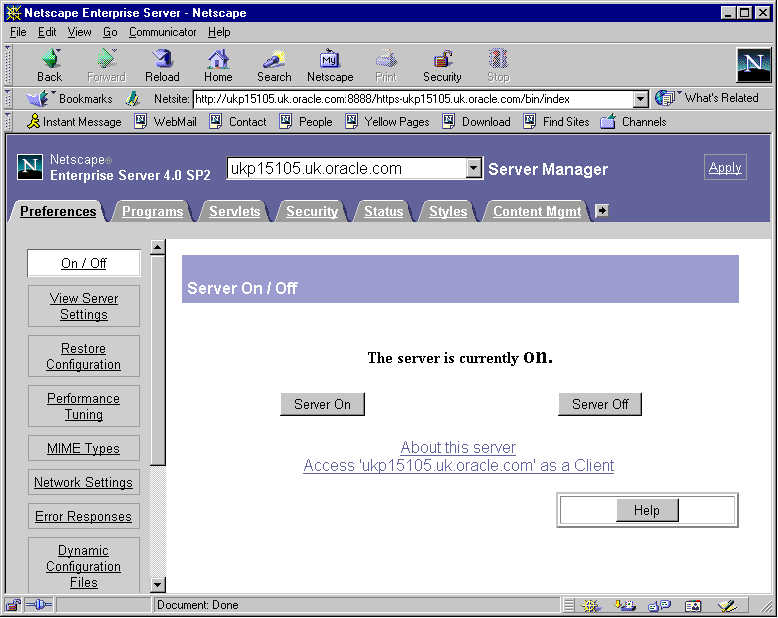
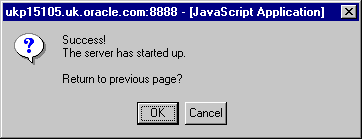
mywebserver.company.com/discoservlet
Where mywebserver.company.com is the machine name the HTTP server is installed on.
This should start Discoverer 3i Viewer.

Your configuration is complete.
This servlet engine can be used with a number of different web servers.
This section includes the following topics:
JRun is a separate Servlet Engine that can run with different Web Servers.
Although JRun has a user interface all configuration files are stored as text files which are simpler to edit and manage.
If you are using JRun servlet engine under Apache then See Section 2.3.6.1, "Defining a directory alias for an Apache web server" for details.
If you are using JRun servlet engine under Netscape Enterprise Server 4.0 then see Section 2.3.6.1, "Defining a directory alias for an Apache web server" for details.
Start up the Microsoft Internet Service Manager
Select default web site under the machine name you wish to configure.
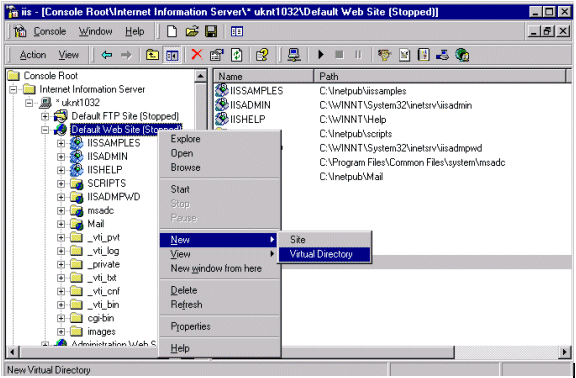
Right click to get the menu and select the `New - >Virtual Directory'
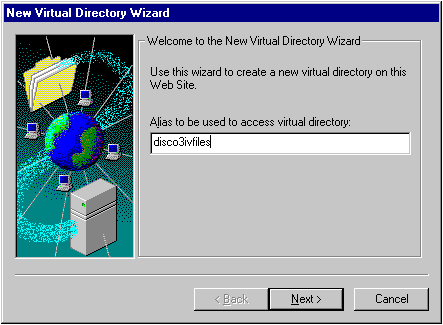
Enter `disco3ivfiles' as the virtual directory and press `Next'.
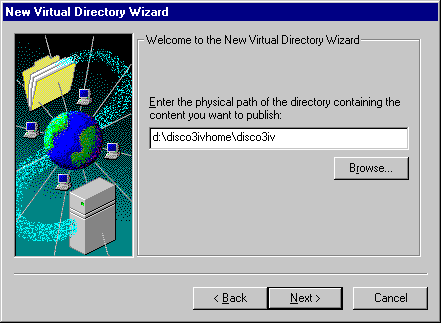
Enter `d:\disco3ivhome\disco3iv' and press `Next'.
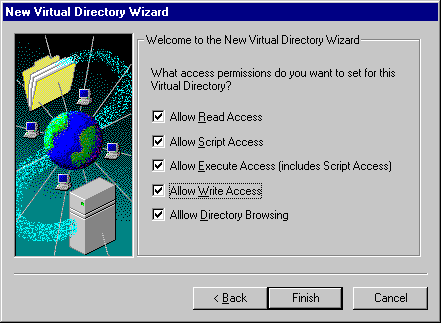
Ensure that all check boxes are checked and press `Finish'
Select `Default Web Site' under the machine name you wish to configure.
Right click and select `Start' if it is not greyed out (i.e. it has not already been selected).
Start a browser and enter the following
`mywebserver.company.com/disco3ivfiles/'
This should give you the following window:

Start up the Personal Web Manager
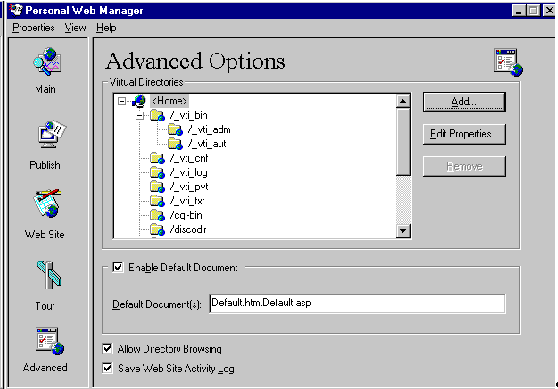
Make sure the `Allow Directory Browsing' checkbox is ticked as it is unchecked by default.
Click on the `Add button' and enter the following information:
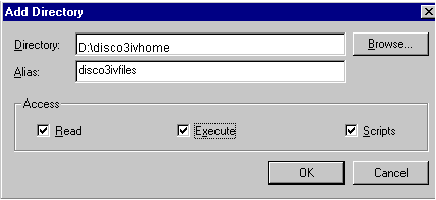
Make sure the `Execute' checkbox is ticked as it is unchecked by default.
Click OK.
Stop and restart IIS/PWS and then type in the following address into the address window
`mywebserver.company.com/disco3ivfiles/'
This should give you the following window:

Edit the jsm.properties file.
This can be found in the JRun installation directory.
Eg if you installed JRun to D:\JRun then the file can be found in the
D:\JRun\jsm-default\properties.
You need to prepend the following string to your classpath value.
D:/orant/vbroker/lib/vbjorb.jar;D:/orant/vbroker/lib/vbjapp.jar;D:/
disco3ivhome/disco3iv/disco3iv.jar;
Before change it looks like this:
java.classpath=D:/JRun/classes;D:/JRun/jsm-default/classes;D:/JRun/lib/
jrun.jar;D:/JRun/lib/servlet.jar;D:/JRun/webl/WebL.jar;D:/JRun/lib/jsp.jar;D:/
JRun/lib/xml4j.jar;D:/JRun/lib/xt.jar;D:/JRun/lib/fesi.jar;D:/JRun/lib/
cfanywhere.jar;D:/JRun/lib/NetComponents.jar;D:/JRun/lib/OROMatcher.jar;D:/JRun/
lib/tools.jar;D:/JRun/instantdb/classes;D:/JRun/lib/jrunadmin/
jrunadmin.jar;d:\\jdk1.2.1\\/lib/classes.zip;d:\\jdk1.2.1\\/lib/
rt.jar;d:\\jdk1.2.1\\/lib/i18n.jar;d:\\jdk1.2.1\\/jre/lib/rt.jar;d:\\jdk1.2.1\\/
jre/lib/i18n.jar;d:\\jdk1.2.1\\/lib/tools.jar;D:/JRun/lib/jrunadmin/swing.jar;
Afterwards it looks like this:
java.classpath=D:/orant/vbroker/lib/vbjorb.jar;D:/orant/vbroker/lib/
vbjapp.jar;D:/disco3ivhome/disco3iv/disco3iv.jar;D:/JRun/classes;D:/JRun/
jsm-default/classes;D:/JRun/lib/jrun.jar;D:/JRun/lib/servlet.jar;D:/JRun/webl/
WebL.jar;D:/JRun/lib/jsp.jar;D:/JRun/lib/xml4j.jar;D:/JRun/lib/xt.jar;D:/JRun/
lib/fesi.jar;D:/JRun/lib/cfanywhere.jar;D:/JRun/lib/NetComponents.jar;D:/JRun/
lib/OROMatcher.jar;D:/JRun/lib/tools.jar;D:/JRun/instantdb/classes;D:/JRun/lib/
jrunadmin/jrunadmin.jar;d:\\jdk1.2.1\\/lib/classes.zip;d:\\jdk1.2.1\\/lib/
rt.jar;d:\\jdk1.2.1\\/lib/i18n.jar;d:\\jdk1.2.1\\/jre/lib/rt.jar;d:\\jdk1.2.1\\/
jre/lib/i18n.jar;d:\\jdk1.2.1\\/lib/tools.jar;D:/JRun/lib/jrunadmin/swing.jar;

(where D:/disco3ivhome/disco3iv is the full path for disco3iv.jar)
(Note: the above classpath must not include a manual line break or carriage
return)
Append the following line to the end of the file
java.args=-Dorg.omg.CORBA.ORBClass=com.visigenic.vbroker.orb.ORB
-Dorg.omg.CORBA.ORBSingletonClass=com.visigenic.vbroker.orb.ORB

(Note: the above classpath must not include a manual line break or carriage
return)
Save the file and exit.
The file is called servlets.properties
This can be found in the JRun installation directory.
If you installed JRun to D:\JRun then the file can be found at
D:\JRun\jsm-default\services\jse\properties
Add the following lines to the end of the file
servlet.discoservlet.code=oracle.disco3iv.Disco3iv
servlet.discoservlet.args=config=http://mywebserver.company.com/disco3ivfiles/
html/disco3iv.xml
servlet.discoservlet.preload=true
Save the file and exit.
In order to run the servlet you need to stop and restart in the following order
Before you start the servlet go to Section 2.3.4.4, "Oracle Discoverer 3i Viewer Edition .XML File Configuration" and follow the instructions there for updating the .xml file with the correct value for the Discoverer session name.
Start a browser window and type the following:
mywebserver.company.com/servlet/discoservlet
Where mywebserver.company.com is the machine name the HTTP server is installed on.
This should start Discoverer 3i Viewer.

Your installation is now complete.
This section includes the following topics:
The file is called servlets.properties
This can be found in the ServletExec installation directory.
If you installed ServletExec to D:\ServletExec then the file can be found at
D:\ServletExec\ServletExec Data\default
Append the following 4 lines to the end of the document
# discoservlet servlet

servlet.discoservlet.code=oracle.disco3iv.Disco3iv

servlet.discoservlet.codebase=D:/disco3ivhome/disco3iv.jar

servlet.discoservlet.initArgs=config=http://mywebserver.company.com/
disco3ivfiles/html/disco3iv.xml
Save the file and exit.
The file is called rules.properties and can be found in the ServletExec installation directory.
If you installed ServletExec to D:\ServletExec then the file can be found at
D:\ServletExec\ServletExec Data\default
Append the following line to the end of the file
/discoservlet=discoservlet
Save the file and exit.
The file is called Classpath.pref
This can be found in the ServletExec installation directory.
If you installed ServletExec to D:\ServletExec then the file can be found at
D:\ServletExec\ServletExec Data
Append the following text to the existing line.
;D:/orant/vbroker/lib/vbjorb.jar;D:/orant/vbroker/lib/vbjapp.jar
So before the line will look like this:
D:\SE4\classes
Afterwards it will look like this:
D:\SE4\classes
;D:/orant/vbroker/lib/vbjorb.jar;D:/orant/vbroker/lib/vbjapp.jar

(Note: the above line must not include a manual line break or carriage return)
Save file and exit
Stop and restart the Web Server
Before you start the servlet go to Section 2.3.4.4, "Oracle Discoverer 3i Viewer Edition .XML File Configuration" and follow the instructions there for updating the .xml file with the correct value for the Discoverer session name.
Start a web browser and type the following
mywebserver.company.com/servlet/discoservlet
Where mywebserver.company.com is the machine name the HTTP server is installed on.
This should start Discoverer 3i Viewer.

Your installation is now complete.
You must first unpack the disco3iv.jar file found in the D:\disco3ivhome\disco3iv directory.
It is necessary to download JRE 1.2.2 from www.javasoft.com to gain access to the unpacker executable jar.exe.

After hitting `Return' and executing the command, you will get similar results at the end of the extraction as shown below.
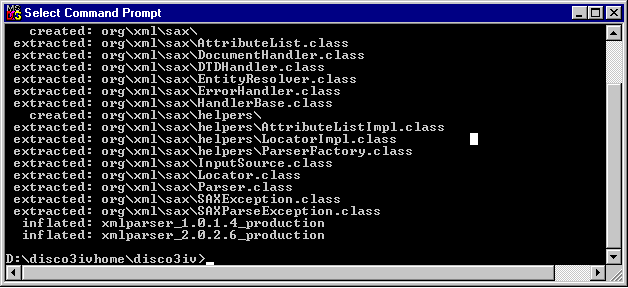
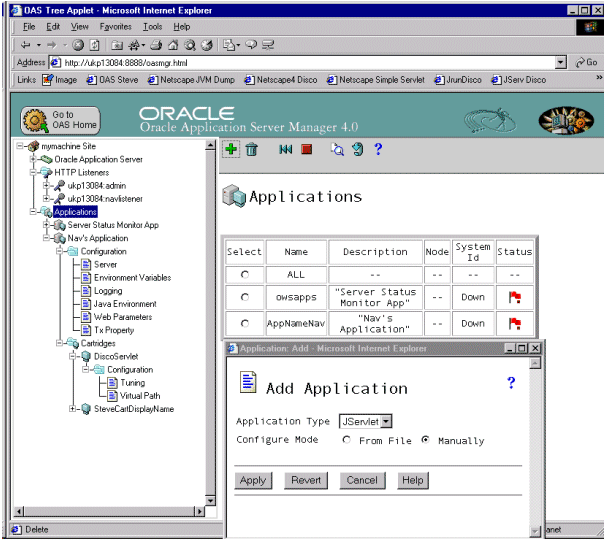
Start the Oracle Application Server Manager by selecting Start | Oracle Application Server | Oracle Application Server Manager.
Type your username and password.
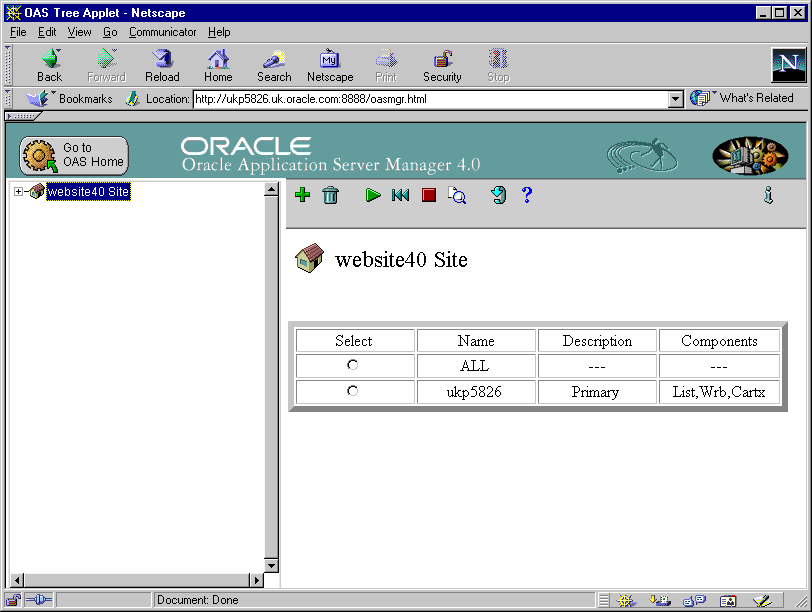
Expand the top level item.
Expand the `HTTP Listeners' section and select your default HTTP listener.
By default there is always 2 listeners.
The `mywebserver.company.com:admin' listener is used for administration of the web site.
The `mywebserver.company.com:www' listener is used for web browsers to access your web server.
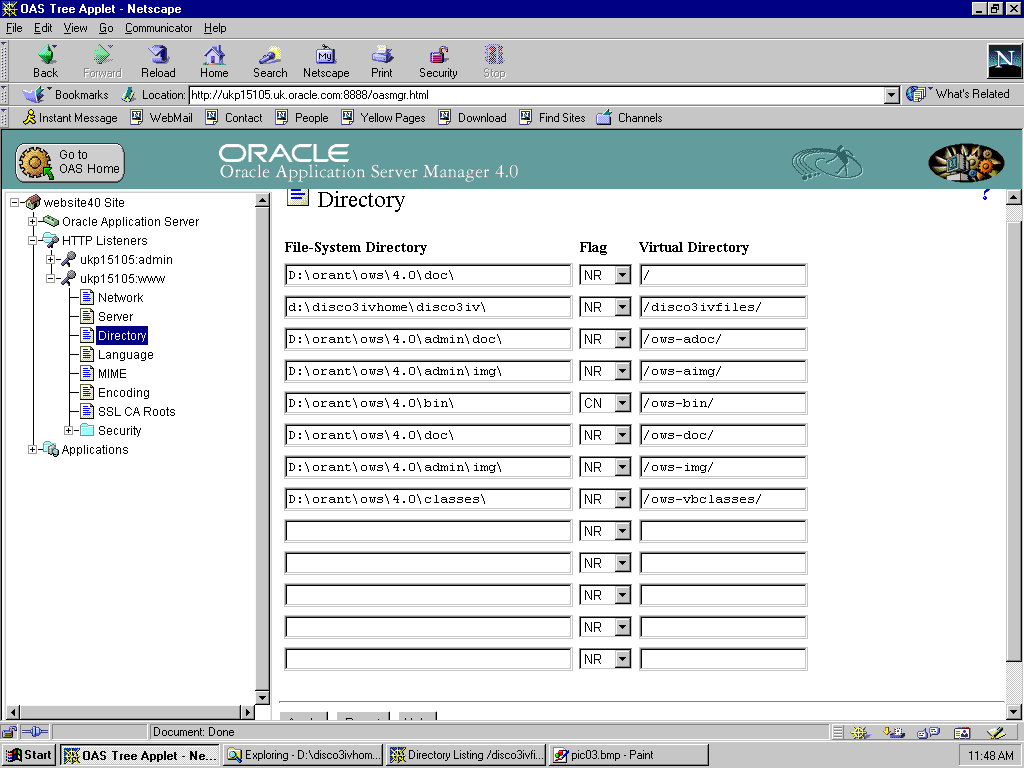
`mywebserver.company.com/disco3ivfiles/'
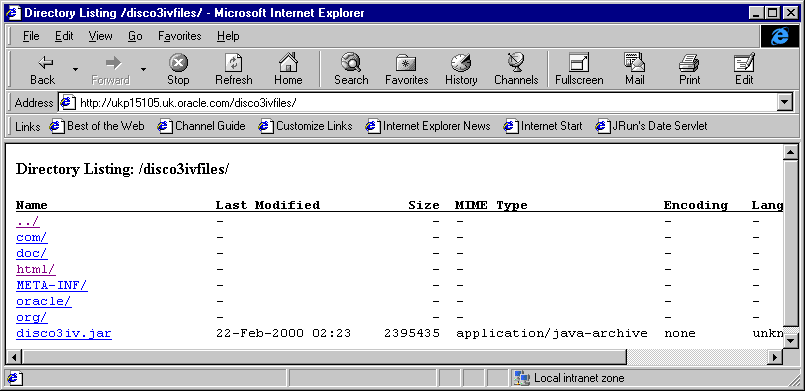
You should get the contents of the directory similar to the above.
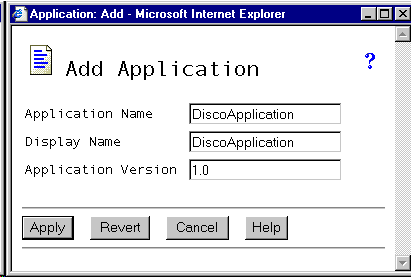
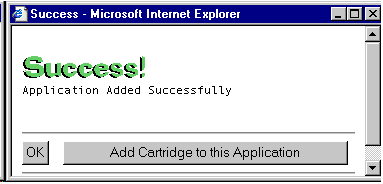
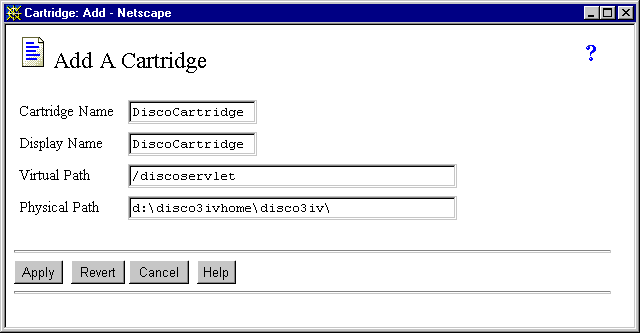
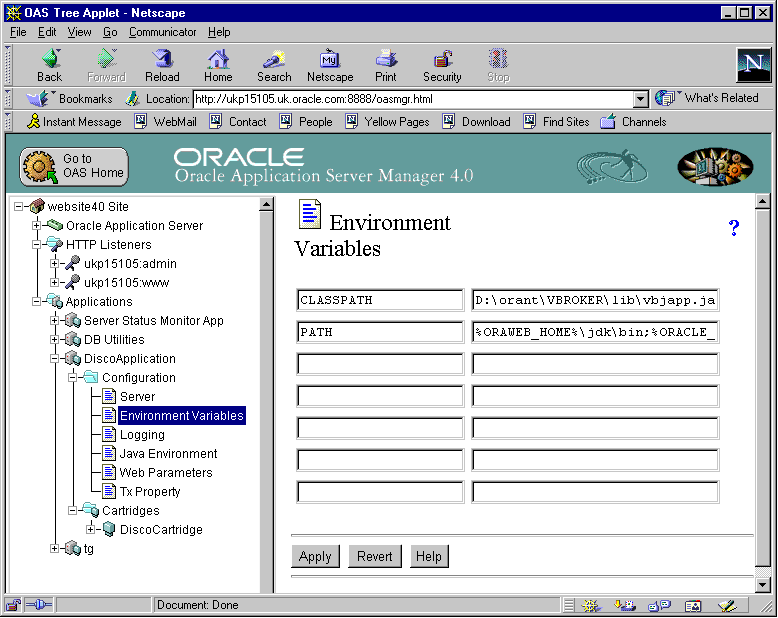
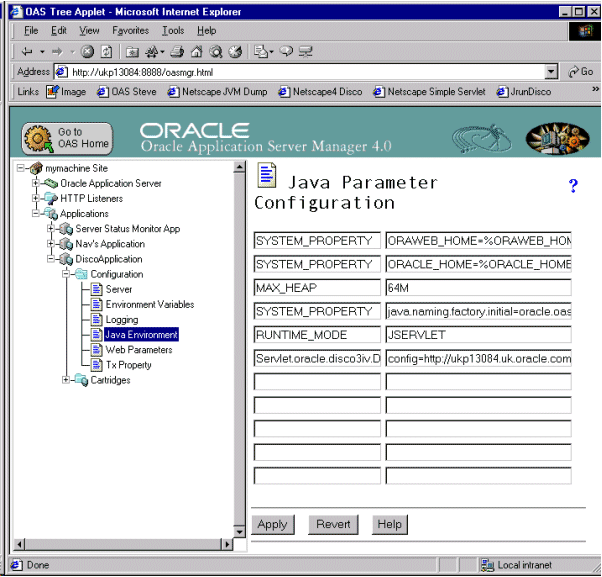
D:\disco3ivhome\disco3iv\disco3iv.jar;D:\orant\VBROKER\lib\VBJAPP.JAR;D:\orant\V
BROKER\lib\VBJORB.JAR;
Before you start the servlet go to Section 2.3.4.4, "Oracle Discoverer 3i Viewer Edition .XML File Configuration" and follow the instructions there for updating the .xml file with the correct value for the Discoverer session name.
http://mywebserver.company.com/discoservlet/oracle.disco3iv.Disco3iv
You should see the following screen

The servlet is now running and your installation is complete.
To ensure that your entire discoverer document is secure and to get your browser to acknowledge a "secure" page, it is necessary to make a minor adjustment to your disco3iv.xml file.
Make changes as follows:
Below is an example of the change:
disco3iv.xml - Before change<argument name="help_path" type="href">help</argument><argument name="image_path" type="href"> images</argument><argument name="show_login_method_control">true</argument> </document></disco_config>disco3iv.xml - After change<argument name="help_path" type="href">help</argument><argument name="image_path" type="href">https://mywebserver.company.com/disco3ivfiles/images</argument><argument name="show_login_method_control">true</argument> </document></disco_config>
If you already have an existing installation of Discoverer Viewer Version 3.1 you can install Version 3i alongside it using the process described in the preceeding sections. On completion of the upgrade, both versions of Discoverer viewer can run in parallel.
If you wish to de-install Discoverer Viewer Version 3.1, it is necessary to perform the following steps which can all be carried out from your Discoverer 3i Viewer install media :
|
|
 Copyright © 2000 Oracle Corporation. All Rights Reserved. |
|