Skip Headers

Oracle9i Data Guard Concepts and Administration
Release 2 (9.2)

Part Number A96653-01
Go To Documentation Library
Home
Go To Product List
Book List
Go To Table Of Contents
Contents
Go To Index
Index

Master Index

Feedback

Go to previous page Go to next page

3
Creating a Physical Standby Database

This chapter explains how to create a physical standby database and start applying redo logs to it. This chapter includes the following main topics:

3.1 Checklist of Tasks

Table 3-1 provides a checklist of tasks that you perform to create a standby database and synchronize it so that it is ready to begin managed recovery. Each step includes a reference to a section that provides additional information.


Note:

Use the Create Configuration Wizard that comes with Oracle9i Data Guard Manager to automatically perform all of the steps described in this chapter.


Table 3-1  Task List: Preparing for Managed Recovery
Step Task Site Reference

1

Either make a new backup of the primary database datafiles or access an old backup.

Primary

Section 3.3.2

2

Ensure the primary database is in ARCHIVELOG mode.

Primary

Section 3.3.3

3

Connect to the primary database and create the standby control file.

Primary

Section 3.3.3

4

Copy the backup datafiles and standby control file from the primary site to the standby site.

Primary

Section 3.3.4

5

Set the initialization parameters for the primary database.

Primary

Section 5.6.3

6

Create the standby initialization parameter file and set the initialization parameters for the standby database. Depending on your configuration, you may need to set filename conversion parameters.

Primary or Standby

Section 5.6.1 and Section 6.3.4

7

Use Oracle Net Manager to create a net service name that the standby database can use to connect to the primary database. The net service name must resolve to a connect descriptor that uses the same protocol, host address, port, and SID that you specified when you configured the listener on the primary database site. If you are unsure what values to use for these parameters, run Oracle Net Manager on the primary database site to display the listener configuration.

Standby

Oracle9i Net Services Administrator's Guide

8

Use Oracle Net Manager to create a net service name that the primary database can use to connect to the standby database. The net service name must resolve to a connect descriptor that uses the same protocol, host address, port, and SID that you specified when you configured the listener on the standby database site. If you are unsure what values to use for these parameters, run Oracle Net Manager on the standby database site to display the listener configuration.

Primary

Oracle9i Net Services Administrator's Guide

9

Use Oracle Net Manager to configure a listener on the standby database. If you plan to manage this standby database using the Data Guard broker, you must configure the listener to use the TCP/IP protocol and statically register the standby database service using its SID.

Standby

Oracle9i Net Services Administrator's Guide

10

Start the standby instance and mount the standby database.

Standby

Section 6.3.2

11

Create standby redo log files, if necessary.

Standby

Section 5.8.4

12

Manually change the names of the primary datafiles and redo logs in the standby control file for all files not automatically renamed using DB_FILE_NAME_CONVERT and LOG_FILE_NAME_CONVERT as noted in step 6.

Standby

Section B.4

13

Stop and restart the listener on the primary database, and start the listener on the standby database.

Primary and Standby

Oracle9i Net Services Administrator's Guide

14

Manually enable initialization parameter changes on the primary database so that it can initiate archiving to the standby site.

Primary

Section 5.3.2.2

3.2 Creating a Standby Database: Basic Tasks

Setting up a standby database for managed recovery requires you to perform a series of different tasks. After you have completed the preparation and initiated managed recovery, the standby database automatically and continuously applies redo logs as they are received from the primary database. Figure 3-1 shows the creation of a standby database.

Figure 3-1 Standby Database Creation

Text description of sbr81101.gif follows.

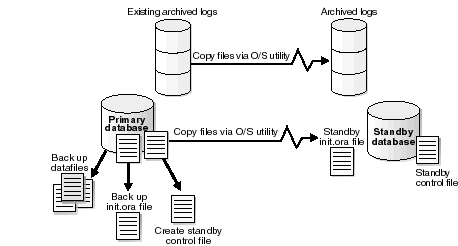
Text description of the illustration sbr81101.gif

3.3 Creating the Standby Database Files

You can create a standby database on the same site as your primary database or on a separate site. If you create your standby database on the same site, follow the creation procedure carefully when creating the standby database files so that you do not overwrite files on the primary database.

The creation of the standby database files occurs in four stages:

  1. Using Backups for Standby Creation
  2. Creating the Standby Datafiles
  3. Creating the Standby Control File
  4. Copying Files to the Standby Site

3.3.1 Using Backups for Standby Creation

Each standby database must be created from a backup of the primary database.


Note:

To protect against unlogged direct writes in the primary database that cannot be propagated to the standby database, turn on FORCE LOGGING at the primary database before taking datafile backups for standby creation. Keep the database (or at least important tablespaces) in FORCE LOGGING mode as long as the standby database is active.


You can also use a single backup of the primary database to create up to nine standby databases, although the various standby databases in the environment do not have to be created from the same backup. (You can create an unlimited number of standby databases, but a single primary database can only support up to nine standby databases at a time.) Figure 3-2 shows that you can create one standby database from a backup of the primary database taken on January 20 and create another standby database from the backup taken on June 20. So long as you have the archived redo logs required to perform complete recovery of a backup, it can serve as the basis for a standby database.

Figure 3-2 Creating Standby Databases Using Different Backups

Text description of sbr81104.gif follows.

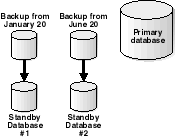
Text description of the illustration sbr81104.gif

3.3.2 Creating the Standby Datafiles

First, make backups of your primary database datafiles. You create the standby datafiles from these backups.

You can use any backup of the primary database so long as you have archived redo logs to completely recover the database. The backup can be old or new, consistent or inconsistent. Hot backups (or open backups) allow you to keep the database open while performing the backup. Nevertheless, you may prefer to make a new closed, consistent backup using the Recovery Manager utility (RMAN) to prevent the application of a large number of archived redo logs.

To make a consistent, whole database backup to serve as the basis for the standby database:

  1. Start a SQL session on your primary database and query the V$DATAFILE fixed view to obtain a list of the primary datafiles. For example, enter:
    SQL> SELECT NAME FROM V$DATAFILE;
    NAME 
    ----------------------------------------------------------------------------
    /oracle/dbs/tbs_01.dbf
    /oracle/dbs/tbs_02.dbf
    /oracle/dbs/tbs_03.dbf
    /oracle/dbs2/tbs_11.dbf 
    /oracle/dbs2/tbs_12.dbf
    /oracle/dbs3/tbs_21.dbf
    /oracle/dbs3/tbs_22.dbf 
    7 rows selected.
    
  2. Shut down the primary database cleanly:
    SQL> SHUTDOWN;
    
    
  3. Make a consistent backup of the datafiles from your primary database using the Recovery Manager utility (RMAN) or an operating system utility.
  4. Reopen the primary database. For example, enter:
    SQL> STARTUP PFILE=initPRIMARY1.ora;
    
    See Also:

    Oracle9i Recovery Manager User's Guide to learn how to create a standby database with Recovery Manager

3.3.3 Creating the Standby Control File

After you have created the backups that will be used as the standby datafiles, you can create the standby database control file. The control file must be created after the latest timestamp for the backup datafiles.


Note:

You cannot use a single control file for both the primary and standby databases. The standby instance is independent from the primary instance and so requires exclusive possession of its database files.


To create the standby database control file:

  1. Ensure that the primary database is in ARCHIVELOG mode and that archiving is enabled. Either issue the SQL*Plus ARCHIVE LOG LIST command or query the V$DATABASE view. Take the following steps:
    1. Start and mount the primary database without opening it. For example:
      SQL> STARTUP MOUNT PFILE=initPRIMARY1.ora
      
    2. Issue the SQL*Plus ARCHIVE LOG LIST command to determine if the database is in ARCHIVELOG mode. For example:
      SQL> ARCHIVE LOG LIST;
      Database log mode              No Archive Mode
      Automatic archival             Disabled
      Archive destination            /oracle/dbs/arch
      Oldest online log sequence     0
      Current log sequence           1
      
    3. If the database is not in ARCHIVELOG mode, as shown in step b, issue the following command to place the database in ARCHIVELOG mode:
      SQL> ALTER DATABASE ARCHIVELOG;
      
    4. You can issue the SQL*Plus ARCHIVE LOG LIST command again to verify the database has been placed in ARCHIVELOG mode. For example:
      SQL> ARCHIVE LOG LIST;
      Database log mode              Archive Mode
      Automatic archival             Disabled
      Archive destination            /oracle/dbs/arch
      Oldest online log sequence     0
      Next log sequence to archive   1
      Current log sequence           1
      

    To enable the automatic archiving of the online redo logs, you must set LOG_ARCHIVE_START=true in the initialization parameter file. However, this does not have to be done before you create the standby control file.

    See Also:

    SQL*Plus User's Guide and Reference for additional information on the ARCHIVE LOG LIST command and Oracle9i Database Administrator's Guide for additional information on the ALTER DATABASE ARCHIVELOG statement and the LOG_ARCHIVE_START initialization parameter

  2. Connect to the primary database and create the control file for your standby database. For example, to create the standby control file as /oracle/dbs/stbycf.ctl on the primary site, enter the following:
    SQL> ALTER DATABASE CREATE STANDBY CONTROLFILE AS '/oracle/dbs/stbycf.ctl';
    

    The filename for the created standby control file must be different from the filename of the current control file of the primary database. You can also use RMAN to create the standby database control file.

    See Also:

    Oracle9i SQL Reference for additional information on the ALTER DATABASE statement and Oracle9i Recovery Manager User's Guide for additional information on RMAN

3.3.4 Copying Files to the Standby Site

After you have successfully created the standby datafiles and control file, copy the files to the standby site using an operating system utility.

If the standby database is on Then you

A separate site with the same directory structure as the primary database

Can use the same path names for the standby files as the primary files. In this way, you do not have to rename the primary datafiles in the standby control file.

The same site as the primary database, or the standby database is on a separate site with a different directory structure

Must rename the primary datafiles in the standby control file after copying them to the standby site. You can:

  • Set the filename conversion initialization parameters. See Section 6.3.4.
  • Rename the files manually using ALTER DATABASE statements. See Section B.4.
  • Use a combination of conversion parameters and manual renames.

Use operating system commands or utilities to perform the following copy operations to the standby location:

  1. Copy the standby control file.
  2. Copy the backup datafiles.
  3. Copy all available archived redo logs to the standby site.
  4. Copy the online redo logs. This is recommended for switchover and failover operations.

Do not copy temporary tablespaces. Use an appropriate method for copying binary files.

See Also:

Section 6.3.6 for more information about creating temporary tablespaces and Section 10.1.2 for a scenario showing how to copy files to a standby site

3.4 Creating the Standby Initialization Parameter File

Once you have configured the primary database initialization parameter file, you can duplicate the file for use by the standby database. The procedure for creating the standby initialization parameter file is as follows:

  1. Copy the initialization parameter file for the primary database using an operating system utility.
  2. Edit the initialization parameter file for use by the standby database.
  3. Transfer the initialization parameter file to the standby site using an appropriate operating system utility.

    See Also:

    Section 5.6.1, Section 6.3.4, and Section 10.1.2


Go to previous page Go to next page
Oracle
Copyright © 1999, 2002 Oracle Corporation.

All Rights Reserved.
Go To Documentation Library
Home
Go To Product List
Book List
Go To Table Of Contents
Contents
Go To Index
Index

Master Index

Feedback