Skip Headers

Oracle9i Application Server Installation Guide
Release 2 (9.0.3) for Microsoft Windows

Part Number B10005-01
Go To Core Documentation
Core
Go To Platform Documentation
Platform
Go To Table Of Contents
Contents
Go To Index
Index

Go to previous page Go to next page

5
Deinstallation and Reinstallation

This chapter guides you through the deinstallation and reinstallation process for Oracle9i Application Server Release 2 (9.0.3) (Oracle9iAS 9.0.3). The topics include:

5.1 Deinstallation

This section guides you through the deinstallation process of Oracle9iAS 9.0.3. This section includes the following topics:

5.1.1 Switching the Active Oracle Enterprise Manager before Deinstallation

If you have only one Oracle9iAS instance (9.0.2 or 9.0.3) on your machine, then that instance also contains the active Oracle Enterprise Manager. Deinstalling that instance also removes the active Oracle Enterprise Manager. This is the desired result, and it does not cause any problems because no other instance depends on that active Oracle Enterprise Manager.

If you have multiple Oracle9iAS instances (9.0.2 or 9.0.3) on a machine, then you have to be careful when you deinstall an instance because all the instances on the machine share the same active Oracle Enterprise Manager. You need to ensure that you do not deinstall an instance that contains the active Oracle Enterprise Manager.

Recall that when you install a 9.0.3 instance on a machine that already has 9.0.2 instances, the installer automatically switches the active Oracle Enterprise Manager to the 9.0.3 instance.

Before you deinstall an instance on a machine that has multiple Oracle9iAS instances:

  1. Determine which Oracle9iAS instance contains the active Oracle Enterprise Manager.

    1. Click Start > Run, type in regedit.exe, and click OK.

      The Registry Editor is displayed.

    2. Navigate to the following key in the Registry: HKEY_LOCAL_MACHINE > SOFTWARE > ORACLE > em_loc. em_loc appears on the right side of the window.

      This key contains the path of the Oracle home directory that contains the active Oracle Enterprise Manager.

  2. If the instance you want to deinstall contains the active Oracle Enterprise Manager, switch the active Oracle Enterprise Manager to a remaining instance.

    If you have a remaining instance that is at version 9.0.3, you must switch your active Oracle Enterprise Manager to that instance. Otherwise, you can switch to an instance that is at version 9.0.2.

    prompt> cd ORACLE_HOME\bin
    prompt> emctl switch home


    This displays a dialog where you can select another Oracle9iAS instance to contain the active Oracle Enterprise Manager.

  3. Deinstall the instance.

5.1.2 Stopping All Oracle Services and Applications

You must stop all Oracle services and applications before starting the deinstallation process. Refer to the Oracle9i Application Server Administrator's Guide for instructions on starting and stopping the Oracle Enterprise Manager Web site.


Note:

Oracle Universal Installer does not permit custom deinstallation of select components of Oracle9iAS 9.0.3 instances. Confirm deinstall objectives before launching deinstallation.


Note:

Use the version of Oracle Universal Installer that comes with this release to deinstall any Oracle products installed on your system.


5.1.3 Deinstalling an Oracle9iAS 9.0.3 Instance

  1. Launch the Oracle Universal Installer from Start > Programs > Oracle Installation Products > Universal Installer. The Welcome screen appears.

    Click Deinstall Products.

    See Also:

    Section 2.6.5, "Starting Oracle Universal Installer"

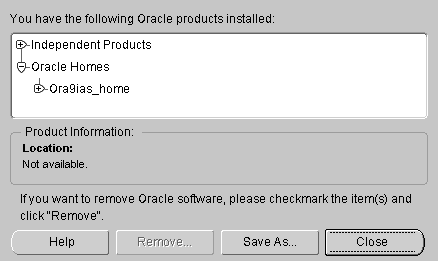
  2. Review the installations on the Inventory screen and check the one you wish to deinstall. Click Remove.


    Note:

    The "+" sign before a product name indicates that there are more components and files installed within that particular product. Click on it to view dependent components. If you choose to remove a product or component, then all of its dependent components are also deinstalled. Confirm deinstall objectives before launching deinstallation.


    Figure 5-1 Inventory Screen

    Text description of deinstallinventory.gif follows.

    Text description of the illustration deinstallinventory.gif

    The Inventory screen appears when you click Deinstall Products on the Welcome screen, or Installed Products on any screen.

    The Inventory screen displays installed components installed in an Oracle home.

    The Inventory screen contains the following:
    • Product Information: View the full location path of the selected component.

    • Help: Access detailed information about the functionality of the Inventory screen.

    • Remove: Deinstall all checked components from Oracle home.

    • Save As: Save the inventory to a text file. A file browser dialog pops up when you click Save As. Enter a file name to save the complete inventory list.

    • Close: Quit the Inventory screen and return to Oracle Universal Installer.

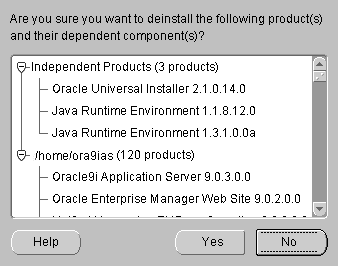
  3. Verify the components selected for deinstallation, and click Yes.

    Figure 5-2 Confirmation Screen

    Text description of deinstallconfirmation.gif follows.

    Text description of the illustration deinstallconfirmation.gif

    The Confirmation screen lists all the components selected for deinstallation in the Inventory screen. Scroll down the screen to verify selected components.

    The following buttons appear on the Confirmation screen:
    • Help: Access detailed information about the functionality of the Confirmation screen.

    • Yes: Start deinstallation of listed components.

    • No: Return to the Inventory screen. Listed components are not removed.

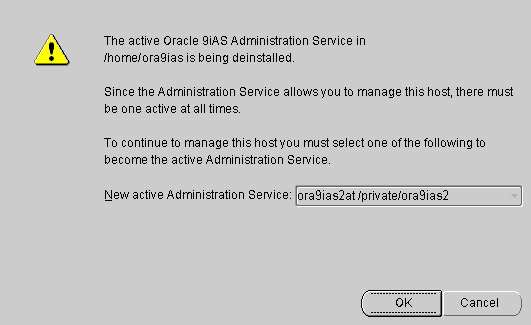
  4. The following Oracle9iAS Administration Service screen appears if you are deinstalling the primary Oracle9iAS installation on the host. Confirm deinstallation objectives and click OK to continue.

    Figure 5-3 Oracle9iAS Administration Service Screen

    Text description of adminserv.gif follows.

    Text description of the illustration adminserv.gif

    This screen presents one of the following messages:

    • "The active Oracle9iAS Administration Service in your Oracle home is being deinstalled. There are no other Administration Services available."

      This message appears when there is only one Oracle9iAS installation on the host and you are about to deinstall it.

    • "The active Oracle9iAS Administration Service in your Oracle home is being deinstalled. Since the Administration Service allows you to manage this host, there must be one active at all times. To continue to manage this host you must select one of the following to become the active Administration Service."

      A drop down list allows you to choose a new active Administration Service.

      This message appears when there are multiple Oracle9iAS installations on the host and you are about to deinstall the primary installation. You can select one of the remaining Oracle9iAS installations which will then become the primary installation and the new location for the Oracle9iAS Administration Service.

  5. Monitor the deinstallation process.

    The Remove Progress Bar screen appears when you click Remove. The installer detects all components chosen for deinstallation from the Inventory screen and removes them from Oracle home.

  6. Following deinstallation of Oracle9iAS 9.0.3 using Oracle Universal Installer, restart your computer to stop any remaining processes associated with the deinstallation.

  7. Perform the following manual tasks to remove all remaining references to the instance from your computer:

    1. Back up any files you want to save from the Oracle home directory for this instance.

    2. Delete the Oracle home directory for this instance.

  8. If your Oracle9iAS 9.0.3 was associated with an Oracle9iAS Infrastructure on another host, then you must manually remove entries from the Oracle Internet Directory. Refer to the Oracle9i Application Server Administrator's Guide for further instructions.

5.1.4 Deinstalling by Manually Removing All Oracle Products

The following steps remove all Oracle products from your computer.


Caution:

These instructions remove all Oracle components, services, and registry entries from your computer. Exercise extreme care when removing registry entries. Removing incorrect entries can cause a system failure. Oracle recommends following these steps after trying all other options.


  1. Delete entries from the Registry.

    1. Start up the Registry Editor.

      Click Start > Run, type in regedit.exe and click OK.

    2. Delete these folders from the Registry, if they exist:

      • HKEY_LOCAL_MACHINE > SOFTWARE > ORACLE

      • HKEY_LOCAL_MACHINE > SYSTEM > CurrentControlSet > Services > ORACLE

      • HKEY_LOCAL_MACHINE > SYSTEM > ControlSet X > Services > ORACLE

        X is a number (for example, ControlSet001).

      • HKEY_CURRENT_USER > Software > ORACLE

      • HKEY_CLASSES_ROOT > ORACLE

      Delete these additional folders for Windows NT:

      • HKEY_LOCAL_MACHINE > SOFTWARE > Apache Group > Apache 1.X.X. If the ServerRoot path points to an existing Oracle home, select and delete Apache Group.

      • HKEY_LOCAL_MACHINE > SOFTWARE > Classes. Delete any ORACLE folders.

    3. Exit the Registry Editor.

  2. Clean up environment variables.

    1. Display the dialog box that shows the environment variables.

      Windows 2000: Right click My Computer > Properties > Advanced > Environmental Variables.

      Windows NT: Right click My Computer > Properties > Environment.

    2. Delete the following system variables, if they exist:

      • DISCO_JRE

      • DISCO_VBROKER

      • VBROKER_JAVAVM

      • VBROKER_TAG -D

      • WV_GATEWAY_CFG

    3. Modify the Path system variable to remove all references to any previous Oracle home paths.

      • Windows 2000:

        Highlight the Path system variable. Click the Edit button and modify the Path in the Variable Value field. Click OK to save and exit the System Properties dialog.

      • Windows NT:

        Highlight the Path system variable so that it appears in the Variable field. Modify the Path in the Value field. Click Set, then click OK to exit the System Properties dialog.

        For example, the following shows an Oracle-modified Path system variable:

        C:\ias903\iSuites\BIN;C:\ias903\806\bin;C:\ias903\iSuites\Apache\Per
        l\5.00503\bin\mswin32-x86;C:\ProgramFiles\Oracle\jre\1.1.7\bin;C:\WI
        NNT\system32;C:\WINNT;C:\WINNT\System32\Wbem;C:\ias903\806\vbroker\b
        in;C:\ias903\806\jdk\bin


        The following shows the Path system variable after removal of the Oracle home references:

        C:\WINNT\system32;C:\WINNT;C:\WINNT\System32\Wbem
        
        
  3. Remove Oracle program folders.

    Windows 2000:

    • Click Start > Programs. Remove Oracle folders by right clicking on the folder and selecting Delete.

    Window NT:

    1. Click Start > Programs > Windows NT Explorer.

    2. On the installation hard drive, go to WINNT\Profiles\All Users\Start Menu\Programs.

    3. Right click and delete each Oracle directories.

    4. Go to WINNT\Profiles\All Users\Start Menu\Programs\Startup.

    5. Right click and delete each Oracle icon.

  4. Delete the Oracle user.

    Windows 2000:

    1. Click Start > Settings > Control Panel > Administrative Tools > Computer Management > Local Users and Groups > Users. Open the Users folder and delete the user name for installation of Oracle applications.

    2. Exit Administrative Tools.

    3. Double click My Computer on your desktop. Inspect the Documents and Settings directories on your hard drive and delete any Oracle user entries.

    4. Exit My Computer.

    Windows NT:

    1. Click Start > Programs > Administrative Tools > User Manager. Under the Username column, highlight the user name for installation of Oracle applications. Select Delete from the User menu.

    2. Exit the User Manager.

    3. Click Start > Programs > Windows NT Explorer. Go to WINNT\Profiles on the installation hard drive and remove the user for installation of Oracle applications.

    4. Exit Windows NT Explorer.

  5. For Windows NT, delete Oracle folders in the TEMP directory.

    1. Click Start > Programs > Windows NT Explorer

    2. Open the TEMP directory on your installation hard drive and delete the Install Guide and OraInstall directories.

    3. Exit Windows NT Explorer.

  6. Reboot your computer.

  7. After your computer reboots, remove existing Oracle home directories from your hard drive.

    Click Start > Programs > Windows NT Explorer. Delete any Oracle home directories that are displayed on your installation hard drive.

    For example:

    C:\Oracle\*, C:\Program Files\Oracle\*

  8. Exit Windows NT Explorer.

  9. Reboot your computer.

  10. If your Oracle9iAS 9.0.3 was associated with an Oracle9iAS Infrastructure on another host, then you must manually remove entries from the Oracle Internet Directory. Refer to the Oracle9i Application Server Administrator's Guide for further instructions.

5.2 Reinstallation

Oracle Universal Installer does not allow reinstallation of Oracle9iAS 9.0.3 over an installed version. To reinstall Oracle9iAS 9.0.3 over the same version, deinstall and then install the product.

If you deinstall an Oracle9iAS 9.0.3 instance that uses an Oracle9iAS Infrastructure 9.0.2, you cannot reuse the same Oracle9iAS 9.0.3 instance name of that deinstalled instance when installing subsequent Oracle9iAS 9.0.3 instances. In order to reuse the Oracle9iAS 9.0.3 instance name, you must manually delete the entry for the deinstalled Oracle9iAS 9.0.3 instance from Oracle Internet Directory.

See Also:


Go to previous page Go to next page
Oracle
Copyright © 2002 Oracle Corporation.

All Rights Reserved.
Go To Core Documentation
Core
Go To Platform Documentation
Platform
Go To Table Of Contents
Contents
Go To Index
Index