Release 2 (9.0.2) for AIX-Based Systems, Compaq Tru64 UNIX, HP 9000 Series HP-UX, and Linux Intel
Part Number A95258-03
Home |
Contents |
Index |
| Oracle9i Application Server Installation Guide Release 2 (9.0.2) for AIX-Based Systems, Compaq Tru64 UNIX, HP 9000 Series HP-UX, and Linux Intel Part Number A95258-03 |
|
This appendix describes how to install Oracle9iAS InterConnect. It contains the following sections:
Oracle9iAS InterConnect is a hub-and-spoke, end-to-end integration solution. This section describes the following topics:
Oracle9iAS InterConnect has different installation types, depending on what you are installing:
These installation types appear in the installer in the Install Types screen.
You can run Oracle9iAS InterConnect in three different topologies.
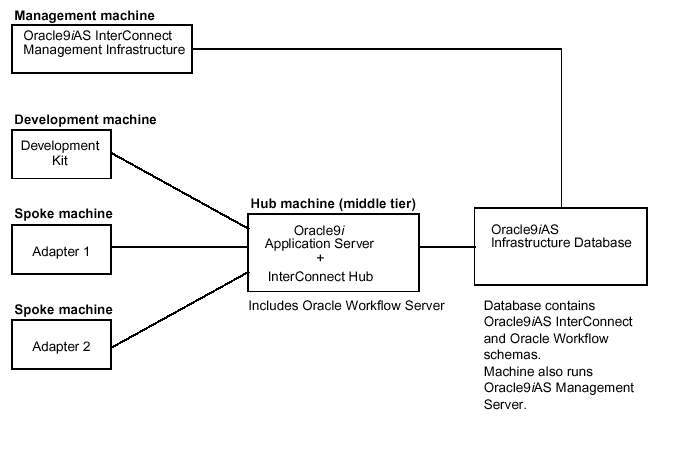
Running Oracle9iAS InterConnect with Oracle9iAS is the recommended topology. In this topology, you need to do the following:
The following figure shows the recommended topology. Oracle9iAS InterConnect hub uses the Oracle9iAS Infrastructure database as the hub database.
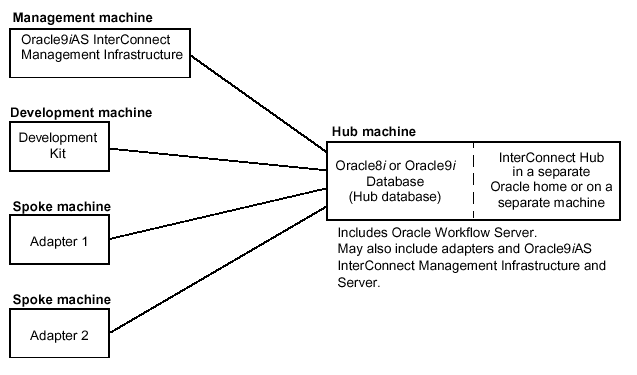
In this topology, you need an Oracle8i or Oracle9i database. Oracle9iAS InterConnect uses the database as the hub database to store its schemas. In this topology, you need to install Oracle9iAS InterConnect hub (Oracle Workflow included) on the same server as the Oracle database or on a different server. If you are installing Oracle9iAS InterConnect hub on the same server as the database, you must install it in an Oracle home separate from the Oracle database.
The following figure shows such a topology.
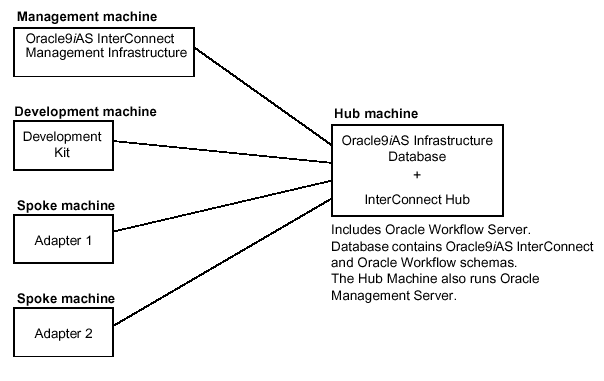
This topology is similar to Topology 1 in that Oracle9iAS InterConnect uses the Oracle9iAS Infrastructure database as the hub database. The difference between the two topologies is that in Topology 3, you install only the Infrastructure from Oracle9iAS; you do not install Oracle9iAS installation types in the middle tier. You can use this topology if you do not wish to use Oracle9iAS.
The following figure shows such a topology.
For all topologies, you have to perform the following steps:
Install the adapters on the same servers as the applications they connect to, provided they are hosted on a platform that supports Oracle9iAS InterConnect. These servers are known as Oracle9iAS InterConnect Spoke servers.
If the adapters are not on the same servers as the applications, assign one spoke server for each application. You can have one spoke server for all applications if it meets your throughput needs.
If you are installing Oracle9iAS InterConnect hub on a server that also contains Oracle9iAS, the server should already meet the requirements listed in Section 2.1, "Hardware Requirements".
If you are installing Oracle9iAS InterConnect hub on a server that does not have an Oracle9i Application Server installation, the server should meet the requirements listed in Table C-2.
Table C-3 lists the hardware requirements for the spoke server (for adapters).
| Hardware | Windows NT/2000 | UNIX |
|---|---|---|
|
Memory |
256 MB |
256 MB |
|
Service Pack |
4.0 Service Pack 6 or later |
Not applicable |
|
Disk Space |
500 MB |
500 MB |
Table C-4 lists the hardware requirements for Development Kit servers.
| Hardware | Windows NT/2000 | UNIX |
|---|---|---|
|
Memory |
128 MB |
Not applicable |
|
Service Pack |
4.0 Service Pack 3 or later |
Not applicable |
|
Disk Space |
500 MB |
Not applicable |
This section describes:
The hub server, the spoke server, and iStudio run on the following operating systems:
Oracle9iAS InterConnect runs on JRE 1.3.1.
JRE is bundled with Oracle9iAS on Sun SPARC Solaris, Linux Intel and Windows NT. When you install Oracle9iAS on these platforms, it installs JRE for you. If you are installing Oracle9iAS on other platforms, you have to download and install JRE prior to installing Oracle9iAS. See Chapter 2 for details.
The Notification Mailer is required only if you are using Oracle Workflow. If you are not using Oracle Workflow, you can skip this section.
The notification component of Oracle Workflow includes a program called the Notification Mailer. This program communicates notifications to users using Email and interprets responses. The Notification Mailer has implementations that can integrate directly with UNIX sendmail or MAPI-compliant mail applications:
The MAPI-compliant implementation is available with Oracle9iAS for Windows NT only. It is not available with Oracle9iAS for UNIX.
|
Note:
The Microsoft Outlook Email Security Update that was released on June 7, 2000 desupports the MAPI Common Messaging Calls (CMC) interface used by the Oracle Workflow MAPI Mailer. (See: OL2000: Developer Information About the Outlook E-mail Security Update, Oracle Workflow customers running on Windows NT/2000 are certified to install the UNIX version of the Oracle Workflow Notification Mailer and connect to a Oracle Workflow Server database running on Windows NT/2000. |
The installer does not allow you to install more than one of the same Oracle9iAS InterConnect component in each Oracle home. When you install the same component the second time, it deinstalls the first installation before performing the second installation. For example, you cannot install more than one database adapter in one Oracle home.
You have two options if you need to install more than one instance of the same component on the same server:
copyAdapter script located in ORACLE_HOME/oai/9.0.2/bin/ to install multiple adapters of the same type in the same Oracle home.
To use this script, enter the following command:
copyAdapter app1 app2
The script creates an adapter app2 that is of the same type as app1. If you want to service a different application with this adapter, you need to edit the application connectivity information in the adapter.ini file accordingly.
You perform the following steps in the Oracle Universal Installer to display the Install Types screen, which enables you to select the install type you want. See Section C.1.1, "Oracle9iAS InterConnect Installation Types" for descriptions of the types.
setup.exe.
runInstaller.
The Welcome screen displays.
The Welcome screen provides information about the Oracle Universal Installer.
See Section C.1.1, "Oracle9iAS InterConnect Installation Types" for information about these installation types.
Table C-5 directs you to the installation information for the components selected on this screen.
| To install this component | See this section |
|---|---|
|
Hub |
|
|
Adapters |
|
|
Development Kit |
Section C.5, "Oracle9iAS InterConnect Development Kit Installation" |
|
Management Infrastructure |
Section C.6, "Oracle9iAS InterConnect Management Infrastructure Installation" |
The hub installation installs Oracle Workflow Server and the InterConnect repository. This section contains the following topics:
These steps apply only to Topology 2.
init.ora, for the metadata repository database:
AQ_TM_PROCESSES: Oracle Workflow requires the time manager process in Oracle9i Advanced Queuing (AQ) to monitor delay events in queues, as in the case of the Oracle Workflow standard Wait activity. The minimum recommended number of time manager processes for Oracle Workflow is one. Verify that the AQ_TM_PROCESSES parameter is set in the init.ora file. For example:
AQ_TM_PROCESSES = 1
JOB_QUEUE_PROCESSES: Oracle Workflow leverages Oracle9i Advanced Queuing, which requires job queue processes to handle message propagation. You must start at least one job queue process to enable message propagation. The minimum recommended number of processes for Oracle Workflow is two and may need to be increased to five or ten if not enough processes are available for propagation. Verify that the JOB_QUEUE_PROCESSES parameter is set in the init.ora file to specify the number of SNP job queue processes for your instance. For example:
JOB_QUEUE_PROCESSES = 10
You can either modify these parameters in the init.ora file and restart your database to make the changes effective, or you can use the ALTER SYSTEM statement to dynamically modify the parameter values for the duration of the instance. For more information, refer to Oracle9i Reference and Oracle9i Application Developer's Guide - Advanced Queuing.
When you install the hub on a server with Oracle9iAS, you see a dialog that enables you to reset the password for the oaihub902 and owf_mgr schemas. This dialog box displays after you select Oracle9iAS InterConnect Hub on the Oracle9iAS InterConnect Install Types screen.
To perform this installation:
See Section C.2, "Starting the Oracle9iAS InterConnect Installation" for instructions on how to display the Install Types screen.
In this screen, enter the password of the Oracle Internet Directory administrator (cn=orcladmin) so that the installer can retrieve configuration information:
To properly configure all parts of the Oracle9iAS InterConnect installation, you must create a new password for the Oracle9iAS InterConnect schemas:
oaihub902 and owf_mgr.
Note that the same password is used for both oaihub902 and owf_mgr schemas.
This screen displays the selections made on previous screens. Review the selections and click Install.
When the installation is complete, the file ORACLE_HOME/oai/9.0.2/hub/hub.ini is empty. This is the correct result of the installation.
When you install the hub on a server that does not have Oracle9iAS, you see two dialog boxes: one dialog box enables you to specify the database to use as the hub database, and the second dialog box enables you to set the password for the Oracle9iAS InterConnect schema.
These dialog boxes display after you select Oracle9iAS InterConnect Hub on the Oracle9iAS InterConnect Install Types screen.
Note that the installer does not permit you to install Oracle9iAS InterConnect hub in the same Oracle home as the database. You have to select another Oracle home.
If you have an existing Workflow Server setup, you need to migrate it to Oracle9iAS Workflow Server after the hub install. The Oracle9iAS Workflow Server is installed as part of InterConnect Hub install. See Oracle9i Application Server: Migrating from Oracle9i Application Server Release 1 (1.0.2.2.x) to Release 2 (9.0.2) for more information on Workflow Migration.
To perform this installation:
See Section C.2, "Starting the Oracle9iAS InterConnect Installation" for instructions on how to display the Install Types screen.
The Summary screen appears.
See $ORACLE_HOME/oai/9.0.2/repository/post_installation.txt for instructions on how to do this. You do not have to run this step in Topology 1 and 3 because the schema was created for you automatically.
If you are using Oracle Workflow, you need to perform the steps in this section after installing Oracle9iAS InterConnect hub. The hub installation installs Oracle Workflow automatically; if you are not planning to use Oracle Workflow, you can skip this section.
The post-installation steps are:
You need to run this step if you are upgrading Oracle Workflow, or if you need to reconfigure a new installation.
If you are installing Oracle Workflow for the first time, Oracle Universal Installer automatically loads Oracle Workflow into your database.
If you are upgrading an existing installation of Oracle Workflow, or if you need to reconfigure Oracle Workflow, you can run Oracle Workflow Configuration Assistant manually.
Before you run Oracle Workflow Configuration Assistant, you should close other applications you may have running, including Java applications, Oracle-based applications, and any other applications that consume large amounts of memory, hard disk space, or CPU time. However, you should not close any components of the Oracle9i database where you want to load Oracle Workflow.
When you run Oracle Workflow Configuration Assistant on Windows, several command windows open and close automatically. You should ignore these windows. You must not manually close any of these command windows, or you will interrupt the configuration process.
To configure Oracle Workflow:
OWF_MGR.
oaihub902 schema.
workflow.log file in the wf/install subdirectory within your Oracle home.
Oracle Workflow requires Oracle HTTP Server as your Web server. The Web server must be able to access the Oracle Workflow Java area, the Oracle Workflow icon area, and the Oracle Workflow documentation area.
After installing Oracle HTTP Server and Oracle Workflow, you must create a database access descriptor (DAD) for Oracle Workflow in Oracle HTTP Server.
http://host_name:port_number/
For example:
http://test:1810/
The default username for the administrator is ias_admin. The password was specified during the installation of Oracle9iAS.
pls/your_Workflow_DAD
CONNECT_STRING
wfa_html.home
Basic
Click Next.
Oracle Enterprise Manager displays your new DAD in the DAD Status section of the mod_plsql Services page.
For more information, see the Oracle HTTP Server Administration Guide.
http://server_name[:portID]/pls/your_Workflow_DAD/wfa_html.home
|
Note: The icons on the Oracle Workflow Web pages appear as broken images if the virtual directory mapping to the Oracle Workflow icon area has not been added. See Step 3: "Verify Oracle Workflow virtual directory mappings". |
Oracle Workflow requires the following virtual directory mappings:
If you installed Oracle HTTP Server and Oracle Workflow in the same Oracle home, the virtual directory mappings are set by default. Verify these mappings and add them, if necessary.
To add the virtual directory mappings in Oracle HTTP Server:
jlib directory and the Oracle Workflow icon and doc directories to the ORACLE_HOME/Apache/Apache/conf/httpd.conf or httpds.conf file.
The Alias directive has the following format:
Alias aliasname realname
Examples (UNIX):
Alias /OA_JAVA/ "/oracle9ias/jlib/"Alias /OA_MEDIA/ "/oracle9ias/wf/java/oracle/apps/fnd/wf/icons/"Alias /OA_DOC/ "/oracle9ias/wf/doc/"
Examples (Windows NT):
Alias /OA_JAVA/ "C:\oracle9ias\jlib/"Alias /OA_MEDIA/ "C:\oracle9ias\wf\java\oracle\apps\fnd\wf\icons/"Alias /OA_DOC/ "C:\oracle9ias\wf\doc/"
Oracle Workflow provides access to HTML help from the Help button on each of its web pages. The HTML help that appears is context sensitive and provides links to the entire contents of the Oracle Workflow Guide.
To set up the HTML help, unzip the ORACLE_HOME/wf/wfdoc262.zip file and verify that you have a virtual directory mapping called /OA_DOC/ in your web listener that points to the documentation area on your file system.
If you installed Oracle HTTP Server in the same Oracle home as Oracle Workflow, the /OA_DOC/ virtual directory mapping is set by default. Verify this mapping and add it, if necessary.
/wf/wfdoc262.zip file.
You need at least 5 MB of free disk space to extract the zip file.
Extract the files to ORACLE_HOME/wf/. You should get the following subdirectories:
| Directory | Contents |
|---|---|
|
ORACLE_HOME |
Oracle Workflow Guide |
|
ORACLE_HOME |
Custom Help. You can add your own customized Workflow help in this directory. |
Alternatively, you can install the doc directory tree on a PC file system. Create a directory for the HTML help on your PC. Then transfer the HTML help zip file to the new directory on your PC. Use an unzip utility to extract the doc directory tree from the zip file in that directory.
/OA_DOC/ in your web listener. See Step 3: "Verify Oracle Workflow virtual directory mappings".
The path for the contents page of the Oracle Workflow Guide is:
http://server_name[:portID]/OA_DOC/lang/wf/toc.htm
The path for the contents page of your Oracle Workflow Custom Help is:
http://server_name[:portID]/OA_DOC/lang/wfcust/wfcust.htm
wfcust directory, wfcust.htm, with your own help material. The HTM file that is the main entry point for your custom help must be named wfcust.htm and must contain an anchor named contents. Your custom help will be accessible through the Custom Help link on the contents page of the Oracle Workflow Guide.
You must map Oracle Workflow directory service views to your organization's users and roles. The directory service views are WF_USERS, WF_ROLES, and WF_USER_ROLES.
Oracle Universal Installer automatically executes the ORACLE_HOME/wf/sql/wfdirouv.sql script to map the directory service views to your native Oracle database users and roles. This script bases the views on the tables DBA_USERS, WF_LOCAL_USERS, DBA_ROLES, and WF_LOCAL_ROLES.
To map Oracle Workflow directory service views, do one of the following:
wfdirouv.sql script to map the directory service views to the users and roles defined in your organization's directory repository.
The wfdirouv.sql script sets each native Oracle user's Email address to the user's respective username. As a minimal setup step, edit the script to either link your native Oracle users to an existing mail directory store through the WF_ROLES view definition, or, if the usernames and e-mail account names match, then simply add the domain for your organization, such as @oracle.com, to the usernames in the WF_USERS view definition. Typically, the columns that should change are EMAIL_ADDRESS in WF_USERS and EMAIL_ADDRESS in WF_ROLES.
/wf/sql/wfdircsv.sql script to map the directory service views only to the WF_LOCAL_USERS and WF_LOCAL_ROLES tables.
After setting up your directory service, run the wfdirchk.sql script in SQL*Plus to verify the integrity of your directory service data model. The script is located on your Oracle Workflow server in the Oracle Workflow admin/sql subdirectory. See the "Workflow Administration Scripts" chapter of the Oracle Workflow Guide for more information.
You can optionally implement LDAP integration and single sign-on for Oracle Workflow through Oracle Internet Directory and Oracle9iAS Single Sign-On Server.
To implement Oracle Internet Directory integration:
You must protect the Database Access Descriptor you created by adding the following entry in your mod_osso configuration file (replace "your_Workflow_DAD" with the name of the DAD you created in Step 2: "Create a database access descriptor (DAD) for Oracle Workflow"):
<Location /pls/your_Workflow_DAD>
  require valid-user
  authType Basic
</Location>
/wf/sql/wfdircsv.sql script to map the directory service views only to the WF_LOCAL_USERS and WF_LOCAL_ROLES tables.
WF_LOCAL_USERS is the only table that is synchronized with Oracle Internet Directory. Only users are maintained through Oracle Internet Directory, not Oracle Workflow roles.
You must perform a one-time migration of existing Oracle Workflow user information to Oracle Internet Directory to enable single sign-on only and single administration. Ensure that you migrate all the necessary data from WF_LOCAL_USERS as well as any other user tables in which you previously stored user information. After performing the migration, you should maintain your user information only through Oracle Internet Directory.
Oracle Internet Directory provides a migration tool called ldifMigrator. To use this tool:
The ldifMigrator tool converts the intermediate entries in the file to actual LDIF entries by replacing the variables based on arguments provided at runtime or information retrieved from the LDAP directory.
ldifMigrator into Oracle Internet Directory using Oracle Internet Directory bulk tools.
For more information about the ldifMigrator, the format required for the intermediate LDIF file, and Oracle Internet Directory bulk upload tools, see Appendix A, "Syntax for LDIF and Command-Line Tools" in the Oracle Internet Directory Administrator's Guide.
desc DBMS_LDAP
If the package does not exist, load it manually by running the ORACLE_HOME/rdbms/admin/catldap.sql script. Run this script as the SYS user. For example, use the following command:
$ sqlplus "SYS/SYS password AS SYSDBA" @$ORACLE_HOME/rdbms/admin/
catldap.sql
/wf/sql/wfsecwsb.sql script. Run this script as the Oracle Workflow user. For example, use the following command:
$ sqlplus owf_mgr/passwd @$ORACLE_HOME/wf/sql/wfsecwsb.sql
For details, see "Synchronizing Oracle Workflow Directory Services with Oracle Internet Directory" and "Setting Up Oracle Workflow" in the Oracle Workflow Guide.
To invoke Oracle Workflow Web services, you simply append the appropriate procedure and arguments to your base URL. Once you define your Web security and Web users, you can verify your base URL by connecting to the Oracle Workflow home page as a valid user:
http://server_name[:portID]/pls/your Workflow DAD/wfa_html.home
When using Oracle HTTP Server, you can authenticate yourself with a database username and password. When you install Oracle Workflow and its demonstration workflow processes, you also install a demonstration data model that seeds a set of demonstration users in the directory service and creates these same users as database accounts. The users are: sysadmin, wfadmin, blewis, cdouglas, kwalker, and spierson. To set passwords for these accounts, connect to the SYSTEM database account using SQL*Plus and specify a password for each account using the ALTER USER command. For more information, refer to the Oracle9i SQL Reference.
With Oracle HTTP Server, you can authenticate your connection to an Oracle Workflow Web page with any of these database usernames and passwords. Public grants and synonyms were created so that these database accounts have full access to the Oracle Workflow Web-based user interface.
See your Oracle DBA if you need more information about the SYSTEM account and password.
The Oracle Workflow server installation and upgrade are available only in English. To support access to Oracle Workflow in another language, you must load that language after the installation and configuration steps using Oracle Workflow Configuration Assistant.
When you run the Oracle Workflow Configuration Assistant on Windows, several command windows open and close automatically. You should ignore these windows. You must not manually close any of these command windows, or you will interrupt the configuration process.
To load additional languages:
workflow.log file located in the wf/install subdirectory within your Oracle home.
The steps in this section are specific to configuring Oracle Workflow to run with Oracle9iAS InterConnect.
For each subscription, specify these values:
The configuration steps in this section are generic to Oracle Workflow (that is, these steps are not specific to using Oracle Workflow with Oracle9iAS InterConnect).
See the section "Step 2: Setting Global User Preferences" in Chapter 2 of the Oracle Workflow Guide for details.
The wfdirouv.sql script run by the Oracle Universal Installer automatically creates a sample WF_LANGUAGES view. If you want to use this view, you should verify it first by connecting to SQL*Plus using your Oracle Workflow database account and querying the view for all languages defined in your Oracle9i installation.
See the section "Step 5: Creating the WF_LANGUAGES View" in Chapter 2 of the Oracle Workflow Guide for details.
See the section "Step 7: Setting the WF_RESOURCES Environment Variable" in Chapter 2 of the Oracle Workflow Guide for details.
See the section "Step 9: Setting up Background Workflow Engines" in Chapter 2 of the Oracle Workflow Guide for details.
You may need to perform these customizations, depending on the feature that you want to implement. The following table lists the steps, along with a pointer to the section in the Oracle Workflow Guide where you can find instructions on how to perform the step.
To install any number of the Oracle9iAS InterConnect adapters, start the Oracle Universal Installer and complete the following steps.
See Table C-7 for component-specific installation information.
This section describes how to install the Oracle9iAS InterConnect development kit.
In Oracle9iAS for UNIX, the Oracle Workflow Client includes Oracle Workflow Builder.
In Oracle9iAS for Windows NT, the Oracle Workflow Client includes Oracle Workflow Builder and the MAPI-compliant Notification Mailer.
If you want to write your own custom Oracle9iAS InterConnect Adapter, you must install the Development Kit in a new Oracle home. This installs all dependencies. If you have not installed the Oracle9iAS InterConnect hub, you need to do so before proceeding with this installation.
Perform the following steps to install the Development Kit:
Note that this screen appears only when all of the following conditions are met:
Enter the following information about the Oracle9iAS InterConnect hub (usually an Oracle9iAS Metadata Repository) to use.
iasdb1.
Review the selections made on previous screens and click Install.
The Development Kit is installed on your server in the following directory:
| Platform | Directory |
|---|---|
|
Windows NT |
|
|
UNIX |
|
Perform these steps after installing Oracle Workflow Client only if you are using Oracle Workflow.
When you install Oracle Workflow Builder, the Oracle Universal Installer copies a zip file containing the HTML help to the Workflow directory in your Oracle home. The zip file is ORACLE_HOME\wf\wfdoc262.zip. To view the HTML help, extract the doc directory tree from the zip file to your file system:
You need at least 5 Mb of free disk space to extract the zip file.
Extract the files to ORACLE_HOME/wf/. You should get the following subdirectories:
| Directory | Contents |
|---|---|
|
ORACLE_HOME |
Oracle Workflow Guide |
|
ORACLE_HOME |
Custom Help. You can add your own customized Workflow help in this directory. |
The path for the contents page of the Oracle Workflow Guide is:
ORACLE_HOME/wf/doc/lang/wf/toc.htm
The path for the contents page of your Oracle Workflow Custom Help is:
ORACLE_HOME/wf/doc/lang/wfcust/wfcust.htm
wfcust directory, wfcust.htm, with your own help material. The HTM file that is the main entry point for your custom help must be named wfcust.htm and must contain an anchor named contents. Your custom help will be accessible through the Custom Help link on the contents page of the Oracle Workflow Guide.
If you are installing Oracle Workflow Builder in another language, such as Japanese, you can modify the font used by the windows in Oracle Workflow Builder to a font that is appropriate for your language. Any change you make applies to all windows within the program.
If you need to create custom adapters and browsers, see the documentation in ORACLE_HOME/oai/9.0.2/sdk/cookbook.zip.
Oracle9iAS InterConnect Management Infrastructure is required for managing InterConnect components.
In Topology 1 and 3, Oracle Management Server was installed as part of the Oracle9iAS Infrastructure installation. The remaining step is to install the Oracle9iAS InterConnect Management Infrastructure; see instructions below.
In Topology 2, you need to install both Oracle9iAS InterConnect Management Infrastructure and Oracle Management Server:
To install Oracle9iAS InterConnect Management Infrastructure:
Review the selections made on previous screens and click Install.
/oai/9.0.2/console/post_installation.txt for post-installation steps.
The following sections describe how to start Oracle9iAS InterConnect.
See the Oracle Internet Directory Administrator's Guide for details.
On UNIX, you use the start command.
cd$ORACLE_HOME/oai/9.0.2/repository./start
On Windows NT, you can use the start.bat command or you can use the Windows NT service for the repository:
cd%ORACLE_HOME%\oai\9.0.2\repository.\start.bat
To start iStudio, choose Start > Programs > Oracle - ORACLE_HOME_NAME > Application Development
See the corresponding adapter documentation.
You might need to change the passwords of the oaihub902 and owf_mgr schemas on a regular basis, depending on your company's security policy. How you change the passwords depends on the topology of your setup.
The oaihub902 schema is the schema for Oracle9iAS InterConnect, and owf_mgr is the schema for Oracle Workflow.
To change passwords of the oaihub902 and owf_mgr schemas in the Infrastructure database:
See the Oracle9iAS Administration Guide for details on changing schema passwords in the Infrastructure database.
encrypt utility in the $ORACLE_HOME/oai/9.0.2/bin directory. The command prompts you to enter the password to encrypt.
Table C-8 Update files with encrypted password
To change passwords of the oaihub902 and owf_mgr schemas in the Oracle database:
See the Oracle database documentation for details on changing schema passwords.
encrypt utility in the $ORACLE_HOME/oai/9.0.2/bin directory. This is the InterConnect Oracle home (as opposed to the database Oracle home). The command prompts you to enter the password to encrypt.
Table C-9 Update files with encrypted password
You created the first schema in the repository database when you ran the hub installation for any of the three topologies. If you need a second schema in the repository database, you can create it by following this procedure:
When the installer prompts you for database information, you enter hub information (database host, port, and SID) that is identical to the hub information in the first install.
oaihub902 with the name of the new schema in the original files.
For example, if you want the new schema to be called oaihub, you would replace oaihub902 with oaihub.
oaihub in this example) in the hub database.
|
|
 Copyright © 2002 Oracle Corporation. All Rights Reserved. |
|