Skip Headers

Oracle Files Administration Guide
9.0.3

Part Number A97358-01
Go to Documentation Home
Home
Go to Book List
Book List
Go to Table of Contents
Contents
Go to Index
Index
Go to Master Index
Master Index
Go to Feedback page
Feedback

Go to previous page
Previous
Go to next page
Next
View PDF

4
Basic Administrative Operations

Administering Oracle Files includes starting and stopping the system; monitoring the system; and reconfiguring system components--changing port numbers on a specific protocol server, for example. To perform such tasks, you use the Oracle Enterprise Manager Website provided by Oracle9i Application Server. This chapter tells you how to use Oracle Enterprise Manager Website to perform these tasks. Topics include:

Starting and Stopping an Oracle Files Domain

The domain controller manages the set of nodes comprising the domain. The domain controller controls which nodes are running, tracks nodes' statuses, and allows nodes to be monitored and administered. The Oracle Files software runs on the database machine and as a set of middle-tier processes, called nodes. Each node executes on a particular computer, or host. Although a domain's nodes are often split across a set of hosts, a single host can have more than one Oracle Files node. Each node has a name, which is unique across the Oracle Files domain. Oracle Files nodes are processes of Oracle Files managing one or more services and servers (agents and protocols).

Because the HTTP Server runs as part of an OC4J process and is controlled outside of Oracle Files, the HTTP Server runs in its own node. Typically, each Oracle Files node will have an associated HTTP node.

The domain controller polls the nodes that are configured to run under its control. Once all the nodes are identified, you'll see them under the list of nodes for the specific domain.

Controlling the domain and the nodes using the Oracle Enterprise Manager Website requires that the Oracle Enterprise Manager server-side software (basically, Java servlets that have been deployed to the OC4J instance running on each host) is running on each host that comprises the domain.

Starting the Oracle Files Domain Controller Process

  1. If it's not running already, start the Oracle Enterprise Manager server-side software by executing its startup script from the command line (Table 4-1).

    Table 4-1 Starting the Oracle Enterprise Manager Web Server
    UNIX-based Hosts Windows NT/2000/MX Hosts

    $ORACLE_HOME/bin/emctl start

    Start the NT service from the Oracle Enterprise Manager Website.

  2. Using a Web browser, access the Oracle9iAS Home page by entering:
    http://hostname:1810/


    where hostname is the name of the middle-tier machine running the Oracle9i Application Server software on which Oracle Files has been installed and configured.

    The Application Server Home page displays, listing all of the system components that have been configured on the host.

    Text description of oem01.gif follows.

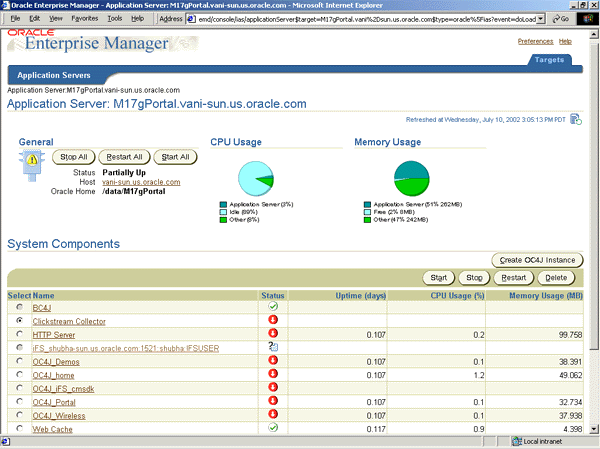
    Text description of the illustration oem01.gif

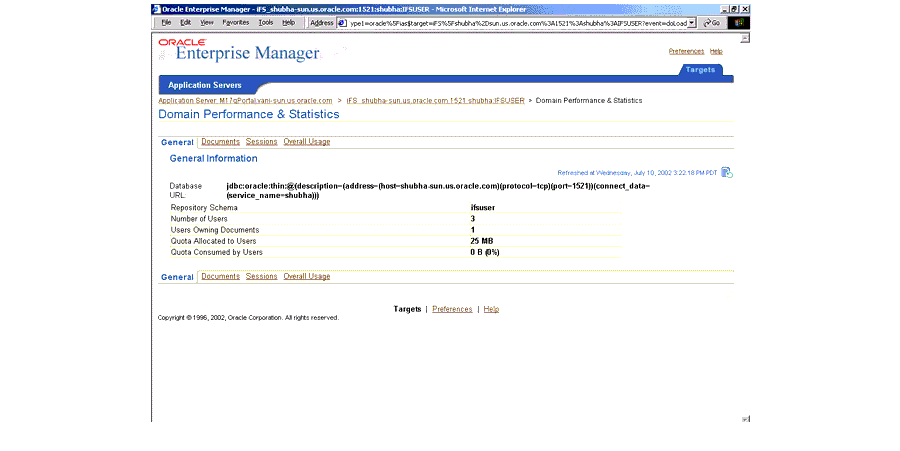
    Among these components, you'll find the Oracle Files domain targets with type Internet File System. The domain is:

    iFS_shubha-sun.us.oracle.com:1521:shubha:IFSUSER


    The Oracle9iAS instance is:

    M17gPortal.vani-sun.us.oracle.com
    
    
  3. From the Application Server Home page, click the Internet File System link, in this example:
     iFS_shubha-sun.us.oracle.com:1521:shubha:IFSUSER
    
    
  4. The Oracle Files Top-level page displays, showing the status of the domain controller and the set of nodes. The green checkmark in the Status column means the component has been started.

    Text description of oem02.gif follows.

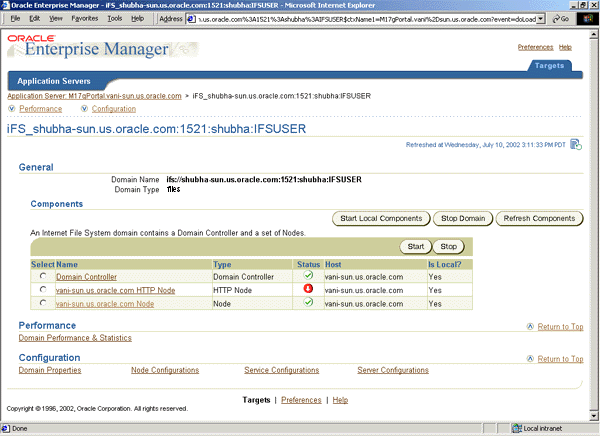
    Text description of the illustration oem02.gif

    Some operations are performed on local domain components, others are performed on the entire domain.

    • To start or refresh the local components, click the Start Local Components button.
    • To start a single component, select it and click the Start button.
    • To stop a single component, select it and click the Stop button.
    • To stop the entire domain, click the Stop Domain button. This action stops everything, including the local components. The presence of the Stop Domain button indicates that the domain is running. If the domain isn't running, the Start Domain is displayed so you can start the domain.
    • To refresh the entire domain, click the Refresh Components button.

    If a component's selection button is greyed out, that component is not located on the local host.

    Oracle Enterprise Manager identifies domain controllers, nodes, and other resources using the Uniform Resource Locator (URL) format: ifs://<host>:<port>:<service>:<schema>.

Starting the Node Processes

There are two types of nodes: Non-HTTP nodes and HTTP nodes. Although the domain can contain nodes on multiple middle-tier machines, you can only start and stop nodes that are on your local machine.

For Non-HTTP Nodes

  1. On the Oracle Files Top-level page, select the non-HTTP node from the Components table.
  2. Click Start.
  3. The Node status changes to a green checkmark icon, which means the node is up.

For HTTP Nodes

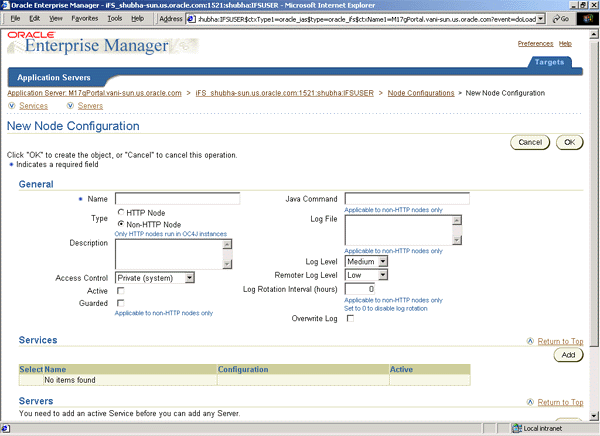
You need to know the corresponding OC4J instance name. For the Oracle Files domain, the default OC4J instance name is OC4J_iFS_files.

  1. Go to the Application Server Home page.
  2. Select the OC4J instance for the HTTP node from the Components table.
  3. Click Start, if the node has not already been started.
  4. On the Confirmation page, click OK.

Starting, Stopping, Suspending, and Resuming and Servers

A node configuration defines the behavior of a particular node. Which servers start up with the node are determined by the node configuration selected. Each Oracle Files node can have one or more services and one or more servers. These services and servers are started automatically when you start the domain, unless you specify otherwise.

To view the status of the servers:

  1. On the Oracle Files Top-level page, click the name of the Oracle Files node. The Node page displays showing the service and servers that comprise the node (see Figure 4-1).
  2. Examine the Status column for the servers to see which servers are running or are stopped.
  3. Use the buttons provided to:
    • Start
    • Restart
    • Suspend
    • Resume
    • Stop
    • Unload

    the servers. Any changes you make remain active for this session only. To permanently change which servers start up automatically and the server properties, see "Configuration Settings and How to Change Them".

Figure 4-1 Services and Servers Sections of Node Page

Text description of 3server.gif follows.

Text description of the illustration 3server.gif

Starting Oracle Files from the Command Line

As an alternative to using the Oracle Enterprise Manager Website to start the domain and nodes, you can use the ifsctl command-line tool. The general syntax is:

ifsctl command [switch ...] [argument ...]

Some commands require a schema password. For those, ifsctl prompts for the password, either on the terminal (UNIX) or using a dialog box (Windows).

The commands include:

Table 4-2 ifsctl Commands
Command Use

ifsctl start [-n] [domain]

Launches any local Oracle Files nodes for the specified domain. ("Local nodes" are those configured to run on the computer where ifsctl is invoked.) If the domain controller for the specified domain runs locally, it is also launched. If domain is omitted, all local Oracle Files nodes and domain controllers for all domains for which the computer is registered are launched. The command also starts the domain controller if it has been launched (either locally or remotely) but is not yet started.

ifsctl stop [domain]

Stops the specified domain. The domain controller and all nodes, whether local or remote, are stopped. If only one domain is registered for the computer, the domain may be omitted.

ifsctl stoplocalnodes [domain]

Stops the local nodes for the specified domain. Nodes running on other computers are not affected. The domain controller is not stopped. If only one domain is registered for the computer, the domain may be omitted.

ifsctl status [-n] [domain]

Displays the status of the specified domain. If the domain is omitted, displays the status for all domains for which the computer is registered.

ifsctl validateconfiguration [-p] [domain]

Synchronizes the Oracle Files registry file (on the local computer) with the domain registry (in the Oracle Files schema). This is normally done automatically; however, if the local computer's file system was restored from a backup (for example, after a disk failure), explicit synchronization might be required.

-p means "prune". If the registry file contains a domain that no longer exists (namely, if Oracle Files cannot connect to the database schema for that domain), the computer is deregistered from that domain.

Including -n requests non-interactive operation; ifsctl does not prompt for the schema password. In this case, the Oracle Files nodes and domain controllers are still launched, but the domain controller is not started (since starting an Oracle Files domain requires a schema password).

All commands support a -v, "verbose" switch. This displays additional diagnostic information. ifsctl generates a log file. In the installed environment, this is located at:

$ORACLE_HOME/ifs/files/log/ifsctl.log 

ifsctl and OC4J

Oracle Files HTTP nodes run in OC4J processes. Because OC4J processes are not owned by Oracle Files (and might also be running non-Oracle Files servlets), ifsctl does not launch or stop OC4J processes. Use the Oracle Enterprise Manager Website for this purpose, or dcmctl from the command line. When an OC4J process is launched, any Oracle Files HTTP nodes configured to run in that OC4J instance are automatically started, if the domain controller is running and started. When an OC4J process is stopped, the HTTP nodes are stopped. Although it doesn't start and stop HTTP nodes, ifsctl does display their status.

Oracle Process Management and Notification

Oracle Process Management and Notification (OPMN) manages Oracle HTTP Server and OC4J processes within an application server instance. It channels all events from different compoentnts to all components interested in receiving them. OPMN consists of two components:

To start Oracle HTTP Server and OC4J processes, you can:

Or:

Type opmnctl to see the supported syntax.

Configuration Settings and How to Change Them

The default domain configuration is based initially on the settings you selected during installation and configuration. The specific settings are stored in the Oracle Files repository, in different configuration objects, specifically:

When the domain is started, it uses the settings contained in the repository to determine which nodes it should control (what nodes comprise the domain). The node configuration defines the runtime behavior of the nodes. The service configuration specifies the size of service each node supports (small, medium, or large). The server configuration determines the protocol servers and agents (AFP, FTP, NFS, and so on) that each service offers for use of the system.

You can change these settings by using the Oracle Enterprise Manager Website to access a specific configuration object and modify the various properties that each comprises.

Domain Properties

To make changes to the domain configuration properties:

  1. From the Application Server Home page, click the Internet File System link. The Oracle Files Top-level page displays.
  2. In the Configuration section, select Domain Properties.
  3. On the Domain Properties, click the name of the property you want to change. Only those properties that are underlined may be changed.
  4. Make the changes to the property and click OK.

You can change these properties:

You must restart the domain controller for changes to take effect.

Node Configuration

The runtime behavior of any node is specified in a node configuration object. On the Oracle Files Website, you can dynamically change the node configuration, change to a different configuration, alter a node configuration permanently, create a new node configuration, or delete a node configuration that is no longer needed. Depending on whether you select the HTTP node or a non-HTTP node, different properties are changeable.

Changing a Node Configuration

  1. From the Configuration section on the Oracle Files Top-level page, click Node Configurations.
  2. On the Node Configurations page, click the Name of the node configuration you want to change, either the HTTP node or the non-HTTP node. The Edit page displays.
  1. Change the node configuration. You can make the following modifications:

    Property HTTP Node Non-HTTP Node

    Description of the node configuration.

    Yes

    Yes

    Access Control level associated with the node configuration.

    Yes

    Yes

    Active status. Deselect to make inactive.

    Yes

    Yes

    Guarded. Whether the node's guardian runs as a separate process. Defaults to true.

    N/A

    Yes

    Java Command. For guarded nodes, the command issued by the node guardian to create a node manager process. Defaults to "java".

    N/A

    Yes

    Edit the value to specify command-line arguments for the Java VM, such as "java -Xmx512M" to increase the maximum size of the Java VM's heap.

    Log File to which to generate logs. If not specified, logs are generated to the console.

    N/A

    Yes

    Log Level. Verbosity level of the node log.

    0 = disabled (no logging)

    2 = low (error conditions only)

    4 = medium (normal operation; default)

    6 = high (debug information)

    Yes

    Yes

    Remoter Log Level. Verbosity level of the inter-process communication log.

    0 = disabled (no logging)

    2 = low (error conditions only; default)

    4 = medium (normal operation)

    6 = high (debug information)

    Yes

    Yes

    Log Rotation Interval. The interval in hours that the log file is archived and rotated. Specify 0 to disable log rotation.

    N/A

    Yes

    Overwrite Log. Whether any existing log file is overwritten each time the node starts. Defaults to false and appends the log to the existing log file.

    N/A

    Yes


  2. In addition to the above properties, you can add, edit, and remove services and servers for this node.
  3. Click OK to save the changes.

Note:

Changes take effect when the node is loaded or re-started.


Creating a Non-HTTP Node Configuration

  1. From the Configuration section on the Oracle Files Top-level page, click Node Configurations.
  2. On the Node Configurations page, decide whether to create a new node from scratch or to base it on the properties of an existing node.
    • To create the node from scratch, click the Create button.
    • To base the node on an existing node, select that node's checkbox and click Create Like.

    In both cases, the New Node Configuration page displays. If you selected Create Like, the properties have been filled in with those of the selected existing node.

    Text description of newnode.gif follows.

    Text description of the illustration newnode.gif

  3. Enter or change the node information:
    • Name of the node.
    • Type of the node; select Non-HTTP Node.
    • Whether the node is currently active.
    • Default services for the node. For each, the node configuration records:
      • Service name.
      • Which service configuration object provides the service's configuration properties.
      • Whether the service is currently active. Inactive services are not automatically started by the node.
    • The node's default servers. For each, the node configuration records:
      • Server name.
      • Which server configuration object provides the server's configuration parameters.
      • Whether the server is currently active. Inactive servers are not automatically loaded by the node.
      • Name of the service against which the server should operate.
      • Priority of the server.
      • Whether the server is automatically started once loaded.
  4. Click OK.

Creating an HTTP Node Configuration

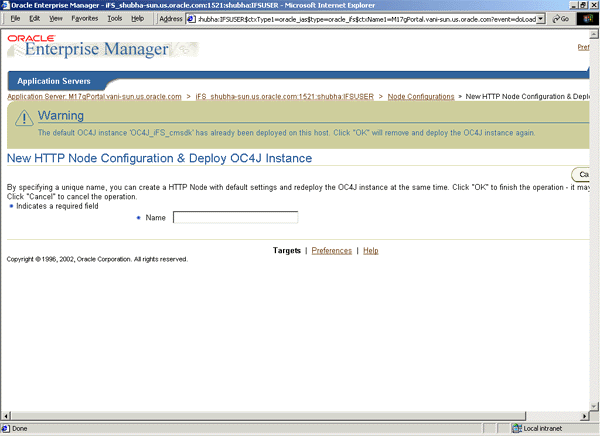
You cannot follow exactly the same procedure as in "Creating a Non-HTTP Node Configuration" to create an HTTP node configuration. You need to create and deploy a correspondent OC4J instance for the HTTP node. To create an HTTP node and also deploy its OC4J instance:

  1. From the Configuration section on the Oracle Files Top-level page, click Node Configurations.
  2. On the Node Configurations page, click the Create and Deploy HTTP Node button. The New HTTP Node Configuration & Deploy OC4J Instance page displays:

    Text description of httpnode.gif follows.

    Text description of the illustration httpnode.gif

  3. Enter the HTTP node name.
  4. Click OK.

Note:

This operation will deploy a default OC4J instance. Any custom changes that were made to the existing OC4J instance will be lost. If you already have an HTTP node on the host, this operation removes the currently deployed OC4J instance and redeploys the default OC4J instance again. This results in the original HTTP node not functioning anymore. You should delete the node configuration for the original HTTP node.


Service Configuration

A service configuration holds the default values used when a service is started for an Oracle Files node. Each service configuration specifies values for properties such as the database instance and schema name of the repository, the sizes of the cache and database connection pools, the maximum number of sessions, and the service's default language and character set. (See Appendix B, "Service Configuration Reference" for a complete list of service configuration parameters.) Service configurations are uniquely named across the domain.

Whenever a new Oracle Files schema is created, three service configuration objects are generated: SmallServiceConfiguration, MediumServiceConfiguration, and LargeServiceConfiguration. These objects are named to reflect the sizes of their data caches.

Use the Oracle Enterprise Manager Website to create or edit service configuration objects (see Figure 4-2, "Service Configurations Page"). The services read their service configuration properties only when they start. You must stop and re-start a service for changes to take effect. The changes you make this way are applied each time you start a service and overwrite any changes you make on a particular service while it is running.

Figure 4-2 Service Configurations Page

Text description of oemsvc01.gif follows.

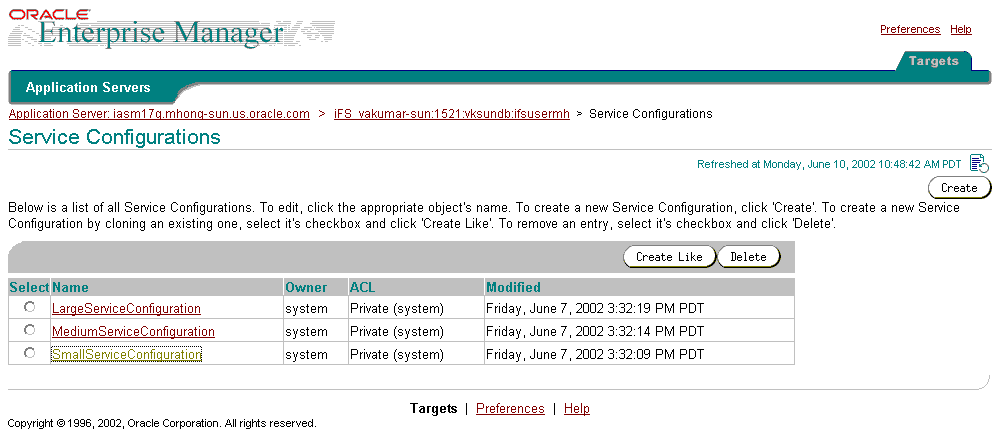
Text description of the illustration oemsvc01.gif


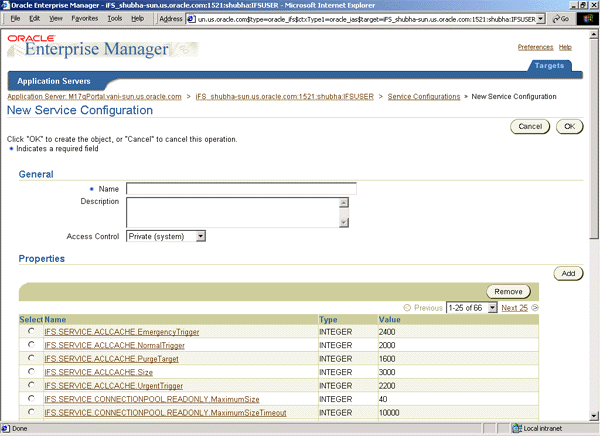
Like the node configuration, you can dynamically change the service configuration properties, change to a different configuration, alter a service configuration permanently, or create a new service configuration.

Changing a Service Configuration

  1. From the Configuration section on the Oracle Files Top-level page, click Service Configurations.
  2. On the Service Configurations page, click the Name of the service configuration you want to change. The Edit page displays.
  1. You can change general information about the service as well as the properties of the service.

    General information. Change the description of the service or the access control assigned to the service.

    Properties. Click the name of the property you want to change to display the Edit page. Change the values shown as desired.

  2. Click OK to save the changes.

Note:

Changes take effect when the node is loaded or re-started.


Creating a Service Configuration

  1. From the Configuration section on the Oracle Files Top-level page, click Service Configurations.
  2. On the Service Configurations page, decide whether to create a new service from scratch or to base it on the properties of an existing node.
    • To create the service from scratch, click the Create button.
    • To base the service on an existing service, select that service's checkbox and click Create Like.

    In both cases, the New Service Configuration page displays. If you selected Create Like, the properties have been filled in with those of the selected existing service.

    Text description of crelike.gif follows.

    Text description of the illustration crelike.gif

  3. Enter a description of the service.
  4. Assign an access level to the configuration by selecting from the Access Level list.
  5. Add, remove, or update the new service's properties.
  6. Click OK.

Runtime Service Configuration

You can also dynamically configure the committed data cache, readonly connection pool, and the writeable connection pool while the service runs.

  1. On the Oracle Files Top-level page, click the node whose service you want to configure.
  2. On the Node page, click the service.
  3. On the Service page, scroll to the Configuration section.
  4. To configure the committed data cache, click Committed Data Cache Configuration to display the Committed Data Cache Configuration page Continue with Step 5.

    Or:

    To configure the readonly or writeable connection pool, click Connection Pool Configuration. Continue with Step 6.

  5. Change the parameters on the Committed Data Cache Configuration page as desired.

    Text description of dataconf.gif follows.

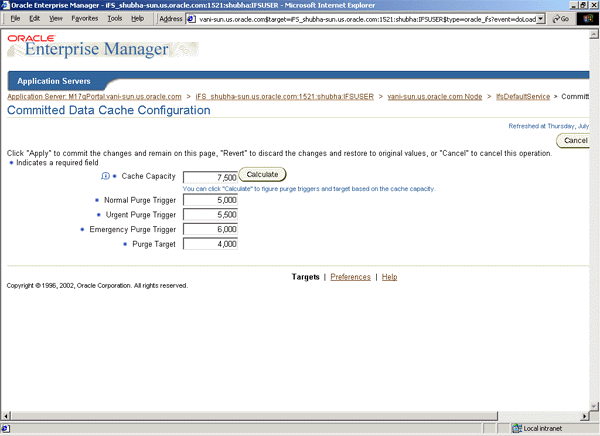
    Text description of the illustration dataconf.gif

    Parameter Description

    Cache Capacity

    The absolute maximum size of the service is data cache, in LibraryObjects. The service data cache holds the attribute values of recently used LibraryObjects. Optional; defaults to 7500.

    Normal Purge Trigger

    The cache size, in LibraryObjects, at which the service data cache schedules a low-priority purge of data that has not been recently used. Optional; defaults to 5000.

    Urgent Purge Trigger

    The cache size, in LibraryObjects, at which the service data cache schedules a high-priority purge of data that has not been recently used. Must be greater than IFS.SERVICE.DATACACHE.NormalTrigger. Optional; defaults to 5500.

    Emergency Purge Trigger

    The cache size, in LibraryObjects, at which the service data cache performs an immediate purge of data that has not been recently used. Must be greater than IFS.SERVICE.DATACACHE.UrgentTrigger but less than IFS.SERVICE.DATACACHE.Size. Optional; defaults to 6000.

    Purge Target

    The target cache size, in LibraryObjects, upon completion of a purge cycle. Must be less than IFS.SERVICE.DATACACHE.NormalTrigger. Optional; defaults to 4000.

  6. Change the parameters on the Connection Pool Configuration page as desired.

    Text description of poolconf.gif follows.

    Text description of the illustration poolconf.gif

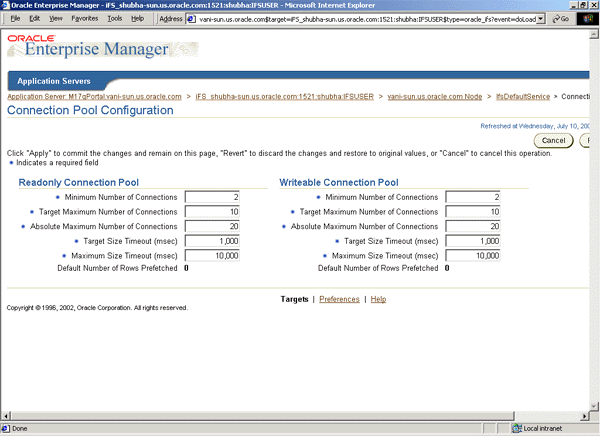
The Readonly Connection Pool properties include:

Property Description

Minimum Number of Connections

The initial number of database connections in the read-only connection pool. Optional; defaults to 2.

Target Maximum Number of Connections

The target maximum number of database connections in the read-only connection pool. Must be greater than or equal to IFS.SERVICE.CONNECTIONPOOL.READONLY.MinimumSize. Optional; defaults to 5.

Absolute Maximum Number of Connections

The absolute maximum number of database connections in the read-only connection pool. Must be greater than or equal to IFS.SERVICE.CONNECTIONPOOL.READONLY.TargetSize. Optional; defaults to 10.

Target Size Timeout

The maximum period, in milliseconds, that the service will postpone a connection allocation request when there are no unallocated connections, if the current size of the read-only connection pool is greater than or equal to its target size but less than the maximum size. If a database connection does not become available within this period, a new connection will be created. Optional; defaults to 1000.

Maximum Size Timeout

The maximum period, in milliseconds, that a service will postpone a connection allocation request when there are no unallocated connections, if the current size of the read-only connection pool is equal to its maximum size. If a database connection does not become available within this period, the allocation request will fail and an exception will be thrown. Optional; defaults to 10000.

The Writeable Connection Pool properties include:

Property Description

Minimum Number of Connections

The initial number of database connections in the writable connection pool. Optional; defaults to 2.

Target Maximum Number of Connections

The target maximum number of database connections in the writable connection pool. Must be greater than or equal to IFS.SERVICE.CONNECTIONPOOL.WRITEABLE.MinimumSize. Optional; defaults to 5.

Absolute Maximum Number of Connections

The absolute maximum number of database connections in the writable connection pool. Must be greater than or equal to IFS.SERVICE.CONNECTIONPOOL.WRITEABLE.TargetSize. Optional; defaults to 10.

Target Size Timeout

The maximum period, in milliseconds, that the service will postpone a connection allocation request when there are no unallocated connections, if the current size of the writable connection pool is greater than or equal to its target size but less than the maximum size. If a database connection does not become available within this period, a new connection will be created. Optional; defaults to 1000.

Maximum Size Timeout

The maximum period, in milliseconds, that a service will postpone a connection allocation request when there are no unallocated connections, if the current size of the writable connection pool is equal to its maximum size. If a database connection does not become available within this period, the allocation request will fail and an exception will be thrown. Optional; defaults to 10000.

Server Configuration

A server configuration holds the default values used when a server is started for an Oracle Files node. Server configurations specify their server types as Java classnames. In addition to the server type, each server configuration specifies values for parameters relevant to that type (see Appendix C, "Server Configuration Properties"). For example, a server configuration for the Oracle Files FTP server specifies the FTP port number, whether anonymous FTP connections are allowed, and the connection time-out period.

Most of the server configuration information is used by the server itself. Only the server Java class entry is used by the node to instantiate a new server.

When Oracle Files is installed, server configurations are automatically created for each protocol server and agent. You can edit these configurations or create additional server configurations using the Oracle Enterprise Manager Website. Any changes you make will be reflected the next time the server is loaded or started.

To change to a different server configuration, you must stop the server and unload it, make the changes, then load and restart the server.

Abstract versus Non-abstract Server Configuration

Server configuration objects get created for each protocol server and agent as part of the configuration of Oracle Files. These objects in turn have a number of properties that are used by the respective servers and agents. These are assigned certain values by default.

Server configuration objects themselves are of two types:

When you create a new server configuration, you can choose to inherit the properties from one or more server configurations. These in turn bring into play their own properties and their respective values. You could choose to use the same values as inherited or, alternatively, use different values. This is done by creating a new attribute with the same name for the new server configuration object that you just created.

Inheritance operations are accessed from the New Server Configuration page (Figure 4-3).

Figure 4-3 Inheritance Operations on the New Server Configuration Page

Text description of inherit.gif follows.

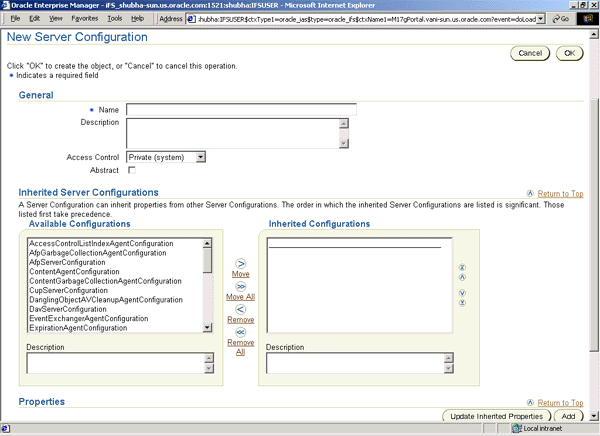
Text description of the illustration inherit.gif

Change Values of Properties

Create a new property in the inherited server configuration object that is identical in name to the one in the parent, but has values that override those in the parent server configuration object.

View Inherited Properties

View the inherited properties to determine whether the property in the current server configuration object is local to this object or taken from a parent server configuration object.

You can also differentiate between inherited server configuration objects and those that are local to the server configuration.

Stopping and Unloading Servers

  1. In the Servers section of the Node page, select the checkbox of the server you want to unload.
  2. Click Stop. The status should now be "Stopped."
  3. If you want to delete the server from the configuration, select the server and click Unload. The server is removed from the Servers list.
  4. You can now make the desired changes to the server configuration. Click the Name of the server. On the Edit page, only properties that are underlined may be edited. When your edits are complete, click OK.
  5. Click Load.
  6. Click Start.

Changing a Server Configuration

  1. From the Configuration section on the Oracle Files Top-level page, click Server Configurations.
  2. On the Server Configurations page, click the Name of the server configuration you want to change.
  1. On the Edit page, you can change general information about the server as well as the properties of the server.
    • In the General section, change the description of the server or the access control assigned to the server. Select or de-select Abstract.
    • In the Inherited Server Configurations section, select or de-select the existing configurations from which the configuration should inherit properties.
    • In the Properties section, click the Show Inherited Properties button to display the properties of the inherited server configurations.
      • Delete any of the properties by selecting the checkbox and clicking Remove.
      • You can edit any property that is underlined by clicking the property name to display the Edit page. Change the values and click OK.
      • To add a new property, in the Properties section, click the Add button.
      • On the Add Property page, enter the values shown and click OK.
  2. When the server configuration is complete, click OK.


    Note:

    Changes take effect when the server is loaded or re-started.


    Creating a Server Configuration

    1. From the Configuration section on the Oracle Files Top-level page, click Server Configurations.
    2. On the server Configurations page, decide whether to create a new server configuration from scratch or to base it on the properties of an existing server.
      • To create the server configuration from scratch, click the Create button.
      • To base the server configuration on an existing server configuration, select that server checkbox and click Create Like.

      In both cases, the New Server Configuration page displays. If you selected Create Like, the properties have been filled in with those of the selected existing server.

    1. On the New Server Configuration page, in the General section, enter a name for the new server configuration.
    2. Check the Abstract box to make this server configuration not instantiable.
    3. In the Inherited Server Configurations section, select the existing configurations from which the new configuration should inherit properties. Select configurations from the Available Configurations list and move them to the Selected Configurations list.
    4. In the Properties section, click the Update Inherited Properties button to display the properties of the inherited server configurations.
      • Delete any of the properties by selecting the checkbox and clicking Remove.
      • You can edit any property that is locally defined (not inherited) by selecting the property and clicking Edit to display the Edit page. Change the values and click OK.
      • To add a new property, in the Properties section, click the Add button.
      • On the Add Property page, enter the name, type, and value and click OK.
    5. When the server configuration is complete, click OK.

    Oracle Files Configuration Options

    Oracle Enterprise Manager Website provides three additional configuration options critical to the Oracle Collaboration Suite. These components include:

    Oracle Collaboration Suite Search Configuration

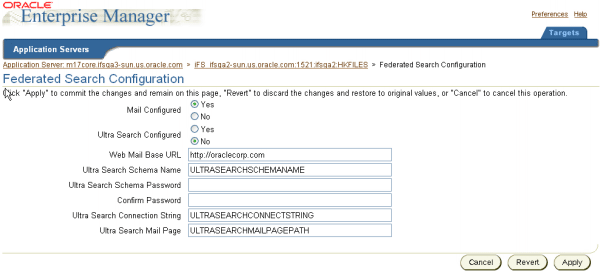
    Oracle Collaboration Suite Search is an application that lets users search any and all configured applications in the Oracle Collaboration Suite. If all the applications are configured, Oracle Collaboration Suite Search will search Oracle Files, Unified Messaging, and Oracle UltraSearch (searches internal web sites).

    Enabling Oracle Collaboration Suite Search is a post-configuration step dependent on Oracle Email and Oracle UltraSearch configuration. Oracle Files must be configured to enable Oracle Collaboration Suite Search.

    To begin configuring Oracle Collaboration Suite Search:

    1. From the Configuration section of the Oracle Files Domain Controller page, click Oracle Collaboration Suite Search.
    2. On the Oracle Collaboration Suite Search Configuration page, you can begin setting search configuration parameters.

    Figure 4-4 Oracle Collaboration Suite Search Configuration Page

    Text description of fedsearc.gif follows.

    Text description of the illustration fedsearc.gif

    Configuration Search Parameters

    To configure and enable Oracle Collaboration Suite Search, the administrator must enter search parameters in the Oracle Collaboration Suite Search Configuration page. Besides the Oracle UltraSearch Schema Password parameter, all properties are stored as Oracle Files domain properties. The Oracle UltraSearch Schema Password is stored as an encrypted repository parameter.

    Table 4-3 Oracle Collaboration Suite Search Configuration Search Properties
    Property Description

    Oracle Email Configured

    Click Yes to configure the Oracle Email application. Click No if you do not wish to configure the application.

    Oracle UltraSearch Configured

    Click Yes to configure the Oracle UltraSearch application. Click No if you do not wish to configure the application.

    Oracle WebMail Base URL

    The base URL to access Oracle WebMail messages.

    Oracle UltraSearch Schema Name

    The Oracle UltraSearch schema name.

    Oracle UltraSearch Schema Password

    The Oracle UltraSearch password.

    Confirm Password

    Confirmation of the Oracle UltraSearch password.

    Oracle UltraSearch Connection String

    A JDBC connection string for the database which contains the Oracle UltraSearch installation. For example, jdbc:oracle:thin:@sunmachine4200:1520:test

    Oracle UltraSearch Mail Page

    The base URL for Oracle UltraSearch email results. Results pass to oracle.ultrasearch.query.QueryInstance.setMailPagePath()

    Oracle Files Domain Configuration Property

    Oracle Files uses an additonal Domain Configuration Property, specific to Oracle Files:

    Table 4-4 Oracle Files Domain Configuration Property
    Property Type Description

    IFS.DOMAIN.APPLICATION.FILES.WorkflowSchemaName

    String

    Enter a value that is set to the Workflow schema name. The value represents how the application has been configured for Oracle Files.


    To access this property:

    1. Click Domain Configuration under the Configuration section on the Oracle Files Administration page.
    2. From the Domain Configuration page, click IFS.DOMAIN.APPLICATION.FILES.WorkflowSchemaName.
    3. On the IFS.DOMAIN.APPLICATION.FILES.WorkflowSchemaName page, enter a value.
    4. Click OK.

    Printing Services

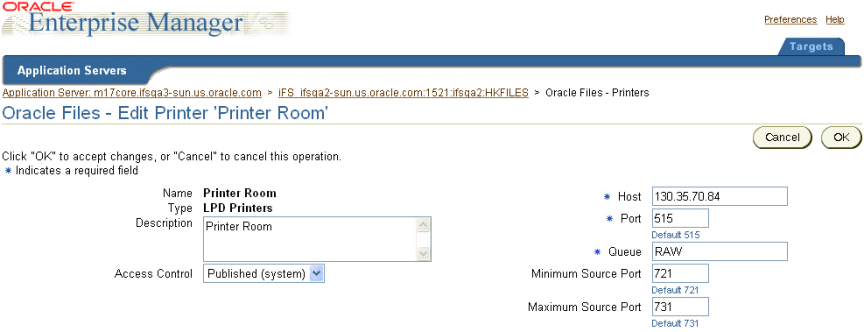
    Oracle Files supports printing to line printer daemon (LPD) printers using the SMB protocol. To integrate with--and allow users to print from--the Oracle Collaboration Suite, a printer must be physically connected to the network using the TCP/IP protocol. This means that a host name or an IP address is required to establish a connection with the network.

    Administrators can add, modify, and delete printers:

    1. On the Oracle Files Domain Controller page, select Printers from the Oracle Files Administration section.
    2. On the Printers page, you can:
      • Click New Printer, and on the Printers page enter the printer configuration information.
      • Select a printer and click Delete.
      • Click an existing printer name to modify the printer configuration information.

    Figure 4-5 Adding and Configuring a Printer

    Text description of filespri.gif follows.

    Text description of the illustration filespri.gif

    For information on entering the printer configuration information and completing the process of adding, modifying, or deleting a printer, see the Online Help for the Oracle Enterprise Manager Website.

    Notes

    • After adding and modifying a printer, both the SMB server and the Printer agent must be stopped and then restarted before the new settings are enabled. Click the node from the Oracle Files Domain Controller page and then stop and start the Print agent and the SMB server from the Node page.
    • After a printer is configured, Windows users must use the "Add Printer" wizard in the Windows Control Panel to add and enable the printer.
    • Although the Online Help for the Oracle Files indicates that an administrator can choose any ACL for a printer, only the Published (system) ACL is currently supported.

    MimeType Formats

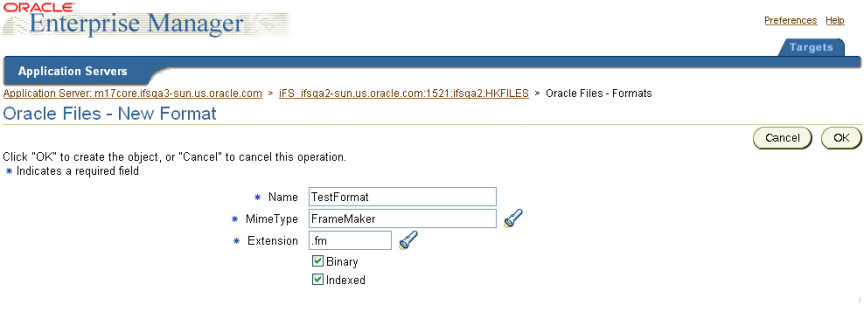
    Oracle Files associates a format (MIME type) with each document. The format of a document specifies the way document information is encoded. To determine how to store content, Internet browsers require document formats (for example, binary or text/xml).

    Specifying document formats becomes especially important when indexing a format type; in Oracle Files, indexing a format type is the basis of content searching. If a format is not indexed, searches will fail. However, searches for content can also fail when indexed incorrectly. For example, on the New Format page an Administrator can add a new format called .fm, a binary Adobe FrameMaker file. However, an administrator can then erroneously associate a text/plain format to the binary .fm file. As a result, searches will not return any content contained in a FrameMaker file because Oracle Files "expects" to find text/plain format content in a binary file.

    Administrators can create, modify, and delete formats.

    1. From the Oracle Files Administration section of the Oracle Files Domain Controller page, select Formats.
    2. On the Formats page, you can:
      • Click New Format, and on the New Format page enter the MimeType format information. Using the default system format requires no administration; using supplemental and custom formats does.
      • Select a format and click Delete.
      • Click an existing format name and edit the MimeType format information.

    Figure 4-6 Adding a New MimeType Format

    Text description of format.gif follows.

    Text description of the illustration format.gif

    For information on entering the MimeType format configuration information and completing the process of adding, modifying, or deleting MimeType formats, see the Online Help for the Oracle Enterprise Manager Website.

    Monitoring Domain, Node, and Service Performance

    In addition to starting and stopping the domain and nodes and changing properties of services and servers, you can monitor domain, node, and service performance on the Oracle Enterprise Manager Website.

    You can use this information to get an overall picture of the domain's performance or determine whether the domain's configuration needs modification.

    Monitoring Domain Performance

    1. From the Performance section on the Oracle Files Top-level page, click Domain Performance and Statistics The Domain Performance & Statistics page displays.

      Text description of operat13.gif follows

      Text description of the illustration operat13.gif

      From this page, you can access various statistics and usage charts, tables, and summaries to evaluate system performance and guide you in making changes to your configuration, if necessary. Table 4-5 lists the various charts, graphs, and tables and shows you which subtab and view names you should select to access the information.

    2. Select one of the four subtabs:
      • The General subtab for general information and information about document storage.
      • The Documents subtab for systemwide information about documents.
      • The Sessions subtab for a viewing the connected sessions by server type
      • The Overall Usage subtab for monitoring sessions, threads, and memory by node and host.
    3. To refresh the information, click the Refresh icon.
    4. To navigate between pages, make a selection from the Select a View list and click the Go button.

      Table 4-5 Reference to Statistical Information about the Domain and Node
      Chart, Graph, or Table Name Statistics or information Displayed Subtab Select a View item

      Document Table

      Document distribution by MIME type

      Documents

      Table

      Document Distribution Chart

      Space consumed displayed by MIME type (displays a bar chart comparing quantities of the different types of documents stored in the system)

      Documents

      Distribution Chart

      Document Consumption Chart

      Space consumed displayed by document type

      Documents

      Consumption Chart

      General Information

      A tabular display listing:

      • Database URL (connect string) for the database containing the Oracle Files schema where the statistics are calculated)
      • Schema name for the Oracle Files instance
      • Total number of user accounts
      • Total users who own documents in the system
      • Quota allocated for all users
      • Quota consumed by all users

      General

      N/A

      Session Table

      Tabular display of the total number of connected sessions per protocol server (AFP, FTP, and so on). Agents display as having 0 connections.

      Sessions

      Table

      Session Chart

      Pie chart of total number of connected sessions per protocol server. (The same information as the Session Table but in a graphical pie chart display.)

      Sessions

      Chart

      Overall Usage Table by Node

      Total connected sessions, threads, and memory consumed by each node in the domain.

      Overall Usage

      Table by Node

      Overall Usage Table by Host

      Total connected sessions, threads, and memory consumed by each host in the domain.

      Overall Usage

      Table by Host

      Overall Session Usage Chart by Node

      Bar graph showing the total number of connected sessions and consumed threads by each node.

      Overall Usage

      Session Chart by Node

      Overall Session Usage Chart by Host

      Bar graph showing the total number of connected sessions and consumed threads by each host

      Overall Usage

      Session Chart by Host

      Overall Memory Usage Chart by Node

      Bar graph showing the total amount of memory consumed by each host

      Overall Usage

      Memory Chart by Node

      Overall Memory Usage Chart by Host

      Bar graph showing the total amount of memory consumed by each node

      Overall Usage

      Memory Chart by Host

Monitoring Node Performance

  1. From the Oracle Files Node Page, click the Node Performance & Statistics link to display the summary-level information about the node.

    Text description of 2nodperf.gif follows.

    Text description of the illustration 2nodperf.gif

Monitoring Service Performance

  1. On the Oracle Files Top-level page, click the node whose service you want to monitor.
  2. On the Node page, click the service.
  3. On the Service page, scroll to the Performance section.
  4. Click the link to the statistics you want to view: Committed Data Cache Statistics or Connection Pool Statistics.

Figure 4-7 Committed Data Cache Statistics

Text description of data.gif follows.

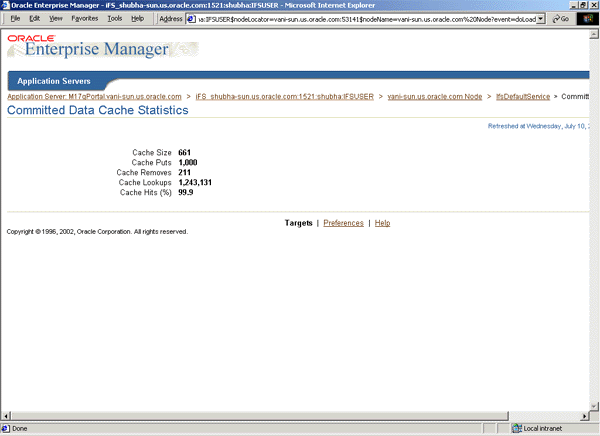
Text description of the illustration data.gif

Figure 4-8 Connection Pool Statistics

Text description of pool.gif follows.

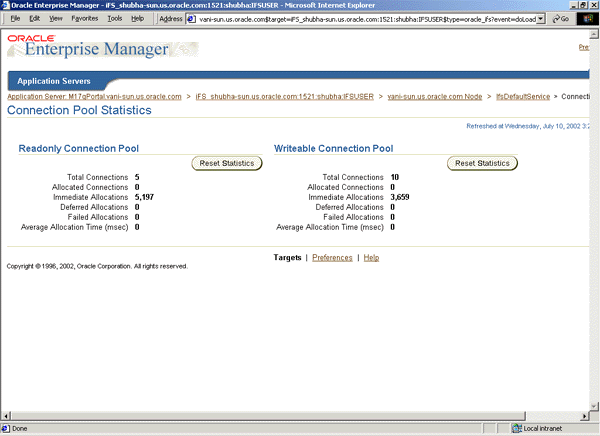
Text description of the illustration pool.gif

Log Files

Oracle Enterprise Manager Website Logs

The Oracle Enterprise Manager Website logs are located in:

$ORACLE_HOME/sysman/log:  em-servlet.log, emd.log, em-application.log 

Oracle Files Logs

Log files are generated by the domain controller and each node.

You can set various options for these log files; for example, whether to overwrite the log each time the domain is started through the domain and node configuration properties (see "Domain Properties" and "Node Configuration").