10g (9.0.4)
Part Number B10268-01
Contents |
Home | Solution Area | Index |
| Oracle Application Server Discoverer Plus User's Guide 10g (9.0.4) Part Number B10268-01 |
|
This chapter explains how to use Discoverer's drilling capabilities to answer typical business questions, and contains the following topics:
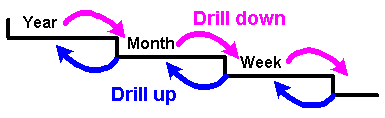
Discoverer's drilling capability enables you to navigate worksheet data quickly and easily. Drilling works as follows:
Note: Drilling up is also known as collapsing data, because detail is removed from a worksheet.
You can drill whenever you see a drill icon on a worksheet. Drill icons are right arrows that appear beside items, or icons for spreadsheets, HTML files, or text files.
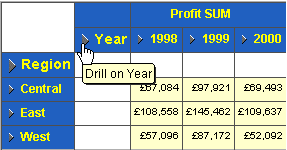
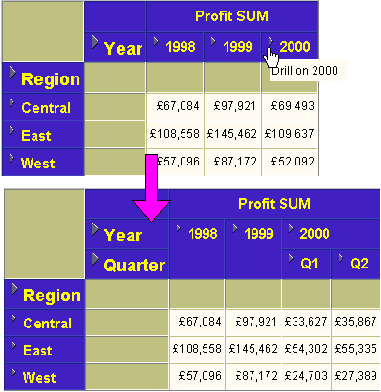
In the example below, a year item has the value '2000'. The right arrow next to the value '2000' indicates that you can drill down into that year, typically to see data for months in that year.

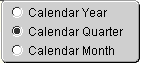
When you click a drill icon, Discoverer displays a list of drill options and indicates the current drill level. In the example below, the current drill level is Calendar Quarter.
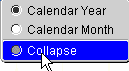
The display options for the detail drill items contain a Collapse option. This option removes the drill detail from the worksheet. In the example below, choosing Collapse removes drill detail.
Note: Alternatively, to collapse drill detail, click the drill icon on the detail and drill up to a higher level.
You can drill out when you see icons for spreadsheets, HTML files, or text files. In the example below,
When you drill into numeric data, the following rules apply:
Note: When you drill into worksheet that contains analytic functions, you might have to adjust the analytic function formula to work correctly with the new worksheet layout (for more information, see "About analytic functions and drilling into and out of data").
When using drilling, you use drill options (also known as a drill path) defined by the Discoverer manager. Drill options define what level of detail you can drill to when drilling up or down in worksheet data.
For example, to enable worksheet users to drill into time-based data, the Discoverer manager might define time-based drill options. In the example below, the drill options enable you to navigate from:
You drill down into worksheet data to see more detail. For example, you might:
To drill down into worksheet data:
A drop down menu is displayed showing drill options for that item and indicates the current drill level.
Note: If there are too many items to display in a drop down list, you choose the drill item from the "Select item to drill dialog".
Discoverer displays more detailed data on the worksheet.
You drill up to see worksheet data in less detail. For example, you might:
To drill up to see worksheet data in less detail:
A drop down menu is displayed showing drill options for that item and indicates the current drill level.
Note: If there are too many items to display in a drop down list, you choose the drill item from the "Select item to drill dialog".
Discoverer removes detail data from the worksheet.
Note: Alternatively, to drill up, click the icon next to detail data and choose Collapse.
You drill out to see worksheet data displayed in another application. For example, you might:
To drill out:
For example, the icon might be a spreadsheet icon, a HTML file icon, or a text file icon (for more information, see "When to drill").
If you choose to open the file, Discoverer starts up the associated application and displays the file.
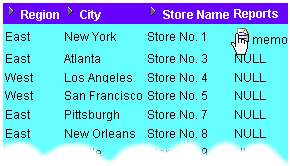
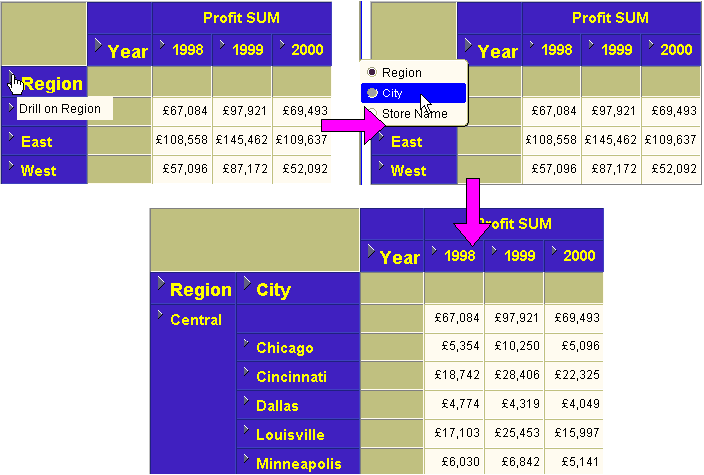
Example 1: In this example, the Region drill icon is selected, then City is selected from the drill options to display city data for each region. If you select the drill icon next to one of the regions (Central, East, or West), you would only drill down on that region.
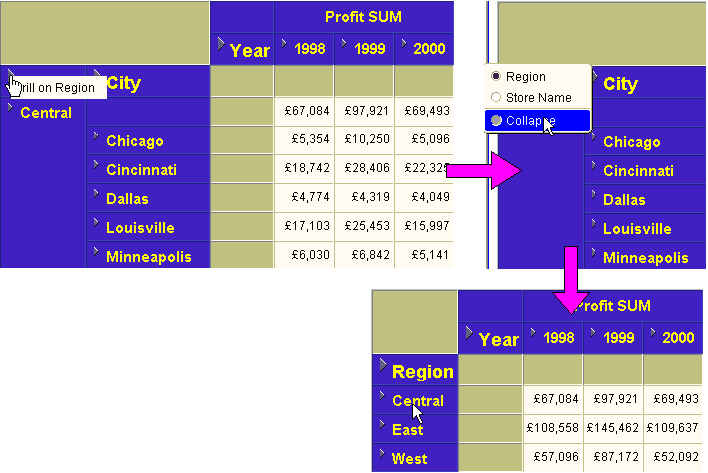
Example 2: In this example, the drill icon next to the value 'Region' is selected to display the drill menu. Then, the Collapse option is selected to remove the city detail data (i.e. Chicago, Cincinnati, Dallas) from the worksheet.
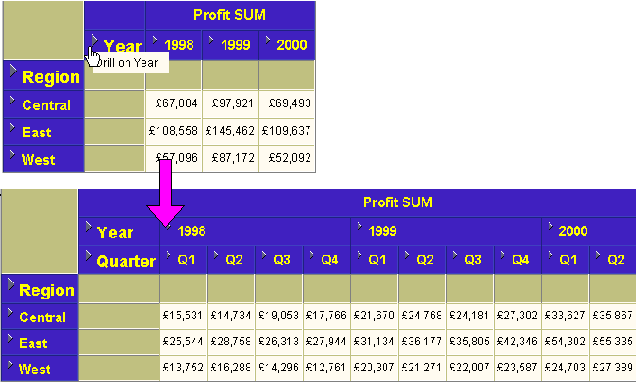
Example 3: You can drill down on the whole worksheet or selectively for particular areas of a worksheet. In this example, drilling on Year down to Quarter displays more detailed data for all Years (1998, 1999, and 2000).
Example 4: In this example, drilling on 2000 down to Quarter displays more detailed data for the year 2000, but not 1998 or 1999.
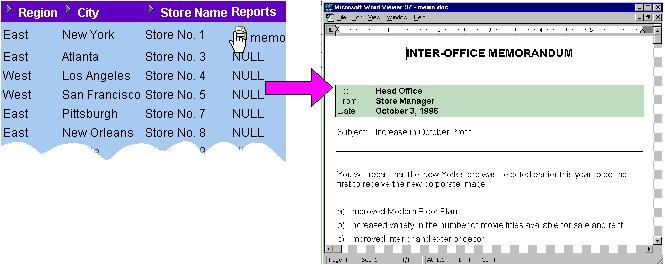
Example 5: In this example, a text report is stored in the database. Clicking the document icon displays the report in an external application, such as Microsoft Word or a text editor.
|
|
 Copyright © 1999, 2003 Oracle Corporation. All Rights Reserved. |
|