Skip Headers

Oracle® Application Server Integration Adapter for Tuxedo Installation and User's Guide
10g (9.0.4)

Part Number B10459-01
Go To Documentation Library
Home
Go To Product List
Solution Area
Go To Table Of Contents
Contents
Go To Index
Index

Go to previous page Go to next page

2
Installing the Oracle Application Server Integration Adapter for Tuxedo

This chapter explains how to install Oracle Connect for Tuxedo and Oracle Studio software from the distribution CD-ROM.


Note:

In addition to the installation procedures described in this chapter, the Tuxedo adapter component of the Oracle Application Server Integration Adapter for Tuxedo software must be installed with Oracle Application Server ProcessConnect. Installing the Tuxedo adapter component is described in the Oracle Application Server ProcessConnect Installation Guide.


This chapter includes the following sections:

Before You Begin

Confirm that you have met all hardware and software requirements. Refer to the following sections:

Determining the UNIX Hardware and Software Requirements

This section describes the following requirements for installing Oracle Connect for Tuxedo:

Hardware Requirements

The following table summarizes the hardware requirements for Oracle Connect for Tuxedo.

Hardware Component Requirements

Processor

An HP Alpha workstation running the required version of HP Tru64 UNIX

Or

An HP-UX workstation running the required version of HP-UX

Or

An IBM AIX workstation running the required version of IBM AIX

Or

A Sun Solaris workstation running the required version of Solaris Operating System (SPARC)

CD-ROM Drive

An internal or external CD-ROM drive

Disk Space

50MB of free disk space

Software Requirements

The system software configuration described in this section is supported by Oracle Corporation as long as the underlying system software products are supported by their respective vendors. Verify the latest support status with your system software vendors.

The following table summarizes the software requirements for Oracle Connect for Tuxedo.

Software Component Requirements

Operating System

HP Tru64 UNIX version 5.1 and up

Or

HP-UX version 11 and up. Note: The operating system must run in its 32 bit mode.

Or

IBM AIX version 4.33 and up. Note: The operating system must run in its 32 bit mode.

Or

Solaris Operating System (SPARC) version 2.8 and up. Note: The operating system must run in its 32 bit mode.

BEA Tuxedo

Version 8.0 and up

Oracle Application Server ProcessConnect

Oracle Application Server 10g (9.0.4)

Oracle Application Server ProcessConnect can reside on any supported platform

Determining the Hardware and Software Requirements for Windows

This section describes the following requirements for installing Oracle Studio or Oracle Connect for Tuxedo when the Tuxedo workstation runs on the Windows platform:

Hardware Requirements

The following table summarizes the hardware requirements for Oracle Studio or Oracle Connect for Tuxedo when the Tuxedo workstation runs on the Windows platform.

.

Hardware Component Requirements

Processor

An Intel or 100% compatible personal computer (PC), based on a Pentium processor

Memory

128 MB of RAM

CD-ROM Drive

An internal or external CD-ROM drive

Disk Space for Oracle Studio

75MB of free disk space

Disk Space for Oracle Connect for Tuxedo

30MB of free disk space

Software Requirements

The system software configuration described in this section is supported by Oracle Corporation as long as the underlying system software products are supported by their respective vendors. Verify the latest support status with your system software vendors.

The following table summarizes the software requirements for Oracle Studio or Oracle Connect for Tuxedo when the Tuxedo workstation runs on the Windows platform.

Software Component Requirements

Operating System

Microsoft Windows NT Server Version 4.0 with service pack 5 or higher, Microsoft Windows 2000 with service pack 2 or higher, or Microsoft Windows XP

Microsoft

Network transport protocol software, TCP/IP, included with Microsoft Windows

Installing Oracle Connect for Tuxedo on a UNIX Platform

This section explains how to install Oracle Connect for Tuxedo software on a UNIX platform from the distribution CD-ROM. This section includes the following:

Preinstallation Instructions

Before starting the installation, make sure that you have the following information available:

Oracle Connect for Tuxedo software is contained in the following operating system dependent files:

These files are provided on a CD-ROM in the directory Oracle_Connect\Tuxedo_Legacy_Adapter.

Installing the Kit

  1. Using FTP, copy the relevant Oracle Connect for Tuxedo software installation file in binary mode from the installation CD to the UNIX machine.

  2. On the UNIX machine, rename the taz file, as in the following example:

    mv ocl904-sunsol.taz ocl904-sunsol.tar.Z
    
    
  3. Decompress the file, as in the following example:

    uncompress ocl904-sunsol.tar.Z
    
    
  4. Run the tar command, as in the following example:

    tar xvf ocl904-sunsol.tar nav_install


    A message similar to the following is returned:

    x nav_install, nnnn bytes, mmmm tape blocks
    
    
  5. Make sure the directory used to run the installation has write privileges.

Installation Instructions

Complete the following steps to install Oracle Connect for Tuxedo:

  1. Run the following command:

    ./nav_install


    Follow the instructions in the Response column in Table 2-1 for each entry in the Screen column.

    Table 2-1  Installation Prompts and Responses
    Screen Response

    ORA01A: Please enter the name of the .tar file containing the Oracle Connect software [./tarfile]:

    Enter the full path of the disk archive file

    ORA02A: The Oracle Connect software will be installed in a fixed directory (named "navroot"), under the root directory of your choice. You need at least 16000 kbytes of free disk space to install the software.

    Please enter the root directory name [/home/username]:

    Enter the root directory for the installation. You must have write permission to this directory

    The default directory is the users home directory

    Note: The root directory cannot be a system root directory or /var or /tmp

    The Oracle Connect software installation directory (NAVROOT): /home/username/navroot

    Please confirm (Yes/No/Quit) [Yes]:

    Confirm the root directory for the installation

    ORA04A: Supply the account name where you want Oracle Connect to run. This is the default that you can change after the installation.

    Please enter the account name [username]:

    The account name used for anonymous access by clients to the server

    The Oracle Connect server will be running as "username"

    Please confirm (Yes/No/Quit) [Yes]:

    Confirm the account name for used for client access

    ORA05A: Please choose the shell which you want the Oracle Connect server to run under:

    1. C-shell (/bin/csh)

    2. Korn-shell (/bin/ksh)

    3. Bourne-shell (/bin/sh)

    Please enter your choice (1/2/3/Quit) [1]:

    Enter the shell used at the site

    The installation creates a startup file based on the shell specified

    ORA06A: Adding and updating Oracle Connect for Tuxedo's configuration on this machine, from a remote Oracle administration console, can only be done by someone defined as an administrator for Oracle Connect on this machine.

    Enter a valid user name for an Oracle Connect administrator [All]:

    In order to manage Oracle Connect on this machine from Oracle Studio, you need to enter a user account of a user who will have administrative authorization, or press Enter to enable any user to administer Oracle Connect on this machine. The administrative rights can be changed from within Oracle Studio after the installation.

The installation completes.

Postinstallation Instructions

The following postinstallation tasks must be done to work with Oracle Connect for Tuxedo:

Setting Up the Oracle Connect for Tuxedo Environment

When Oracle Connect for Tuxedo is installed on a UNIX platform, using FTP, copy the brand.bin file, in binary mode, from the Oracle Connect\Tuxedo Legacy Adapter directory in the installation CD to the Tuxedo workstation machine, to NAVROOT/bin.

NAVROOT is the directory where Oracle Connect for Tuxedo is installed.

Setting the Tuxedo Environment for Oracle Connect for Tuxedo

Check the following Tuxedo environment variables are correctly set:

TUXDIR is set to the Tuxedo root directory.

WSNADDR is set to the Tuxedo workstation network address.

Check the shared library environment variable (LD_LIBRARY_PATH, or SHLIB_PATH under HP-UX) includes the path to the Tuxedo lib directory, as in the following example:

LD_LIBRARY_PATH = /disk2/users/tuxedo/tuxedo8.0/lib

Setting the Oracle Connect for Tuxedo Script

The program that manages Oracle Connect for Tuxedo server processes (nav_server) is accessed by a symbolic link to a file for the C-shell, Bourne and Korn shells. To set up nav_server, perform the following procedure:

  1. In the bin directory, under the directory where Oracle Connect for Tuxedo is installed, delete the existing link to nav_server as follows:

    rm nav_server
    
    
  2. In the bin directory, under the directory where Oracle Connect for Tuxedo is installed, link to the appropriate version of nav_server as follows:

    C-shell: ln -s nav_server.csh nav_server

    Bourne: ln -s nav_server.sh nav_server

    Korn: ln -s nav_server.ksh nav_server


    Note:

    Use a symbolic link as shown instead of renaming files.


Oracle Connect for Tuxedo's nav_login procedure defines the default environment when the adapter runs. If you want site-dependent variables to be included in the environment, create a file called site_nav_login and save this file in the bin directory under the Oracle Connect for Tuxedo root directory. nav_login runs site_nav_login automatically.

nav_login must be invoked to run Oracle Connect for Tuxedo. It can be invoked from the user's login script.


Note:

It is recommended to add the TUXDIR and WSNADDR environment variables to the site_nav_login file, so that they are always available when new server processes are started to handle client requests.


The command line for invoking nav_login varies according to the shell the user is running. The following table shows the different options:

Shell nav_login Command

CSH

source root/bin/nav_login

Bourne

. root/bin/nav_login.sh

Korn

. root/bin/nav_login.sh

where root represents the root directory of the Oracle Connect for Tuxedo installation. After the login procedure is executed, the environment variable NAVROOT points to this root directory.


Note:

For the Bourne and Korn shells, nav_login.sh requires a period and space (as shown in the above table).


Make sure that users have read and execute permission on the Oracle Connect for Tuxedo files (if necessary, use the chmod command to change the permissions).

Starting the Oracle Connect for Tuxedo Daemon

The Oracle Connect for Tuxedo daemon must run on a server for client/server access to Oracle Connect for Tuxedo. To start the daemon at system boot time, add the following command invoking the daemon to the end of the /etc/inittab file.

nv:3:once:navroot/bin/irpcd -l ip:2552 start >/dev/console 2>&1

where the symbol navroot should be replaced with the directory where Oracle Connect for Tuxedo is installed and ip replaced by the ip address of the machine.


Note:

To allow automatic client/server access to Oracle Connect for Tuxedo, start the daemon at system boot time from a super user account. Otherwise, make sure that all users have access to the account that started the daemon.


Installing Oracle Connect for Tuxedo on a Windows Platform

This section explains how to install Oracle Connect for Tuxedo software from the distribution CD-ROM.

Assuming that the CD-ROM drive is D:, the installation file is located in the D:\Oracle_Connect\Tuxedo_Legacy_Adapter directory. Install the software from the CD-ROM by running the installation batch file, OCL904-win32.bat, either using the Run option in the Windows Start menu or through Windows Explorer.


Caution:

If you are installing Oracle Connect for Tuxedo on a Windows XP machine, you cannot specify a logical drive as the Destination folder for the installation.


Installing Oracle Studio


Note:

If you have Oracle Studio already installed because you are also using another legacy adapter, you do not need to reinstall it.

The other legacy adapters are:

  • Oracle Application Server Integration Adapter for CICS

  • Oracle Application Server Integration Adapter for IMS/DB

  • Oracle Application Server Integration Adapter for Tuxedo

  • Oracle Application Server Integration Adapter for VSAM


This section explains how to install Oracle Studio software from the distribution CD-ROM.

Installing Oracle Studio from the CD-ROM

Assuming that the CD-ROM drive is D:, the installation file is located in the D:\Oracle_Studio directory. Install the software from the CD-ROM by running the self-extracting executable installation file, OSL904-win32.exe, either using the Run option in the Windows Start menu or through Windows Explorer.


Caution:

If you are installing Oracle Studio on a Windows XP machine, you cannot specify a logical drive as the Destination folder for the installation.


Configuring Oracle Connect for Tuxedo

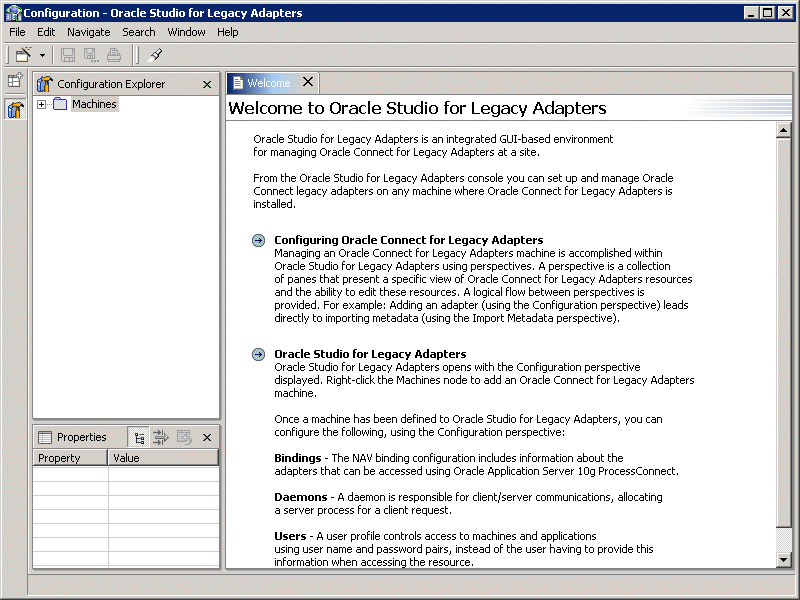
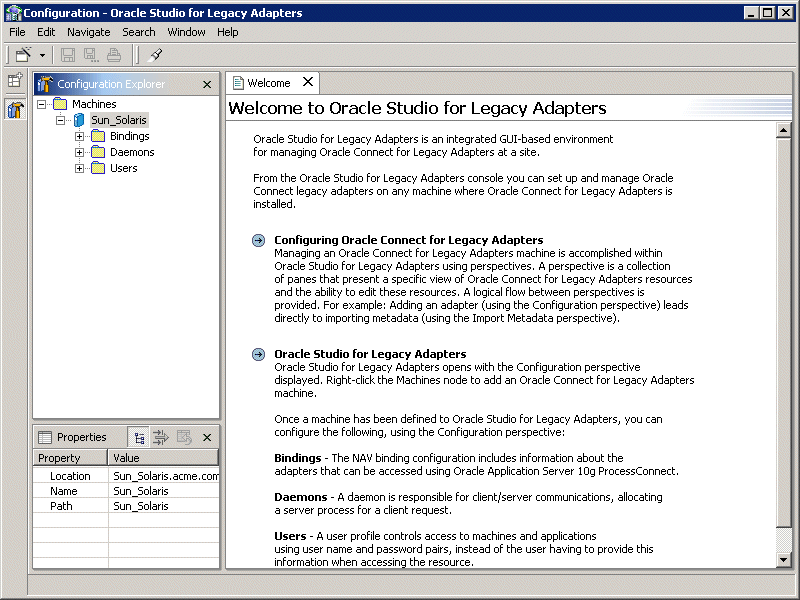
All modeling of Oracle Connect for Tuxedo is performed using Oracle Studio. To use Oracle Studio you first configure it to enable access to the platform where the Tuxedo workstation runs.


Note:

The following tasks assume you have permission to access the platform where the Tuxedo workstation runs and that the Oracle Connect for Tuxedo daemon is running on this machine.

Check with the system administrator to ensure these requirements are fulfilled.


Task: Setting Up the Tuxedo Workstation Machine

  1. On the machine where Oracle Studio is installed, from the Start menu, choose Start > Programs > Oracle > Studio > Studio. Oracle Studio opens, displaying the Configuration perspective.

    Text description of 1.gif follows.

    Text description of the illustration 1.gif

  2. Right-click Machines in the Configuration Explorer and choose Add Machine from the popup menu.

    The Add Machine window appears.

    Text description of 3.gif follows.

    Text description of the illustration 3.gif

  3. In the Add Machine window, uncheck the Default port check box and enter 2552 as the port number.

  4. Enter the name of the machine you want to connect to, or click Browse to choose the machine from the list of machines that is displayed.

  5. Specify the username and password of the user who was specified as the administrator when Oracle Connect for Tuxedo was installed.


    Note:

    Checking the Anonymous connection checkbox enables anyone having access to the machine to be an administrator, if this was defined for the machine.


  6. Click Finish.

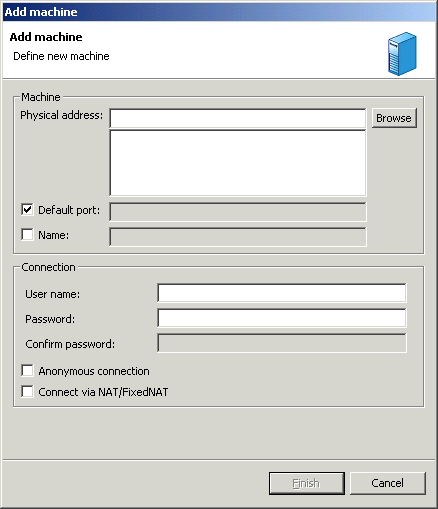
    The machine is displayed in the Configuration Explorer.

    Text description of 4.gif follows.

    Text description of the illustration 4.gif

Securing Access to Oracle Connect for Tuxedo

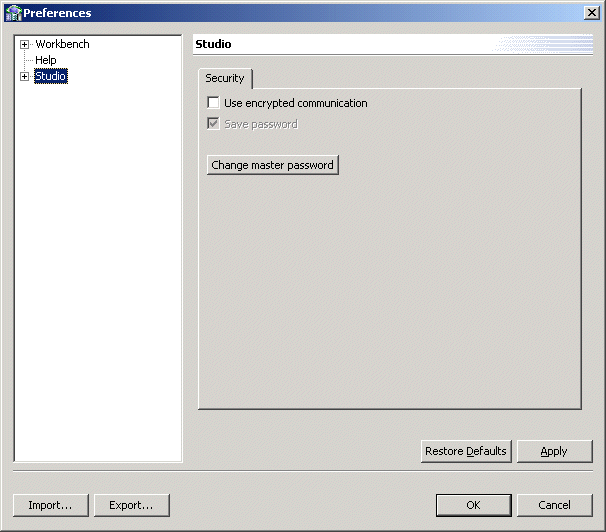
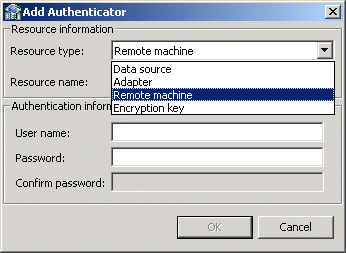
Oracle Studio includes mechanisms to secure access to Oracle Connect for Tuxedo both during modeling and at runtime.

During modeling the following security mechanisms can be applied:

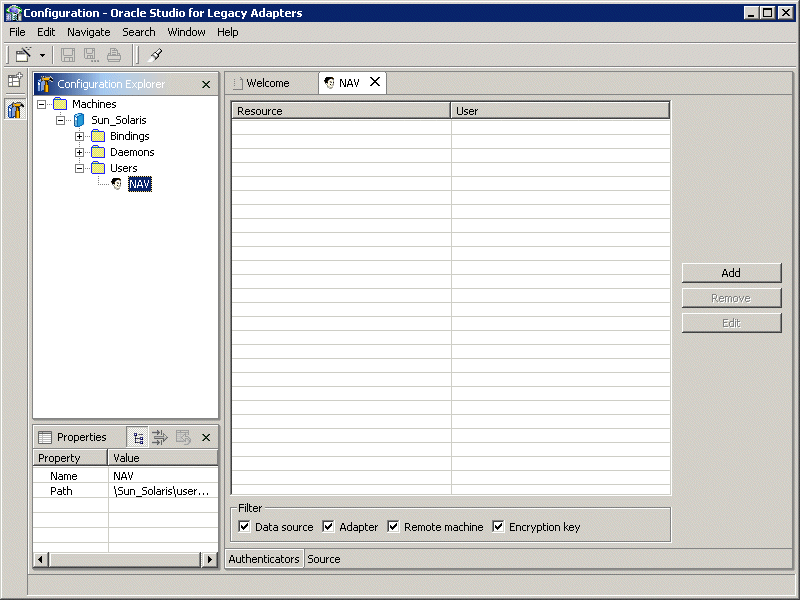
At runtime client access to Oracle Connect for Tuxedo is provided by the user profile:

Setting Password Access to Oracle Studio

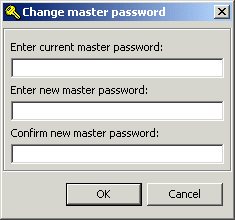
Initially, any operation performed using Oracle Studio does not require a password. You can set a password so that the first operation that involves accessing the server from Oracle Studio requires a password to be entered.

Task: Setting Up a Master Password to Access Oracle Studio

  1. On the machine where Oracle Studio is installed, from the Start menu, choose Start > Programs > Oracle > Studio > Studio. Oracle Studio opens.

  2. Choose Window > Preferences from the menu bar. to open the Preferences window.

  3. Select the Studio node.

    Text description of sec1.gif follows.

    Text description of the illustration sec1.gif


    Note:

    The Save password checkbox is for future use.


  4. Click Change master password to open the Change master password window.

    Text description of sec2.gif follows.

    Text description of the illustration sec2.gif

  5. Leave the Enter current master password field empty and type a new master password.

  6. Confirm the password.

  7. Click OK.

Specifying Users with Administrative Rights

By default, only the user who was specified during the installation as an administrator has the authorization to modify settings on that machine from Oracle Studio. This user can then authorize other users to make changes or to view the definitions for a selected machine. Adding a machine to Oracle Studio is described in "Task: Setting Up the Tuxedo Workstation Machine".


Note:

The default during installation is to enable all users to be administrators.


Task: Setting Administrative Rights to a Machine

  1. On the machine where Oracle Studio is installed, from the Start menu, choose Start > Programs > Oracle > Studio > Studio. Oracle Studio opens, displaying the Configuration perspective.

  2. Right-click the machine in the Configuration Explorer and choose Administration Authorization from the popup menu.

    The Administration Authorization window opens.

    Text description of sec4.gif follows.

    Text description of the illustration sec4.gif

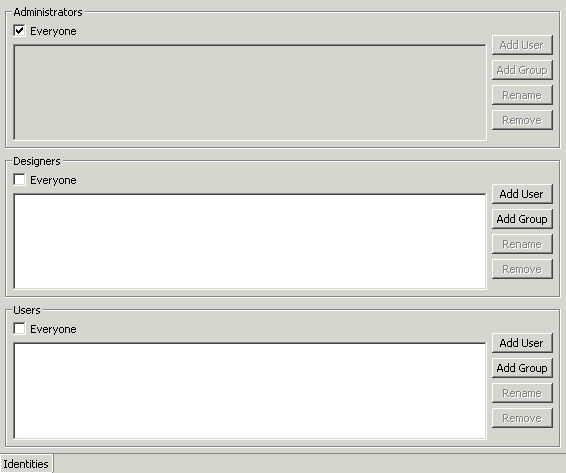
    The window has three sections:

    Administrators - Administrators can view and modify all the definitions in Oracle Studio for the selected machine. On initial entry to Oracle Studio, every user is defined as a system administrator.

    Designers - Designers can view all the definitions for the machine in Oracle Studio and can modify any of the definitions under the Bindings and Users nodes for the selected machine. For example, Oracle Studio database administrator can add new data sources and adapters and can change metadata definitions for a table in a data source.

    Users - Users can view all the definitions for the machine in Oracle Studio for the selected machine. Regular users cannot modify any of the definitions.

  3. Add users or groups of users by clicking Add User or Add Group for the relevant sections.

    The user or group that is added must be recognized as a valid user or group for the machine.

    Once a name has been added to a section, only the user or group who logs on with that user name has the relevant authorization.

Setting Up Runtime User Access to the Tuxedo Workstation Machine

At runtime, client access to Oracle Connect for Tuxedo is provided by the user profile. A user profile contains name and password pairs that are used to access a machine, data source or application at runtime, when anonymous access is not allowed.

  1. In the Configuration Explorer, click the + next to the machine node of the machine for which you want to set the user name and password.

  2. Click the + next to the Users node.

  3. Right-click the NAV user profile and choose Edit User.


    Caution:

    You must not delete the NAV user profile since it also contains Oracle Connect for Tuxedo system settings.


    Text description of 5.gif follows.

    Text description of the illustration 5.gif

  4. In the User editor, click Add to open the Add authenticator window.

  5. Select the Remote Machine resource type.

    Text description of 7.gif follows.

    Text description of the illustration 7.gif

  6. Enter the name of the Tuxedo workstation machine defined in the previous task.

  7. Enter the name and password used to access the machine and confirm the password.

  8. Click OK.


Go to previous page Go to next page
Oracle
Copyright © 2003 Oracle Corporation.

All Rights Reserved.
Go To Documentation Library
Home
Go To Product List
Solution Area
Go To Table Of Contents
Contents
Go To Index
Index