10g (9.0.4)
Part Number B10851-01
Home |
Solution Area |
Contents |
Index |
| Oracle® Application Server Single Sign-On Administrator's Guide 10g (9.0.4) Part Number B10851-01 |
|
This chapter explores nondefault ways to use OracleAS Single Sign-On. It presents scenarios that you may encounter in a production environment. Some of these scenarios are complex and involve deploying and configuring the feature to interact with other OracleAS components.
The chapter contains the following topics:
This section explains how to enable the single sign-on server and associated components for SSL. The single sign-on server is not, by default, configured to use the SSL port of the Oracle HTTP Server. Nor can you configure SSL during installation. Complete the following tasks in the order listed:
The following steps involve configuring the Oracle HTTP Server. Perform them on the single sign-on middle tier. In doing so, keep the following in mind:
To quickly enable SSL on the Oracle HTTP Server, do the following:
start-mode to ssl-enabled parameter. This parameter appears in boldface in the xml tag immediately following. The file is located at $ORACLE_HOME/opmn/conf.
 <ias-component id="HTTP_Server">
    <process-type id="HTTP_Server" module-id="OHS">
        <module-data>
           <category id="start-parameters">
               <data id="start-mode" value="ssl-enabled"/>
           </category>
        </module-data>
    <process-set id="HTTP_Server" numprocs="1"/>
    </process-type>
</ias-component>
Reload the modified opmn configuration file:
$ORACLE_HOME/opmn/bin/opmnctl reload
Add the following lines to the SSL Virtual Hosts section.
<VirtualHost ssl_host:port>
  .
  .
  .
  RewriteEngine on
  RewriteOptions inherit
</VirtualHost>
Save and close the file.
To learn more about configuring the Oracle HTTP Server for SSL, see Oracle HTTP Server Administrator's Guide.
Change all references of http in single sign-on URLs to https within the identity management infrastructure database. The ssocfg script is provided for this purpose. Be sure to enter the command on the computer where the single sign-on middle tier is located, using the following syntax.
$ORACLE_HOME/sso/bin/ssocfg.shprotocolhostport
%ORACLE_HOME%\sso\bin\ssocfg.bat protocol host port
In this case, protocol is https. (To change back to HTTP, use http.) host is the host name, or server name, of the Oracle HTTP listener for the single sign-on server.
Here is an example:
ssocfg.sh https login.acme.com 4443
To determine the correct port number, examine the ssl.conf file at $ORACLE_HOME/Apache/Apache/conf. Port 4443 is the port number that the OracleAS installer assigns during installation.
If you run ssocfg successfully, the script returns a status 0.
Now that you have modified single sign-on URLs for SSL, apply directives that protect them. This step, too, is performed on the computer where the single sign-on middle tier is located. Note, however, that these directives must be used with specific URLs--the login and change password URLs, for instance--not with all single sign-on URLs.
Directives are provided both for Java and PL/SQL authentication links. The PL/SQL directives for login and change password modules are provided for backward compatibility.
To make Java login and change password pages accessible only over SSL, edit the sso_apache.conf file, located at $ORACLE_HOME/sso/conf.
Add the following directives to the end of the file:
<IfDefine SSL>
  <location "/sso/auth">
    SSLRequireSSL
  </location>

  <location "/sso/ChangePwdServlet">
    SSLRequireSSL
  </location>
</IfDefine>
To enable SSL for PL/SQL links, edit the dads.conf file, located at $ORACLE_HOME/Apache/modplsql/conf. Add the directives that follow to the end of the file.
Use these directives to make login, change password, and external application URLs accessible only over SSL:
<IfDefine SSL>

  #Login URL for single sign-on server and external applications
  <Location  "/pls/orasso/*[Ll][Oo][Gg][Ii][Nn]">
    SSLRequireSSL
  </Location>

  #Change password page
   <Location  "/pls/orasso/*[Pp][Aa][Ss][Ss][Ww][Oo][Rr][Dd]">
     SSLRequireSSL
   </Location>
   #External application login URL
    <Location  "/pls/orasso/*[Ff][Aa][Pp][Pp][Uu][Ss][Ee][Rr]">
      SSLRequireSSL
    </Location>

</IfDefine>
When the single sign-on server is enabled for SSL, you must specify that HTTP access is limited to those hosts that must access the server using this protocol. This is especially true in the case of those computers hosting the OracleAS installer and OracleAS Portal.
Add the following directive for backward compatibility. This directive enables the installer to access the single sign-on server over HTTP. Substitute your domain for your_domain_name.
<Location "/pls/orasso/*[Ss][Ss][Oo][Pp][Ii][Nn][Gg]">
  Order deny,allow
  Deny from all
  Allow from your_domain_name
</Location>
OracleAS Portal must use HTTP to access the URL that provides a list of external applications. The following directive enables such access. Again, substitute your domain for your_domain_name.
<Location "/pls/orasso/*[Aa][Pp][Pp][Ss]_[Ll][Ii][Ss][Tt]">
  Order deny,allow
  Deny from all
  Allow from your_domain_name
</Location>
See "Stopping and Starting the Single Sign-On Middle Tier" in Chapter 2.
Once you have enabled the single sign-on server for SSL, reregister mod_osso on the single sign-on middle tier and on the application middle tiers. This step configures mod_osso to use the effective single sign-on URL. See "Registering mod_osso" in Chapter 4 for instructions.
Configuring an SSL link between the single sign-on server and Oracle Internet Directory involves running the ssooconf.sql script on the computer where the single sign-on database is located. You can find the script at $ORACLE_HOME/sso/admin/plsql/sso.
To configure an SSL link:
orasso. To obtain the password, see Appendix B.
SQL> @ssooconf.sql
The following prompt appears:
Enter value for new_oid_host:
This prompt appears:
Enter value for new_oid_port:
Enter value for new_ldapusessl:
Y and then press Return or Enter.
A message appears, indicating that the value new_ldapusessl has been updated.
After running the script, restart the single sign-on middle tier. See "Stopping and Starting the Single Sign-On Middle Tier" in Chapter 2.
This section describes different ways that the single sign-on server may be deployed to improve availability. The section covers the following topics:
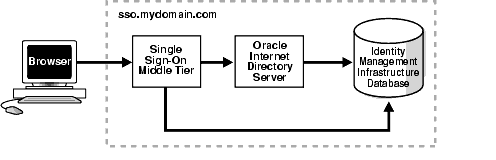
The simplest and quickest way to deploy OracleAS Single Sign-On is to install OracleAS infrastructure components on the same computer. To do this, you choose the installation type "OracleAS Infrastructure 9.0.4.0.0" and the installation option "Identity Management and OracleAS Metadata Repository." When presented with the component list for this installation type, accept the default selected components.
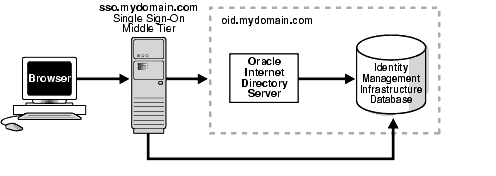
Alternatively, you can install the single sign-on middle tier on a separate computer, choosing in succession "OracleAS Infrastructure 9.0.4.0.0," "Identity Management," and finally "Single Sign-On." This is the simplest distributed configuration.
Figure 9-1 shows the first type of installation. Figure 9-2 shows the second. The first is typical of a testing, staging, or development environment. The second is appropriate when you want to position a firewall between the single sign-on computer and the Oracle Internet Directory computer. Placing these servers on separate computers has the added benefit that it improves performance.
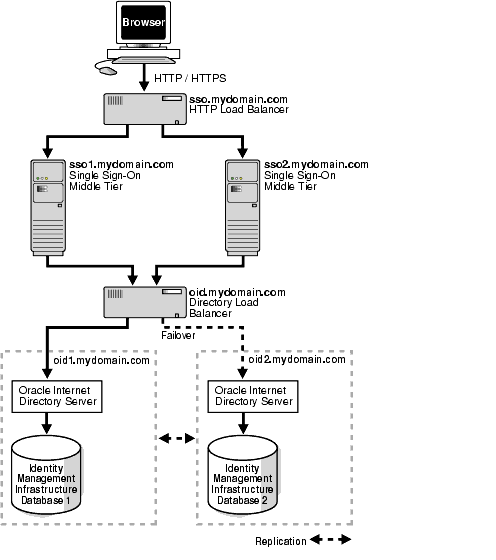
The simplest high availability scenario involves failover within the single sign-on instance itself, at the middle tier. Adding multiple middle tiers increases scalability and therefore makes the single sign-on server more available.
In this configuration, a single HTTP load balancer is placed in front of two or more Oracle HTTP servers. At the backend is one directory server and one identity management infrastructure database. The purpose of the load balancer is to publish a single address to single sign-on partner applications while providing a farm of single sign-on middle tiers that actually service the application requests. The HTTP load balancer can detect when one of these Oracle HTTP Server instances has failed and can then fail over requests to another instance.
The usage scenario presented here assumes the following hypothetical configurations:
Figure 9-3 shows two single sign-on middle tiers configured to use a single instance of Oracle Internet Directory.
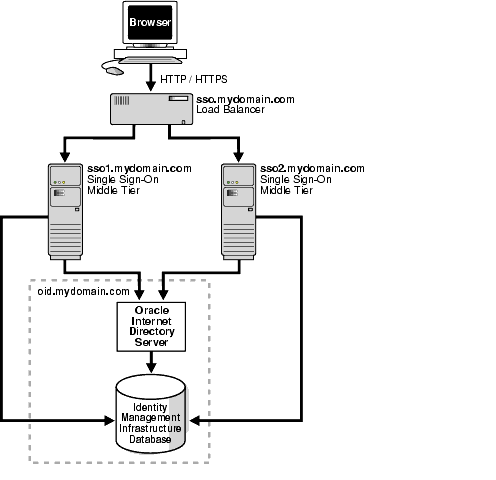
Setting up the single sign-on system presented in Figure 9-3 involves the following tasks:
When a load balancer is placed between the user and the Oracle HTTP Server, the effective URL of the single sign-on server changes. The Oracle HTTP configuration httpd.conf file on both single sign-on middle tiers must be modified to reflect this change. This file can be found at $ORACLE_HOME/Apache/Apache/conf.
KeepAlive off
ServerName sso.mydomain.com
Port 80
This step configures the Oracle HTTP servers at the single sign-on middle tiers to listen at the effective URL, which, in the scenario presented, is sso.mydomain.com.
LoadModule certheaders_module libexec/mod_certheaders.so
AddCertHeader HTTPS
If you are using a hardware load balancer, enter the following line:
SimulateHttps on
$ORACLE_HOME/dcm/bin/dcmctl updateConfig -v -d
The HTTP load balancer used can be hardware such as BigIP, Alteon, or Local Director or software such as OracleAS Web Cache.
If you are using a hardware load balancer, configure one pool of real servers with the addresses 138.1.34.172 and 138.1.34.173. Configure one virtual server with the address 138.1.34.234. This virtual server is the external interface of the load balancer. For instructions, consult the documentation provided by your load balancer vendor.
If you are using OracleAS Web Cache to load balance connection requests, see the following links:
Run the ssocfg script on one of the single sign-on middle tiers. This script configures the single sign-on server to accept authentication requests from the externally published address of the single sign-on server. Using the example provided, the script would be executed in the following way.
$ORACLE_HOME/sso/bin/ssocfg.sh http sso.mydomain.com 80
%ORACLE_HOME%\sso\bin\ssocfg.bat http sso.mydomain.com 80
Note that the command example provides the listener protocol, host name, and port number of the load balancer as arguments. Recall that the load balancer address is the externally published address of the single sign-on server. If the load balancer is configured to use SSL, replace non-SSL port 80 with SSL port 4443 and http with https.
On both middle tier computers, reregister mod_osso as the partner application sso.mydomain.com.
To reregister mod_osso on sso1.mydomain.com:
ORACLE_HOME to point to the Oracle home for sso1.mydomain.com. Include $ORACLE_HOME/jdk/bin in the PATH variable.
$ORACLE_HOME/jdk/bin/java -jar$ORACLE_HOME/sso/lib/ossoreg.jar -oracle_home_path orcl_home_path -site_name site_name -config_mod_osso TRUE -mod_osso_url mod_osso_url -u userid [-virtualhostvirtual_host_name][-update_mode CREATE | DELETE | MODIFY] [-config_fileconfig_file_path] [-admin_id adminid] [-admin_info admin_info]
For a description of command parameters, see "Registering mod_osso" in Chapter 4.
To reregister mod_osso on sso2.mydomain.com:
http://sso.mydomain.com/pls/orasso
$ORACLE_HOME/Apache/Apache/bin/ssotransfer $ORACLE_
HOME/Apache/Apache/conf/osso/osso.conf
|
Note: The ssotransfer command should not be used to synchronize the Distributed Cluster Management repository with the mod_osso configuration file created for a virtual host. To learn how to register mod_osso for a virtual host, see "Configuring mod_osso with Virtual Hosts" in Chapter 4. |
$ORACLE_HOME/bin/oidadmin
cn=orcladmin.
orcldasurlbase attribute:
cn=OperationURLs,cn=DAS,cn=Products,cn=OracleContext,Entry Management
http://sso.mydomain.com/
Make sure that you include the backslash after the host name.
http://sso.mydomain.com/oiddas
http://sso.mydomain.com/pls/orasso
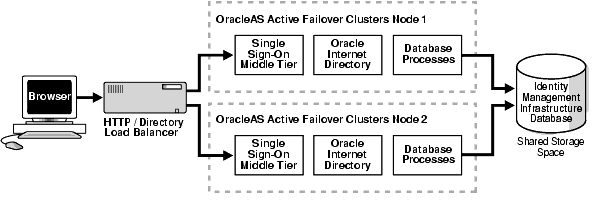
In OracleAS release 9.0.4, the OracleAS infrastructure may be installed on active failover clusters. When this option is selected, all infrastructure components--single sign-on, Oracle Internet Directory, and the database--are installed on one node. In Figure 9-4, a load balancer sits in front of a two-node active cluster, providing scalability, high availability, and failover for all infrastructure components.
Postinstallation note: if you modify policy.properties, web.xml, or any other single sign-on configuration file on one active cluster node, you must manually copy the files to the other active failover cluster nodes. Alternatively, you can make the files soft links to a shared disk drive.
To learn how to configure and use OracleAS Active Failover Clusters, see Chapter 3, "Infrastructure High Availability," in Oracle Application Server 10g High Availability Guide.
In local area networks that experience high traffic, it might be beneficial to supplement multiple single sign-on middle tiers with replicated instances of Oracle Internet Directory. This arrangement, depicted in Figure 9-5, provides failover not only at the middle tier, but also at the directory server.
The usage scenario that follows assumes the following hypothetical configurations:
The following steps combine instructions presented in directory replication documentation and "Multiple Single Sign-On Middle Tiers, One Oracle Internet Directory". The latter is a deployment scenario that was presented earlier in this chapter.
$ORACLE_HOME/sso/bin/ssocfg.sh http sso.mydomain.com 80
%ORACLE_HOME%\sso\bin\ssocfg.bat http sso.mydomain.com 80
Note that the command example provides the listener protocol, host name, and port number of the load balancer as arguments. Recall that the load balancer address is the effective URL of the single sign-on server. If the load balancer is configured to use SSL, replace non-SSL port 80 with SSL port 4443 and http with https.
Server availability is critical for an enterprise whose operations are widely distributed geographically. If the enterprise uses a single server to authenticate remote users over a wide area network, the authentication time can be lengthy. To shorten network roundtrips and speed access to applications, the enterprise can implement multiple, geographically distributed instances of the single sign-on server. This arrangement enables users to travel to remote locations and be authenticated by the nearest server, regardless of where applications are located.
In this scenario, single sign-on database tables are replicated over either a local area network or a wide area network. The DNS server located at each single sign-on middle tier site must be configured to resolve the effective address of the single sign-on server to the single sign-on instance that is nearest to the user.
The usage scenario presented here assumes the following hypothetical configurations:
Figure 9-6 depicts what this geographically distributed system looks like once it is deployed.
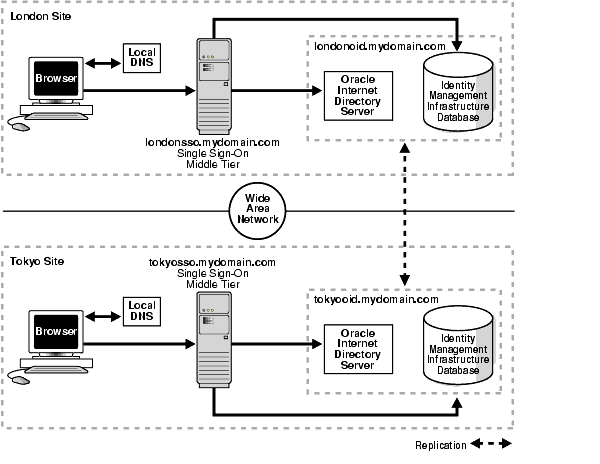
The geographically dispersed single sign-on system shown in Figure 9-6 incorporates steps presented in "Multiple Single Sign-On Middle Tiers, One Oracle Internet Directory" and "Configuring the Identity Management Database for Replication".
Note that some advanced DNS server products may be able to route users to the nearest server based on the geographic location.
OracleAS supports cold failover clusters, disaster recovery, and backup and recovery for single sign-on as well as for other OracleAS components.
A cold failover cluster is a group of loosely coupled computers that together provide a single view of network services. Cluster software enables the logical IP address and processes of the primary node to be moved to a secondary node in the event that the primary fails. The node running the infrastructure is "hot." The node waiting to take over is "cold." Hence the term cold failover. To learn more about cold failover clusters, see the chapter "Infrastructure High Availability," in Oracle Application Server 10g High Availability Guide.
A disaster recovery deployment consists of two identically configured sites--one primary (production), the other secondary (standby). Both sites may be dispersed geographically and connected by a wide area network. When the primary site becomes unavailable due to a disaster, the secondary site can become operational within a reasonable amount of time. Client requests are always routed to the site playing the production role. After failover occurs, client requests are routed to the secondary site, which then assumes the production role. Both sites have identical middle tier servers, and these servers are also identical between the two sites. To learn more about disaster recovery, see the chapter devoted to this topic in Oracle Application Server 10g High Availability Guide.
Backup and recovery are terms used to describe strategies and procedures for preventing data loss and reconstructing lost data. To learn more about backup and recovery, see the chapter devoted to this topic in Oracle Application Server 10g Administrator's Guide.
This section describes how to replicate the identity management database between two or more instances. Note that OracleAS Single Sign-On and Oracle Internet Directory share the scripts and procedures that replicate database tables. Before continuing with this section, become familiar with the following material:
The section covers the following topics:
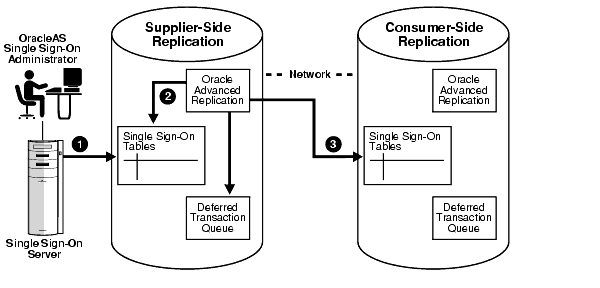
The identity management infrastructure uses Oracle9i Advanced Replication to replicate tables between two databases. This feature propagates data changes between databases asynchronously. In other words, suppliers write changes to single sign-on tables and periodically send batched changes to consumers, servers that replicate this data. All of the servers in a multiple, geographically distributed system can either propagate or receive data. This arrangement is called multimaster replication. Figure 9-7 illustrates the process.
Before proceeding with this section, become familiar with multimaster replication concepts in Oracle Internet Directory Administrator's Guide.
You might also want to familiarize yourself with the deployment scenario presented in "Multiple, Geographically Distributed Single Sign-On Instances". This section describes the circumstances under which single sign-on replication occurs.
The sequence for enabling the identity management database for replication is as follows:
On the MDS, run the ssoReplSetup.jar tool to synchronize single sign-on schema passwords between the MDS database and the RMS database. This step must be repeated for each RMS. Table 9-1 defines the tool parameters.
To run the script:
$ORACLE_HOME/sso/lib.
$ORACLE_HOME/jdk/bin/java -jar ssoReplSetup.jarmds_oid_hostmds_oid_ portmds_oid_adminmds_oid_passwordrms_oid_hostrms_oid_portrms_oid_ admin rms_oid_passwordrms_db_sys_password
To run ssooconf.sql, follow the instructions in "Changing Single Sign-On Server Settings for Directory Access" in Chapter 3.
If you want to add a node to an existing single sign-on replication group and have not replicated Oracle Internet Directory to this node, follow the instructions in Oracle Internet Directory Administrator's Guide. To configure this new node for single sign-on, install the single sign-on middle tier and repeat steps 2 and 3 in "Configuring the Identity Management Database for Replication".
To delete a node from the single sign-on replication group, follow the instructions in Oracle Internet Directory Administrator's Guide.
OracleAS Single Sign-On can have reverse proxies deployed in front of it. Proxies fulfill various functions:
Whatever proxy you use in front of the single sign-on server, the configurations that follow apply. They assume that you have already installed OracleAS Single Sign-On and the proxy server. To install the proxy, use instructions provided by your proxy vendor.
In network configurations where a range of distinct proxy addresses "front" the single sign-on server, the single sign-on IP check feature must be turned off. IP check is turned off by default, but to verify this, go to the Edit SSO Server page. To learn how to access this page, see "Accessing the Administration Pages" in Chapter 2. Once into the Edit SSO Server page, make sure that the box Verify IP addresses for requests made to the SSO Server is deselected.
To enable a proxy server, do the following:
$ORACLE_HOME/sso/bin/ssocfg.sh httpproxy_server_nameproxy_port
%ORACLE_HOME%\sso\bin\ssocfg.bat httpproxy_server_nameproxy_port
If the server is configured for SSL, substitute https for http.
ServerName from the name of the actual server to the name of the proxy:
KeepAlive off
ServerName proxy_host_name
Port proxy_port
Note that if you are using SSL, the port must be an SSL port such as 4443.
You can add these steps at the end of httpd.conf. Where they appear in the file is unimportant:
http://proxy_host_name:proxy_port/pls/orasso/
This URL takes you to the single sign-on home page. If you are able to log in, you have configured the proxy correctly.
The single sign-on database uses the user nickname to store and reference user data for external applications. In the event that the nickname attribute value changes in Oracle Internet Directory, the user is forced to reenter her credentials when she logs in with a new user ID. For her convenience, changes to her user name can be automatically synchronized between the directory and the single sign-on database. This synchronization mechanism, offered through the Directory Integration Platform, also deletes the external application data from the single sign-on database when the user's entry is deleted from the directory.
To synchronize nickname changes between the directory and the single sign-on database, follow these steps:
sqlplus orasso/password
See Appendix B to learn how to obtain the password.
SQL> @ssodip.sql
SQL> @ssodip.pks
SQL> @ssodip.pkb
- $ORACLE_HOME/bin/oidprovtool operation=create ldap_host=oid_hostldap_ port=oid_portldap_user_dn=cn=orcladmin ldap_user_password=orcladmin_passwordschedule=synchronization_interval_in_secondsorganization_dn=realm_DNapplication_dn=orclApplicationCommonName=ORASSO_SSOSERVER,cn=SSO, cn=Products,cn=OracleContext interface_name=LDAP_NTFY interface_type=PLSQL interface_connect_info=sso_database_host:sso_database_port:sso_database_ SID:orasso:orasso_schema_passwordevent_subscription=USER:user_search_base_for_realm:ADDnicknameevent_subscription=USER:user_search_base_for_realm:MODIFYnicknameevent_subscription=USER:user_search_base_for_realm:DELETE
If changes to the realm occur, reregister the profile. The nickname attribute or user search base might, for example, change.
For help using oidprovtool, see Oracle Internet Directory Administrator's Guide.
First create an LDIF file:
dn: orclApplicationCommonName=ORASSO_SSOSERVER,cn=SSO,cn=Products,
cn=OracleContext
changetype: modify
add: orclaci
orclaci: access to entry by group="cn=odisgroup,cn=odi,cn=oracle internet
directory" (proxy)
cn=orcladmin.
Providing that these steps have been completed, external application information is made available to the user as soon as synchronization occurs and the user logs in with her new user ID.
|
|
 Copyright © 1996, 2003 Oracle Corporation. All Rights Reserved. |
|