10g (9.0.4)
Part Number B10356-01
Home |
Solution Area |
Contents |
Index |
| Oracle® Application Server Portal Configuration Guide 10g (9.0.4) Part Number B10356-01 |
|
OracleAS Portal provides a set of export/import utilities that enable you to move content between portal installations. This chapter provides a summary of recommendations and best practices developed for export/import functionality as provided in OracleAS Portal version 10g (9.0.4). This chapter contains the following sections:
The export and import process consists of the following steps:
OracleAS Portal supports the ability to copy or update page groups and portal content between your source and target destination portal instances. This section introduces some of the most common uses.
This case illustrates the steps involved in copying or updating portal page groups and portlets between a development instance and a production instance of OracleAS Portal.
Scenario 1. Exporting your pages and content to a target portal system. The first export to your target system should migrate the entire page group. The subsequent steps provide an overview of the process:
Scenario 2. Updating content on your target instance. OracleAS Portal supports the updating of item, region-level content on your target system ONLY under the following circumstance:
Refer to Section 10.8, "What Are the Recommended Best Practices?", for a detailed overview of the recommended practices.
This case illustrates the process of deploying the same set of OracleAS Portal objects across multiple portal instances. Oracle EXP and IMP utilities can be useful when deploying identical content across multiple OracleAS Portal instances. In this case, the OracleAS Portal objects (portlets, page groups, and so on), can be created in one instance, and propagated to multiple instances using the Oracle EXP and IMP utilities. See Section 10.8.8, "Migrating Your Portal Across Databases" for details.
Before proceeding with the export/import process, make sure you have the following information:
Before exporting and importing, ensure that your system meets the minimum system requirements, as described in this section.
The choice of whether to use the database Oracle home or the middle-tier Oracle home depends on the version of the database used for the source and target portal installations. The 9.0.4 middle-tier uses a 9.0.1.4 Oracle home.
Based on the recommendations given earlier, the following conditions apply when a 9.0.4 portal and 9.0.4 middle-tier is involved:
For example, to create an export file for an import into a higher release database, use a version of the Oracle EXP utility that is equal to the source database. To create an export file for an import into a lower release database, use a version of the Oracle EXP utility that is equal to the version of the target database.
The Oracle IMP utility automatically converts the data to the character sets of the import server.
Some 8-bit characters can be lost (that is, converted to 7-bit equivalents) when you import an 8-bit character set export file. This occurs if the client system has a native 7-bit character set or if the NLS_LANG operating system environment variable is set to a 7-bit character set. Most often, you notice that accented characters lose their accent mark.
Both the EXP and IMP utilities provide indications of any required character set conversion before exporting or importing the data.
job_queue_processes database parameter is set appropriately.
To check the value of the job_queue_processes parameter, perform the following query from SQL*Plus:
%select name, value from v$parameter where name='job_queue_processes'
The value for job_queue_processes should be at least 2 to allow the execution of background jobs.
An alternative way of checking the job_queue_processes parameter is to examine the init.ora file in your database's ORACLE_HOME.
This section describes the privileges required to successfully export and import your content.
To allow for secured control over the export of shared objects (objects in the Shared page group), there are now two privileges defined at the infrastructure level.
Table 10-1 provides a description of export user privileges.
| User Privileges | Export non - shared objects? | Export shared objects? |
|---|---|---|
|
Any Transport Set - Manage |
Yes |
Yes |
|
Any Transport Set - Execute |
Yes |
No |
|
Any Transport Set - None |
No |
No |
In addition to the Any Transport Set - Manage privilege, you must also have Manage privilege on objects of a given type to successfully import your content.
For example, a page group containing Web providers require you to have Manage All privileges on All Providers and All Page Groups in order to import that page group. Table 10-2 provides a description of each object type and the required privilege level.
This section describes the export process and the steps required to successfully move content from the source portal system, including:
Once the system requirements are verified, your goal is to create a transport set. The subsequent diagram illustrates the process.
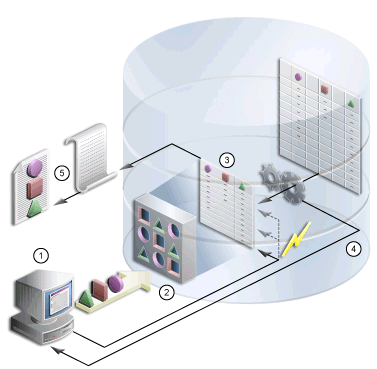
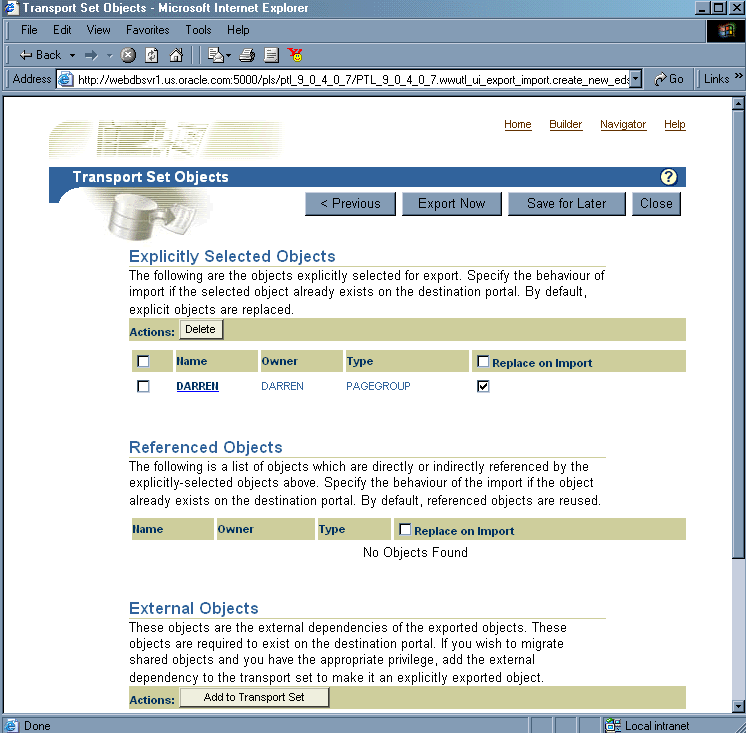
The Export/Import Dependency Manager ensures that all the dependencies of objects in the transport set are correctly extracted. Specifically, the Dependency Manager classifies each object as explicitly selected, referenced, external or child, based on how the object is related to the objects being explicitly exported. The information is displayed in the manifest, see Figure 10-2.
The manifest provides a granular level of control over the import mode. The manifest is simply the list of objects in a transport set. There are two modes available during import:
The following table describes the object classification and the default modes.
| Object Classification | Default Import Mode |
|---|---|
|
Explicitly Selected Objects |
Replace on Import |
|
Referenced Objects |
Reuse |
|
Child Objects |
Replace on Import |
|
External Objects |
Reuse |
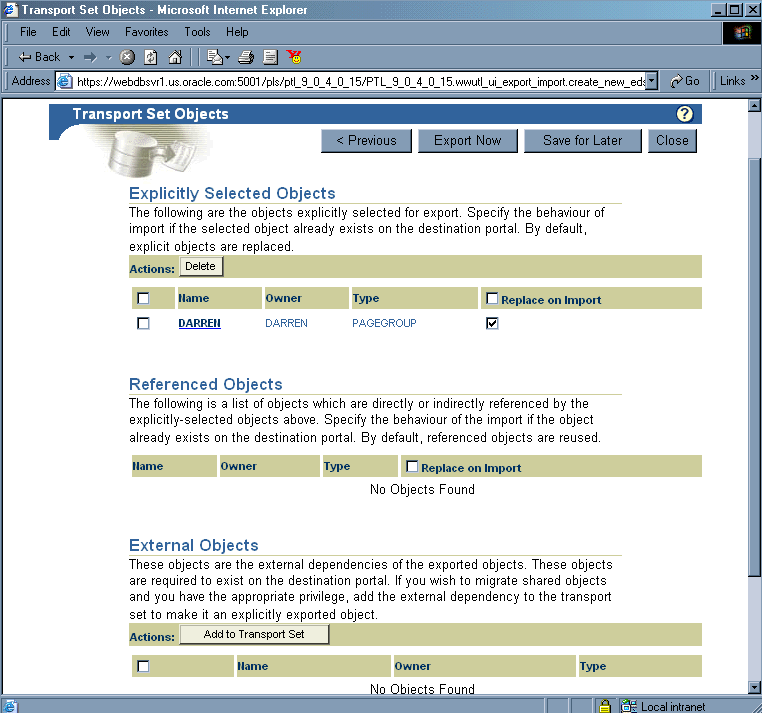
Text description of the illustration cg_imex_exp_dep_mgr.gif
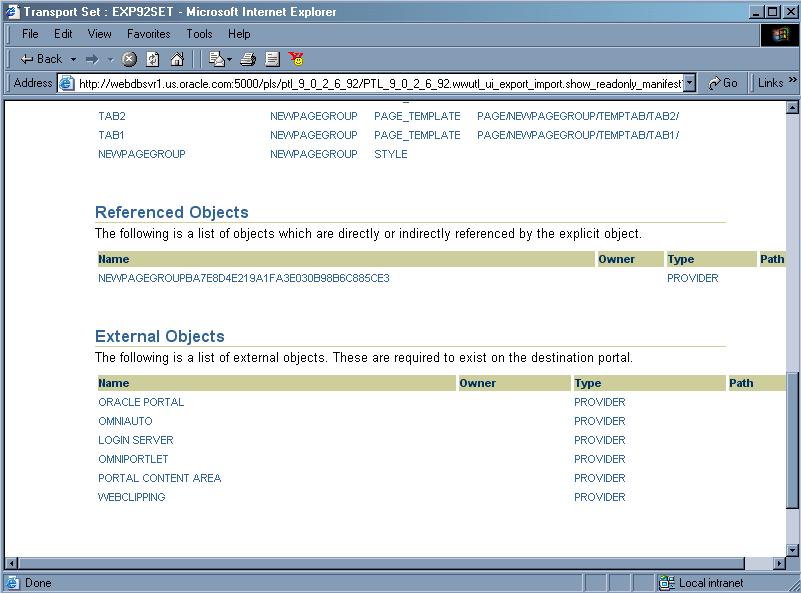
Clicking the name of an object, for example, an explicitly selected object, displays a detailed read-only screen of child, referenced and external objects, as shown in Figure 10-3.
Review the Section 10.7, "How Do Objects Behave After Migration?" before migrating your portal content from a source to a target instance.
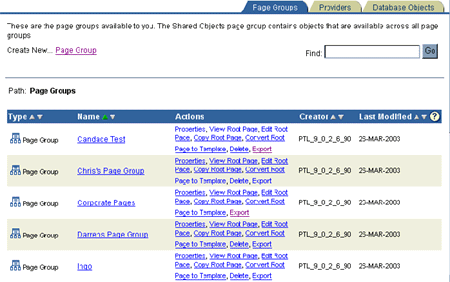
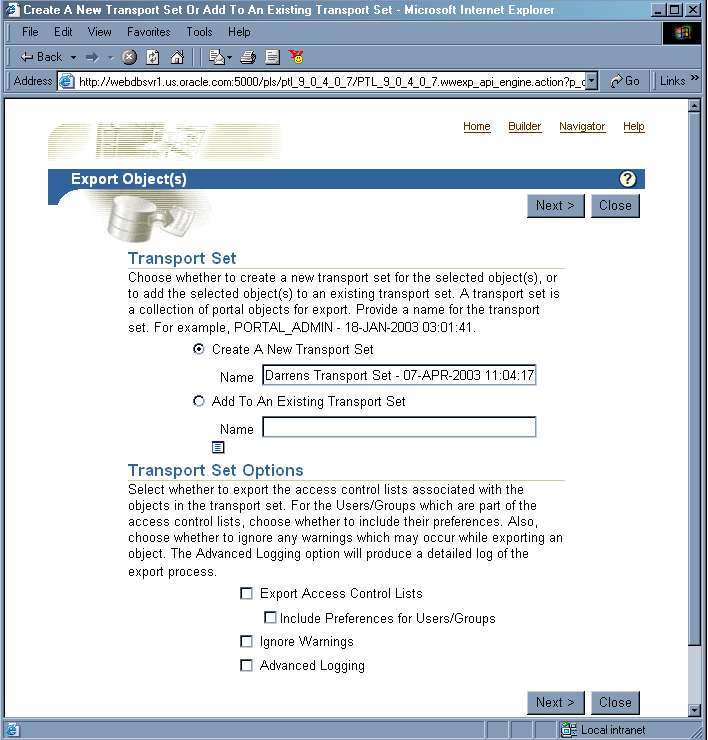
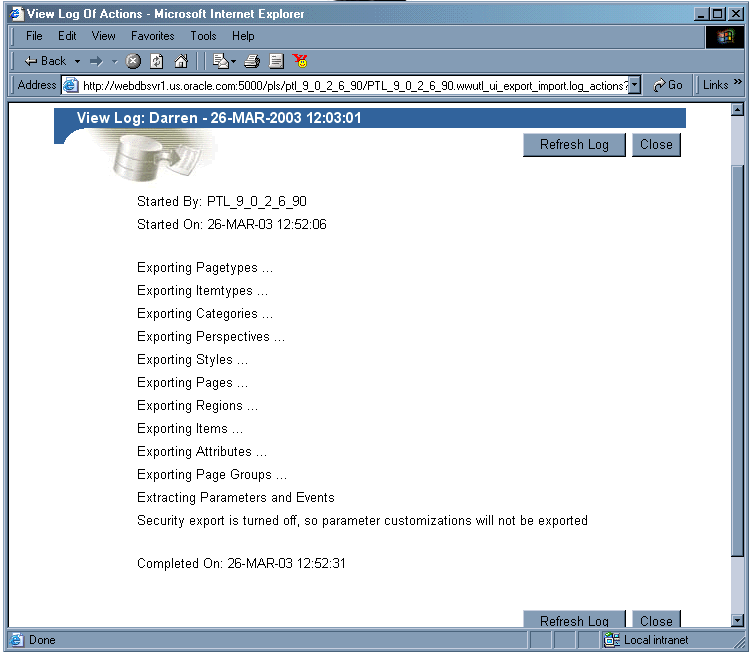
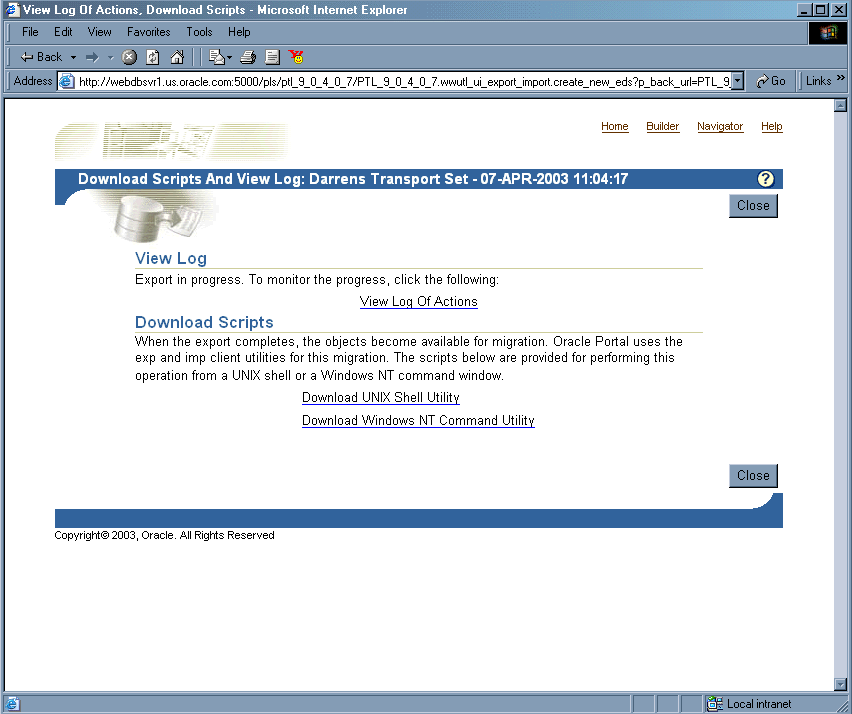
To create a transport set for export:
Text description of the illustration cg_imex_transmanifest.gif
Text description of the illustration cg_imex_trans_log_file.gif
Text description of the illustration cg_imex_transscripts.gif
For Netscape users:
MyScript.csh.
For Internet Explorer users:
MyScript.csh.
The next steps in the export process are to create a transport set dump file using the script you just created in the last section, and then transfer your export data to your target system.
To create a dump file:
MyScript.csh.
%MyScript.csh
Usage: MyScript.csh <-mode export_or_import> <-s portal_schema>
<-p portal_password> <-pu portal_username> <-pp portal_userpassword>
<-company company_name> <-c connect_string> <-d dump_file_name(s)>
<-automatic_merge>
The following table provides a description of the parameters you can use in this process.
To transfer your export data:
%MyScript.csh -mode export
This prompts you for information such as schema name (source), password, dump file name(s), and so on. It also creates a dump file upon completion.
You can use the opeasst.csh (Oracle Portal Export Assistant) script to export large page groups, which may time out in the browser while calculating the page group dependencies. These timeout issues are due to the Dependency Manager and the pre-check routines that are run as foreground processes. The actual data extraction and the data merge are performed in the background.
The script can be found in the /portal/admin/plsql/wwu directory. An example of the script follows:
%opeasst.csh
Usage: opeasst.csh <-s portal_schema> <-p portal_password> <-c connect_string>
<-ts transportset_name> <-pgrps pgrp_names> <[-export_acls [-include_prefs]]>
<[-ignore_warnings]> <[-advanced_logging]>
The following table provides a description of the parameters used in this process.
Perform the export from the command line, then:
%MyScript.csh -mode export
This prompts you for information such as schema name (source), password, dump file name(s), and so on. It also creates a dump file upon completion.
The following features and limitations currently exist:
This section describes the import process and the steps required to successfully move content to the target portal system, including:
To import your objects, the contents of the transport set dump file must first be imported to the transport set tables on the target system. This is done by calling the same script (used in the export) with -mode set to import. The parameters in bold are only applicable for import and are mandatory.
%MyScript.csh
Usage: MyScript.csh <-mode export_or_import> <-s portal_schema>
<-p portal_password> <-pu portal_username> <-pp portal_userpassword>
<-company company_name> <-c connect_string> <-d dump_file_name(s)>
<-automatic_merge>
To perform the entire import from the command line, which initiates a background process, you must include the portal username and password parameters. This is required to validate your role on the target portal instance.
The contents of the dump files are imported and the transport set is made available from the UI for merging on the target portal system. Figure 10-9 illustrates how the import process works.
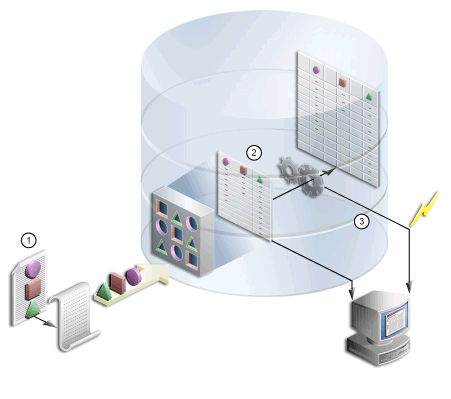
To import an object, the contents of the transport set must first be imported to the target system. When you select a transport set for import, a pre-check process determines if the objects already exist on the target.
To import your content:
The Import Manager is displayed.
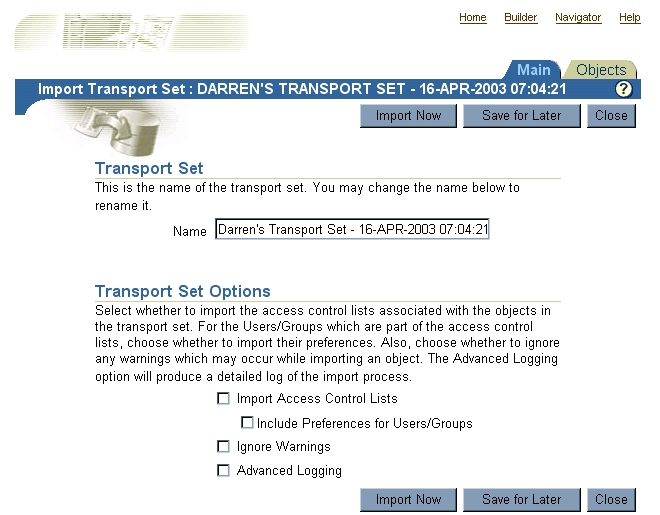
Check the appropriate boxes under the Transport Set Options:
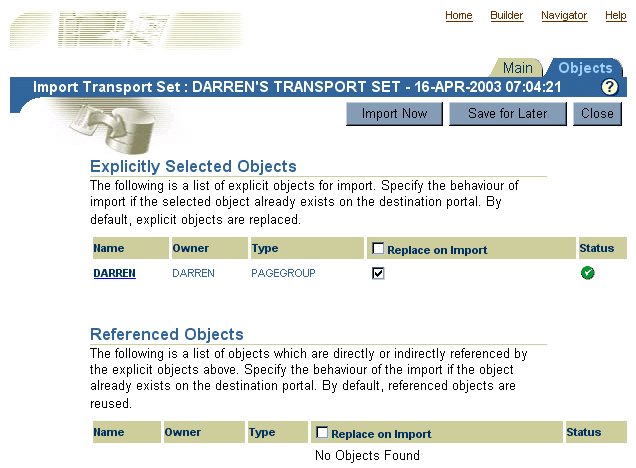
| Status | Description |
|---|---|

|
Pass. |

|
Fail. |

Text description of the illustration cg_expimp_warning_1.gif |
Pass with Warnings. The Pass with Warnings status only appears when the Ignore Warnings option is selected in the transport set. Otherwise the object status will be set to Fail. |
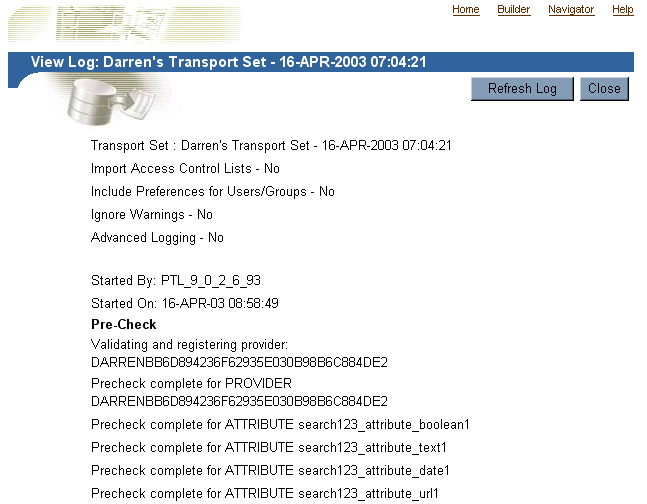
When you select Import Now, the exported objects are imported in the background. Clicking Save for Later saves changes to the transport set for later resolution and import.
To ensure that everything has been imported correctly, check the following:
Objects that are being imported can be classified into two types:
When the Ignore Warnings option is selected the warning types will raise warnings and the explicitly selected objects will be imported. However, if there is a failure type object and it fails, then the explicitly selected object will also fail irrespective of the Ignore Warnings value.
If an explicitly selected object has two dependencies, a warning type and a failure type and if both the dependencies fail the pre-check process, then the failure type will dominate and the explicitly selected object will also fail even if Ignore Warnings is selected.
If Ignore Warnings is not selected, then the warning type objects will fail, that is, the explicitly selected object will fail.
Ignore Warnings impacts explicitly selected objects more than any other kind of object. Referenced and external objects raise failure/warnings for the explicitly selected object based on their type and whether the Ignore Warnings option is set. Figure 10-6 describes the expected behavior for each object when selecting the Ignore Warnings option.
When the container objects listed subsequently appear as an external dependency, because their child objects have been selected for export and they do not exist on the target, then the explicitly selected object (child object of the container object) will always fail irrespective of the Ignore Warnings value.
The Export/Import Transport Set portlet, shown in Figure 10-12, is installed by default on the Administer tab and enables you to export, import, edit and browse the transport sets currently on the system. This section discusses the following:
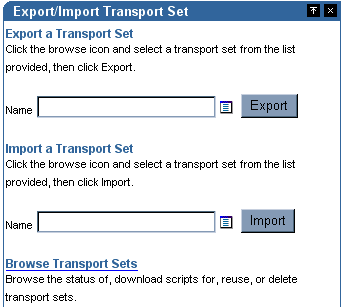
Text description of the illustration cg_imex_exp_imp_portlet.gif
You can view and edit the list of objects selected for a transport set. Once you have created a new transport set and selected the Save for Later option:
You can view all of the transport sets that are on the system and their current status. You can also view the log of actions, referenced objects and download export/import scripts. Additionally, you can delete transport sets from the system or to reuse a transport set, select the transport set and click Reuse.
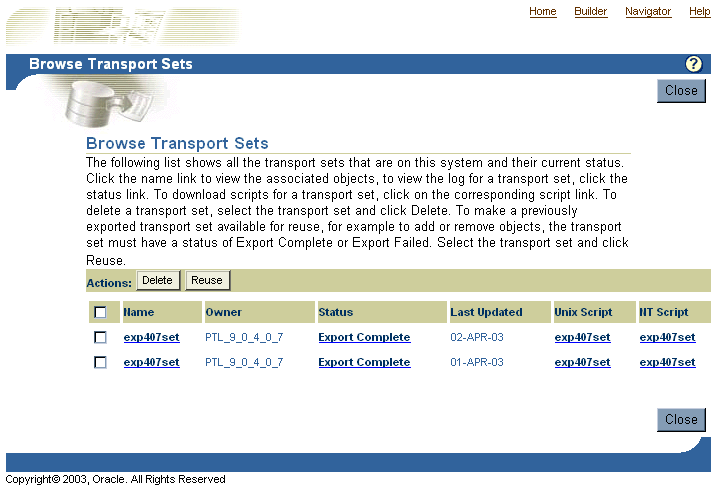
Text description of the illustration cg_imex_browsw_trans.gif
The following considerations should be made before migrating portal content from a source to a target instance using OracleAS Portal export/import. This section discusses the behavior of portal objects after migration.
The following is a summary of important recommendations and best practices developed for migrating portal content from a development or test environment to a production instance using OracleAS Portal export/import:
Oracle recommends the following procedure for export/import:
Users and groups are defined in Oracle Internet Directory. When you choose to include Access Control Lists and User and Group Preferences during a Portal Export, the user and group profiles held in the Portal schema are included in the transport set. However this does not migrate the user and group definitions that are held in Oracle Internet Directory.
For the user and group profiles to be properly imported on the target portal, the user and groups that they refer to, must exist in the target portal's associated Oracle Internet Directory.
If you are building your portal content on a test or development server, with the intention to then move that content to a production server, you have the option of assigning your security privileges on the test server and then migrating them, along with the content, to your production server.
In this scenario, assign the privileges to groups, so there is no need to ensure the consistency of the user population between the test and production infrastructures.
If you want to precisely model your user population on both the production and test servers, the best approach is to use Oracle Internet Directory's Directory Integration Platform - Directory Synchronization capabilities to synchronize the data from the production directory server to the test server. Synchronizing the data from production to test also provides you the option of adding test users and groups to the test Oracle Internet Directory server without affecting the production server.
|
Note: See the Oracle Internet Directory Administrator's Guide for more information on setting up directory synchronization. Note that it is advisable to automatically synchronize the data from production to test, but not the other way around. |
With the production groups also present on the test server, you can model and test all your access privileges on the test server and then safely migrate the Portal Access Control Lists with your exported objects onto the production system.
If you are introducing new groups and access privileges for those groups on the test system, then before you move the Portal content and access control lists to production, make sure you migrate the group definitions to production first. You can actually create the groups on production first, and let the synchronization process reflect the new group on the test system before applying the test access control entries, if you need to actually create the group on the test instance first, you can create the group on production with the same means you used to generate the group on test. If this was done manually, and you want to avoid repeating the manual step on production, you can issue an LDAP query on the test instance to generate an LDIF file, which you can then load onto the production instance. For example:
%ldapsearch -h testoid.domain.com -p 389 -D cn=orcladmin -w password123 -b
'cn=portal.iasdb.domain.com,cn=groups,dc=domain,dc=com' -s sub -L `cn=groupname'
> newgroup.ldif
In this example, cn=portal.iasdb.dbserver.domain.dcom, cn=groups, dc=us, dc=oracle, dc=com is the location under which the portal groups are located. Refer to the Security chapter for more information on the organization of the entries in the Directory Information Tree in Oracle Internet Directory. This creates a file called newgroup.ldif containing the group definition. You can then load the file on the production Oracle Internet Directory instance by using ldapadd:
%ldapadd -h prodoid.domain.com -p 389 -D cn=orcladmin -w password123 -v -f
newgroup.ldif
You may only want to deploy default privileges granted to some of the seeded Portal groups, or no privileges at all. If no privileges are deployed, then the user performing the import will own the objects. The user can then further grant privileges on the target system as necessary for the specific deployment.
There is no need to synchronize seeded groups or users, assuming that, if privileges are granted to seeded groups in Portal, and those seeded groups are still present on the target system, then the privileges will be correctly associated with those seeded groups.
When migrating group profiles from the source to the target, the import will remap the DNs of the groups to the local group base on the target system if the exported profile was one for a local group on the source. A local group is one that is under the portal group container (the group install base). For groups that were not under the group install base, the DN will remain unchanged.
Page groups and their associated components may be moved from development to production using the export/import utilities described in this document. In addition to page groups as a whole, individual components within page groups such as sub-pages, categories, perspectives and page styles can be moved individually to the target system, only if the entire page group has been imported to the target system earlier.
By default, portal page URLs generated by OracleAS Portal contain installation specific ID numbers that change when the object is exported. This causes broken links when pages are imported into a different site.
Here is an example of a URL generated for a page. If the page is imported on another site, this PAGEID will change.
http://my.portal.com/servlet/page?_pageid=47,49&_dad=portalr2&_schema=portal
If you are using such URLs as manually entered links, we recommend instead the use of Direct Access URLs or Page Link item types.
The same page has this direct access URL:
http://my.portal.com/pls/portal/url/PAGE/HRPAGEGROUP/HRHOME/HRBENEFITS
To find the direct access URL for a page, look at the page property sheet. A link to the property sheet can be displayed by adding a Property Sheet Smart Link item to the page.
You can also use a Page Link item type to create a link to a page. The Page Link item type dynamically generates the correct link at runtime.
To preserve content in a page (items, portlets) on the target, but import a style, layout or rendering changes from the source then expose your content through the Federated Portal Adapter portlet. The key here is to separate your content from your page structure into two separate page groups. One for content only, exposed through the Federated Portal Adapter, and the other is your 'display' page group. Users can use this to access, view, and customize their portal. Follow these steps:
Base objects that no longer exist on the page in the source portal will be removed from the target page after subsequent imports. This will ensure that all customizations for base portlet regions are also removed. Base objects are regions, portlets/items and tabs that are imported as part of the core definition of the page, defining its structure and content.
Portlets that already exist on a page behave in the following way when the page is imported in replace on import mode:
Properties of the page behave in the following way when the page is imported in replace on import mode:
When you import the page with an increase in the number of portlets on a page, then the source takes precedence even if you have customized the page in the target and deleted a portlet. The next time you import the same page, the deleted portlet is considered to be a new portlet to be added to the structure on the target. This also applies to tabs.
The order of appearance of these portlets (customizations) and the portlets that form the content of the page are determined by the source and mode of import.
Before importing on your target system, all providers referenced by your transport set must either already exist on your target system or be able to be registered successfully during the import on your target system. The pre-check process determines if a provider of the same name already exists on the target. If the provider does not exist, then the pre-check attempts to register the provider.
To ensure successful registration, check that your providers meet the following conditions on your target system:
A Portal DB Provider Schema is the schema specified when registering the DB provider. The subsequent steps must be performed for the successful migration of pages that reference Portal DB Provider portlets.
The simple example that follows provides an overview of the process. SAMPLE_APPLICATION is a Portal DB Provider that needs to be migrated. It uses the PORTAL_SRC_DEMO schema for the database objects referenced by the components.
Assumptions
Steps
Ensure that the source portal instance is setup in one database instance and that the target portal is setup in a different database instance.
The Portal DB Provider schemas must be exported and imported first. Follow the steps that follow:
Portal DB Providers (portlet builder components) may be exported as part of a transport set in much the same way as page groups, either independently or as part of the same transport set with page groups and shared objects.
If the same schema name cannot be used for the Portal DB Provider in the target portal instance, then perform the following steps:
The following Portlet Builder object types can be exported from Portal:
Oracle Reports objects may be moved from development to production using the export/import utilities described in this document. Individual components can be moved to the target system, only if the first export migrates the entire page group from the source portal to the target portal instance. Subsequent transport sets can then export individual components.
The Portal DB Provider owner creates every Report Security Access component (RWSVR,RWPRN,RWCAL,RWCPC,RWREP). Once the owner is migrated, all of the dependent components, shared components, and report security access components are migrated as well.
Available options include:
There a number of options for adding search components to your pages. You can add a simple Basic Search to match search criteria entered into the Search field; an Advanced Search, and a Custom Search to create an automatically executed search.
Basic Search portlets and Advanced Search portlets can be exported and imported. After import, the portlets should appear as they did in the source portal including the user preferences (if the user preferences were being imported).
Custom Search portlets can have many customizations which refer to other objects in the portal, such as page groups to search, attributes to search on, image on submission form, style for results, page for the results, attributes for the results, default values for category, perspective and item type attributes. These can be referred to as dependencies. When a custom search portlet is exported and imported its dependencies are not automatically exported and imported. Therefore, it is possible that a custom search portlet is customized in the source but the dependencies do not exist in the target.
Also, a custom search portlet in the source may have been customized and then the dependency is removed from the portal and the custom search portlet's customizations are not updated. In this case when the custom search portlet is used for a search the missing reference is ignored. When the custom search portlet is re customized and the customizations saved the missing reference is removed.
On export, all the custom search portlets that have been selected for export are checked and any missing references are removed. The customizations are then included in the transport set.
On import, a pre-check will determine if any dependencies are missing in the target after import. Messages are written to the log, for each custom search portlet that has missing dependencies, the log will show the reference path of the custom search portlet and the missing dependencies and what will happen on import.
The page on which the custom search portlet resides will be flagged with a warning. On the actual import the custom search portlet customizations are modified to have the correct ID's of all the same dependencies in the target and the customizations are copied into the target.
Portal export/import does not migrate any data that is in the Single Sign-On schema, ORASSO. However, portal pages that are migrated may contain instances of the external applications portlet, which refers to external applications that are defined in the ORASSO schema, along with user credentials for these applications.
Pages may also contain portlets from providers that are defined to include an associated external application for automatically authenticating to an external application that the provider is integrated with. In these cases, the referenced external application needs to be migrated along with the provider information.
The external application information is treated as external dependencies by the portal export/import utility. See Section 10.4.1, "Creating Transport Sets" for more details on the types of objects. When migrating portal content that references external applications, the references are expected to be present on the target portal during the import. For this reason, you will need to migrate any external applications that may be referenced before completing your import into the target portal.
The portal export/import utility does not assume that the external application identifiers will be the same on the source portal and the target portal.
This association by name also enables you to manually synchronize external application definitions between the source and the target portal's SSO servers.
If the user population is different between the source and the target portal, you may not want to manually migrate the external application definitions and credentials using the ssomig utility, see Section 10.8.7.2, "The Export and Import SSO Utility".
If the user population is the same on the source and the target, then the credentials can be transferred. Pages must be migrated with security. If the export is done without security and without preferences, the external application portlets are still migrated and loose-wired, but without any of their customizations. See Table 10-10 for more details.
The utility ssomig (ssomig.bat in Windows) uses Perl, Oracle SQL*Plus, and the tools EXP and IMP to move data between two version 9.0.4 servers. The two operational modes, export and import, must be run separately.
For more information on the SSO Export/Import utility (ssomig), refer to the Oracle Application Server Single Sign-On Administrator's Guide.
Oracle EXP and IMP utilities can be useful when deploying identical content across multiple OracleAS Portal instances.
The migration is a multi-step process that involves:
SELECT USERNAME, DEFAULT_TABLESPACE, TEMPORARY_TABLESPACE FROM DBA_USERS
WHERE USERNAME IN (user, user||'_PUBLIC', user||'_DEMO', user||'_APP')
OR USERNAME IN (SELECT DISTINCT OWNER
FROM WWAPP_APPLICATION$
WHERE NAME != 'WWV_SYSTEM');
SELECT DISTINCT TABLESPACE_NAME FROM DBA_SEGMENTS WHERE OWNER IN (<list of
schemas>)
UNION
SELECT DISTINCT DEFAULT_TABLESPACE FROM DBA_USERS WHERE USERNAME IN (<list
of schemas>)
UNION
SELECT DISTINCT TEMPORARY_TABLESPACE FROM DBA_USERS WHERE USERNAME IN (<list
of schemas>)
EXP \'sys/<password of sys user>@<Connect String> as sysdba\'
FILE=portal.dmp OWNER=<List of Schemas> LOG=portal.log
The export should terminate without any errors. If there are any ORA- 00942 errors reported in this step, run the following script from SQL*Plus as the SYS user:
ORACLE_HOME/rdbms/admin/catexp.sql
SELECT TABLESPACE_NAME FROM DBA_TABLESPACES;
CREATE TABLESPACE or CREATE TEMPORARY TABLESPACE commands. For example:
CREATE TABLESPACE <tablespace_name>
DATAFILE '<datafile_location>' SIZE 20M
DEFAULT STORAGE (INITIAL 1M NEXT 2M MINEXTENTS 2) AUTOEXTEND ON;
<datafile_location> is the file location for the dbf file. On UNIX, for example, the location may be: /u02/oracle/data/tbsa01.dbf.
For any tablespaces that already exist in the target database, it is recommended that they be set to autoextend or they must be sized large enough to hold the imported portal schemas. The following script can be used to enable autoextend on all datafiles:
SET DEFI OFF
SPOOL DATAFILES.SQL
SELECT 'ALTER DATABASE DATAFILE '''||FILE_NAME||''' AUTOEXTEND ON;'
FROM DBA_DATA_FILES ;
SPOOL OFF
@DATAFILES.SQL
ORACLE_HOME/portal/admin/plsql/wwv and run the following script from SQL*Plus as the SYS user.
@wdbisys.sql <Portal Schema> <Portal Default Tablespace> <Portal Temporary
Tablespace> WDBISYS.LOG
This creates the portal schema and grants all of the necessary privileges. Use the results of the query from Step 1 to find the names of the default and temporary tablespaces for the portal schema.
ORACLE_HOME/portal/admin/plsql/wws run the following script as the SYS user.
@cruser.sql <Portal Schema> <Portal Default Tablespace> <Portal Temporary
Tablespace>
This creates the PORTAL_PUBLIC schema.
GRANT CONNECT, RESOURCE TO <user> IDENTIFIED BY <password>;
A user must be created for each user in the list from Step 1. Use the ALTER USER command to adjust any user properties as necessary. For instance, the default and temporary tablespaces should be set to the ones specified by the results from the query in Step 1.
IMP \'sys/<password of sys user>@<Connect String> as sysdba\' FROMUSER=<LIST
OF SCHEMAS> TOUSER=<LIST OF SCHEMAS> FILE=PORTAL.DMP LOG=PORTAL_IMP.LOG
The following Import error can be ignored as it is expected:
IMP-00041: Warning: object created with compilation warnings.
ORACLE_HOME/rdbms/admin/utlrp.sql as the SYS user.
ORACLE_HOME/portal/plsql/admin/wwhost and run the following script from SQL*Plus as the SYS user.
@droptrig.sql.
SET HEAD OFF
SET LINES 4000
SPOOL DBUSERS.SQL
SELECT DISTINCT `ALTER USER '||DB_USER ||' GRANT CONNECT THROUGH '|| WWCTX_
API.GET_PRODUCT_SCHEMA||';'
FROM WWSEC_PERSON$;
SPOOL OFF
Run DBUSERS.SQL in the target portal instance to grant connect through privilege to database users associated with portal users.
|
|
 Copyright © 2002, 2003 Oracle Corporation. All Rights Reserved. |
|