10g (9.0.4)
Part Number B10316-01
Home |
Solution Area |
Contents |
Index |
| Oracle Application Server TopLink Mapping Workbench User's Guide 10g (9.0.4) Part Number B10316-01 |
|
The Oracle Application Server TopLink Mapping Workbench is a separate component from Oracle Application Server TopLink -- it allows you to graphically configure descriptors and map your project. The OracleAS TopLink Mapping Workbench can verify the descriptor options, access the data source, and create the database schema. With the OracleAS TopLink Mapping Workbench you can define OracleAS TopLink descriptors without using code.
This chapter includes the following subjects:
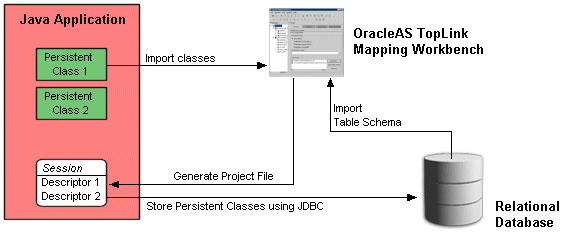
Use this procedure to start the OracleAS TopLink Mapping Workbench.
Use one of the following methods to start the OracleAS TopLink Mapping Workbench:
<ORACLE_HOME>\toplink\
bin\workbench.sh file.
The splash screen appears, followed by the OracleAS TopLink Mapping Workbench window.
The OracleAS TopLink Mapping Workbench window includes these parts:
Pull-down menus for each OracleAS TopLink Mapping Workbench function. Some objects also contain context-sensitive pop-up menus. See "Using the Menus" for more information.
Shortcuts to specific functions. See "Using the Toolbars" for more information.
The project tree for all open projects (see "Using the Navigator Pane"). Click the plus or minus ( +/- ) next to an object (or double-click the object) to expand/collapse the tree. When you select an object in the Navigator pane, its properties appear in the Editor pane.
Specific property sheets and option tabs for the currently selected object. See "Using the Editor Pane" for more information.
Provides instant information regarding the status of projects, descriptors, and mappings.
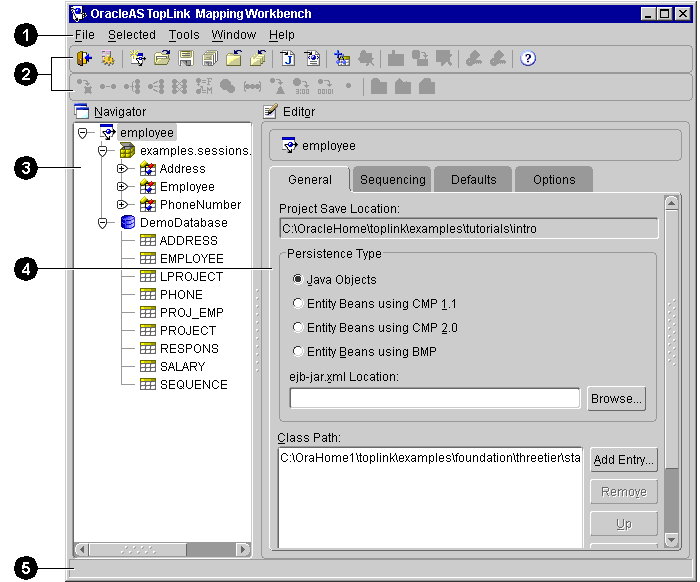
Figure 1-2 calls out the following user-interface components.
The OracleAS TopLink Mapping Workbench contains two types of menus:
The menu bar provides pull-down menus for each OracleAS TopLink Mapping Workbench function. Some menus (such as Selected) are context-sensitive -- the available options may vary, depending on the currently selected object.
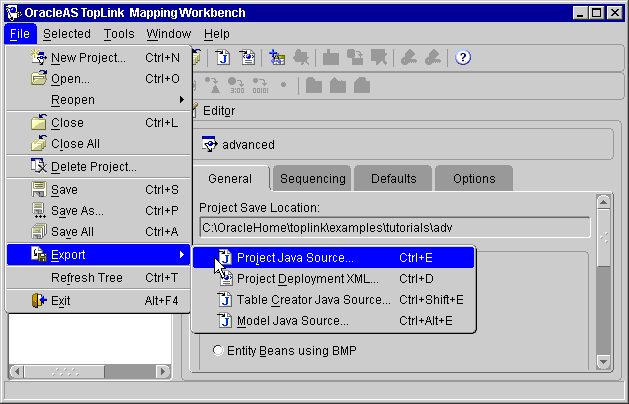
Text description of the illustration menubar.gif
When you right-click objects in the Navigator pane, a pop-up menu appears with functions specific to the selected object.
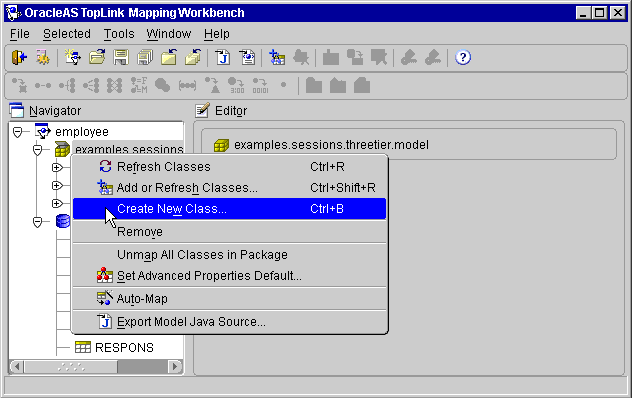
Text description of the illustration popup.gif
The OracleAS TopLink Mapping Workbench contains two types of toolbars:
Use these toolbars to select options and functions.
The standard toolbar furnishes quick access to the standard (File, Edit, Selected, and so on) menu options.
The mapping toolbar provides quick access to create mapping and descriptor types. You can specify a mapping or descriptor type by selecting the object in the Navigator pane, then clicking the appropriate button on the mapping toolbar.
You can also right-click the object and choose the appropriate mapping from the pop-up menu.
The OracleAS TopLink Sessions Editor contains a toolbar that appears in the Navigator pane and offers quick access to create and modify configurations, sessions, and connection pools.
| Button | Description |
|---|---|
|
|
Caching |
|
|
Login |
|
|
Connection Pool |
|
|
Rename |
|
|
Session |
|
|
Session Broker |
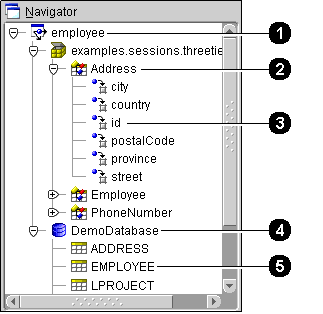
OracleAS TopLink displays each project's descriptors, mappings, and database tables in the Navigator pane on the left side of the workbench.
Text description of the illustration city.gif
Figure 1-5 identifies the following user-interface components:
Click the +/- symbol next to the item, or double-click the item name to expand and collapse the item.
When you select an item in the Navigator pane, its properties appear in the Editor pane (see "Using the Editor Pane"). You can perform specific functions for an item by selecting the item in the Navigator pane and:
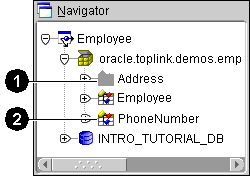
Inactive descriptors appear dimmed in the Navigator pane. Inactive descriptors are not registered with the session when the project is loaded into Java. This feature allows you to define and test subsets of descriptors. To activate or inactivate a descriptor, right-click the descriptor and select Activate/Deactivate Descriptor from the pop-up menu.
Text description of the illustration inactive.gif
Figure 1-6 shows the following user-interface components.
If an element in the project (such as a descriptor mapping), contains an error or deficiency (sometimes called neediness), a warning icon
![]() appears beside the element icon in the Navigator pane, and a message displays in the status bar detailing the error. Appendix C, "Troubleshooting" contains complete information on each OracleAS TopLink Mapping Workbench error message.
appears beside the element icon in the Navigator pane, and a message displays in the status bar detailing the error. Appendix C, "Troubleshooting" contains complete information on each OracleAS TopLink Mapping Workbench error message.
The Editor pane, on the right side of the OracleAS TopLink Mapping Workbench (see Figure 1-2), displays the property sheet associated with the currently selected item in the Navigator pane.
This section includes information on customizing the following aspects of the OracleAS TopLink Mapping Workbench:
Use the General preferences to customize the "look and feel" (the graphical user interface) of the OracleAS TopLink Mapping Workbench.
 on the toolbar. The Preferences dialog appears.
You can also display the Preferences dialog box by choosing Tools > Preferences from the menu.
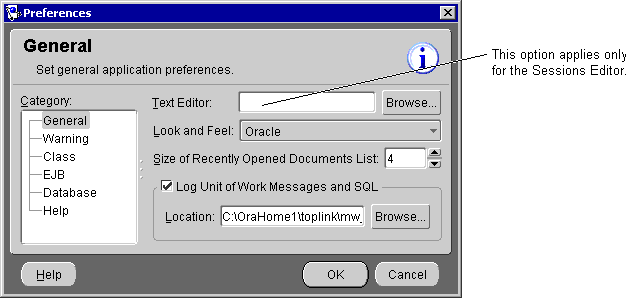
| Field | Description |
|---|---|
|
Text Editor |
Click Browse and select a text editor (used when viewing the session configuration source). See "Working with the Source" for more information. Note: This field appears for the OracleAS TopLink Sessions Editor only. |
|
Look and Feel |
Select the "look and feel" to use for the OracleAS TopLink Mapping Workbench. See Figure 1-8 for a sample of each option. |
|
Size of Recently Opened Documents List |
Select the number of projects to maintain in the File > Reopen option. See "Opening Existing Projects" for more information. |
|
Log Unit of Work Messages and SQL |
Specify if the OracleAS TopLink Mapping Workbench logs runtime messages to help troubleshoot projects.
Click Browse to select a filename (default |
You must restart the OracleAS TopLink Mapping Workbench to apply the changes.
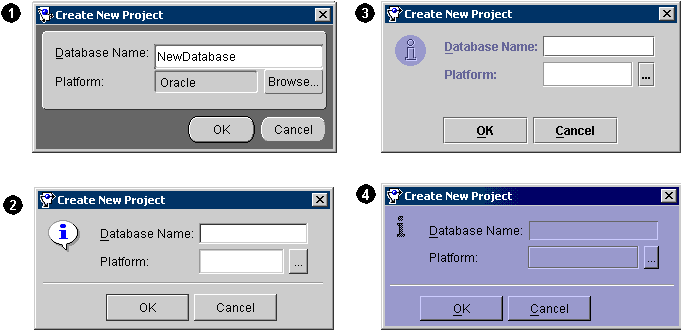
Text description of the illustration lfsample.gif
Figure 1-8 shows the following "look and feel" samples:
Use the Warnings preferences to specify if the OracleAS TopLink Mapping Workbench displays certain warning and confirmation dialog boxes.
 on the toolbar. The Preferences dialog box appears.
You can also display the Preferences dialog box by choosing Tools > Preferences from the menu.
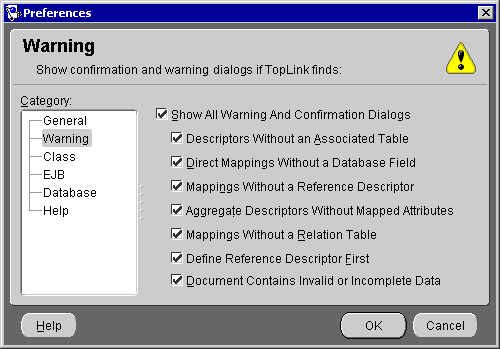
Use this procedure to specify how the OracleAS TopLink Mapping Workbench imports and edits classes. See "Working with Classes" for more information.
 on the toolbar. The Preferences dialog box appears.
You can also display the Preferences dialog box by choosing Tools > Preferences from the menu.
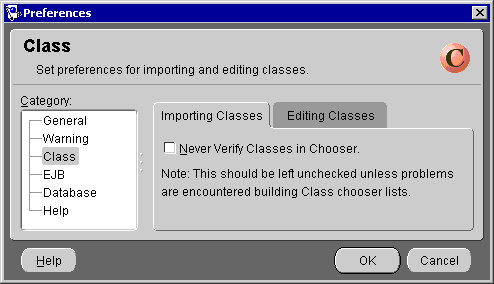
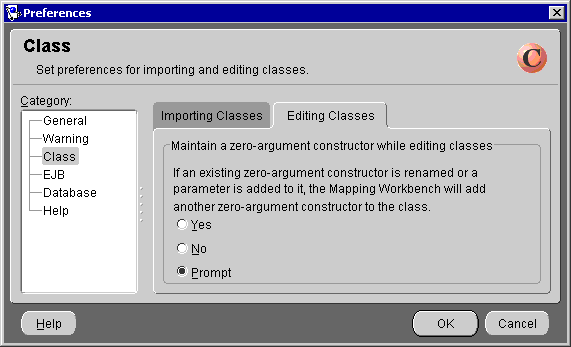
Use this procedure to specify how the OracleAS TopLink Mapping Workbench updates the ejb-jar.xml file when saving projects.
 on the toolbar. The Preferences dialog box appears.
You can also display the Preferences dialog box by choosing Tools > Preferences from the menu.
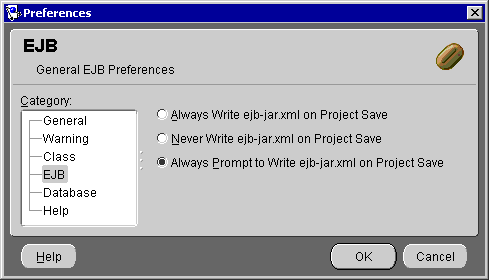
ejb-jar.xml file when you save the project.
Use the Database preferences to specify custom database divers and connection URLs for the OracleAS TopLink Mapping Workbench. These drivers and URLs can then be used when defining database logins.
 on the toolbar. The Preferences dialog appears.
You can also display the Preferences dialog box by choosing Tools > Preferences from the menu.
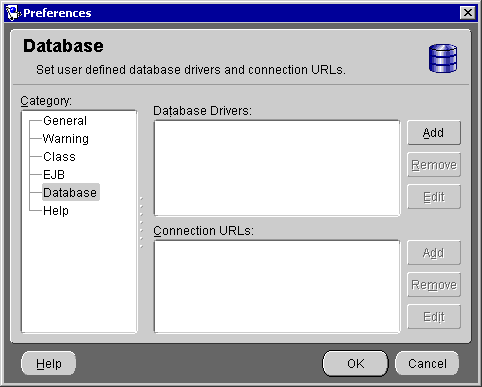
| Field | Description |
|---|---|
|
Database Drivers |
Click Add to add a custom database driver. |
|
Connection URLs |
Select a Database Driver, then click Add to add a custom database connection URL. |
To edit or remove an existing driver or URL, select the driver or URL and click Remove or Edit.
Use the Help preferences to select a Web browser to use the online help and Web-based support.
 on the toolbar. The Preferences dialog box appears.
You can also display the Preferences dialog box by choosing Tools > Preferences from the menu.
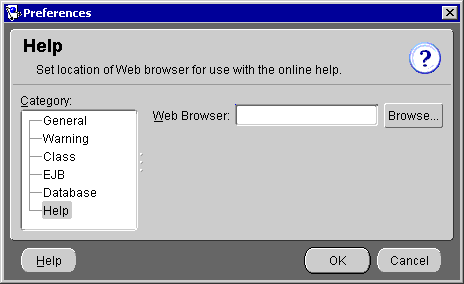
| Field | Description |
|---|---|
|
Web Browser |
Click Browse and select the location of your default Web browser. You must specify a Web browser to use the online help and Web-based support. |
When using an OracleAS TopLink Mapping Workbench project in a team environment, you must synchronize your changes with other developers. See "Merging Files" for more information.
You can use the OracleAS TopLink Mapping Workbench with a source control system (see "Using a Source Control Management System") to facilitate enterprise-level team development. If you have a small development team, you can manage the changes from within XML files (see "Sharing Project Objects").
If you use an enterprise, file-based, source control management system to manage your Java source files, you can use the same system with your OracleAS TopLink Mapping Workbench project files. These project files are maintained by the OracleAS TopLink Mapping Workbench and written in XML file format.
The source control system's check in and out mechanism defines how to manage the source (the XML source and OracleAS TopLink Mapping Workbench project file) in a multi-user environment.
Although your actual development process will vary, depending on your SCM tool, a typical process involves:
The most difficult aspect of team development is merging changes from two (or more) members that have simultaneously edited the same file. If one developer checks in his or her changes, a merge condition exists. Use a file comparison tool to determine the merged aspects of the project. The files to edit will vary, depending on the type of merge:
Example 1-1 and Example 1-2 demonstrate a "merge out" merging technique.
Project files contain references to the objects in the project. Generally, your project <projectName>.mwp contains:
Changes in these parts of the .mwp file are normally caused by adding, deleting, or renaming project elements.
Generally, you will need to merge a project file if another developer has added or removed a descriptor, table, or class, and checked in the project while you were adding or removing descriptors, tables, or classes from the same project. Use this procedure to merge the project's .mwp file:
<projectName>.mwp file in the repository and the your local copy. The file comparison shows the addition or removal of an element inside the owner (i.e., <database>, <descriptors>, or <repository>).
<projectName>.mwp file (inside the corresponding owner element). This brings your local code up to date to the current code in the code repository.
Another developer has added and checked in a new Employee class descriptor to the com.demo package while you were working with the same OracleAS TopLink Mapping Workbench project. To merge your work with the newly changed project:
<projectName>.mwp to determine the differences between your local file and the file in the repository. Your SCM system may show the file in merge status.
The file comparison shows the addition of the <package-descriptor> tag and a <name> element inside that tag:
<package-descriptor><name>com.demo.Employee.ClassDescriptor</name></package-descriptor>
<projectName>.mwp file (inside the <descriptors> element) to bring it up to date to the current files the source repository.
Developers who concurrently modify the same existing table, descriptor, or class file will create a merge condition for the following files:
<tableName>.xml (one for each table)
<descriptorName.type>.xml (one for each descriptor)
<className>.xml (one for each class)
The OracleAS TopLink Mapping Workbench changes these files when saving a project if you have changed any of the contents within them (such as adding a mapping to a descriptor, adding an attribute to a class, or a changing a field reference in a table).
If another developer has changed an attribute in a table, descriptor, or class, while you were changing a different mapping on that same descriptor, you will need to merge your project.
.xml file(s) in merge status (i.e., table, descriptor, or class). The file comparison shows the addition or removal of an XML element.
.xml file to bring it up to date to the current files the source repository.
Another developer has added and checked in the firstName mapping to the Employee class descriptor while you were changing a different mapping on that same descriptor. To merge your work with the newly changed project:
com.demo.Employee.ClassDescriptor.xml file located in <projectRoot>/Descriptor/ that is in merge status.
The file comparison shows the addition of the <mapping> tag and the elements inside that tag:
<mapping><uses-method-accessing>false</uses-method-accessing><inherited>false</inherited><read-only>false</read-only><instance-variable-name>firstName</instance-variable-name><default-field-names><default-field-name>direct field=</default-field-name></default-field-names><field-handle><field-handle><table>EMPLOYEE</table><field-name>F_NAME</field-name></field-handle></field-handle><mapping-class>MWDirectToFieldMapping </mapping-class></mapping>
com.demo.Employee.ClassDescriptor.xml file (inside the existing <mappings> element) to bring it up to date to the current files in the source repository.
You can also share project objects by copying the table or descriptor file(s) into the appropriate directories in the target project.
After copying the file(s), insert a reference to the table, descriptor, or class in the appropriate place in the <projectName>.mwp file. All references contained within the project file must refer to an existing object in the project.
When working in a team environment, manage the ejb-jar.xml file similarly to the .xml project files. The OracleAS TopLink Mapping Workbench edits and updates the ejb-jar.xml file, if necessary, when working with an EJB project.
If you use a version control system, perform the same check in and check out procedures. For merge conditions, use a file comparison tool to determine which elements have been added or removed. Modify the file as necessary and check in the file to version control your work.
When working in a team environment, your source control system may lock files when you retrieve them from the repository. If the OracleAS TopLink Mapping Workbench attempts to save a locked file, the Version Control Assistance dialog box appears, showing the locked files.
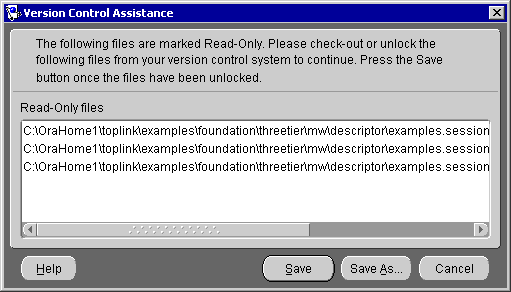
Text description of the illustration readonly.gif
Select one of the following methods to save your project:
See "Saving Projects" for more information.
|
|
 Copyright © 1997, 2003 Oracle Corporation. All Rights Reserved. |
|