8
JAAS and Enterprise Manager
The JAAS LDAP-based Provider stores information in Oracle Internet Directory (OID). This chapter describes how to use Oracle Enterprise Manager to manage data in the Oracle Application Server Containers for J2EE (OC4J) JAAS Provider.
This chapter contains these topics:
Startup
Use this procedure to access the Oracle Enterprise Manager for OC4J Home page.
- From the Enterprise Manager home, click Targets.
Figure 8-1 Enterprise Manager Home Tab
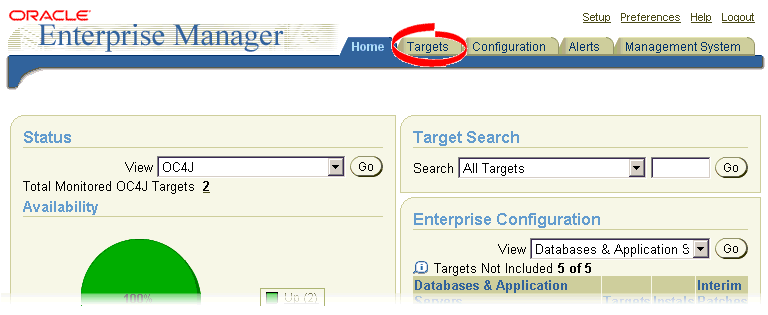
Text description of the illustration em_home.gif
- From the Targets tab, click All Targets.
Figure 8-2 Enterprise Manager Targets Tab

Text description of the illustration em_targe.gif
- From the All Targets page, select your specific OC4J instance.
- From the Home page of the OC4J instance, click Administer in the Related Links area near the bottom of the page.
Figure 8-3 OC4J Instance Home Page
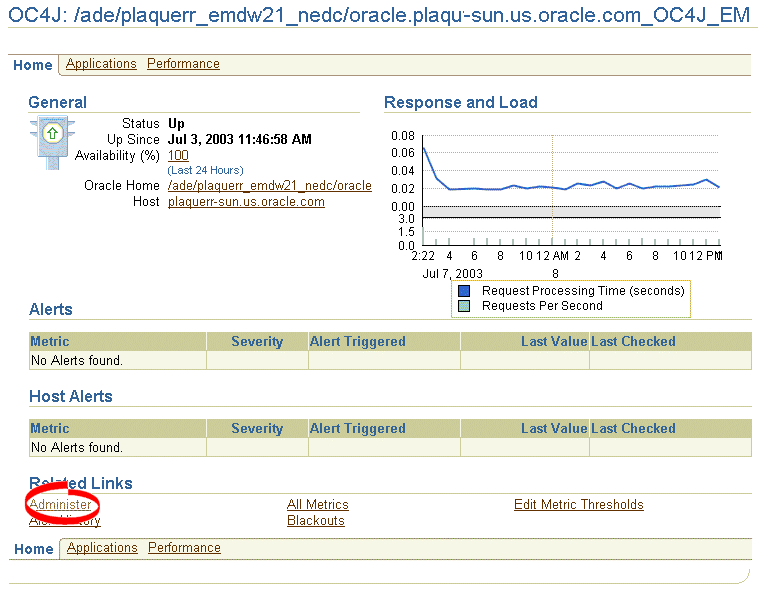
Text description of the illustration em_oc4j_.gif
Note:
You may be required to supply your username and password to log into the administer page.
|
- From the Enterprise Manager for Oracle Application Server OC4J Home page, select one of the following options:
Editing Global Security Settings
- From the Enterprise Manager for Oracle Application Server OC4J Home page, click Administration.
Figure 8-4 Oracle Enterprise Manager for Oracle Application Server OC4J Home Page

Text description of the illustration em_oc4j.gif
- From the Administration page, click Security.
Figure 8-5 Oracle Enterprise Manager for Oracle Application Server Administration
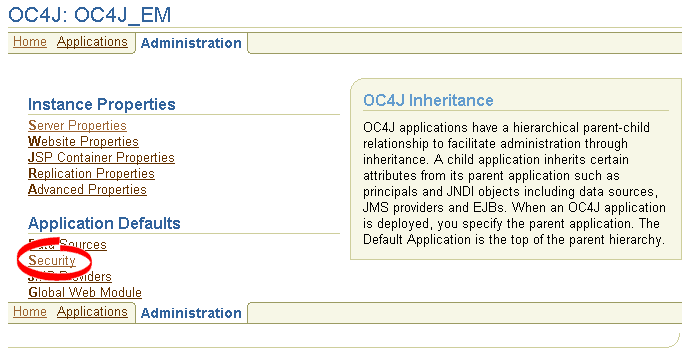
Text description of the illustration em_admin.gif
The security page appears (see Figure 8-10).
Editing Individual Security Settings
- From the Enterprise Manager for Oracle Application Server OC4J Home page, click Applications.
Figure 8-6 Oracle Enterprise Manager for Oracle Application Server OC4J Home Page
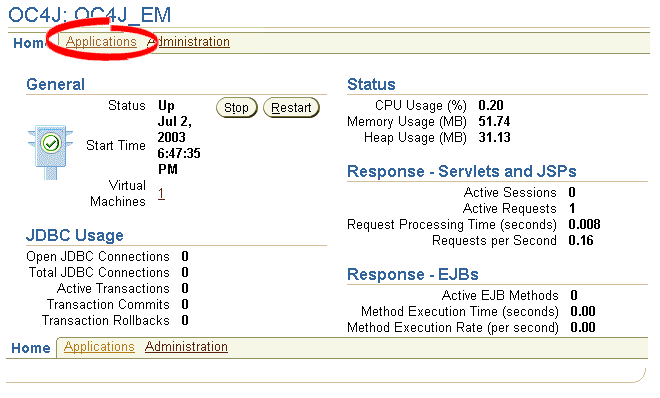
Text description of the illustration em_oc4ja.gif
- Select an deployed application or click Default.
- From the module's Application page, click Security.
Figure 8-7 Oracle Enterprise Manager for Oracle Application Server Application Page
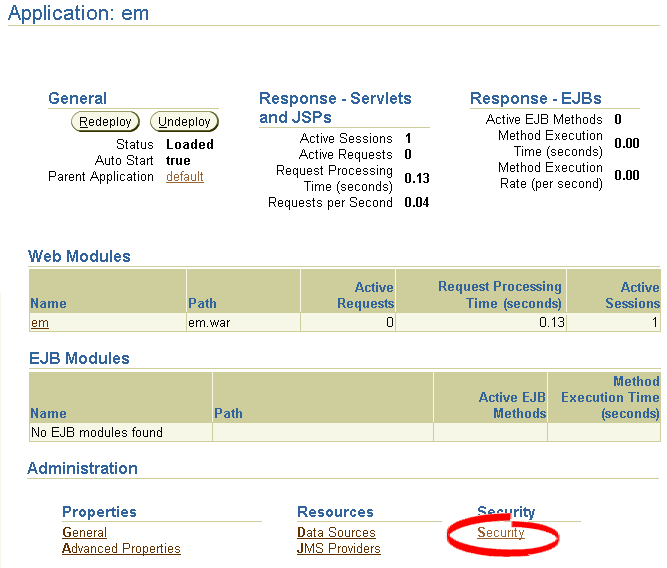
Text description of the illustration module_s.gif
The Security page appears (see Figure 8-10).
Selecting a UserManager
- From a module's Application page (see Figure 8-7), click General in the Administration Properties area.
Figure 8-8 Oracle Enterprise Manager for Oracle Application Server Application Page
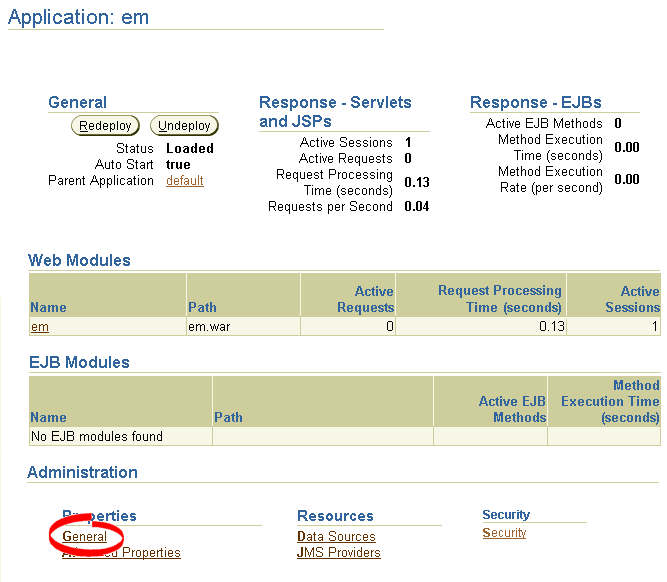
Text description of the illustration em_appmo.gif
- On the Properties screen, scroll down to the User Manager area.
Figure 8-9 User Manager area of Properties Page
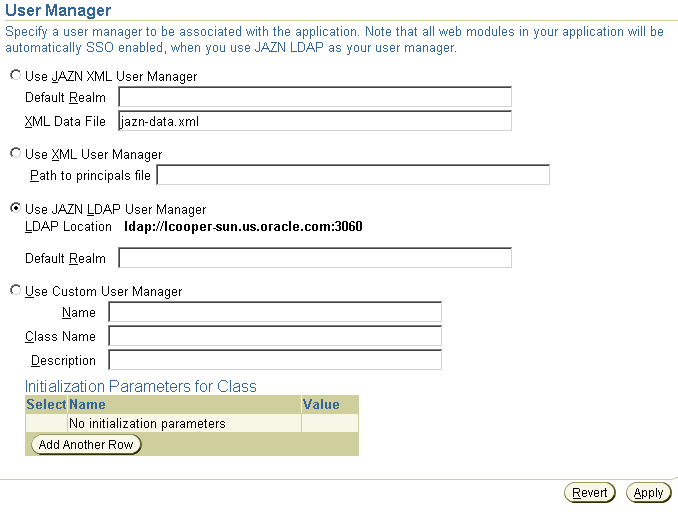
Text description of the illustration usermgr.gif
- Click the user manager you want to use, and fill in the appropriate pathname and realm information.
Mapping Security Roles
- Navigate to the Security page as discussed in "Startup" and click Map Role To Principals in the Security Roles area.
Figure 8-10 Security Page
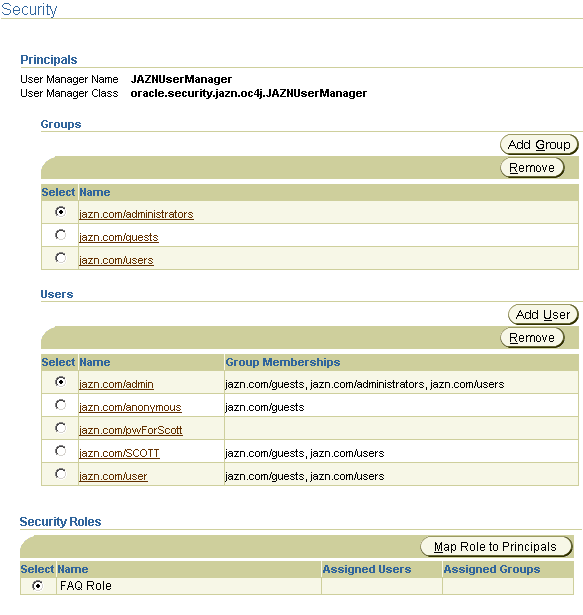
Text description of the illustration security.gif
- Select the group and/or user to map to the role and click Apply.
Figure 8-11 Security: Map Role Screen
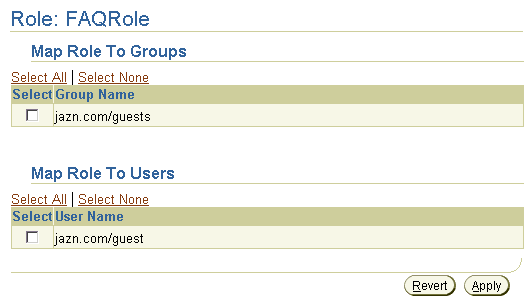
Text description of the illustration maprole.gif
Creating Users
Note:
Enterprise Manager manages only XML-based roles and users. To manage LDAP-based users and roles, use the Delegated Administration Service (DAS); see the Oracle Internet Directory Administrator's Guide for details.
|
- From the Security page (see Figure 8-10), click Add User in the Users area. The Security: Add User screen appears.
Figure 8-12 Security: Add User Screen
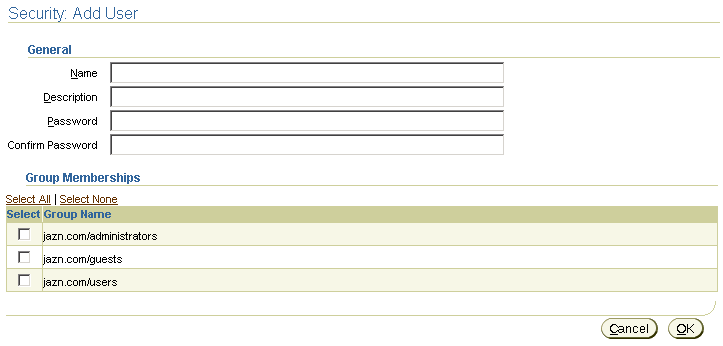
Text description of the illustration adduser.gif
- Fill in the Name, Description, Password, and Confirm Password fields and place checks beside any groups the user should be a member of. Click OK.
Creating Groups
Note:
Enterprise Manager manages only XML-based roles and users. To manage LDAP-based users and roles, use the Delegated Administration Service (DAS); see the Oracle Internet Directory Administrator's Guide for details.
|
- From the Security page (see Figure 8-10), click Add Group in the Groups area. The Security: Add Group screen appears.
Figure 8-13 Security: Add Group Screen

Text description of the illustration addgrp.gif
- Fill in the Name and Description fields and place checks beside any permissions you want to grant the group. Click OK.
Deleting Users Or Groups
Note:
Enterprise Manager manages only XML-based roles and users. To manage LDAP-based users and roles, use the Delegated Administration Service (DAS); see the Oracle Internet Directory Administrator's Guide for details.
|
- From the Security page (see Figure 8-10), select the user or group from the appropriate list.
- Click Remove.
- A confirmation screen appears asking whether you want to remove the specified user or group. Click Yes.
Editing Users
Note:
Enterprise Manager manages only XML-based roles and users. To manage LDAP-based users and roles, use the Delegated Administration Service (DAS); see the Oracle Internet Directory Administrator's Guide for details.
|
- From the Security page (see Figure 8-10), select a user.
Figure 8-14 User Screen
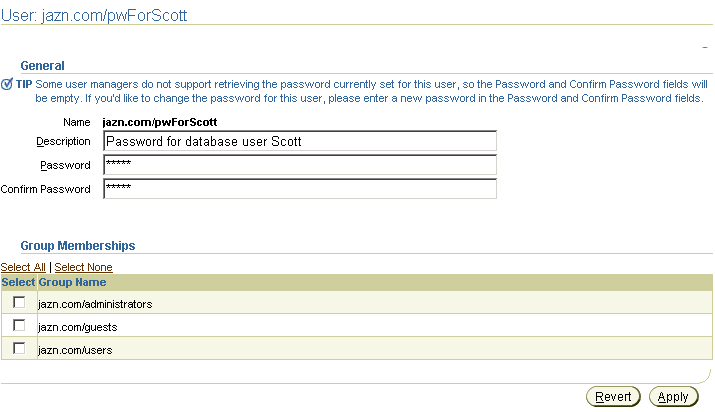
Text description of the illustration emuser.gif
- Type the new description or password into the appropriate text box. (To help avoid typographical errors, you must type the password twice.)
- Click Apply.
Assigning Users To Groups
Note:
Enterprise Manager manages only XML-based roles and users. To manage LDAP-based users and roles, use the Delegated Administration Service (DAS); see the Oracle Internet Directory Administrator's Guide for details.
|
- From the Security page (see Figure 8-10), select the user from the Users list. The User screen appears.
Figure 8-15 User Screen

Text description of the illustration emuser.gif
- To add the selected user to a group, click the group's checkbox.
- Click Apply.
Granting Permissions To Groups
Note:
Enterprise Manager manages only XML-based roles and users. To manage LDAP-based users and roles, use the Delegated Administration Service (DAS); see the Oracle Internet Directory Administrator's Guide for details.
|
- From the Security page (see Figure 8-10), select the group from the Groups list. The Group screen appears.
Figure 8-16 Group Screen
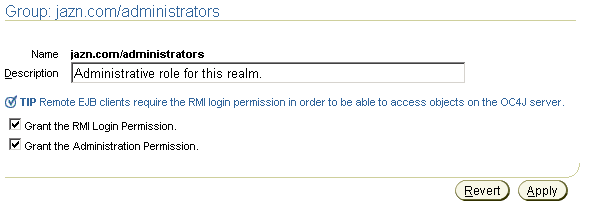
Text description of the illustration groupper.gif
- To grant the group RMI or Administration permission, click the appropriate checkbox.
- Click Apply.


