Skip Headers

Oracle Application Server Wireless Administrator's Guide
10g (9.0.4)

Part Number B10188-01
Go To Documentation Library
Home
Go To Product List
Solution Area
Go To Table Of Contents
Contents
Go To Index
Index

Go to previous page Go to next page

2
Verifying the Wireless Installation

This chapter describes how to access the Webtools and the Device Customization portal to verify the proper installment and functioning of these applications. See the Oracle Application Server Wireless Developer's Guide for information on installing Wireless.

This chapter includes the following sections:

2.1 Starting the Oracle Application Server Wireless Server

Before Wireless users can access the Wireless development tools, the administrator must start the server using the Wireless system management page access through the Oracle Enterprise Manager Application Server Control.

To log into the Application Server Control and access the management functions for Wireless:

  1. Enter the following URL into a browser:

    http://Server:1810


Note:

The default ports are 1810 and 1811. The port number range is 1812 to 1820. To ensure that you are using the correct port number, check the port number for Oracle Application Server Wireless stored in [Oracle home]/install/portlist.ini. For more information on port usage, see the Oracle Application Server Installation Guide and the Oracle Application Server Administrator's Guide. 


  1. Enter the administrator user name and password. The Oracle Enterprise Manager Home Page appears (Figure 2-1).

Figure 2-1 The OracleAS Enterprise Manager Home Page (Partial View)


Text description of ver_entp.gif follows.
Text description of the illustration ver_entp.gif

  1. From the System Components table, select Wireless. The Wireless home page appears (Figure 2-2).

Figure 2-2 The System Manager Home Page (Partial View)


Text description of ver_sysh.gif follows.
Text description of the illustration ver_sysh.gif

2.1.1 Configuring the Wireless Server

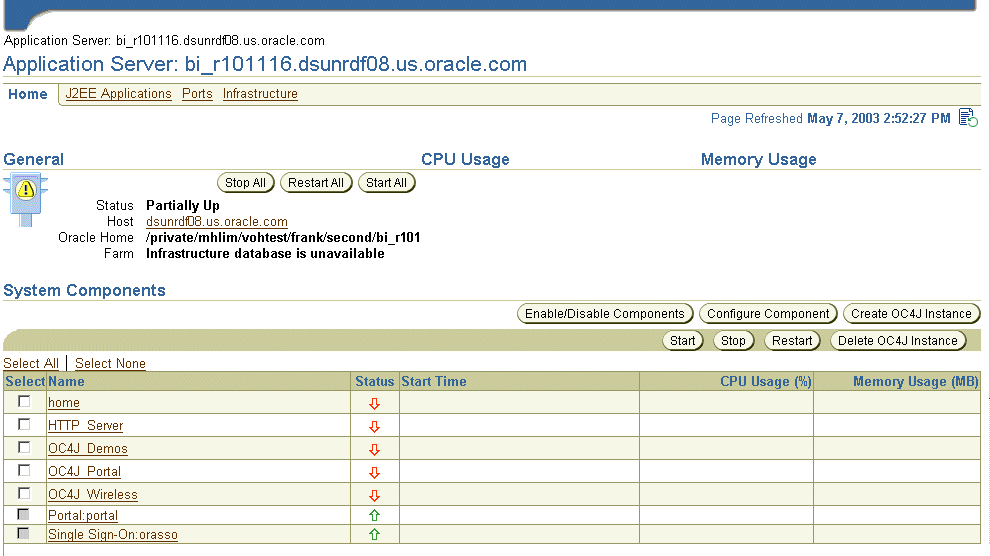
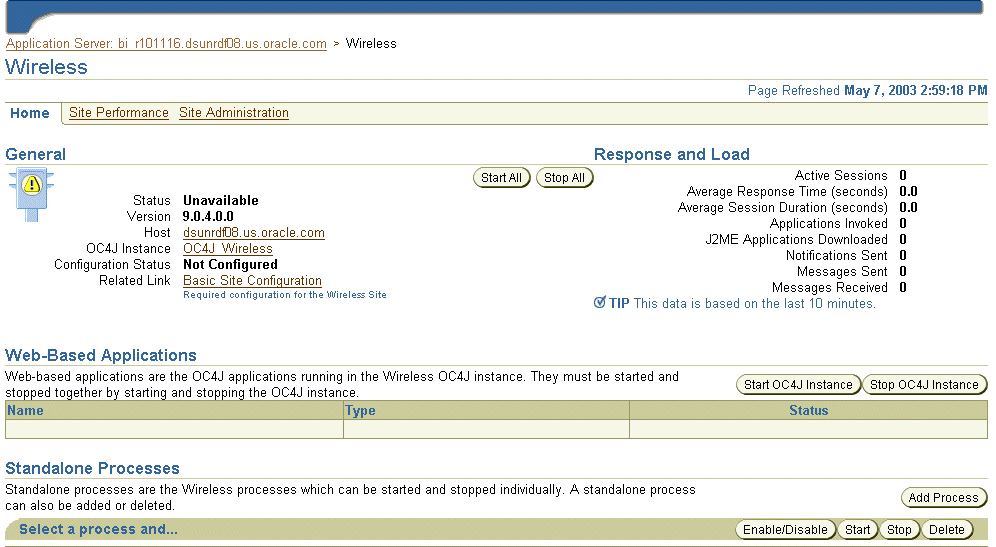
If the Configuration Status displays Not Configured (as it would, for example, during the initial session after the Wireless repository has been installed), an administrator can configure the Wireless server within minutes using a two-step configuration wizard accessed through the Basic Site Configuration link. The Wireless administrator need only add the name and port values for the HTTP and HTTPS proxy server, the address for the Wireless access points for the Async, SMS and IM servers, and then set the correct time zone for the server. For more information, see Section 3.3.1 in Chapter 3, "Managing the Wireless Server".


Note:

If the Configuration Status indicates that the Wireless sever has not been configured, then the administrator must configure the server before starting the processes.  


2.2 Accessing the Wireless Customization Portal

This section describes how to log into the Wireless Customization Portal.

Before using the Wireless Customization Portal, you must access the login page by entering the following URL in a browser:

http://<host>:<port>/mobile/Login.uix

For example, you access the login page through the following URL:

http://hostname:7777/mobile/Login.uix


Note:

7777 is the default port number for Oracle Application Server Wireless. The port number range is 7777 to 7877. To ensure that you are using the correct port number, check the port number for Oracle Application Server Wireless stored in [Oracle home]/install/portlist.ini. For more information on port usage, see Oracle Application Server Installation Guide and the Oracle Application Server Administrator's Guide. 


Table 2-1 Login Screen Buttons

Button  Description 

Login 

Clicking this button logs you in after you have entered the correct user name and password. 

Help 

Clicking this button displays a list of help topics. 

Page Help 

Clicking this button displays help topics specific to this screen. 

  1. Enter your user name and then enter your password. If you are an administrator, enter orcladmin as your user name. (The password is set during installation, but can be changed with the User Manager.)

  2. Click Login.

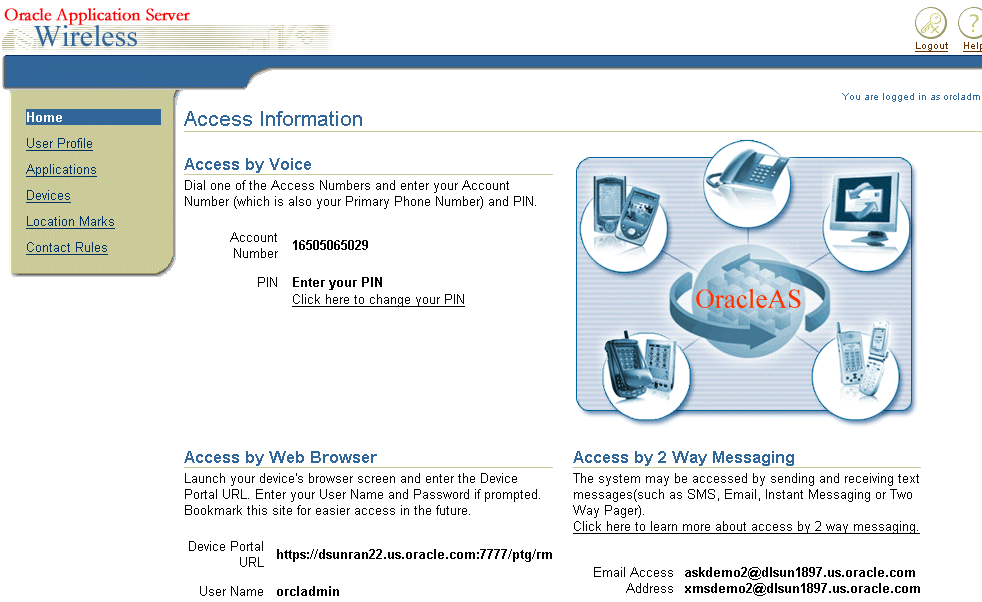
After you successfully log in, the Welcome screen appears (Figure 2-3), which includes your addresses for accessing Oracle Application Server Wireless applications.

Figure 2-3 The Welcome Screen of Wireless Customization (Partial View)


Text description of ver_cust.gif follows.
Text description of the illustration ver_cust.gif

2.3 Accessing the Wireless Tools

This section describes how to log into the Oracle Application Server Wireless Tools to access the User Manager, Service Designer, Foundation Manager, and Content Manager. If you access the Oracle Application Server Wireless Tools in standalone mode, then you can also access the System Manager.

Access the login page for the Oracle Application Server Wireless Tools through the following URL:

http://<host>:<port>/webtool/login.uix

For example, you access the login page through the following URL:

http://hostname:7777/webtool/login.uix


Note:

7777 is the default port number for Oracle Application Server Wireless. The port number range is 7777 to 7877. To ensure that you are using the correct port number, check the port number for Oracle Application Server Wireless stored in [Oracle home]/install/portlist.ini. For more information on port usage, see Oracle Application Server Installation Guide and the Oracle Application Server Administrator's Guide. 


Enter your user name and then enter your password. If you are an administrator, enter orcladmin as your user name. (The password is set during installation, but can be changed with the User Manager.) The Oracle Application Server Wireless Tools appears, with the User Manager displaying by default (as displayed in Figure 2-4).

Figure 2-4 The Oracle Application Server Wireless Tools (with User Manager Displayed)


Text description of ver_wtls.gif follows.
Text description of the illustration ver_wtls.gif


Go to previous page Go to next page
Oracle
Copyright © 2003 Oracle Corporation.

All Rights Reserved.
Go To Documentation Library
Home
Go To Product List
Solution Area
Go To Table Of Contents
Contents
Go To Index
Index