10g (9.0.4)
Part Number B10948-01
Home |
Solution Area |
Contents |
Index |
| Oracle Application Server Wireless Developer's Guide 10g (9.0.4) Part Number B10948-01 |
|
Each section of this document presents a different topic. These sections include:
OracleAS Wireless notification system provides a scalable and flexible mechanism for delivering mobile notification messages based on predefined predicates. The message content is generated by invoking a regular OracleAS Wireless application upon verification of user-defined predicates, and end-user messages are delivered using OracleAS Wireless messaging application. See Chapter 10, "Creating Messaging Applications" for more information.
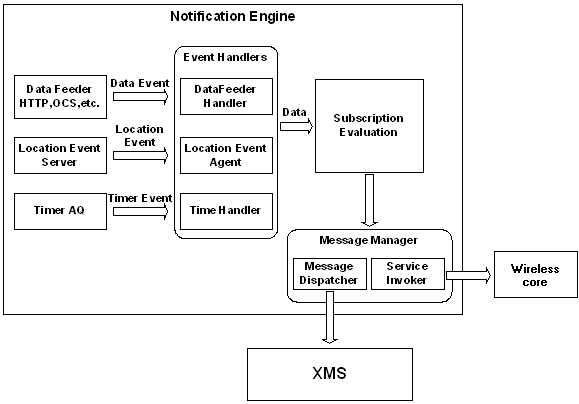
The notification engine evaluates predicates every time an event is received from time, data or location providers. The engine is triggered whenever there is a change in the underlying feed.
There are three major types of notification triggering:
|
See: For more information on Location capabilities, see Chapter 14, "Using Location Services" |
A notification need not be strictly based on only one of the above. The same notification can have multiple entry points, and can be triggered by a combination of these (that is, it can be time and data based, and can be triggered by both data feeder and timers).
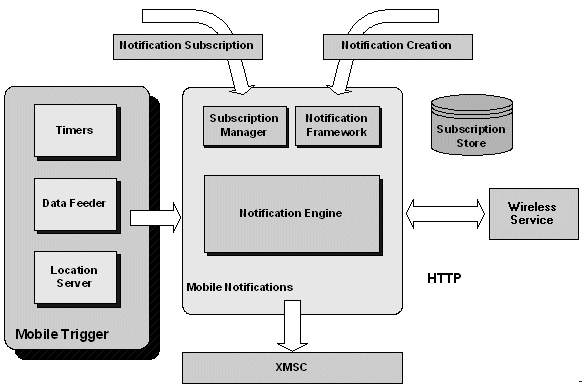
Notification Engine is an event server which performs the following tasks:
Events are triggered when there are changes in the underlying data source; the data sources provide certain data for evaluation of this event.
The notification mechanism consists of four layers:
The key features of the Notification System are:
There have been significant changes in the notification engine since the previous release. The most important architectural difference is the way content is generated; now, content is retrieved from an application instead of processing a message template. Due to this paradigm shift, it is not possible for the new engine to process old type of notifications (referred to as alerts, alert services, and master alert services in previous Wireless releases).
To overcome this backward compatibility problem, administrators can create separate notification processes. Notifications created by the two different versions will be intact. The new engine will only handle the new type of notifications; new features will not be available for notifications created using the older version.
Since OracleAS Wireless Notification Engine supports message template specification (as explained in Section 11.1.2, "Key Features"), it is easy to migrate alert services (that is, notication applications) created with the old version into the new version; tools to automate this process are provided. After migration, migrated alerts will be handled by the new engine, then you can use new features included in this version.
With OracleAS Wireless, creating notifications is straightforward. You simply build an application and notification-enable it. Based on the condition specified while notification enabling an application, end users subscribe to that application with their own criteria. That completes the process. The notification engine does the rest. At runtime, condition matching, subscription collecting, messaging generating and dispatching are fully automated and managed by the notification engine with no intervention necessary. The creation process can be summarized as follows:
The whole process can be performed using the OracleAS Wireless Tools and Customization Portal. These tools provide you with wizards that guide you through each step. For more information, see OracleAS Wireless Administrator's Guide. Developers can also use provided public APIs to accomplish these tasks.
The most crucial information for creating a master alert application is to define the type of predicate(s) that can be used. Predicate types can be data, time or location-based. Furthermore, master notification applications can consist of a combination of these three types. Possible predicate types can be listed as follows:
For every event generated, the notification engine derives a list of users who are interested in this event. In some cases, a notification designer may need to apply some additional logic to manipulate this list. OracleAS Wireless Notification Engine allows developers to supply a Java class which implements the Java interface MobileAlertSubscriberFilter for additional filtering logic.
Designers can provide a set of triggering conditions for data-based master notifications. These conditions must be based on output parameters of the selected data feeder. For each condition, a designer must specify which output parameter to check, the condition type, and default value for the user input. For example, for a stock feed which provides price and change, the condition can be defined as output parameter price is greater than <user specified value>.
For output parameters that are of type number, condition types can be:
For output parameters that are variants of type string, condition type can be:
This parameter is optional. If designers specify a message template, it can be used to generate notification content. The Messages Provided template should be a valid Mobile XML document. If this master notification application is based on a data feeder, any data feeder input or output parameter can be used in the template using the notation of &<parameter name>;, which is similar to the XML entity notation. The following sample shows a template for a notification with input parameter sym, and output parameters price and change:
<?xml version = "1.0" encoding = "UTF-8" standalone="yes" ?>
<SimpleResult>
  <SimpleContainer>
    <SimpleText>
      <SimpleTitle>OracleAS Wireless</SimpleTitle>
      <SimpleTextItem>Sample Notification: price: &price; and change: &change;
for stock: &sym;</SimpleTextItem>
    </SimpleText>
  </SimpleContainer>
</SimpleResult>
If a message template is specified, the notification engine can generate required application parameters (such as URL and parameter-mapping) automatically to process this message template and generate notification messages. A generic jsp is included with OracleAS Wireless, and application designers should create a basic application and notification-enable it by specifying that this application is based on a message template.
The following code fragment shows how to create a time + data + location-based master notification application named StockNotification. StockFeed is specified as the data feed for this notification application, and it has two triggering conditions: price > user_input (with default value 23) and change > user_input (with default value 10). The relation type between these two conditions is AND. Additionally, a message template is provided.
MetaLocator m = MetaLocator.getInstance();
ModelFactory f = m.getModelFactory();
ModelServices s = m.getModelServices();

//Locate the data feed that will be used by this notification
DataFeeder df = s.lookupDataFeeder("StockFeed")

//Create a master notification with timebase enabled.
//Note that, new master notification interface is
oracle.panama.mobilealert.MasterAlertService
MasterAlertService mAS = null;
mAS = f.createMobileMasterAlertService("StockNotification", true, "Stock
Master Notification", df);

//Set the condition relation type to "AND"
mAS.setConditionRelationType(MasterAlertService.RELATION_AND);

//Set time based typed to strictly time based
mAS.setTimeBasedType(true);

//Enable Location based support
mAS.enableLocationBaseAlert(true);

StringBuffer msgTemplate = new StringBuffer("<?xml version = \"1.0\"
encoding = \"UTF-8\" standalone=\"yes\" ?>");
msgTemplate.append("<SimpleResult><SimpleContainer>");
msgTemplate.append("<SimpleText>Stock alert for [&symbol;] price is
[&price;]");
msgTemplate.append("</SimpleText>");
msgTemplate.append("</SimpleContainer></SimpleResult>");

//Provide the default message template
//that can be used with default notification master service
mAS.setFormattedXMLTemplate(msgTemplate.toString());

//add conditions with default valuesto this notifications, i.e. if "price >
10 "

AlertConditionType cType1 = s.getMobileAlertConditionTypeByName("GT");
FeedMetaData fmdPrice = df.getOutputParameter("price");
mAS.addConditionDefinition("PriceMax", fmdPrice, cType1, "23");

AlertConditionType cType2 = s.getMobileAlertConditionTypeByName("GT");
FeedMetaData fmdChange = df.getOutputParameter("Change");
mAS.addConditionDefinition("ChangeMax", fmdChange, cType2, "10");

//Notification object does not use the persistent store/wireless caching
//Any create/update operation has to be committed with the save
mAS.save();
Application invocation is the recommended way for generating notification content. Designers should map master notification applications to master applications that will be used for generating notification content. In some cases, applications may need to have access to some or all of the input or output parameters of the master notification application, in order to perform further processing. For example, a stock price watch notification can trigger a stock selling application to sell the stocks in case of a significant price drop. In this case, the stock selling application must access the stock ticker so that it will know what to sell. To provide this information, application developers would map master notification application input and output parameter(s) to the master application input parameter(s).
Since the Notification Engine is a generic event server that can handle various event generators and invoke multiple applications, it is possible to create many-to-many mappings between master notification applications and master applications. Simply put, a particular master notification application can be mapped to many master applications such as: stock trade master application, or stock news master application. For example, a stock notification engine can invoke a master application that will sell the stocks for user A, and this engine can also be used to invoke a master application that sends the latest news about that particular stock for user B. The same engine can be used to deliver a simple message template for user C. Likewise, a stock trade master application can be invoked by a master notification application that checks if the stock has reached a certain value at some time (time and value-based) and/or another master notification application that is fired upon a significant price change (value-based); for example, a 10% price drop.
OracleAS Wireless Tools can only manage 1-to-n mappings due to user interface constraints (same master notification application can be mapped to many master applications). However, it is possible to accomplish m-to-n mapping using notification APIs.
As mentioned in Section 11.1.2, "Key Features", the notification engine can generate personalized content by invoking the target application separately for each user, or invoke it once per event and share the content between all users who are interested in that event. When application designers create a mapping, they must choose the proper content generation type depending on user requirements.
The following code fragment displays how to create a mapping between an existing master notification application (which was created in Section 11.2.1.5, "API Sample: Creating Master Notification Application") and a master application. In this example, the mapping will map the parameters symbol and price, and content generation type is specified as personalized content.
//Locate the existing master notification service
MasterAlertService mAS = s.lookupMobileMasterAlertService("StockNotification");

//Locate the existing stock trade master service
MasterService masterService =
s.lookupMasterService("/master/examples/StockTradeMasterService");

//Create the mapping definition between the notification service and master
service
MAlertServiceMapping map = mAS.createMapping(masterService,
"StockNotificationMapping");

//Retrieve input arguments for the master service
Arguments args = masterService.getInputArguments();
InputArgument inpArgTicker = args.getInput("symbol");
InputArgument inpArgPrice  = args.getInput("price");

//Retrieve notification parameters (including input and output)
AlertParameterMeta[] alertParams = mAS.getParameters(); //returns symbol, price

//Map notification master service parameter "symbol" to stock trade input
argument "ticker"
map.addChainParameter(alertParams[0], inpArgTicker);

//Map notification master service parameter "price" to stock trade input
argument "price"
map.addChainParameter(alertParams[1], inpArgPrice);

//This invocation has to be performed in "personalized content mode", for each
user separately
map.setInvocationType(false);

//Commit changes
mAS.save();
The following code fragment displays creating a mapping using the existing message template for the StockNotification master notification application. In this example, we must create a master application for template-based mapping with the least amount of information. Parameter mapping and target URL settings will be performed by the createTemplateMapping method.
//Locate the existing master notification service
MasterAlertService mAS = s.lookupMobileMasterAlertService("StockNotification");

//Create a simple master service
MasterService templateMasterService = f.createMasterService("StockInfo",
s.lookupUser("orcladmin"), s.lookupAdapter("HttpAdapter"),
s.lookupFolder("/master/examples"));

//Parameter mappings will be handled by the createTemplateMapping method
//this method will also modify the provided master service to use default
template processor
mAS.createTemplateMapping(templateMasterService);

//Commit changes
mAS.save();
After notification creation, mapping the notification to a application and publishing it as an application, users can start subscribing to this notification-enabled application by using OracleAS Wireless Portal. The reason for subscribing to a application instead of notification is that end-users care about the content that is generated, but not how it is generated. Since the content is generated by an application that can be invoked by any notification, they do not and should not care about the underlying infrastructure.
As the notification creation process defines the structure and metadata by specifying predicate information, users must provide the required parameter values for each predicate in the subscription step. For each predicate type, users should set the following information:
Along with this information, users can pick a device to use for receiving notifications, and an alternative device to send notifications to when the maximum number of notifications is reached for the primary device. Device selection is an optional step.
When the notification engine validates user subscription predicates and generates message content for a user, it hands over this message to the XMS layer for delivery. If the user has selected a device for notification retrieval, XMS will use the selected device (or the specified alternative device, if the daily maximum is reached) to deliver end-user messages with the appropriate protocol. However, if the user prefers not to specify a device, XMS will pick the best device to use depending on contact rules, user profile and message content type. For more information about device selection, see Section 11.4, "Integrated Notification Solutions".
The following code fragment shows subscribing to a notification-enabled application. The link in this example is based on the StockTradeMasterService master application which was used in Section 11.2.2.1, "Sample Code: Notification Mapping". Remember that this master application was mapped to the StockFeed master notification application in that example.
    //Locate the master notification service
    MasterAlertService mAS =
s.lookupMobileMasterAlertService("StockNotification");
    //Locate the stock trade master service
    MasterService masterService =
              s.lookupMasterService("/master/examples/StockTradeMasterService");
    //Locate the stock trade link
    Link link = s.lookupLink("/Examples/StockTradeLink");
    //Locate the user
    User user = s.lookupUser("orcladmin");

    //Locate primary and alternative device addresses
    DeviceAddress addr1 = s.lookupDeviceAddress(DeliveryType.SMS, "1234567890");
    DeviceAddress addr2 = s.lookupDeviceAddress(DeliveryType.EMAIL,
              "Okan.Alper@oracle.com");

    //Create a subscription for orcladmin on the stock trade link
    ServiceAlertSubscription sub = mAS.addUserAlertSubscription(user, link);

    //Set the data feed input parameter (ticker) to ORCL
    AlertInputParamValue[] paramVals = sub.getInputParameters();
    paramVals[0].setValue("ORCL");

    //Set triggering condition values: price:30 and change: 12
    AlertConditionValue[] conVals = sub.getConditions();
    conVals[0].setValue("30"); //price
    conVals[1].setValue("12"); //change

    //Set frequency to daily, receive notifications on weekdays
    AlertTimeFrequency freq =
AlertTimeFrequencyImpl.getAlertTimeFrequencys()[0];

    //Activate the notification tomorrow
    Calendar startDate = Calendar.getInstance();
    startDate.add(Calendar.DATE, 1);

    //User will be subscribed for 365 days
    Calendar expirationDate = Calendar.getInstance();
    expirationDate.add(Calendar.DATE, 366);

    //User will be going on vacation 30 days from now,
    //so deactivate them temporarily in that period for 10 days
    Calendar blackoutStartDate = Calendar.getInstance();
    blackoutStartDate.add(Calendar.DATE, 30);
    Calendar blackoutEndDate = Calendar.getInstance();
    blackoutEndDate.add(Calendar.DATE, 40);

    //Create location condition for monitoring myself for getting into a region
with id 18191.
    LocationPrivacyDomain lbDomain = new LocationPrivacyDomain(masterService);
    LBCondition lbCondition = f.createLBCondition(LBCondition.MODE_REPEAT,
                expirationDate, user, lbDomain);
    lbCondition.addCriteria("orcladmin", "user", "IN", 18191);

    //Set data and time predicates for this subscription.
    //This notification will evaluate the conditions starting at 8:00 a.m. till
1:30pm
    //every 45 minutes, on every weekday (Monday-Friday).
    sub.setCondition(paramVals, conVals, 8, 0, 13, 30, 45, freq,
                 expirationDate, startDate);
    //Set the location condition
    sub.setLocationCondition(lbCondition);

    //Set the primary device that notifications will be send to
    sub.setSubscriptionDevice(addr1);
    //When the max. number of notifications is reached,
    //send the notifications to the alternative device
    sub.setAlternativeType(ServiceAlertSubscription.AFTERMAX_DEVICE);
    //Set the secondary device as alternative device
    sub.setAlternativeDevice(addr2);

    //Set blackout periods, activation/deactivation information
    sub.setSuspendStartDate(blackoutStartDate);
    sub.setSuspendEndDate(blackoutStartDate);
    sub.setStartDate(startDate);
    sub.setExpirationDate(expirationDate);

    //save the subscription
    sub.save();
Notification Engine must run in continuos mode by managing its own resources (such as threads), so that it can process incoming events to determine which subscriptions are eligible for notification delivery. Upon successful notification creation, application developers should create a separate process for the notification engine, and attach appropriate notifications that are designed ahead of time.
Since Notification Engine is designed as a scalable system, OracleAS Wireless Tools, as part of Oracle Enterprise Manager, can create multiple processes to manage a single notification. In this case, load (incoming events) is distributed among these processes; each of these processes handle incoming events independently, meaning each process will perform the filtering for a specific event that they receive.
For notifications that do not consume much resource, it is also possible to share the resources among various notifications in a single process. In this case, application designers should create a process, and add multiple notifications to this process.
As explained earlier, data-based notifications rely on incoming data events, which are provided by the data feeders. Therefore, a separate data feeder process should also be created and started for the Data Feeder instance that will be providing data events for the notification engine.
It is possible to migrate 9.0.2.x notifications (referred to as alerts hereinafter) to the current release by running the provided migrateNotifications.sh[.bat] script. For migrating:
migrateNotifications.sh[.bat] name <deprecated master alert name(s)> -owner <owner username>
The name parameter is used to locate the alerts (that will be migrated) by name.
You can use wildcards, such as % in <deprecated master alert name(s)>. All 9.0.4.x notification-related objects (such as master notification application, master application, application link) will be owned by the given username.
-oid option as:
migrateNotifications.sh[.bat] -oid <deprecated master alert oid> -owner
<owner use name>
Using the OID option locates a specific notification by object ID.
Running (a) or (b) above performs the following operations:
Sample usage of Notification Migration is provided below.
UNIX:
migrateNotifications.sh -name StockAlert% -owner orcladmin
Migrate all 9.0.2.X master alert applications whose names start with StockAlert (such as, StockAlertNews, StockAlertWarning). All new objects will be owned by orcladmin user.
migrateNotification.sh -name StockAlert -owner systemadmin
Migrate 9.0.2.X master alert application that have the name StockAlert. Assign all new objects to systemadmin user.
WINDOWS:
migrateNotification.sh -oid 1973 -owner systemadmin
Migrate 9.0.2.X master alert application whose ID is 1973. Assign all new objects to systemadmin user.
The Data Feeder is the agent that downloads content. The data feeder runs periodically, independent of application invocations. The feed framework is designed to download content for a OracleAS Wireless process. The downloaded content can be used both for asynchronous notifications as well as cached data for synchronous applications.
The download schedule for a data feeder is maintained in the update policy for that data feeder. The update policy determines the update interval, or how often the data feeder runs. The update policy tracks the time of day, and which days of the week to run the data feeder.
Each data feeder has a content provider, which is the source of the content. The content provider maintains information about the URI of the content, the protocol to use for downloading the content, and the format of the data to be downloaded.
When specifying a feed, a user sets up a metadata definition of the content to be downloaded using feed parameters. These parameters are instances of the data type, FeedMetaData. Feed parameters have an underlying SQL data type chosen from a predefined set of types, defined in oracle.panama.feed.FeedUtil.
Feed Input Parameters are input parameters particular to a content provider. They specify the data used when requesting data from the content provider. For example, when downloading data from a content provider using HTTP, the input parameters will be used either to construct a GET URL or as POST parameters in the HTTP request.
Feed Output Parameters define the data type of the output from the content provider.
The runtime behavior of a data feeder can be customized with the FeedDownloadHook and the FeedDataFilterHook.
The FeedDownloadHook is used to customize the URI used when downloading content. For example, in an HTTP download, the input parameters are, by default, used to construct a GET URL, with the input parameters used as GET HTTP parameters. In some cases, however, the base URL depends on the input parameters. In such a case, the URL would be http://www.ahost.com/input_ param_1/input_param2/index.html. The behavior for constructing the URL can be overridden with a custom FeedDownloadHook to achieve the desired result.
The FeedDataFilterHook is used to do additional processing on the downloaded content. As each row of data is downloaded, the data filter hook is invoked on each row. This allows the feed implementer to perform special processing, such as splitting a single output parameter into several output parameters.
The pass-through data feeder is a datafeeder that accesses local content through user-defined Java code. Consequently, a pass-through data feeder has neither a content Provider nor an update policy. Similarly, the FeedDownloadHook and the FeedDataFilterHook are not relevant for a pass-through data feeder. The feed metadata must still be set up for a pass-through data feeder.
You can create a data feeder using OracleAS Wireless Tools, or programatically. OracleAS Wireless Tools provides you with a wizard to guide you through each step of the creation process. For more information, see OracleAS Wireless Administrator's Guide.
Creating a data feeder includes these steps:
createFeedDefinition. This method creates the feed metadata definition in the repository, which is required to use the feed and the feed cache table. Once the feed definition has been created, feed parameters cannot be deleted, only renamed.
A pass-through datafeeder requires that you specify the classname of the pass-through datafeeder to use. It does not require all the information that a regular datafeeder needs; in particular, the protocol and format to use is irrelevant.
The following code creates a pass-through datafeeder:
ModelFactory mf = MetaLocator.getInstance().getModelFactory();
// Create a named datafeeder
PassthroughDataFeeder df = mf. createPassThroughDataFeeder ("stock_passthrough")
// Set the class name to use for implementation
df.setClassName("fully.qualified.package.and.Class");
// Create input parameters
FeedMetaData fmi = df.createMetaData("sym", "TEXT_30");
df.addInputParameter(fmi):
// Create output parameters
FeedMetaData fmo1 = df.createMetaData("price", "NUMBER");
df.addOutputParameter(fmo1);

FeedMetaData fmo2 = df.createMetaData("change", "NUMBER");
df.addOutputParameter(fmo2);

// Finalize the feed -- create feed definition
// in repository
df.createFeedDefinition();
OracleAS Wireless includes sample200.xml. This sample file contains a datafeeder for retrieving stock quotes over HTTP. The stock quotes are in XML format; the sample datafeeder includes a stylesheet for extracting the relevant values from the XML input feed.
In order to create this data feeder programmatically, you would use the following code:
ModelFactory mf = MetaLocator.getInstance().getModelFactory();
// Create a named datafeeder
DataFeeder df = mf.createDataFeeder("stock_screamingmedia");
// Set content provider parameters
ContentProviderInfo cpi = df.getContentProviderInfo();
cpi.setProtoolType(ContentProviderInfo.PROTOCOL_HTTP);
cpi.setPrimarySource("http://www.screamingmedia.com/");
cpi.setFormatType(ContentProviderInfo.FORMAT_XML);
// Create input parameters
FeedMetaData fmi = df.createMetaData("sym", "TEXT_30");
df.addInputParameter(fmi):
// Set the parameters for this parameter and content provider
Map paramOptions = new Hashtable();
paramOptions.put(ContentProviderInfo.COLUMN_NUMBER, 1);
cpi.setParamArguments(fmi, paramOptions);


// Create output parameters
FeedMetaData fmo1 = df.createMetaData("price", "NUMBER");
df.addOutputParameter(fmo1);
paramOptions.put(ContentProviderInfo.COLUMN_NUMBER, 2);
cpi.setParamArguments(fmo1, paramOptions);

FeedMetaData fmo2 = df.createMetaData("change", "NUMBER");
df.addOutputParameter(fmo2);
paramOptions.put(ContentProviderInfo.COLUMN_NUMBER, 3);
cpi.setParamArguments(fmo2, paramOptions);
// Finalize the feed -- create feed definition in repository
// create cache table as needed
df.createFeedDefinition();
sample200.xml also includes a datafeeder for retrieving stock quotes over HTTP that downloads the stocks in a comma-separated variable (CSV) format.
The following code illustrates how to create this data feeder programmatically.
ModelFactory mf = MetaLocator.getInstance().getModelFactory();
// Create a named datafeeder
DataFeeder df = mf.createDataFeeder("stock_yahoo")
// Set content provider parameters
ContentProviderInfo cpi = df.getContentProviderInfo();
cpi.setProtocolType(ContentProviderInfo.PROTOCOL_HTTP);
cpi.setPrimarySource("http://quotes.yahoo.com/quote");
cpi.setFormatType(ContentProviderInfo.FORMAT_DELIMITED);
// Create input parameters
FeedMetaData fmi = df.createMetaData("sym", "TEXT_30");
df.addInputParameter(fmi):
// Set the parameters for this parameter and
// content provider
Map paramOptions = new Hashtable();
paramOptions.put(ContentProviderInfo.COLUMN_NUMBER, 1);
cpi.setParamArguments(fmi, paramOptions);

// Create output parameters
FeedMetaData fmo1 = df.createMetaData("price", "NUMBER");
df.addOutputParameter(fmo1);
paramOptions.put(ContentProviderInfo.COLUMN_NUMBER, 2);
cpi.setParamArguments(fmo1, paramOptions);

FeedMetaData fmo2 = df.createMetaData("change", "NUMBER");
df.addOutputParameter(fmo2);
paramOptions.put(ContentProviderInfo.COLUMN_NUMBER, 3);
cpi.setParamArguments(fmo2, paramOptions);

// Finalize the feed -- create feed definition
// in repository, create cache table as needed
df.createFeedDefinition();
The data feeder only downloads content which has a specified input parameter. Input parameter values can be set either implicitly or programmatically. Input values can be added implicitly by adding a notification topic subscription. The following code illustrates how to add a notification programmatically:
// Look up existing data feeder
DataFeeder df = ModelServices.getInstance().lookupDataFeeder("stock_yahoo");
// Want to add input params for ORCL
Map params = new Hashtable();
params.put("sym", "ORCL");
df.setData(params);
One primary use of the data feeder is to download cached data for use with regular synchronous applications. Downloaded data can be accessed using the datafeeder method getData(). This method takes an argument as a map, which is a name-value mapping of the parameters which get values. The following code example illustrates how you can retrieve current price and change given a stock symbol:
ModelServices ms = MetaLocator.getInstance().getModelServices();
DataFeeder df = ms.lookupDataFeeder("stock_yahoo");
Map params = new Hashtable();
params.put("sym", "ORCL");
Map values = df.getData(params);
Iterator i = values.keys();
while(i.hasMore()) {
	String key = (String)i.next();
	String val = (String)values.get(key);
	System.out.println(key + " = " + val);
}
Running this code we while get the following output:
sym = ORCL
price = 18.75
change = 0.5
System managers start a data feeder process. Like other processes, the system manager must set up a process of the datafeeder in order to run it. For more information, see OracleAS Wireless Administrator's Guide.
The external name is the name used when retrieving content from a content provider. This mechanism is intended for cases in which the external representation of the parameter name changes after the feed has been built, such as when one changes to another content provider. The external name is optional; if it is not specified, then the internal name is used.
You specify a caption to use for the input parameter. This is for documentation purposes only.
There are cases in which an input parameter has been defined, but is not relevant when retrieving content. If the special constant __NONE__ is used for the external parameter name, that input parameter will be ignored when constructing the download URL or POST request.
By default, feeds run continuously when started. Each feed has an associated update policy, which can be used to fine-tune the running of the feed (such as the time of day to start and stop the feed, the days on which to run and the interval between feed runs).
The following code sets the update policy of the example data feeder to run on weekdays between 9:00 AM and 5:00 PM.
ModelServices ms = MetaLocator.getInstance().getModelServices();
DataFeeder    df = ms.lookupDataFeeder("stock_yahoo");
UpdatePolicy  up = df.getUpdatePolicy();
up.setStartTime(9,0,0);
up.setEndTime(17,0,0);
up.setUpdateDays(UPDATE_WORKDAYS);
// Set update interval to 300 seconds, i.e. update every
// 5 minutes
up.setUpdateInterval(300);
When accessing datafeeds with XML content, you must specify an XSLT stylesheet that will transform the input XML to a common XML format.
The common XML format consists of a feed result (<omfeed_result>), which has a number (zero or more) of datarows (<omfeed_datarow>), each one consists of one or more named datacolumns (<omfeed_datacolumn>). The name of the data column is matched with the parameters defined for the feed. Each output parameter should have a corresponding data column. This code sample illustrates the output of a stock feed:
<?xml version="1.0"?>
<market-data>
<quote-set>
<quote symbol="ORCL" name="ORACLE CORPORATION" type="stock"
exchange-code="NASDAQ" last="32.000000" close="28.562500" close-flag="closed"
change="3.4375" percent-change="12.04%" volume="56362800" open="30.0"
high="32.4375" low="29.9375" bid="32.0" ask="32.0625" bid-size="36"
ask-size="90" high-52-week="46.468998" low-52-week="15.438"
shares-outstanding="5629833" pe-ratio="29.299999" volatlity="16.150000"
yield="0.000000" earnings-per-share="1.092000" status="ok"/>
</quote-set>
</market-data>
The stylesheet for transforming this result would then look like this:
<xsl:stylesheet version="1.0" xmlns:xsl="http://www.w3.org/1999/XSL/Transform">
  <xsl:template match="quote-set">
    <omfeed_result>
      <xsl:for-each select="quote">
        <omfeed_datarow>
            <omfeed_datacolumn>
              <xsl:attribute name="name">sym</xsl:attribute>
              <xsl:value-of select="@symbol"/>
            </omfeed_datacolumn>
            <omfeed_datacolumn>
              <xsl:attribute name="name">price</xsl:attribute>
               <xsl:value-of select="@last"/>
            </omfeed_datacolumn>
            <omfeed_datacolumn>
              <xsl:attribute name="name">change</xsl:attribute>
              <xsl:value-of select="@change"/>
            </omfeed_datacolumn>
        </omfeed_datarow>
      </xsl:for-each>
    </omfeed_result>
  </xsl:template>
Many software applications offer the ability to notify users of certain events that are occurring in an application. For example, a calendar system may notify users that they have been invited to a meeting, or that the location of a previously scheduled meeting has changed. In most cases the application allows users to indicate the types of events they are interested in. This allows users to limit notifications to only those events they consider urgent. These event notifications are typically sent as emails.
Based on the Notification Engine, OracleAS Wireless includes out-of-the-box multi-channel notification solutions for a number of applications, including Oracle Calendar, Oracle Unified Messaging, Oracle Workflow, and Microsoft Exchange Email. It provides an infrastructure to deliver application notifications to users' preferred wireless devices, with content customized for the specific device type. For the same event, users can receive different notifications, depending on the type of device they are using. Voice-based notifications will use proper sentences and dialog, while SMS-based notifications take into consideration the size limitations of SMS messages.
This section describes the integration architecture of application notification and the Notification Engine. It also discusses two integration cases: Oracle Workflow and Microsoft Exchange.
The application event notification process uses the OracleAS Wireless Notification Engine to deliver notifications to wireless devices. It adds components that collect application events, process user contact rules, and formats notification contents. An architectural overview of the various components of the notification process is shown below.
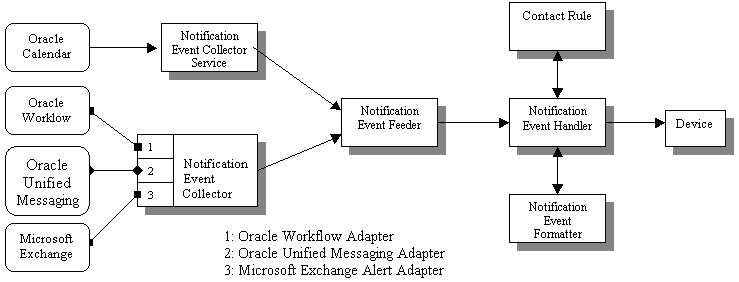
Applications outside of OracleAS Wireless can use two different mechanisms to interface with the Notification Engine.
The first mechanism is the push interface. Applications send notification events over HTTP to the Notification Event Collector, which is based on a servlet. The Notification Event Collector then passes the notification event data to the Notification Event Feeder, which is a customized Data Feeder to the Notification Engine.
The second mechanism is the pull interface. The notification event collector process connects to the application and retrieves the notification events. The notification event data is then passed onto the Notification Event Feeder. The notification event collector process consists of a number of different adapters; each adapter is specific for a particular application. You can enable and disable adapters by configuring the notification collector process. Use the Enterprise Manager console to create, start, stop or configure notification collector processes.
The notification event handler is a customized system-level notification application that reads data from the notification event feeder. The data indicates the target user for this notification, as well as the type of notification and other notification-specific data.
The notification event handler then looks up the target user's active contact rule to determine the user's preferred notification device type and address. The notification event formatter is then invoked, which generates the content of the notification, customized for the user's device type. The generated notification content is delivered to user's devices by the notification engine.
The notification event handler is a system-level notification application. Users do not need to explicitly create a notification subscription on this process in order to receive notifications. Instead, only the user ORCLADMIN is subscribed to this process. Depending on the application, users can specify (either in the customization portal, or in the actual application itself), for which events they want to receive notifications. For each notification processed, the system will look up the contact rule of the target user and make sure that the correct user receives the notification. Use the Enterprise Manager console to start, stop or configure notification event process. See OracleAS Wireless Administrator's Guide for more information on using Oracle Enterprise Manager to start and stop processes.
The notification event collector and notification event handler are two separate processes. Both of them must be running at the same time for the system to process application event notifications.
Oracle Workflow integration includes two components. One is a notification application which receives notifications from the Oracle Workflow Notification queues and sends them to the user's mobile device. The other component is an Oracle Workflow Notification Worklist application which can be accessed through the OracleAS Wireless portal.
Since Oracle Workflow and OracleAS Wireless are both components of Oracle Application Server, OracleAS Wireless has the ability to connect to Oracle Workflow through OID. And since OracleAS Wireless connects to Oracle Workflow through OID, they share the same user repository.
Oracle Workflow provides a queue which contains all the outgoing notifications for that particular instance. Each message on the queue contains all the necessary information for the notification and the user to which it is going. OracleAS Wireless dequeues these messages and constructs a message to be sent to the end user using XMS. The user can then respond to this notification. The response is directed to a OracleAS Wireless application which will then update Oracle Workflow according to the user's response.
This is the equivalent of the Oracle Workflow Notification Worklist through the OracleAS Wireless portal. Using OID, the Worklist Application will connect to Workflow to retrieve a list of all the user's open notifications. Each notification can be closed or responded to (depending on the type of notification).
|
See: For more information on Oracle Workflow and OracleAS Wireless, see Oracle Workflow Administrator's Guide, and Oracle Workflow Developer's Guide. |
OracleAS Wireless provides multi-channel notification capability for Microsoft Exchange Email Server, based on the architecture described above. Users of OracleAS Wireless who have Microsoft Exchange Email accounts are able to receive notification messages on their wireless devices when they receive urgent email and/or email from specified people.
An architectural overview of the various components in Microsoft Exchange Notification Integration is shown below.
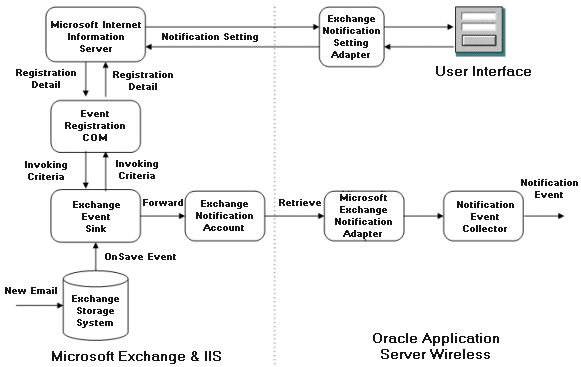
The Microsoft Exchange notification is integrated through the pull interface. A special Microsoft COM object is deployed in the Exchange server. The COM intercepts Exchange Server's store events and creates notification events based on user's event subscription. The notification events are delivered into a special exchange notification account in the form of email. The Microsoft Exchange adapter in the notification event collector process retrieves those notification event emails through standard IMAP or POP3 protocol.
Users create notification subscriptions using OracleAS Wireless Tools. The subscription data is transferred to the Microsoft Exchange Server host through HTTP/ASP, and saved as Microsoft Exchange store event parameters.
See OracleAS Wireless Administrator's Guide for notification configuration for Microsoft Exchange Server and OracleAS Wireless.
This section is for users who want to migrate from the 9.0.2.x version of the notification system to the current version. It requires basic knowledge of the notification systems in both versions, and details the steps required to perform this migration. For information on the notification system for this or the previous release, see the appropriate Developer's Guide.
In this release, 9.0.2.x notifications and their APIs are depleted. Oracle Corporation strongly recommends that you do not mix 9.0.2.x notifications with 9.0.4.x notifications. Use only 9.0.2.x OR only 9.0.4.x notifications at a given time.
If you have not previously used 9.0.2.x notifications, then start with the 9.0.4.x after you have completely migrated your OracleAS Wireless instance to the current release.
If you have existing 9.0.2.x notifications on your system, continue using only them in an environment in which OracleAS Wireless 9.0.2.x and 9.0.4.x co-exist. After migrating your OracleAS Wireless instance to 9.0.4.x, upgrade your notification to the 9.0.4.x style, and start using exclusively 9.0.4.x notifications. A script (provided as part of the product) enables you to upgrade your 9.0.2.x notification objects into 9.0.4.x-compliant notifications. The script is discussed later in this section.
Here is a typical notification migration scenario:
migrateNotifications to upgrade 9.0.2.x-style notifications to 9.0.4.x-style.
There have been significant structural changes to notifications in this release. Major differences include:
Previously, there were only two types of notifications: value-based and time-based.
Value-based notifications are evaluated every time the notification engine receives a data push event from the data feeder component.
Time-based notifications are a bit more complicated.
These notifications were evaluated at certain times (specified by the notification user at subscription time). Every notification, whether time- or value-based, was based on a data feeder (in 9.0.2.x). 9.0.2.x timer events result in data retrieval at this specified time. Furthermore, these time-based notifications are also evaluated every time the notification system receives a data push event from the data feeder. For example, a developer designs a time-based notification, created on a stock feed data feeder. This stock feed data feeder has one input parameter: TICKER and one output parameter: PRICE. If the user subscribes to this notification for 10:00A.M. everyday, then the notification system will generate a notification at 10:00A.M., but it will also evaluate notifications every time the notification engine receives data from the data feeder. So, even though the user has subscribed to receive notifications at 10:00A.M., the user will receive notifications whenever the value triggering condition is validated.
In this release, time-based notifications are extended to avoid receiving notifications at times other than the specified time; this type of time-based notifications are called strictly time-based. All new notifications are defaulted to strictly time-based, if a developer does not specify this parameter.
In this release, it is also possible to design notifications without any data feeder. This type of notification can be used when a user wants to send a simple notification message at certain times, or to retrieve relevant content using the message generation mechanism. For example, if a developer wants to design a calendar notification, there are two options:
In 9.0.4.x, you can also utilize the Location Server to design location-based notifications.
Using 9.0.2.x, one can provide a simple message template to generate message content which in turn will be pushed to end-users. 9.0.2.x notifications can also invoke a hook (java class) to generate message content for more complicated cases.
In this release, the only mechanism to generate message content is by invoking an OracleAS Wireless application, which usually invokes an OracleAS Wireless application to generate this content. For this reason, every notification must be mapped to an OracleAS Wireless master application. In other words, in 9.0.4.x, developers must notification-enable master applications. This feature avoids replication of code, since the same master application can be used by both notifications and regular device access. Also, user subscriptions can be handled by using the mobile portal application tree.
It is still possible to use message templates in this release by utilizing a seeded OracleAS Wireless application, which is capable of accessing and processing this message template to generate end-user content. However, developers must still create a master application to define mapping information between the seeded OracleAS Wireless application and the master notification. In this case, the master application creation process is automated, and manual steps (and API calls) are minimal.
Previously, notification authorization was performed by using topics and Alert Services. After designing a master notification, developers must create AlertServices/Topics and assign these to appropriate users for authorization control.
In this release, since message generation is performed by regular master applications, the notification system is utilizing regular Link and Folder objects to provide authorization.
After upgrading to 9.0.4.x, users must not mix 9.0.4.x notifications with 9.0.2.x. Use 9.0.2.x notifications only until you are ready to migrate to the 9.0.4.x notifications, and use only 9.0.4.X notifications after a successful migration.
The 9.0.4.x OracleAS Wireless Webtool utility is defaulted to show/create only 9.0.4.x notifications. Likewise, the 9.0.4.x OracleAS Wireless Mobile Portal utility can only process 9.0.4.x subscriptions. If you want to process 9.0.2.x notifications using 9.0.4.x OracleAS Wireless Webtool, you must modify the System.properties file located in IASW_HOME/wireless/server/classes/oracle/panama/core/admin directory as follows:
DeprecatedAlertSupport, and change its value to true.
Since the subscription process and authorization are completely different in 9.0.2.x and 9.0.4.x, it is not possible to use OracleAS Wireless Mobile Portal to process 9.0.2.x subscriptions. To do so, users should either enable 9.0.2.x Customization Portal utility or develop their own subscription mechanism. Sample code is provided at the end of this section demonstrating how to migrate your existing code for subscription handling.
It is possible to transform (migrate) any 9.0.2.x notification to 9.0.4.x using a script provided with OracleAS Wireless. This script performs the following operations:
/master/notifications.
/notifications folder.
Although the migration script does not remove or disable the old master alert service for integrity and security purposes, you should disable the old master alert services once the migration process is successfully completed.
To run this script:
migrateNotifications.[sh|bat] by providing parameters as follows:
migrateNotifications.[sh|bat] -name <9.0.2.X master alert name(s)> -owner <owner user name>
migrateNotifications.[sh|bat] -oid <9.0.2.X master alert oid> -owner <owner user name>
Remember that you must stop existing notification processes that contain migrated 9.0.2.x notifications, or remove these master notifications from those processes and restart them. As explained before, the migration script does not remove or disable 9.0.2.x notifications. Therefore, if these processes are not maintained correctly, users will receive 2 copies of each notification, one from the old master notification and one from the new one.
Since the 9.0.4.x notification system is backward-compatible, any custom code written for altering 9.0.2.x notifications or subscriptions should work without any errors or problems, even after the migration. However, code written for 9.0.2.x APIs will be altering 9.0.2.x notifications and subscriptions only; that is, if a new master notification is created using the old API, this master notification will not be available on the 9.0.4.x notification system, hence it will not be processed by the 9.0.4.x notification engine.
Developers must modify their existing code to use 9.0.4.x APIs after successful migration in order to take advantage of new functionality. As of this release, all notification APIs included in the oracle.panama.alert package have been deprecated, and a new package (oracle.panama.mobilealert) is introduced to provide 9.0.4.x functionary. Some methods and interfaces are replicated in both 9.0.2.x and 9.0.4.x APIs. However, every 9.0.4.x notification-related method calls should be performed using this new package (oracle.panama.mobilealert), even for the methods that exist in 9.0.2.x APIs (in oracle.panama.alert package).
The following code samples illustrate how to create a user subscriptions in 9.0.2.x using the deprecated oracle.panama.alert package and also in 9.0.4.x (after migrating the same notification) using the oracle.panama.mobilealert package.
The following sample illustrates code for adding a 9.0.2.x subscription.
    MetaLocator m = MetaLocator.getInstance();
    ModelServices s = m.getModelServices();

    //Assuming we have a user named "DemoUser"
    User myUser = s.lookupUser("DemoUser");

    //Assuming we have a validated E-Mail address, the first e-mail device
address
    DeviceAddress[] deviceAddrList =
            myUser.getDeviceAddresses(DeliveryType.EMAIL);
    DeviceAddress subscriptionDeviceAddr = deviceAddrList[0];

    //Retrieve the alert service object that will be used to create a
subscription
    oracle.panama.alert.AlertService alert =
s.lookupAlertService("StockNotification");

    alert.setUserAlertDevice(subscriptionDeviceAddr);

    oracle.panama.alert.UserAlertSubscription userSub =
            alert.addUserAlertSubscription(myUser);

    userSub.setDisplayName("DemoSubscription");

    // Set subscription time to 13:30 in daily mode.
    userSub.setHour(13);
    userSub.setMinute(30);
    userSub.setFrequency(
            new oracle.panama.alert.impl.AlertTimeFrequencyImpl(
                    oracle.panama.alert.AlertTimeFrequency.DAILY));

    // Expiration time set to one month ahead
    Calendar expireAt = Calendar.getInstance();
    expireAt.add(Calendar.MONTH, 1); //Expire next month
    userSub.setExpirationDate(expireAt);

    //Set the input parameter, i.e. stock ticker to ORCL
    oracle.panama.alert.AlertInputParamValue[] pVs =
userSub.getInputParameters();
    pVs[0].setValue("ORCL");

    // set the triggering condition, i.e. stock price >= 20
    oracle.panama.alert.AlertConditionValue[] acv = userSub.getConditions();
    acv[0].setValue("20");
    userSub.setCondition(pVs, acv);

    // Save subscription
    userSub.save();

    // Save AlertService, so that user alert device can be persisted
    alert.save();

Sample code for adding the  9.0.4.X subscription after migration:


    MetaLocator m = MetaLocator.getInstance();
    ModelServices s = m.getModelServices();

    //Retrieve the master alert service object that will be used to create a
subscription
    oracle.panama.mobilealert.MasterAlertService masterAlertService =
            s.lookupMobileMasterAlertService("StockAlert");

    //Retrieve the link that will be used to create a subscription,
    //note that it has the same name as the AlertService object
    Link myLink = s.lookupLink("/notifications/StockNotification");

    //Assuming we have a user named "DemoUser"
    User myUser = s.lookupUser("DemoUser");

    //Assuming we have a validated E-Mail address, the first e-mail device
address
    DeviceAddress[] deviceAddrList =
            myUser.getDeviceAddresses(DeliveryType.EMAIL);
    DeviceAddress subscriptionDeviceAddr = deviceAddrList[0];

    //
    oracle.panama.mobilealert.ServiceAlertSubscription userSub =
            masterAlertService.addUserAlertSubscription(myUser, myLink);

    userSub.setSubscriptionDevice(subscriptionDeviceAddr);
    userSub.setAlternativeType(ServiceAlertSubscription.AFTERMAX_DISCARD);

    userSub.setDisplayName("DemoSubscription");


    // Set subscription time to 13:30 in daily mode.
    //Since start/end time are same, interval can be any value
    userSub.setHour(13);
    userSub.setMinute(30);
    userSub.setEndHour(13);
    userSub.setEndMinute(30);
    userSub.setInterval(1);
    userSub.setFrequency(
            new oracle.panama.mobilealert.impl.AlertTimeFrequencyImpl(
                    AlertTimeFrequency.DAILY));

    // Expiration time set to one month ahead
    Calendar expireAt = Calendar.getInstance();
    expireAt.add(Calendar.MONTH, 1); //Expire next month
    userSub.setExpirationDate(expireAt);

    //Set the input parameter, i.e. stock ticker to ORCL
    oracle.panama.mobilealert.AlertInputParamValue[] pVs =
            userSub.getInputParameters();
    pVs[0].setValue("ORCL");

    // set the triggering condition, i.e. stock price >= 20
    oracle.panama.mobilealert.AlertConditionValue[] acv =
userSub.getConditions();
    acv[0].setValue("20");

    // Save subscription information
    userSub.save();
Note that all notification-related objects are proceeded by the full package name to avoid confusion.
|
|
 Copyright © 2003 Oracle Corporation. All Rights Reserved. |
|