|
Oracle® Application Server Portal Configuration Guide
10g Release 2 (10.1.2) Part No. B14037-01 |
|
 Previous |
 Next |
|
Oracle® Application Server Portal Configuration Guide
10g Release 2 (10.1.2) Part No. B14037-01 |
|
 Previous |
 Next |
Web Clipping is a browser-based declarative tool that enables you to integrate any Web application with OracleAS Portal. It is designed to give you quick integration by leveraging the Web application's existing user interface. Web Clipping has been implemented as a Web provider using the Java Portal Developers Kit, which is a component of OracleAS Portal.
With Web Clipping, you can collect Web content into portlets in a single centralized Web page. You can use Web Clipping to consolidate content from Web sites scattered throughout a large organization.
Before you use Web Clipping, you must perform some administrative tasks, including:
Adding Certificates for Trusted Sites
Section 6.1.10.1 in Chapter 6, "Securing OracleAS Portal" describes how to configure or extend the trusted certificate file. A trusted server certificate file, ca-bundle.crt, generated from Oracle Wallet Manager is shipped with OracleAS Portal. This file contains an initial list of trusted server certificates that might be used for navigating to some secure servers using HTTPS. However, because it is not a complete list of all possible server certificates that exist on the Web, this file must be configured or extended to recognize any additional trusted server certificates for any new trusted sites that are visited. Section 6.1.10.1 provides information about how to configure or extend this trusted certificate file.
Configuring Oracle Advanced Security for the Web Clipping Provider
Section 6.1.10.2 in Chapter 6, "Securing OracleAS Portal" describes configuring Oracle Advanced Security Option (ASO) to secure and encrypt the channel between itself (at the middle-tier) and the database, which hosts the Web Clipping Repository.
Web clippings have definitions that must be stored persistently in the Web Clipping Repository hosted by an Oracle Database server. The Web Clipping Provider Test Page automatically detects whether or not the Web Clipping provider is configured to access a database. If not, the Status column for the Web Clipping Repository displays Not Configured.
As Portal Administrator, you can configure the Web Clipping Repository using the Provider Test Page: Web Clipping page at:
http://<host>:<port>/portalTools/webClipping/providers/webClipping
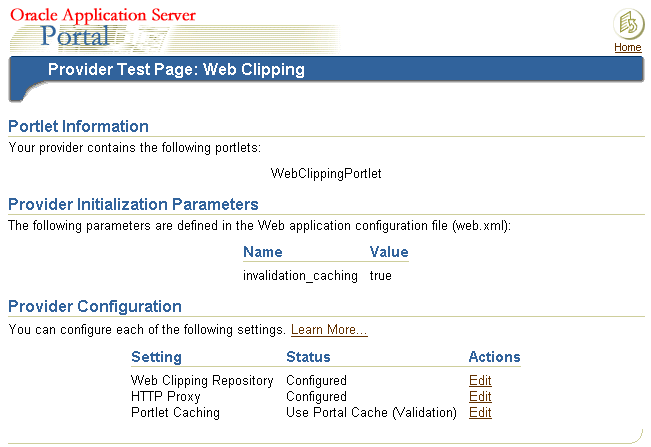
The Provider Test Page: Web Clipping page automatically detects whether or not the Web Clipping provider is configured to access the database. If it is not, the Status column for the Web Clipping Repository displays Not Configured. The Edit link in the Actions column enables you to configure the database connection parameters in the Edit Provider Page. The following figure shows the Provider Test Page: Web Clipping page:
If this is the first time you are installing the Web Clipping provider, you need to obtain a database user account from your database administrator before you begin configuring. For more information, click Learn More in the Provider Configuration section of the Provider Test Page. Review the information in the Web Clipping Provider Test Page section.
To configure the repository settings:
In the Provider Configuration section, the Setting column contains the field Web Clipping Repository. Click its corresponding Edit link in the Actions column.
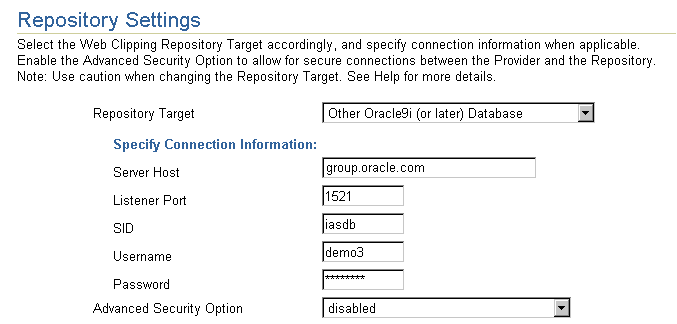
In the Repository Settings section of the Edit Provider: webClipping page, you specify the database connection information for the Web Clipping provider. Select one of the following choices for the Repository Target database:
OracleAS Infrastructure Database (default): If you select this option, no other connection parameters need be specified.
Other Oracle9i (or later) Database: If you select this option, specify the following connection parameters:
Server Host: The name of the database server
Listener Port: The listener port for the database server
SID: The database SID
Username: The database user name
Password: The password for the database user
If you require a secure database connection, in the Advanced Security Option field, select enabled (secure database connection). See Section 6.1.10.2, "Configuring Oracle Advanced Security for the Web Clipping Provider" for more information about configuring the Advanced Security Option.
The following figure shows the Repository Settings section of the Edit Provider page:
Click OK to save the settings and return to the Provider Test Page.
If you have specified the same database for your Repository Target as the one used for a PDK 9.0.2.4.0 installation, as part of your upgrade, you will be notified that a Repository Upgrade also needs to take place. The Web Clipping Provider Test Page will contain a Upgrade (from 9.0.2.4.0) link that enables you to do a one-click upgrade for installing new tables as well as migrating existing Clipping Definitions to the latest versions.
|
Note: After the upgrade, the Clipping Definitions stored in the Web Clipping Repository will no longer work with PDK 9.0.2.4.0. |
For more information, click Learn More in the Provider Configuration section of the Web Clipping Provider test page.
In the Proxy Settings section of this page, you specify proxy information, if necessary. See Section I.3.1, "Configuring Caching Using the Web Clipping Provider Test Page" for more information.
Your HTTP or HTTPS proxy settings must be set to allow the Web Clipping Studio to connect to Web sites outside of your firewall. You can specify the settings in the following ways:
Using the Web Clipping Provider Test Page (see Section I.2.1)
Manually editing the provider.xml file (see Section I.2.2)
As Portal Administrator, you can configure proxy settings using the Web Clipping Provider Test Page at:
http://<host>:<port>/portalTools/webClipping/providers/webClipping
To configure proxy settings using the test page:
In the Provider Configuration section, the Setting column contains the field HTTP Proxy. Click its corresponding Edit link in the Actions column.
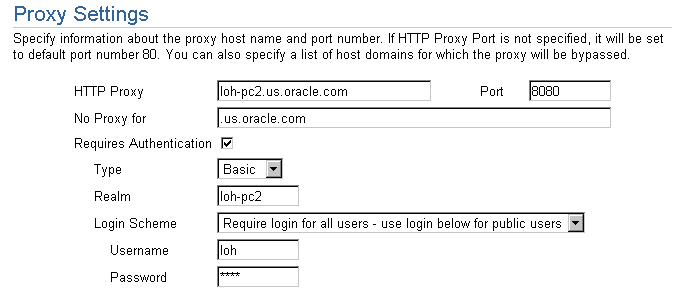
In the Proxy Settings section of the Edit Provider: webClipping page, enter the proxy settings for the Web Clipping provider:
HTTP Proxy: Enter the name of a proxy server if one is required for the provider to access the Web site being clipped. A proxy server provides access to content from servers outside a firewall.
Port: Enter the port number for the HTTP Proxy server. If you specify an HTTP Proxy server, but not a port, the HTTP Proxy port is set to default port number 80.
No Proxy for: Enter the name of any domain to which you can directly connect, bypassing a proxy server. Domain names are the part of a URL that contain the names of a business, or organization, or government agency, for example:
*.company.com, *.companycorp.com, *.us.company.com
You can also use this field to specify a list of host names to restrict content, as described in Section I.2.3.
Requires Authentication: Select this check box for proxy servers that require authentication before access. Then, enter information in the following fields:
Type: Choose the type of proxy server this provider will use: Basic or Digest.
Realm: Enter the name of the realm of the proxy server that will be accessed by the user. If you do not know the name of the realm, contact the administrator of the proxy server.
Login Scheme: Choose one of the following three options:
Use login below for all users: By choosing this option, the login information you enter in the Username or Password fields will be used for all users. Users will not see the Proxy Authentication section on the Edit Defaults and the Customize page.
Require login for all users: By choosing this option, you do not enter any information in the Username or Password fields. The page designer must log in using the Proxy Authentication section on the Edit Defaults page when they define the portlet. The end user must log in using the Proxy Authentication section on the Customize page.
Require login for all users - use login below for public users: By choosing this option, the login information you enter in the Username or Password fields will be used for all public users only. If the user is not public, they must log in using the Proxy Authentication section on the Customize page.
Username: Enter the user name to log in to the proxy server.
Password: Enter the password for the specified user name.
If you select the Requires Authentication check box and require users to log in (that is, you choose either Use login below for all users or Require login for all users), you must configure the Web Clipping repository. To configure the repository, go to the Web Clipping Provider Test page. In the Provider Configuration section, click the Edit link that corresponds to Web Clipping Repository.
The following figure shows the Proxy Settings section of the Edit Provider page:
Click OK to save the settings and return to the Web Clipping Provider test page.
For more information, click Learn More in the Provider Configuration section of the Web Clipping Provider test page.
As the Portal Administrator, you can set proxy settings manually according to your HTTP or HTTPS configuration. Edit the appropriate entries in the provider.xml file located in the following directory:
On UNIX:
ORACLE_HOME/j2ee/OC4J_Portal/applications/ portalTools/webClipping/WEB-INF/providers/webClipping
On Windows:
ORACLE_HOME\j2ee\OC4J_Portal\applications\ portalTools\webClipping\WEB-INF\providers\webClipping
The following example shows the relevant portion of provider.xml:
<proxyInfo class="oracle.portal.provider.v2.ProxyInformation">
<httpProxyHost>proxy_hostname</httpProxyHost>
<httpProxyPort>proxy_portnum</httpProxyPort>
<dontProxyFor>list_of_proxies</dontProxyFor>
<proxyUser>proxy_username</proxyUser>
<proxyPassword>proxy_password</proxyPassword>
<proxyType>basic_or_digest</proxyType>
<proxyUseAuth>true_or_false</proxyUseAuth>
<proxyUseGlobal>true_or_false</proxyUseGlobal>
<proxyRealm>realm_name</proxyRealm>
</proxyInfo>
The elements have the following meanings and values:
httpProxyHost: The name of a proxy server if one is required to make a URL connection with the provider, for example, when OracleAS Portal requests one of the provider's portlets. A proxy server provides access to content from servers outside a firewall.
httpProxyPort: The port number for the proxy server. If you specify an httpProxyHost, but not a port, httpProxyPort is set to default port number 80.
dontProxyFor: The name of any domain to which you can directly connect, bypassing a proxy server. Domain names are the part of a URL that contain the names of a business, or organization, or government agency, for example:
*.company.com, *.companycorp.com, *.us.company.com
You can also use this element to specify a list of host names to restrict content, as described in Section I.2.3.
proxyUser: The user name to log in to the proxy server.
proxyPassword: The password for the specified user name.
proxyType: The type of proxy server this provider will use. Valid values are Basic or Digest.
proxyUseAuth: Whether or not login information is required to access this proxy server. A value of true specifies that login information is required. A value of false indicates that login information is not required.
proxyUseGlobal: Whether or not the user name and password are required for public users or all users and how the user name and password are used:
If the value is true, the proxy_username specified in proxyUser and the proxy_password specified in proxyPassword are used for all users. The proxyUser and proxyPassword elements must be present in the file and must contain a user name and password. Users will not see the Proxy Authentication section on the Edit Defaults and Customize page.
If the value is false and the proxyUser and proxyPassword elements are present in the file, the specified proxy_username and proxy_password are used for public users only. If the user is not public, they must log in using the Proxy Authentication section on the Customize page.
If the value is false and the proxyUser and proxyPassword elements are not present in the file, all users must log in. The page designer must log in using the Proxy Authentication section on the Edit Defaults page when they define the portlet. The end user must log in using the Proxy Authentication section on the Customize page.
If the value is false, regardless of whether or not the proxyUser and proxyPassword elements are present in the file, you must configure the Web Clipping repository. To configure the repository, go to the Web Clipping Provider Test page. In the Provider Configuration section, click the Edit link that corresponds to Web Clipping Repository.
proxyRealm: The name of the realm of the proxy server that will be accessed by the user. If you do not know the name of the realm, contact the administrator of the proxy server.
To restrict users from clipping content from unauthorized external Web sites, Web Clipping uses the proxy exception list. This is available only for environments that utilize a proxy server to reach external Web sites. (Usually, you use the proxy exception list to specify any domain to which you can directly connect, bypassing a proxy server.)
To add an external Web site to the proxy exception list:
Go to the Edit Provider: webClipping page, as described in Section I.2.1.
In the Proxy Settings section, for the No proxy for field, enter the Web sites which you want to restrict.
Click OK to save the settings and return to the Web Clipping Provider test page.
Users attempting to reach a Web site in one of the listed domains, from the Web Clipping Studio, will receive an HTTP timeout error.
By default, validation-based caching is used through OracleAS Portal for all Web Clipping portlets. With validation-based caching, the Parallel Page Engine (PPE) contacts the OracleAS Portal provider to determine if the cached item is still valid.
If you have Oracle Application Server Web Cache installed, you can elect to use invalidation-based caching through OracleAS Web Cache. Note that each type of caching is mutually exclusive; that is, you can use only one or the other, but not both.
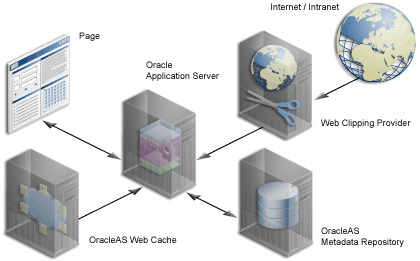
With invalidation-based caching, an item remains in the cache until the cache receives notification that the item needs to be refreshed. For example, if the Web Clipping portlet contains content that is updated on a regular basis, the cache will be invalidated. Invalidation-based caching, as shown in Figure I-1, decreases the number of requests the Web Clipping provider must entertain while maintaining the same network traffic for each round trip involving PPE. Depending on your deployment scenario, you may prefer using one caching method over the other.
Figure I-1 Invalidation-Based Caching Provided by OracleAS Web Cache
See Section 1.3, "Understanding Caching in OracleAS Portal" and Section 5.7, "Configuring OracleAS Web Cache Caching in OracleAS Portal" for more information about caching.
By default, the Web Clipping provider uses Portal caching (validation-based caching). To use OracleAS Web Cache (invalidation-based caching), see one of the following sections to configure caching:
If you decide to use OracleAS Web Cache to cache Web clipping content, as a final step, you must use the Portal Navigator and change the connect string for the provider URL to point to a URL with the OracleAS Web Cache port (portalTools/builder/providerui/Navigator?event=init). Usually, the OracleAS Web Cache port is 7778. Check the Oracle Application Server port usage page to verify this value. See Oracle Application Server Administrator's Guide for a list of default port numbers used by Oracle Application Server components and services.
In this configuration, OracleAS Web Cache caches Web clipping content between the OracleAS Portal instance and the Web Clipping provider.
As Portal Administrator, you can configure caching using the Web Clipping Provider Test Page at:
http://<host>:<port>/portalTools/webClipping/providers/webClipping
To configure caching:
In the Provider Configuration section, the Setting column contains the field Portlet Caching. Click its corresponding Edit link in the Actions column.
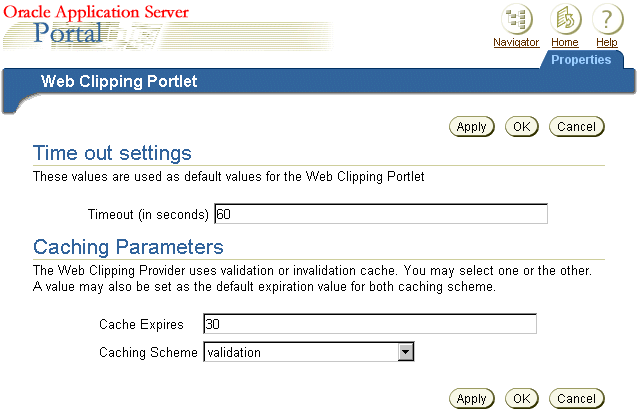
In the Time out settings section of the Web Clipping Portlet page, enter the number of seconds OracleAS Portal should try to connect to Web Clipping portlets before displaying a timeout message.
In the Caching Parameters section, specify a cache expires value in the Cache Expires field. The default value is 30 minutes.
In the Caching Scheme field, select the caching scheme (either validation or invalidation (requires OracleAS Web Cache).)
The following figure shows the Web Clipping Portlet page:
Click OK to save the settings and return to Web Clipping Provider Test Page.
For more information, click Learn More in the Provider Configuration section of the Web Clipping Provider test page.
To manually enable caching with OracleAS Web Cache, take the following steps:
Check the cache.xml file in the following directory to verify the accurate values of the invalidation host and port number:
On UNIX:
ORACLE_HOME/portal/conf
On Windows:
ORACLE_HOME\portal\conf
Edit the provider.xml file located in the following directory:
On UNIX:
ORACLE_HOME/j2ee/OC4J_Portal/applications/
portalTools/webClipping/WEB-INF/providers/webClipping
On Windows:
ORACLE_HOME\j2ee\OC4J_Portal\applications\
portalTools\webClipping\WEB-INF\providers\webClipping
In the provider.xml file:
Search for the useInvalidationCaching tag and set its value to true to enable OracleAS Web Cache invalidation-based caching.
Search for the cacheExpires tag and set a default value if you wish to modify that value. This value is in minutes.