16
Building a Header and Footer Report
Figure 16-1 Group left report output with header and footer
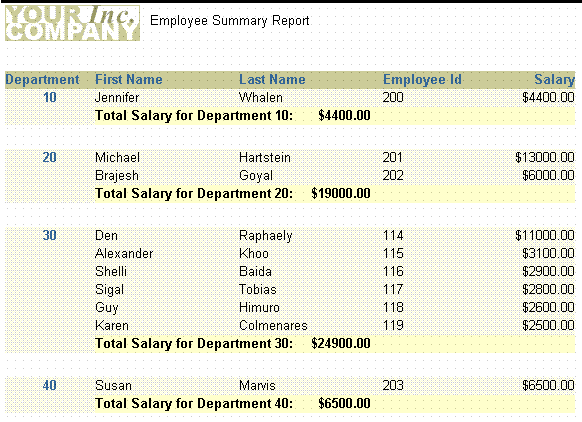
Text description of the illustration headfoot_fin.gif
This report has a page header, Employee Summary Report, printed in the upper margin area of every page of the report, and a footer, Total Salary for Department <number>: <sum_sal>, printed at the end of the list of employee information for each department.
Concepts
- A header and footer report contains boilerplate or fields in its header or footer. To create headers and footers in your report, add the boilerplate or field in the Paper Layout view of the Report Editor. If you create a field, make sure there is only one value for it. Otherwise, Reports Builder will not know which of the different values you want to print.
- How often the boilerplate and fields appear and whether they are headers or footers depends on where you position them in the layout. Any boilerplate that is positioned within a repeating frame will print once every time the repeating frame prints. Boilerplate that is outside of all repeating frames will print once for the entire report.
- This report uses one query to select all necessary columns. You'll add a break by assigning a column to a second group.
- The report uses a group left layout with modifications. You'll increase the size of a repeating frame and the frame enclosing it to ensure they are large enough to contain a footer, then add the footer. Then you'll modify the vertical spacing of a repeating frame to add space between each instance of it.
Example Scenario
Suppose that you want to create a report that displays and summarizes employee data by department. To make the report more readable, you decide to add a header to each page and to add footer for each master record.
To see a sample report with a header and footer, open the examples folder named headerfooter, then open the Oracle Reports example named headfootb.rdf. For details on how to access it, see "Accessing the example reports" in the Preface.
Table 16-1 Features demonstrated in this example
16.1 Prerequisites for this example
To build the example in this chapter, you must have access to the sample schema provided with the Oracle9i database. If you don't know if you have access to this sample schema, contact your database administrator. You should have access to the "Human Resources" portion of the schema to complete this example.
16.2 Create a data model and a group left layout
When you are creating a single-query report, such as this one, you can use the Report Wizard to create the data model and layout simultaneously.
To create a data model and layout:
- Launch Reports Builder (or, if already open, choose File > New > Report)
- In the Welcome or New Report dialog box, select Use the Report Wizard, then click OK.
- If the Welcome page displays, click Next.
- On the Report Type page, select Create Paper Layout Only, then click Next.
- On the Style page, type a Title for your report, select Group Left, then click Next.
- On the Data Source page, click SQL Query, then click Next.
- On the Data page, enter the following SELECT statement in the Data Source definition field:
SELECT FIRST_NAME, LAST_NAME, EMPLOYEE_ID, SALARY, DEPARTMENT_ID
FROM EMPLOYEES
ORDER BY DEPARTMENT_ID, EMPLOYEE_ID
Note:
You can enter this query in any of the following ways:
- Copy and paste the code from the provided text file called
headfoodtb_code.txt into the Data Source definition field.
- Click Query Builder to build the query without entering any code manually.
- Type the code in the Data Source definition field
|
Click Next.
Note:
If you are not already connected to a database, you will be prompted to connect to the database when you click Next. Ensure that you connect to a database that has the appropriate schema for this example. Section 16.1, "Prerequisites for this example" describes the sample schema requirements for this example.
|
- On the Groups page, click DEPARTMENT_ID and click the right arrow (>) to move this field to the Group Fields list, then click Next.
- On the Fields page, click the double right arrows (>>) to move all of the fields to the Displayed Fields list, then click Next.
- On the Totals page, click SALARY, then click Sum.
- Click Next.
- On the Labels page, change the labels as follows, then click Next:
This step will add a footer to each instance of the master repeating frame (departments).
Note:
The DEPARTMENT_ID column is part of the data model so you need to reference DEPARTMENT_ID in the footer label using &DEPARTMENT_ID.
|
- On the Template page, click Finish to display your report output in the Paper Design view. It should look something like this:
Figure 16-2 Group left report output with footer for master repeating frame
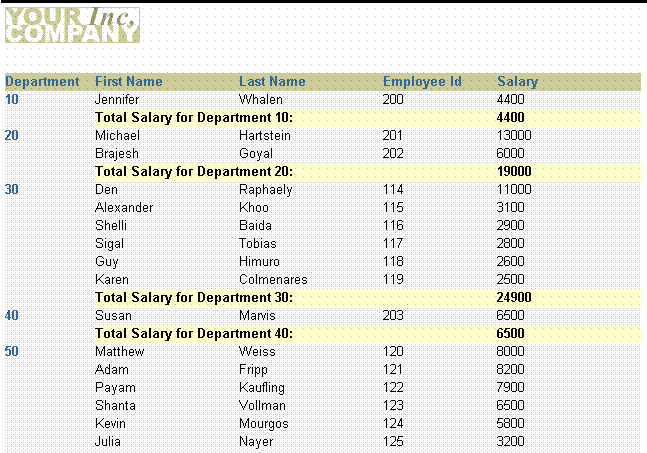
Text description of the illustration headfoot_out2.gif
16.3 Move a summary
In the Paper Design view, notice how the department summary of salaries is very far to the right of the footer label (Total Salary for Department &DEPARTMENT_ID). For this report, you will move the salary summary closer to its label.
To move the summary closer to its label:
- In the Paper Design view, click the Flex Off button in the toolbar to turn Flex mode off.
- Select the label, Total Salary for Department &DEPARTMENT_ID.
- Click and drag the rightmost handle of the label about 0.75 inches to the left to resize the object.
- Select the first summary value to the right of the label Total Salary for Department &DEPARTMENT_ID.
- Click and drag the summary value to the left until it is fairly close to its label.
- Click and drag the rightmost handle of the field about 1 inch to the left.
- Click the Flex On button in the toolbar to turn Flex mode back on.
Figure 16-3 Group left report output with summary closer to label
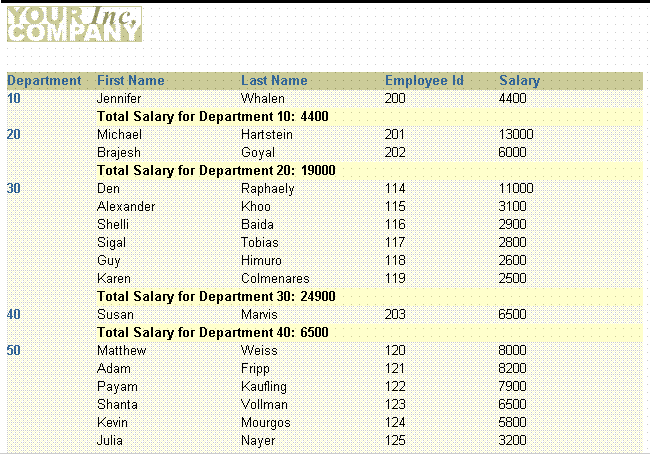
Text description of the illustration headfoot_out3.gif
16.4 Add a page heading
Now that you have added the repeating frame footer, it is time to add a page header. You perform this task from the Paper Layout view.
- In the Paper Layout view, click the Edit Margin button in the toolbar.
- From the font lists in the toolbar, choose Arial (Western), point size 10.
- Click the Text tool in the tool palette.
- Click somewhere to the right of the logo image and type the following text:
Employee Summary Report
- Move to an open area of the Paper Layout view and click the mouse button to exit text mode. Notice that the text object you just created is still selected, you can now adjust its positioning with the arrow keys. If you click in an open area a second time, the object is deselected.
- Save your report.
Figure 16-4 Group left report output with page heading

Text description of the illustration headfoot_out4.gif
16.5 Adding white space and formatting values
The only task that remains now is to make your report a little more readable by adding some white space between records and formatting values properly.
- In the Paper Design view, select the first department number value, which should be 10. All of the department numbers are immediately selected indicating that you can change their properties simultaneously.
- Click the Align Center button in the toolbar.
- Click the Select Parent Frame button in the toolbar.
- Choose Tools > Property Inspector to display the Property Inspector, and set properties:
- Under Repeating Frame, set the Vertical Space Between Frames property to 0.25.
- Click the title bar of the Paper Design view.
- Select the first number value underneath the Salary label.
- Shift-click on the department summary value for the first department.
|
Tip:
If you are familiar with format mask syntax, you could now right click on the field values, choose Property Inspector, and choose or manually enter a value for the Format Mask property.
|
- Click the Currency button in the toolbar. A currency symbol immediately appears next to all of the values.
- Click the Add Decimal Place button twice. Two decimal places are added to the right of the decimal point.
- Resize the salary field (F_SALARY) by clicking and dragging its rightmost handle approximately 0.5 inches to the left. Notice that even though the summary field (F_SumSALARYPerDEPARTMENT_ID) is also selected, only F_SALARY is resized.
- Shift-click the Salary label itself.
- Click the Align Right button in the toolbar. All of the values are immediately right aligned.
|
Tip:
The steps above have formatted all of the salaries and the department summary of your report. The report summary (the summary of all salaries in the report), however, is not yet formatted. You can find the report summary on the last page of the report and format it using the same techniques as above.
|
Figure 16-5 Group left report output with values formatted
Text description of the illustration headfoot_fin.gif
16.6 Summary
Congratulations! You have successfully created a header and footer report. You now know how to:
- create a data model and a layout.
- move a summary field.
- add a heading that repeats on all pages.
- add white space and format values.
For more information on any of the wizards, views, or properties used in this example, refer to the Reports Builder online help, which you can access in two ways:
