9 Adding and Deleting Nodes and Instances
This chapter describes how to add nodes and instances in Oracle Real Application Clusters (Oracle RAC) environments. You can use these methods when configuring a new Oracle RAC cluster, or when scaling up an existing Oracle RAC cluster.
This chapter includes the following sections:
Note:
For this chapter, it is very important that you perform each step in the order shown.See Also:
-
Oracle Real Application Clusters Administration and Deployment Guide for more information about adding and removing nodes from your cluster database
About Preparing the New Node
To prepare the new node prior to installing the Oracle software, see Chapter 2, "Preparing Your Cluster".
It is critical that you follow the configuration steps in order for the following procedures to work. These steps include, but are not limited to the following:
-
Take a backup of your database.
-
Install the operating system on the new node. You must use the same version of the operating system that is being used by the other nodes in the cluster. Also install any operating system patches or packages required by Oracle.
-
Update the kernel parameters on the new node to support the Oracle software.
-
Add storage devices to the
fstabfile. -
Add the public and private node names for the new node to the
/etc/hostsfile on the existing nodes,docrac1anddocrac2 -
Create the operating system groups and users.
-
Create a software owner that is an exact copy of the software owner on the other nodes in the cluster.
-
Verify the public node can be accessed (using the
pingcommand) from the existing nodes -
Configure SSH for the new node:
-
Create an authentication key for the
oracleuser. -
Append the key information for the new node to the
authorized_keysfile on all nodes. -
Copy the
authorized_keysfiles fromdocrac1to the new node. -
Create an SSH connection between
docrac1and the new node for the public and private node names. Accept and register the keys when prompted.
-
-
Run the following command on either
docrac1ordocrac2to verify the new node has been properly configuredcluvfy stage -pre crsinst -n docrac1,docrac3
Extending the Oracle Clusterware Home Directory
Now that the new node has been configured to support Oracle Clusterware, you use Oracle Universal Installer (OUI) to add a CRS home to the node being added to your Oracle RAC cluster. This section assumes that you are adding a node named docrac3 and that you have already successfully installed Oracle Clusterware on docrac1 in a nonshared home, where CRS_home represents the successfully installed Oracle Clusterware home.
Note:
Adding a new node to an Oracle RAC cluster is sometimes referred to as cloning.To extend the Oracle Clusterware installation to include the new node:
-
Verify the
ORACLE_HOMEenvironment variable ondocrac1directs you to the successfully installed CRS home on that node. -
Go to
CRS_home/oui/binand run theaddNode.shscript.cd /u01/app/crs/oui/bin ./addNode.sh
OUI starts and first displays the Welcome window.
-
Click Next.
The Specify Cluster Nodes to Add to Installation window appears.
-
Select the node or nodes that you want to add, for example,
docrac3. Make sure the public, private and VIP names are configured correctly for the node you are adding. Click Next. -
Verify the entries that OUI displays on the Summary window and click OK.
The Cluster Node Addition Progress window appears. During the installation process, you will be prompted to run scripts to complete the configuration.
-
Run the
orainstRoot.shscript ondocrac3, if prompted to do so. -
Run the
rootaddNode.shscript from theCRS_home/install/directory ondocrac1as therootuser when prompted to do so. For example:[docrac1:oracle]$ su root [docrac1:root]# cd /u01/app/crs/install [docrac1:root]# ./rootaddNode.sh
This script adds the node applications of the new node to the Oracle Cluster Registry (OCR) configuration.
-
Run the
orainstRoot.shscript on the nodedocrac3if OUI prompts you to do so. When finished, click OK in the OUI window to continue with the installation.Another window appears, prompting you to run the
root.shscript. -
Run the
CRS_home/root.shscript as therootuser on the nodedocrac3to start Oracle Clusterware on the new node.[docrac3:oracle]$ su root [docrac3:root]# cd /u01/app/crs [docrac3:root]# ./root.sh
-
Return to the OUI window after the script runs successfully, then click OK.
OUI displays the End of Installation window.
-
Exit the installer.
-
Add the new node's ONS configuration information to the shared OCR. From the
CRS_home/bindirectory on the nodedocrac1, run the ONS configuration utility as shown in the following example, whereremote_portis the default port number 6251 (or another free port if port 6251 is unavailable), anddocrac3is the name of the node that you are adding:[docrac1:oracle]$ ./onsconfig add_config docrac3:remote_port
You should now have Oracle Clusterware running on the new node. To verify the installation of Oracle Clusterware on the new node, you can run the following command as the root user on the newly configured node, docrac3, where /u01/app/crs/ is the location of the Oracle Clusterware home.
[docrac1:oracle]$ /u01/app/crs/bin/cluvfy stage -post crsinst -n docrac3 -verbose
See Also:
-
Oracle Real Application Clusters Administration and Deployment Guide for more information about adding and removing nodes from your cluster database
Extending the Automatic Storage Management Home Directory
To extend an existing Oracle RAC database to a new node, you must configure the shared storage for the new database instances that will be created on new node. You must configure access to the same shared storage that is already used by the existing database instances in the cluster. For example, the sales cluster database in this guide uses Automatic Storage Management (ASM) for the database shared storage, so you must configure ASM on the node being added to the cluster.
Because you installed ASM in its own home directory, you must configure an ASM home on the new node using OUI. The procedure for adding an ASM home to the new node is very similar to the procedure you just completed for extending Oracle Clusterware to the new node.
Note:
If the ASM home directory is the same as the Oracle home directory in your installation, then you do not need to complete the steps in this section.To extend the ASM installation to include the new node:
-
Ensure that you have successfully installed the ASM software on at least one node in your cluster environment. In the following steps, ASM_home refers to the location of the successfully installed ASM software.
-
Go to the
ASM_home/oui/bindirectory ondocrac1and run theaddNode.shscript. -
When OUI displays the Node Selection window, select the node to be added (
docrac3), and then click Next. -
Verify the entries that OUI displays on the Summary window, and then click Next.
-
Run the
root.shscript on the new node,docrac3, from the ASM home directory on that node when OUI prompts you to do so.
You now have a copy of the ASM software on the new node.
See Also:
-
Oracle Real Application Clusters Administration and Deployment Guide for more information about adding and removing nodes from your cluster database
Extending the Oracle RAC Home Directory
Now that you have extended the CRS home and ASM home to the new node, you must extend the Oracle home on docrac1 to docrac3. The following steps assume that you have already completed the previous tasks described in this section, and that docrac3 is already a member node of the cluster to which docrac1 belongs.
The procedure for adding an Oracle home to the new node is very similar to the procedure you just completed for extending ASM to the new node.
To extend the Oracle RAC installation to include the new node:
-
Ensure that you have successfully installed the Oracle RAC software on at least one node in your cluster environment. To use these procedures as shown, replace
Oracle_homewith the location of your installed Oracle home directory. -
Go to the
Oracle_home/oui/bindirectory ondocrac1and run theaddNode.shscript. -
When OUI displays the Specify Cluster Nodes to Add to Installation window, select the node to be added (
docrac3), and then click Next. -
Verify the entries that OUI displays in the Cluster Node Addition Summary window, and then click Next.
The Cluster Node Addition Progress window appears.
-
When prompted to do so, run the
root.shscript as therootuser on the new node,docrac3, from the Oracle home directory on that node. -
Return to the OUI window and click OK. The End of Installation window appears.
-
Exit the installer.
After completing these steps, you should have the Oracle software in the specified Oracle home on the new node.
See Also:
-
Oracle Real Application Clusters Administration and Deployment Guide for more information about adding and removing nodes from your cluster database
Adding an Instance to the Cluster Database
You can use Enterprise Manager to add an instance to your cluster database. You must first configured the new node to be a part of the cluster and installed the software on the new node.
To add an instance to the cluster database:
-
From the Cluster Database Home page, click Server.
-
Under the heading Change Database, click Add Instance.
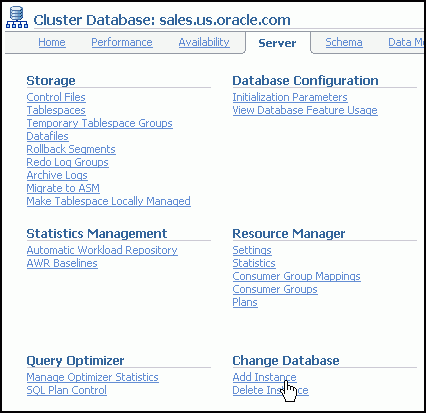
Description of the illustration add_instance1.gif
The Add Instance: Cluster Credentials page appears.
-
Enter the host credentials and ASM credentials, then click Next.
The Add Instance: Host page appears.
-
Select the node on which you want to create the new instance, verify the new instance name is correct, and then Next.
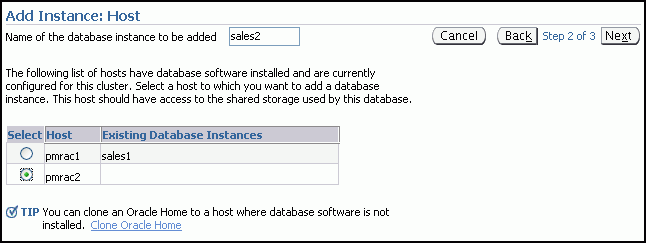
Description of the illustration add_instance2.gif
After the selected host has been validated, the Add Instance: Review page appears.
-
Review the information, then click Submit Job to proceed.
A confirmation page appears.
-
Click View Job to check on the status of the submitted job.
The Job Run detail page appears.
-
Click your browser's Refresh button until the job shows a status of Succeeded or Failed.
If the job shows a status of Failed, you can click the name of the step that failed to view the reason for the failure.
-
Click the Database tab to return to the Cluster Database Home page.
The number of instances available in the cluster database is increased by one.
Deleting an Instance From the Cluster Database
To delete an instance from the cluster:
-
From the Cluster Database Home page, click Server.
-
On the Server subpage, under the heading Change Database, click Delete Instance.
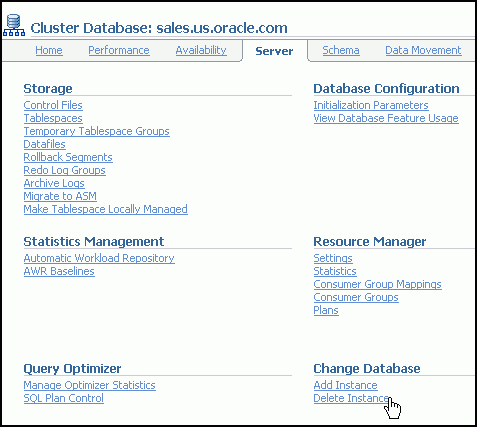
Description of the illustration delete_instance1.gif
The Delete Instance: Cluster Credentials page appears.
-
Enter your cluster credentials and ASM credentials, then click Next.
The Delete Instance: Database Instance page appears
-
Select the instance you want to delete, then click Next.
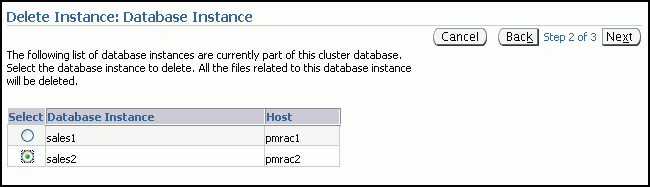
Description of the illustration delete_instance2.gif
The Delete Instance: Review page appears.
-
Review the information, and if correct, click Submit Job to continue. Otherwise, click Back and correct the information.
A Confirmation page appears.
-
Click View Job to view the status of the node deletion job.
A Job Run detail page appears.
-
Click your browser's Refresh button until the job shows a status of Succeeded or Failed.
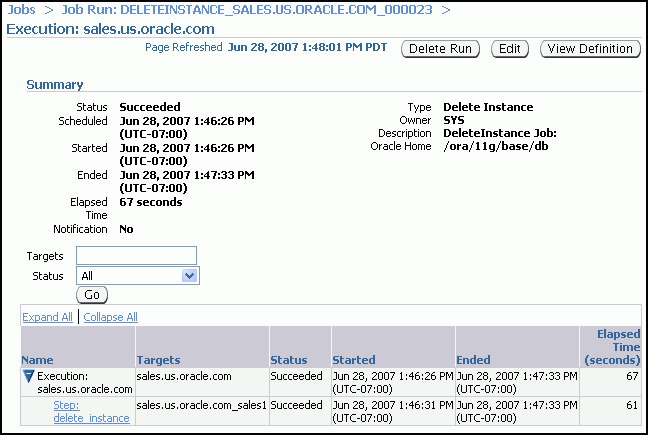
Description of the illustration delete_instance3.gif
If the job shows a status of Failed, you can click the name of the step that failed to view the reason for the failure.
-
Click the Database tab to return to the Cluster Database Home page.
The number of instances available in the cluster database is reduced by one.