2 Managing Your Mobile Client
One of the benefits of Oracle Database Lite is that you can have an application downloaded onto a device, where data can be synchronized between the device and the back-end Oracle database.
In general, the types of Mobile clients are as follows:
-
Windows clients (such as Web-to-Go over OC4J, Web-to-Go, Branch Office, and BC4J): The application built for these clients uses a Java browser.
-
Linux, Win32, and WinCE clients: These applications are client/server applications. Thus, start the application as you would start any application on these platforms.
-
Broadbeam-enabled clients, which are used for network routing.
The following sections detail how to set up your Mobile client device and how to use the Oracle Database Lite technology on that device:
2.1 Start the Mobile Client
The following details how to start the Mobile client stack:
-
Web clients (such as OC4J, Web-to-Go, Branch Office, and BC4J): The application built for these clients uses a Java browser. You can initiate the application or synchronization using the Mobile Workspace GUI.
-
Linux, Win32, and WinCE clients: These applications are client/server applications. Thus, start the application as you would start any application on these platforms. You can initiate synchronization either by implementing it within your application using the synchronization APIs (see Chapter 3 "Synchronization" and Chapter 4, "Synchronization APIs" in the Oracle Database Lite Developer's Guide for more information) or by executing the
msyncexecutable, described in Section 2.3.2, "Use the mSync GUI to Initiate Synchronization of Your Linux, WinCE, and Win32 Client/Server Application Clients". -
Broadbeam-enabled clients, which are used for network routing, are described in Section 2.3.3, "Support Network Roaming for Devices With Broadbeam".
2.1.1 Start the Mobile Client
For Win32 and WinCE devices, you do not have to perform anything extra to start the Mobile client. However, for the Linux and Windows-based clients (OC4J and Web-to-Go), you may have to perform an extra step.
When you installed the Mobile client on Linux or Windows, it configured that the Mobile client should always be started automatically when the device is initiated. So, most of the time, you do not have to do anything to start the Mobile client. However, if you have a failure, you can manually start the Mobile client, as follows:
-
Web Mobile client: If using the OC4J container for your Web applications, then start the Web OC4J Mobile client and its OC4J container by executing
runmobileclient. If you want to use the Oracle Database Lite servlet container that was used prior to Release 10.3, then start the Web-to-Go Mobile client by executing thewebtogoexecutable.Both executables are located in the
<mobile_client>/bindirectory. -
Linux Mobile client: Start the Linux Mobile client by executing the
webtogo.shfile in the<mobile_client>/bin.
2.1.2 Log on to Mobile Client Workspace
If you are using a Windows-based client, then you must have installed the appropriate Windows Mobile client on your client machine. Upon machine startup, the Mobile client is automatically started. Then, you can connect to the Mobile Client Workspace with a browser by connecting to one of the following:
-
http://<client_machine>/webtogo -
http://localhost/webtogo.
If the Mobile client is unexpectedly terminated, you can start the client by double-clicking on the following icon in the corner of your Windows desktop:
Description of the illustration use_log1.gif
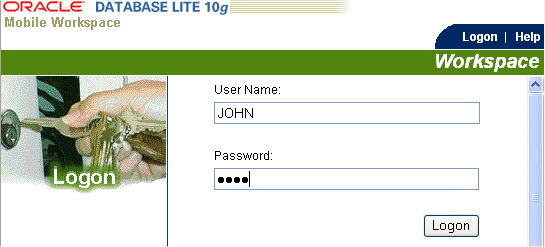
Or you can launch the Mobile client by accessing your Oracle Database Lite program group and choosing the Mobile client. Figure 2-1 displays the Mobile Client Workspace Logon page.
Figure 2-1 The Mobile Workspace Logon Page
Description of "Figure 2-1 The Mobile Workspace Logon Page"
Enter the username and password for the Mobile user and click Logon.
2.2 Synchronize or Execute Applications on the Mobile Client
The following details how to synchronize each Mobile client stack type:
-
Web clients (such as OC4J, Web-to-Go, Branch Office, and BC4J): The application built for these clients uses a Java browser. Synchronization is either automatic or if you disable automatic synchronization, then you can synchronize through the Sync Tab in the Mobile Workspace GUI, as described in Section 2.3.1.1.5, "Sync Tab". You can initiate the application using the Mobile Workspace GUI, as described in Section 2.3.1.2, "Execute Mobile Applications Installed on Your Mobile Client".
-
Linux, Win32, and WinCE clients: These applications are client/server applications. Thus, start the application as you would start any application on these platforms. You can initiate synchronization either by implementing it within your application using the synchronization APIs (see Chapter 3 "Synchronization" and Chapter 4, "Synchronization APIs" in the Oracle Database Lite Developer's Guide for more information) or by executing the
mSyncexecutable, described in Section 2.3.2, "Use the mSync GUI to Initiate Synchronization of Your Linux, WinCE, and Win32 Client/Server Application Clients". -
Broadbeam-enabled clients, which are used for network routing, are described in Section 2.3.3, "Support Network Roaming for Devices With Broadbeam".
Note:
The Mobile client device clock must be accurate for the time zone set on the device before attempting to synchronize. An inaccurate time may result in the following exception during synchronization:CNS: 9026 "Wrong username or password. Please enter correct value and reSync."When you initiate a synchronization from the client, either manually or by scheduling a job, the synchronization cannot occur if there is an active connection with an uncommitted transaction opened from another source. This could be from scheduling two jobs to synchronize at the same time, from mSync, mSQL, Web-to-Go or the client synchronization APIs.
The first synchronization for the Mobile client creates several Oracle Lite database (ODB) files on your client device for storing either Oracle Database Lite information or your application information. These ODB files are stored in the <ORACLE_HOME>\Mobile\SDK\Oldb40 directory, as follows:
consroot.odb
webtogo.odb
<username>\acl.odb
          \conscli.odb
          \A<number>.odb
The following describes the purpose and access for these ODB files:
-
The
consroot,acl, andconscliODB files are used for Oracle Database Lite data. Thewebtogo.odbfile is only present when using a Web-to-Go application. If you want to access the information within these ODB files, useSYSTEM/MANAGERas the username/password. -
The snapshot data for the application is contained within the
A<number>.odbfile, where<number>is a randomly-generated number. You can specify the name of this ODB file when you create your publication; see Chapter 5, "Using Mobile Database Workbench to Create Publications" in the Oracle Database Lite Developer's Guide for details.If you want to access the snapshot data directly using
msqlor any other SQL tool, useSYSTEMas the username and provide the password for the user that owns the snapshot. For example, if the userJohn/Fooinitiated the synchronization, to access theA<number>.odbfile for this snapshot, you would useSYSTEM/Fooas the username/password.
2.3 Manage the Mobile Client
There are several tools that you can use on the client to manage functionality. The following sections describe other tools that you can use in each platform.
-
Section 2.3.1, "Use the Mobile Client Workspace to Manage Your Web Clients"
-
Section 2.3.3, "Support Network Roaming for Devices With Broadbeam"
-
Section 2.3.5, "Use the Device Manager Client GUI to Manage the Client-Side Device"
-
Section 2.3.6, "Initiate Updates of Oracle Database Lite Software from the Client"
-
Section 2.3.7, "Defragmentation and Reducing Size of the Client Application Databases"
-
Section 2.3.8, "Communicate Between the Internet and Intranet Through a Reverse Proxy"
2.3.1 Use the Mobile Client Workspace to Manage Your Web Clients
The Mobile Workspace GUI tool is used for both the Mobile Manager (of the Mobile Server) and for managing OC4J, Web-to-Go, BC4J, or Branch Office Mobile clients. The Mobile Workspace only displays the relevant functionality for the user that logs in. Use the Mobile Manager to manage Mobile applications; use the Mobile Client Workspace to manage the application on the client-side device.
The following sections detail how to use the Mobile Workspace for your Web clients and how to synchronize for each type of client:
Note:
See Chapter 1, "Managing the Mobile Server" for information on how to use the Mobile Workspace for managing the Mobile Server.-
Section 2.3.1.1, "Instructions for Using the Mobile Workspace"
-
Section 2.3.1.2, "Execute Mobile Applications Installed on Your Mobile Client"
2.3.1.1 Instructions for Using the Mobile Workspace
The Mobile Workspace provides you access to your Mobile applications through hyperlinks in a Web browser. The following tabs are available when you use the Mobile Workspace for a Web client:
2.3.1.1.1 Applications Tab
The Applications tab displays the list of applications that have been installed on the client, which you can execute. To access a Mobile application, click the icon or application name. The Mobile Workspace allows you to execute multiple applications concurrently in separate browsers.
Note:
When you log on as an Administrator, the Mobile Manager is listed as the available application.2.3.1.1.2 Configuration Tab
To modify your Workspace configuration, select the Configuration tab.
Note:
When you select the Configuration tab, maximize the window to your display. If you do not, you might not be able to see all of the configuration options on the left.The following options appear on the left:
-
Workspace Settings: Configure your Mobile Workspace settings, such as display options and Web client options for OC4J or Web-to-Go clients. Table 2-1 discusses the Web client settings:
Table 2-1 Workspace Configuration Options
Label Description Display icons?
Enables you to display Web application icons. To display Web application icons, select Yes. If you do not want to display Web application icons, select No.
Display description?
Enables you to display Web application descriptions. To display Web application descriptions, select Yes. If you do not want to display Web application descriptions, select No.
Applications per row
Enables you to specify the number of applications arranged in a horizontal row in the Workspace.
Use default settings for synchronization?
If you select this option, all applications (including new applications) are synchronized at once. If you de-select this option, then you can choose which applications synchronize. Using this list, you can reduce sychronization time by selecting which applications you want to synchronize. In this mode, you are notified when new applications become available.
Mobile Client for OC4J or Web-to-Go Mode
Selecting Always Offline enables you to work continuously. If you want to use the backwards compatible option of offline/online, select the Online/Offline option.
Ask before ugrading the Mobile Client for OC4J or Web-to-Go?
Selecting this option instructs the Mobile client to ask you before downloading newer software versions for the Mobile client. If you do not select this option, your Mobile client is automatically upgraded the next time you synchronize if a new version is available.
Enable Automatic Sync?
By default, this is enabled. If checked, then automatic sync is automatically enabled. Uncheck if you want to manually synchronize this client yourself.
Number of Automatic Sync History Messages to be displayed per page.
This defines the number of history records to display on the Automatic Sync History page. By default, this value is 25.
-
Application Settings: Select the applications that you want to synchronize by default. In the default synchronization mode, the Mobile Server synchronizes your client applications automatically with the Mobile Server. See "Configure Application Synchronization Default" for full details.
-
Change Password: The password is stored on both the client and the Mobile server. To ensure that the password is modified on both the client and the Mobile server, only change the password using the Client Workspace when you have a connection to the Mobile Server. See Section 2.3.4, "Reset the Mobile User Password" for more details.
-
Create a Data Synchronization Job: You can schedule a time when synchronization is to be initiated on the client. This is configured as a job initiated by the client. There is a small job engine on the client, so when you set up a job to execute at a certain time and interval, it initiates the application at the specified time. The only job that you can schedule on the client is for synchronization. You should not schedule multiple client synchronization jobs for the same time on the client. In fact, you should make sure that all other connections to the database, such as msql, jdbc, and so on, are closed before starting the synchronization. For more information on scheduling jobs on the server-side, see Chapter 6, "Job Scheduler".
Scheduled replication jobs will not run on client if there are any pending transactions that have not been committed on that client.
-
In addition, you can disable or enable remote access for the Mobile client. See "Enable or Disable Remote Access for Mobile Client" for more information.
Configure Application Synchronization Default
The Application Settings option allows you to select the applications that you want to assign to the default synchronization setting. In the default mode, the Mobile client synchronizes your client application with the Mobile Server when the user requests synchronization. Selecting fewer applications decreases the amount of data to download and speeds up the synchronization process.
To select the applications for synchronization, click Application Settings. The application settings page appears in the right frame of the Mobile Workspace and displays the following information:
Table 2-2 describes the Application Settings page.
Table 2-2 Application Settings Page Description
| Label | Description |
|---|---|
|
Synchronize |
If selected, the Mobile client synchronizes your client application with the Mobile Server when the user initiates synchronization. |
Select the Synchronize check box next to the application and click Save. If you make an error, click Reset to return to the previous settings.
Enable or Disable Remote Access for Mobile Client
To block a remote machine from getting access to the Mobile Client for OC4J, Web-to-Go, or BC4J, set the DISABLE_REMOTE_ACCESS parameter in the client-side webtogo.ora file to YES. Once this parameter is set to YES and the Mobile client is restarted, only the request coming from the local machine is served by the Mobile client listener. Any other request is blocked and not served.
For Branch Office clients, this parameter must be set to NO, as all clients must have remote access. For more information on the DISABLE_REMOTE_ACCESS parameter, see Section A.2, "[WEBTOGO]".
2.3.1.1.3 Automatic Sync History
This screen shows you the history for all automatic synchronization events that occurred for your Mobile client. The following information is displayed about each event:
| Label | Description |
|---|---|
|
Event code |
An internal code that supplies more information to Oracle Support, if called. |
|
Event type |
An icon showing the outcome of the synchronization, as follows:
|
|
Timestamp |
Date and time of the automatic synchronization. |
|
Event Description |
A message that describes the outcome of the automatic synchronization between your Mobile client and the back-end Oracle database. |
|
Delete |
Check the delete checkbox and click Save if you no longer wish to see the history for this event. |
In addition, you can perform the following:
-
If you have more than a single page of events listed, click Previous and Next to view all events.
-
To delete one or more events, select the Delete checkbox of these items and then click Save.
-
To delete all events on this screen, click Select All and then click Save.
-
To deselect all Delete checkboxes, click Clear All.
2.3.1.1.4 Help Tab
The Help tab launches the online help system.
2.3.1.1.5 Sync Tab
If your device is not currently connected, then you can synchronize data and applications at any time through the Sync tab. When you select the Sync tab, a synchronization of your data is initiated with the Oracle database. In addition, application updates and new applications accessible to the user are downloaded from the Mobile Server. After synchronization, you can work continuously disconnected from the Mobile Server. You only need a connection to the Mobile Server when you synchronize your data and applications.
For information on setting synchronization options, see Section 2.3.1.1.2, "Configuration Tab".
2.3.1.2 Execute Mobile Applications Installed on Your Mobile Client
Web-to-Go and OC4J applications appear in the Mobile Workspace with an icon, name, and description.

Description of the illustration use_acc1.gif
The icon and application name are both hyperlinks. To execute a Web-to-Go or OC4J application, click either the icon or application name.
The Web Mobile clients, such as OC4J or Web-to-Go, enable you to work disconnected from the Mobile Server. You need a connection to the Mobile Server only when you choose to synchronize any data changes from the client with the Oracle database.
The Web Mobile client propagates the tables that your applications use on the Mobile Server to the Mobile client as database snapshots. When you define your snapshot, you can use the SQL WHERE clause to specify a parameterized SQL query, where only the row data that your application uses is downloaded to the client. Thus, you can define what is downloaded to the client: the entire contents of the table or the subset of information that is relevant to the specific user. Most applications specify a particular subset of data that is relevant only to the user to be downloaded.
You can work continuously with Web Mobile clients storing your data changes in the Oracle Lite database. When you click the Sync tab, the Web Mobile client updates the Oracle database with any data changes you made on your client. The Mobile Server downloads any new applications, application changes, or data changes to your client.
2.3.1.3 Customize the Mobile Client Workspace
You can customize the Mobile Client Workspace. See Section 6.2.9 "Customizing the Workspace Application" in the Oracle Database Lite Developer's Guide.
2.3.1.4 Schedule Data Synchronization Jobs
The Mobile Workspace enables you to create data synchronization jobs for your site from the OC4J or Web-to-Go Mobile client. This synchronization job automatically triggers synchronization with the Mobile Server at the start date and at the specified time for this job that you set using the Mobile Workspace. See Section 2.3.1.1.2, "Configuration Tab" for more information.
2.3.2 Use the mSync GUI to Initiate Synchronization of Your Linux, WinCE, and Win32 Client/Server Application Clients
The following details how to synchronize the different Mobile client platforms:
-
Web clients (such as OC4J, Web-to-Go, Branch Office, and BC4J): The application built for these clients uses a Java browser. You can initiate the application or synchronization using the Mobile Workspace GUI.
-
Linux, Win32, and WinCE clients: These applications are client/server applications. Thus, start the application as you would start any application on these platforms. You can initiate synchronization either by implementing it within your application using the synchronization APIs (see Chapter 3 "Synchronization" and Chapter 4, "Synchronization APIs" in the Oracle Database Lite Developer's Guide for more information) or by executing the
mSyncexecutable, described in Section 2.3.2.1, "Use Mobile Client Tools on Linux". -
Broadbeam-enabled clients, which are used for network routing, are described in Section 2.3.3, "Support Network Roaming for Devices With Broadbeam".
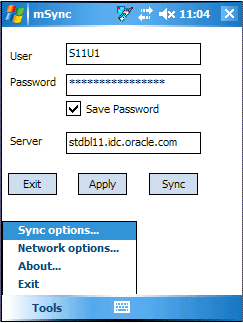
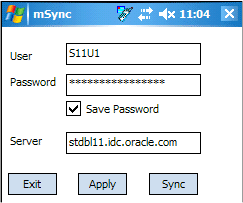
You can initiate synchronization of the client using the mSync GUI, as shown in Figure 2-2.
Figure 2-2 Using the mSync GUI to Initiate Synchronization
Description of "Figure 2-2 Using the mSync GUI to Initiate Synchronization"
To bring up the mSync GUI, execute msync.exe on WinCE and Win32 or msync on Linux, which is located in the /bin subdirectory under the directory where you installed the Mobile client. Modify the following supplied values, if incorrect:
-
Username and password for the user that is starting the synchronization.
Note:
The username and password are limited to a maximum of 28 characters long. -
Check if you want the password saved for future requests.
-
Host name where the Mobile Server is installed.
Click Sync to start the Synchronization. Click Apply to save any modifications you made to the entries. Click Exit to leave the tool.
You can also modify the tool options by selecting the Tools Selection at the bottom of the UI, as shown in Figure 2-3.
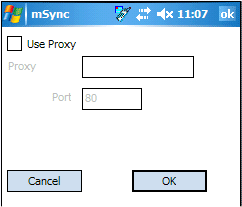
Figure 2-4 displays the Network options screen where you can specify a proxy if your network provider requires that you use a proxy server to access the internet. . Click Use Proxy to use a proxy and then enter the proxy server and port number.
Figure 2-4 The mSync Network Options Selection
Description of "Figure 2-4 The mSync Network Options Selection"
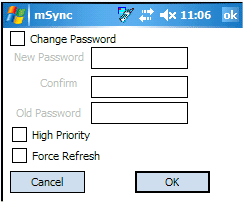
Figure 2-5 displays the Sync Options screen where you can specify the following:
-
Mobile User Password—Modify the existing password. The Mobile user password is stored on both the client and the Mobile Server. To ensure that both are modified, only change the password when connected to the Mobile Server. See Section 2.3.4, "Reset the Mobile User Password" for details.
-
High Priority—Select this checkbox to specify synchronizing only High Priority data. This specifies under what conditions the different priority records are synchronized. By default, the value is LOW, which is synchronized last. If you have a very low network bandwidth and a high ping delay, you may only want to synchronize your HIGH priority data.
-
Force Refresh—The force refresh option is an emergency only synchronization option. Check this option when a client is corrupt or malfunctioning, so that you decide to replace the Mobile client data with a fresh copy of data from the enterprise data store with the forced refresh. When this option is selected, any data transactions that have been made on the client are lost.
When a force refresh is initiated all data on the client is removed. The client then brings down an accurate copy of the client data from the enterprise database to start fresh with exactly what is currently stored in the enterprise data store.
If there are software updates that are waiting to be downloaded to the client, then the update tool is automatically executed after the end of the synchronization process. See Section 2.3.6, "Initiate Updates of Oracle Database Lite Software from the Client" for more information.
Note:
The only time that the client does not check for software updates is if you are using Branch Office or the Synchronization APIs. If you want to launch the update UI, then enterupdate on the command line.2.3.2.1 Use Mobile Client Tools on Linux
The Mobile Client for Linux supports the msync, dmagent and update tools. To use the UI-based tools, use the following executables: msync, dmagent, or update.
To synchronize on a Linux client with the command line tool, use the msync executable for synchronization, as follows:
./msync username/password@server[:port][@proxy:port]
For example,
./msync john/john@testserver:8000
The other msync options, such as -save, -a, -password and -force currently will not result in a successful sync. This is a limitation only for the msync executable in the MDK installation on Linux.
2.3.3 Support Network Roaming for Devices With Broadbeam
Normally, Oracle Database Lite associates devices with a single network provider for Device Manager. The Mobile Server sends commands to the device based on the registered network provider, which works seamlessly as long as the device does not roam over multiple network providers.
To support network roaming with device manager commands, you can integrate Oracle Lite with Broadbeam ExpressQ (Release 4.1 SP3) and Smart IP (Release 3.1 SP1). Broadbeam enables sending commands across any network type that is supported by Broadbeam products. Device Manager Commands use the Broadbeam messaging engine. Mobile Client may synchronize data over Smart IP.
2.3.4 Reset the Mobile User Password
Because the Mobile user password is stored on both the client and the Mobile Server, modify the password as follows:
-
Modify the password on the client using either mSync UI or Client Workspace. Only modify the password using these tools if you are connected to the Mobile Server to ensure that the user password change is propagated to the Mobile repository.
-
Modify the Mobile user password in the Mobile Manager in the User Properties page. If you simply want to invalidate the Mobile user, then you only have to modify the password on this screen; however, if you want to reset the password on both the Mobile Server and the Mobile user, then also send a Reset Password command from the Device Management section in the Mobile Manager to the Mobile client.
See Section 11.2, "Which Password is Which?" for details on all Oracle Lite Database passwords.
2.3.5 Use the Device Manager Client GUI to Manage the Client-Side Device
On any client, you can manage the Mobile device client software using the Oracle Lite Device Manager. See Section 7.9, "Using the Device Manager Agent (dmagent) on the Client" for a full description.
2.3.6 Initiate Updates of Oracle Database Lite Software from the Client
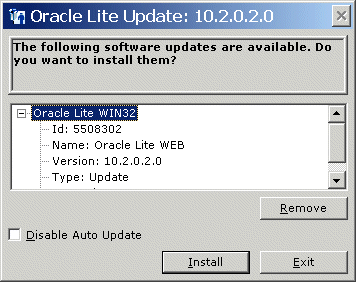
On Windows clients, you can initiate a request for software updates from the Mobile Server by executing the Oracle Lite Update tool, as shown in Figure 2-6. To execute, choose Oracle Lite Update from the Oracle Database Lite Programs list or enter update on the command line.
For each type of client, the update tool acts as follows:
-
The mSync tool automatically launches this tool if and only if a software update is available.
-
For Web-to-Go clients, the client prompts the user in a Web page if an update is available.
-
For Branch Office clients and applications that use the synchronization APIs, this tool is not automatically executed. Instead, if you want to launch the update tool to check for software updates, then explicitly enter
updateon the command line.
Figure 2-6 Updating Oracle Database Lite Software
Description of "Figure 2-6 Updating Oracle Database Lite Software"
When updates are located, you can select items that you do not want to update and click Remove. When all updates are satisfactory, click Install. When you are finished, click Exit.
If you check the Disable Auto Update checkbox, then the next time you execute mSync, this tool is not automatically executed. You can also disable automatic updates from the Mobile Manager. See Section 7.5.3, "Allowing Software Upgrades to All Mobile Devices in a Platform" for more information.
2.3.7 Defragmentation and Reducing Size of the Client Application Databases
On each client device, an Oracle Lite database stores the application data—either as an embedded database that exists solely for the application or as a repository for data for a specific user that is synchronized with a back-end Oracle database.
You can use the DefragDB utility on your database to perform the following optimizations:
-
Reduce size of Oracle Lite databases by defragmenting the Oracle Lite database.
-
Remove any BLOB data from the Oracle Lite database. Prior to release 10.3, all data was stored in an
.odbfile that had a 4 GB limit. This was restrictive to storing BLOB data, such as media files. From release 10.3 onwards, all BLOB data—both binary and character— and indexes are stored in separate files with the extension of.obsfor Oracle Blob Store. This changes the size limit on your device to the operating system file size limitations or 16 terabytes.
Note:
This tool removes any Blob data currently in your Oracle Lite database and stores it in its own.obs file. However, if you do not run this tool, you can continue to work seamlessly. Any new Blob data is stored in an .obs file; the pre-existing Blob data can continue to reside in the .odb file.Use the DefragDB tool to defragment Oracle Lite databases, which reduces their size by compacting them and removing any Blob data from within the database into its own .obs file. The DefragDB tool is a UI dialog which allows you to choose which databases to defragment. This tool defragments databases by dumping each database into a file and then reloading it from this file. Alternatively, you can use the command-line interface: olmig.exe. Both tools exist in the <ORACLE_HOME>/Mobile/Sdk/bin on your desktop or in \OraCE on a WinCE device.
Note:
Currently the tool runs on Win32 desktop and Windows CE devices.The following sections describe this tool:
2.3.7.1 Execute DefragDB
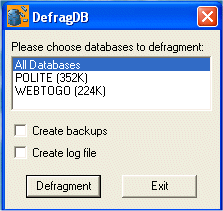
To start the tool, either double-click on the Oracle Database Lite Degramentation icon or execute DefragDB.exe, which brings up the following screen:
You can execute the Oracle Database Lite Defragmentation tool on the client for all applications. Before executing this tool, you must stop all applications, as the database is erased during this process. This includes the Oracle Lite applications, such as the Sync Agent, Web-to-Go, and so on. To stop the Sync Agent, see Section 5.4.2, "Start, Stop, or Get Status for Automatic Synchronization".
All application databases are listed on this screen. Select the existing databases on your PC (or WinCE device) on which you want to perfrom the deframentation.
-
Click Defragment to defragment all databases. This tool performs a defragmentation on one database at a time.
Note:
In the worse case scenario, the defragmentation process requires three times the space of the database to complete the process. Thus, if you do not have enough space to defragment your larger databases, you will receive a warning notice about the database that is too large to complete the process. In order to continue, either free up enough space to enable the process to complete or return to the main screen and select all databases except for the offending one. -
To defragment specific databases, select the databases desired from the list and click Defragment.
Note:
To cancel out without performing any defragmentation, click Cancel. See Section 2.3.7.2, "Pause or Cancel Defragmentation" for more information.In addition, select the following checkboxes, as appropriate:
-
Create backup: provides a backup of the original copy of the database before defragmentation. The backup copy has the same name with a
.bakextension. For example,C:\orant\oldb40\polite.odbbecomesC:\orant\oldb40\polite.odb.bak. Thus, you can restore the database if an error occurs during defragmentation. In addition, the blob storage file (.obs) is backed up. To restore to the original version, rename these files back to the original names without the.bakextensions. -
Create log: provides a log,
defragdb.log, of the defragmentation process, which is useful for the developer in diagnosing any problems that may occur during the defragmentation.
When you click Defragment, the process initiates, which brings up a window that displays messages about the progress of the defragmentation. This same log can be saved in the defradb.log file. See the status bar at the bottom for the final status: defragmenting, success, or fail.
If your database is encrypted, another dialog prompts for the user name and password for the encrypted database. Select the user name from the list of users and enter the password for that user. You only need to enter the password once if all databases are encrypted with the same password.
There are 2 files created during the defrag which should be deleted automatically by DefragDB when it finishes:
-
dump file, which has the same name as the database, but with a
.dmpextension. -
the newly loaded database, which has the same name as the database, but witha
_defragsuffix. This file is renamed to the database name once the load completes.
2.3.7.2 Pause or Cancel Defragmentation
If you are defragmenting large databases, this may take some time. For example, it takes about 5 minutes on a desktop to defragment a 200 MB database; however, on WinCE devices, the defragmentation performs slower than the desktop machine. The amount of time this process takes is proportional to the size of the database. Thus, if you need to pause or cancel this process by clicking the Cancel button. This pauses the process. To continue the defragmentation, select No on the Cancel/Continue prompt. Select Yes on this prompt to stop the process entirely. If you cancel, the database remains in the original state, so your applications still perform normally.
2.3.7.3 Execute DefragDB With Command-Line
You can use automatic defragmentation, execute defragmentation within your application, or use additional options only available with the command-line tool. The following shows two examples: the first deframents all databases, the second defragments a specific database identified by name.
olmig -defrag all
or
olmig -defrag dbname
The usage for olmig.exe is as follows:
olmig -dump|-load|-defrag|-restore <dbName>|all [options]
Where:
-
-dump: dump the database to a dump file (defaultdbName.odb.dmp). You can separate the functionality of the defragmentation into the dumping and loading. You can perform these functions at separate times, if desired. -
-load: load database from the dump file. This completes the defragmentation process and should only be executed after a dump is performed. -
-defrag: defragment database, which performs both the dump and load for the database. -
-restore: restore a database from a backup. If an error occurred, restore the saved original database. -
<dbName>orall: perform the actions on a specfic database or on all Oracle Lite databases on the machine or device.
Options include:
-
-auto: exit the dialog when upgrade is done. When you invoke the command-line, a GUI is initiated. If you want this screen to exit when finished, provide the-autooption. -
-backup: backup the database todbName.odb.bak -
-readonly: connect to a database that is read-only. During a dump only, you can dump a read-only database, such as one that may exist on a CD-ROM. Since the dump normally is written to the same location as the database, you must also provide the directory location and filename for the output. Thus, this option is only valid if used in combination with the-dumpand-fileoptions. -
-nosingle: do not enter single-user mode. Normally, only a single user can connect to the database while performing a dump, load, or defragmentation. That way, other users are not allowed to update an Oracle Lite database that is currently in the middle of a defragmentation, dump, or load activity. However, if you are performing a dump, you can use this option to enable other users to continue to execute their applications against the database. This cannot be allowed during any load activity. -
-log logfile: append messages to the specified file -
-file dumpfile: use the specified dump file, instead of the default file -
-dot interval: print a dot after processing the number of objects designated byinterval; set theintervalto 0 to disable this option. -
-commit interval: during the load process, this designates the number of rows after which to perform a commit; set theintervalto 0 for no commit. -
-passwd passwd: specify a connect password for encrypted databases
2.3.8 Communicate Between the Internet and Intranet Through a Reverse Proxy
If your Mobile client is on either side of the firewall, you can set up a proxy or reverse proxy to facilitate communication between the Mobile client and Mobile Server. See Section 11.5, "Using a Firewall Proxy or Reverse Proxy".
