1 Managing the Mobile Server
Use the Mobile Workspace GUI tool for managing the Mobile Server; formally known as the Mobile Manager. In addition, Mobile clients on a Windows platform can use the Mobile Workspace GUI for managing Mobile clients with OC4J, Web-to-Go, BC4J, or Branch Office Mobile clients.
Note:
See Chapter 2, "Managing Your Mobile Client" for details on how to manage and synchronize each of the Mobile clients—including Linux, WinCE, and Win32—which are not managed using the Mobile Workspace GUI tool.The Mobile Workspace only displays the relevant functionality depending on who logs in. Use the Mobile Manager to manage Mobile applications; use the Mobile Client Workspace to manage the application on the client-side device. The following sections detail how to use the Mobile Workspace for the Mobile Server. See Chapter 2, "Managing Your Mobile Client" for directions on how to use the Mobile Workspace for your Mobile Client.
-
Section 1.2, "Using Mobile Manager to Manage Your Mobile Server"
-
Section 1.3, "Enabling UIX Dynamic Image Generation on UNIX to See Mobile Manager Buttons"
1.1 Using the Mobile Workspace
The Mobile Workspace provides you access to your Mobile applications through hyperlinks in a Web browser. The following tabs are available when you use the Mobile Workspace for either managing the Mobile Server or the OC4J or Web-to-Go clients: Applications, Configuration, Help, Sync, and Log Off. See Section 2.3.1.1, "Instructions for Using the Mobile Workspace" for a description of the functions in each tab—especially the Configuration tab, as it enables you to configure options for your Workspace.
1.2 Using Mobile Manager to Manage Your Mobile Server
Mobile Manager is used to manage the Mobile Server. An administrator is the only user that is able to log on and use the Mobile Manager. To logon to the Mobile Manager, perform the following steps.
-
Using a browser, connect to the Mobile Server by entering the following URL.
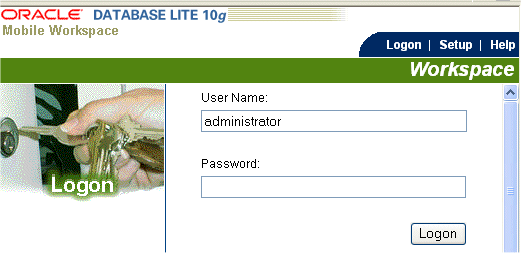
http://<your_Mobile_Server_host_name>/webtogoAs Figure 1-1 displays, the Mobile Server Workspace appears with Mobile Server logon page.
-
Log on to the Mobile Manager with the Mobile Server administrator username and password. A default administrator is created when you install with username/password of
administrator/admin. Change the default password or create your own administrator user with appropriate username/password.Note:
The username or password is limited to a maximum of 28 characters long. Also, the username cannot use multi-byte characters.As shown in Figure 1-2, the Mobile Workspace displays the Mobile Manager in the Applications tab, which is the application available to administrators for managing any Mobile Server.
Note:
Section 1.1, "Using the Mobile Workspace" describes the functions of each of the tabs at the top of the Mobile Workspace. -
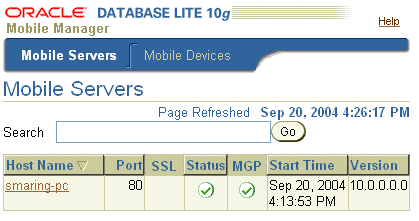
Click the Mobile Manager icon or link. As Figure 1-3 displays, the Mobile Server farm page appears with a list of installed Mobile Servers that use this repository.
A Mobile Server farm is a group of Mobile Servers configured to run against the same repository. The Mobile Server farm page contains Mobile Server and Mobile Devices tabs. The following sections describe each component of the Mobile Server Farm. Topics include:
1.2.1 Viewing Mobile Servers
The Mobile Servers tab lists all Mobile Servers that are configured to run against the same repository. This page lists Mobile Server information such as Host name, Port, SSL enabled, Up or Down Status, the MGP instance, start time of the instance, and Mobile Server version (see Figure 1-3).
If a Mobile Server instance is not running (status column displays down), the hyperlink for the host name—where the Mobile Server exists—is not enabled. Refresh this page after a Mobile Server instance is started or stopped by clicking on Mobile Server link to see the updated status for the Mobile Server. Using search criteria based on host name, you can filter the Mobile Server display list for only those servers you are interested in.
The following sections describe the Mobile Manager components.
1.2.1.1 Mobile Manager Home Page
The Mobile Manager home page displays the following Mobile Server information.
-
General information such as current Mobile Server status, version, and mode.
-
Database information such as database version, JDBC URL, JDBC Driver, JDBC version, and schema name.
-
Data Synchronization information such as MGP Status, In Queue, Out Queue, and Error Queue details. See Chapter 5, "Managing Synchronization" for more information on Data Synchronization and the queues.
-
Alert details that describe alert severity and the date and time on which the alert was triggered.
-
Mobile Server components such as Data Synchronization and the Job Scheduler that enable you to schedule synchronization job sessions.
See Chapter 5, "Managing Synchronization" for more information on Data Synchronization. See Chapter 6, "Job Scheduler" for more information on the Job Scheduler.
1.2.1.2 Manage Applications
The Applications page enables the Mobile Server administrator to accomplish the following tasks.
-
Publish applications.
-
Create or edit application properties.
-
Resume, suspend, and delete applications.
-
Grant or revoke application access to users and groups.
-
Create or edit data subsetting parameters.
-
When required, provision Mobile application files for public use.
-
Add WAR files.
See Chapter 3, "Managing Your Mobile Applications" for more information on how to manage your applications.
1.2.1.3 Manage Users
The Users page enables the Mobile Server administrator to manage groups and users and their permissions. See Chapter 4, "Managing Users and Groups" for full details.
1.2.1.4 Mobile Server Administration
Figure 1-4 shows the Administration page that enables the Mobile Server administrator to accomplish the following tasks:
-
View the sessions that are active. See Section 13.2, "Viewing Active User Sessions" for full details.
-
Edit trace settings. See Chapter 3, "Tracing and Logging" in the Oracle Database Lite Troubleshooting and Tuning Guide for full details.
-
Edit the configuration file. We prefer that you modify the configuration using the GUI tool; however, if you decide to edit the
webtogo.orafile directly, you can access it with this link. See Appendix A, "Configuration Parameters for the WEBTOGO.ORA File" for details on the parameters. -
Add bookmarks. See Chapter 14, "Adding Popular URLs as Bookmarks to Mobile Server Main Page" for full details.
-
View a summary of the database, JRE, and Operating System. See Section 13.1, "Viewing System Status Reports for the Server" for full details.
-
Upload an SSL certificate. When you are using an SSL connection with a reverse proxy in connection with a Web-to-Go client, you need to upload an SSL certificate. See Section 11.5.1.4, "Enable SSL When Using a Reverse Proxy" for full details.
1.2.1.5 Data Synchronization
When you select this link, you can configure and manage how synchronization occurs.
-
Start or stop all synchronization activity for this Mobile Server.
-
View the active sessions where synchronization is currently occuring.
-
View statistics of previously executed synchronization sessions.
-
Execute the Consperf performance tool to evaluate the synchronization performance.
-
Modify parameters that affect how synchronization is performed.
-
View the activity within the Repository—with each of the queues used for managing synchronization or with the users, publications, and publication items loaded in the repository.
-
View all details about the MGP, including statistics, cycles and the Job Scheduler.
1.2.1.6 Job Scheduler
If you click on the Job Scheduler link, you can do the following:
-
Start/stop the Job Scheduler
-
View, enable, disable or delete any scheduled job.
1.2.2 Viewing Mobile Devices
The Mobile devices tab lists all Mobile devices that are registered with any Mobile Server, and are part of the same Mobile Server farm. The following sections briefly describe the functionality available to you in the Mobile Devices tab:
For full details on managing your Mobile devices, see Chapter 7, "Manage Your Devices".
1.2.2.1 Installed Mobile Devices
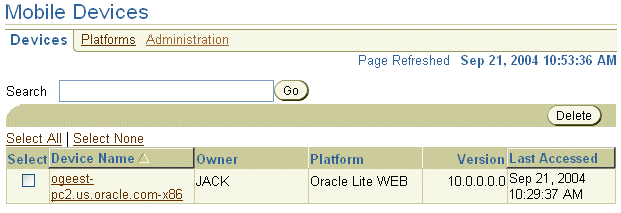
View the installed Mobile device information such as device name, owner, platform, version, and date and time on which it was last accessed. Figure 1-5 displays the Devices page.
To manage the Mobile device, click the Device Name link from the list. For full details on managing your Mobile devices, see Chapter 7, "Manage Your Devices".
1.2.2.2 Mobile Device Platforms
This page lists Mobile device platform information such as platform name, language, enabled, bootstrap, device count, and base platform.
There are hyperlinks that enable you to do the following:
-
View device, installed Oracle Database Lite software, back-end database information, what is currently in the command queues, and the logs.
-
Extend and manage device platforms—You can extend existing platforms for your own customization—adding other binaries to download or instructions on how to modify the client environment.
-
Create commands to be sent to the Mobile device—You can create commands that execute on the device. These commands can start a synchronization, retrieve information, modify the client environment, and many other options.
For full details on managing your Mobile devices, see Chapter 7, "Manage Your Devices".
1.3 Enabling UIX Dynamic Image Generation on UNIX to See Mobile Manager Buttons
UIX generates images dynamically. On UNIX systems, this requires headless Java to be enabled or access to an X server to be enabled for the JVM. If you do not configure one of the following, then you will not see the buttons in the Mobile Manager.
1.3.1 Headless Java
Headless Java is only supported in Java 2 version 1.4 and later. In order to avoid X server configuration issues, enable headless operation by setting the Java option: java.awt.headless to true.
In Mobile Server standalone mode, set the parameter when you start the Mobile Server by modifying the runmobileserver script to include the following:
java -Djava.awt.headless=true -jar oc4j.jar
When deploying to an OC4J instance within the application server, the Java option must be specified within the opmn.xml file, as follows:
    <oc4j instanceName="OC4J_Demos" gid="OC4J_Demos">
      <!-- OC4J configuration information here... -->
      <java-option value="-Djava.awt.headless=true "/>
    </oc4j>
After modification, restart OC4J.
1.3.2 X Server Access
An accessible X server must be running at the same time as the Mobile Server. To make an X server accessible to the Mobile Server, the X server host grants access to the Mobile Server host through commands, such as xhost +. The Mobile Server host configures the DISPLAY environment variable to point to the X server, as follows:
set DISPLAY=<X server machine name>:<X server number>.<screen number>
In Mobile Server standalone mode, set the DISPLAY environment variable before starting the Mobile Server.
When deploying to an OC4J instance within the application server, the DISPLAY must be specified within the opmn.xml file, as follows:
    <oc4j instanceName="OC4J_Demos" gid="OC4J_Demos">
      <!-- OC4J configuration information here... -->
      <environment>
        <prop name="DISPLAY" value="machinename:0.0"/>
      </environment>
    </oc4j>
where value is <machine name or IP address of the XServer>:<display number>
After modification, restart OC4J.


