| Oracle® SOA Suite Developer's Guide 10g (10.1.3.1.0) Part Number B28764-01 |
|
|
View PDF |
| Oracle® SOA Suite Developer's Guide 10g (10.1.3.1.0) Part Number B28764-01 |
|
|
View PDF |
Creating and deploying web services, and finding them and incorporating them in your applications, is made simple in JDeveloper by the use of wizards.
Once you have created a web service, you can test it by running the service locally on JDeveloper's embedded OC4J server. Alternatively, you can deploy the service remotely to an instance of OC4J running outside of JDeveloper on your machine. There is more information about testing a web service in Section 5.4, "Debugging, Testing and Analyzing Web Services in JDeveloper".
Objects that can be passed to and from web services have to be capable of being serialized to an XML type, and then deserialized back to their original type. Oracle Web Services runtime is based on the JAX-RPC standard that defines how objects are serialized from Java2XML and XML2Java. JDeveloper automatically handles Java primitive types and certain Java standard types, converting them to XML types. Put simply, each parameter and return value of a web service method must conform to one of these rules:
A Java primitive (for example int, long, byte), a Java primitive wrapper (for example java.lang.Integer), or java.lang.String.
A Java bean with a zero-argument constructor, with a pair of "get" and "set" methods for each property to be exposed. Each property must itself conform to one of these rules.
An array of a type that meets either of the first two rules.
For more information, see Appendix D, "Mapping Java Types to XML and WSDL Types" in Oracle Application Server Advanced Web Services Developer's Guide.
The wizards in JDeveloper allow you to extend the way Java objects are serialized by using custom mappings and serializers/deserializers. To find out more, search for "Setting Mappings between Java Methods and WSDL Operations" in the JDeveloper online help.
Web services can be developed using two approaches:
Bottom-up development
Top-down development
There are two approaches for JAX-RPC bottom up web services development:
Use one of JDeveloper's web services wizards, and point it at the implementation class. In the wizard, you select the methods you want to expose. JDeveloper generates all the necessary Java artifacts, deployment descriptors, and the WSDL without having to deal with manual operations.
Use JSR-181 annotations in your Java classes or EJB session beans. The WSDL is generated, along with a number of helper files, for example, a mapping file. For more information, see the " Developing Contract-Driven Web Services Using JDeveloper" tutorial, which is available on the Oracle Technology Network at
http://www.oracle.com/technology/obe/obe1013jdev/wstopdown/wstopdown.htm
The bottom-up development approach is usually the easiest and quickest way of developing web services, but it may have some impact on interoperability. In the SOA Order Booking application, RapidService is developed bottom-up, and you can ensure interoperability by testing the WSDL for conformity to the WS-I Basic Profile 1.1. For more information, see Section 5.4.2, "Analyzing Web Services for Interoperability".
Top-down web services development starts from the WSDL. JDeveloper helps you to build WSDL to generate all the necessary Java artifacts and deployment descriptors, and the implementation Java file. Generally, the top-down approach is the best way of ensuring interoperability, since you start to develop your service describing the different message formats and operations using XML standards, so the resulting web service is platform agnostic. In the SOA Order Booking application, CreditService is developed top-down.
JDeveloper provides a number of wizards that help you develop and deploy web services. Each wizard creates the WSDL document and deployment files needed to publish your code as a web service.
Create Java J2EE Web Service wizard, to expose methods in Java classes, or to expose methods in the remote interface of stateless session EJBs
|
Note: You can only use the Create Java J2EE Web Service wizard with EJB 2.0 and 2.1. For information about creating web services for EJB 3.0, see Section 5.2.5, "How to Create a Web Service from EJB 3.0". |
Create JMS J2EE Web Service wizard, to create web services that let you put messages on and take messages off a JMS destination
Create PL/SQL J2EE Web Services wizard, to expose program units stored in PL/SQL packages
Create J2EE Java Web Service from WSDL wizard, to create a top-down web service from an existing WSDL. Top-down web services development starts from the WSDL, and JDeveloper uses the WSDL to generate the necessary Java artifacts and deployment descriptors.
You can also create web services from ADF Business Components, either directly from the remote page of the application module editor, or by wrapping the business component as a stateless session EJB and using the Create Java J2EE Web Service wizard. For more information, search for "Publishing ADF Business Components Application Modules as Web Services" in the JDeveloper online help.
If you want to quickly try out some functionality you can create a web service which has default values from the context menu of a Java class.
The Create Java J2EE Web Services wizard allows you to create web services starting from:
Java classes
Remote interface of EJB 2.0 or 2.1
|
Note: Web services for EJB 3.0 are created by annotating the Bean or interface. For more information, see Section 5.2.5, "How to Create a Web Service from EJB 3.0". |
ADF Business Components service session beans wrapped as EJBs
The Create JMS J2EE Web Service wizard allows you to publish a web service that exposes JMS destinations.
The Create PL/SQL J2EE Web Service wizard allows you to publish a web service based on PL/SQL program units stored in PL/SQL packages.
JDeveloper allows you to create web services that conform to JAX-RPC, or that conform to the earlier Oracle SOAP stack. These are called:
J2EE 1.4 web services which can be deployed to J2EE application servers
J2EE 1.3 web services which can only be deployed to the SOAP containers in OC4J. These conform to the earlier Oracle SOAP stack, and you cannot use any JAX-RPC features with them.
Create the web service. If necessary, edit the deployment profile to change the J2EE context root, and deploy the web service.
To create the web service:
In the Application Navigator, right-click the project and choose New.
In the New Gallery, in the Categories list expand and select Web Services. From the Items list, select Java Web Service, JMS Web Service or PL/SQL Web Service, depending on the underlying implementation.
In the Select J2EE Web Service Version dialog, select the type of web service to create. This dialog only appears the first time you create a web service in a project, and the version you select is used for all web services you create in the project.
In the Create J2EE Web Service wizard, if the Welcome page is displayed, read the information, and click Next.
Complete the wizard.
For additional information about any of the pages in the wizard, click Help.
The web service is generated, and the generated artifacts are listed in the Application Navigator. This is illustrated in Figure 5-4.
Figure 5-4 Web Service and Artifacts in the Application Navigator
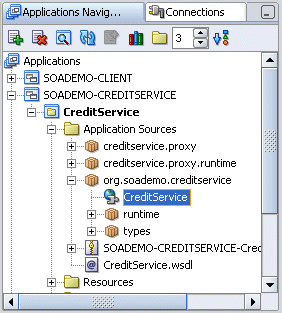
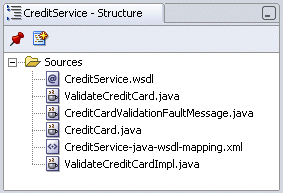
CreditService is the generated web service container. When you select it the Structure window lists the files comprising the web service, see Figure 5-5.
Figure 5-5 Web Service Files in the Structure Window
It is good practice to go examine the contents of the generated archive before you deploy the WAR. If you deploy using the default you may find that you are deploying redundant classes or other artifacts.
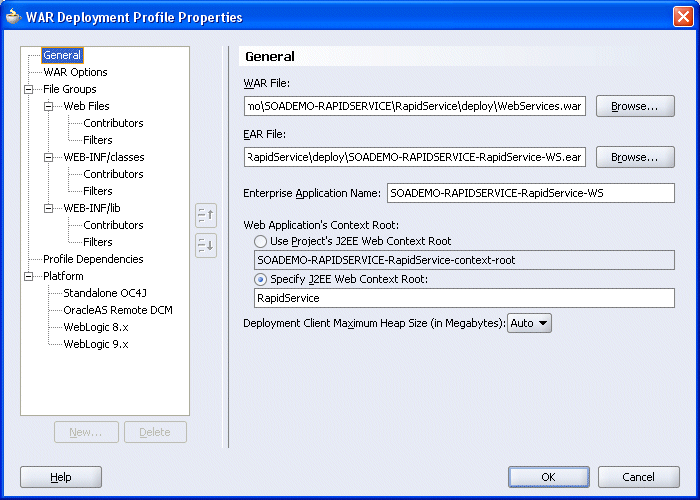
Another reason to examine the generated archive is to change the web context root. By default, the generated WAR deployment profile properties override the settings configured on the J2EE project settings panel in JDeveloper. Thus, the J2EE context root is inherited from the project. If you are following the SOA Order Booking application, you need to change the J2EE web context root before deploying the Rapid Manufacturer Service.
To examine and edit the WAR deployment profile:
In the Application Navigator, expand the project and the Resources folder.
Double-click WebServices.deploy to open the WAR Deployment Profile Properties dialog.
On the General page you can examine the files to be deployed, and if necessary add or remove some. This is also where you can change the J2EE Web Context Root.
The WAR deployment properties dialog is shown in Figure 5-6.
Figure 5-6 WAR Deployment Profile Properties
To deploy the web service:
In the Application Navigator, expand the project and the Resources folder.
Right-click WebServices.deploy to choose the application server connection.
One of the guiding principles for the next iteration of the Java Enterprise Platform (Java EE 5) is to provide ease-of-use features for the enterprise developer. To that end, the Web Services Metadata for the Java Platform Specification (JCP JSR 181) simplifies the Java web service programming model by providing a set of annotations that can be used to declaratively specify the web services of an application. The metadata annotates the Java source files that implement the web services, eliminating the need to modify and maintain additional service artifacts such as deployment descriptors and JAX-RPC mapping files. Thus, the process of developing and deploying a web service is greatly simplified.
When you create a web service from a Java class in JDeveloper, the runtime artifacts are generated into the Web Content folder.
However, if you use JSR-181 the annotations are processed at deployment time, and so the Web Content folder and its contents are not generated. For more information about JSR-181 see http://www.jcp.org/en/jsr/detail?id=181.
In the SOA Order Booking application, RapidService uses JSR-181. The JSR-181 Web Services library is added to the project and annotations are added at class and method level to the implementation class.
To add the JSR-181 library:
In the Application Navigator, right-click the project and choose Project Properties.
In the Project Properties dialog, choose Libraries and click Add Library.
In the Add Library dialog, select JSR-181 Web Services and click OK.
In the Project Properties dialog, ensure that Export is checked for JSR-181 Web Services, and click OK.
To add annotations to the Java class:
In the RequestQuote class, add the following as a class level annotation:
@WebService(serviceName="RapidService",targetNamespace="http://www.globalcompany.com/ns/rapidservice")
In the RequestQuote class, add the following as a method level annotation:
@WebMethod(operationName="OrderQuote")
If you want to create a web service from EJB 2.1, use the Create J2EE 1.4 Java Web Service wizard, which is invoked from the New Gallery. However, to create a web service from EJB 3.0, all you have to do is add the JSR-181 web service library to the project, add an annotation to the implementation class, and then deploy the EJB. The annotation is understood by the application server at runtime, and all necessary artifacts are generated server-side. The following example demonstrates this using SOADEMO-CUSTOMERSERVICE.
To create an EJB 3.0 web service:
Add the JSR-181 library. For more information, see Section 5.2.4, "Web Services metadata, JSR-181".
Locate the implementation class, in this case CustomerService.java, and open it in the source editor. Enter a class level annotation, for example:
@WebService(serviceName="CustomerSvc", targetNamespace="http://www.globalcompany.com/ns/customer")
This is illustrated in Figure 5-7.
Deploy the EJB to the application server. The annotation ensures that the server recognizes that it is a web service, creates a Web context based on the application name, and generates any necessary runtime artifacts.
A top-down web service is developed from a WSDL, where the WSDL provides the contract for the service. This is sometimes called the contract driven approach. For more information about developing a WSDL from the beginning, see the " Developing Contract-Driven Web Services Using JDeveloper" tutorial, which is available on the Oracle Technology Network at http://www.oracle.com/technology/obe/obe1013jdev/wstopdown/wstopdown.htm
JDeveloper allows you to create a web service from a WSDL using the Create J2EE 1.4 Java Web Service wizard (shown in Figure 5-8), which is invoked from the New Gallery. In the SOA Order Booking application, CreditService is a backend service built from a WSDL.
Figure 5-8 Create J2EE 1.4 Java Web Service from WSDL
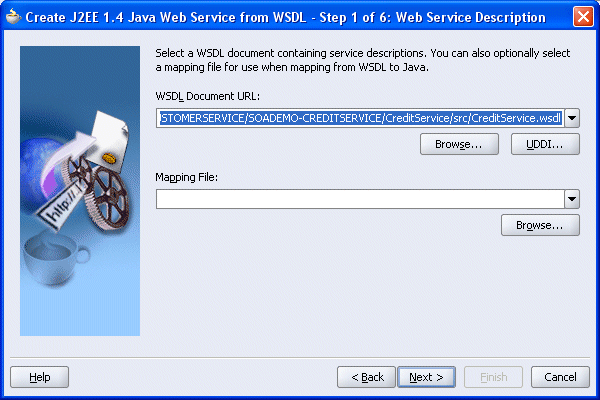
This wizard allows you to browse to a WSDL document on the local file system, enter the URL of a web service on the Internet or an intranet, or connect to a public or private UDDI registry to search for a web service. The web service is created using the contract information contained in the WSDL, and Java classes and other artifacts are automatically generated.
JDeveloper checks that the WSDL document is valid when you click Next from step 1.
You can examine an existing WSDL in JDeveloper by double-clicking it in the Structure window. By default, the editor opens in Design view showing the WSDL graphically. You can reverse the order of Services, Bindings, Port Types, Messages by clicking Switch View.
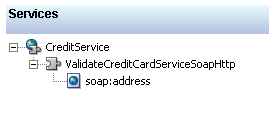
In Design view, expand the node under Services to show the soap:address, see Figure 5-9.
Figure 5-9 CreditService.wsdl in the Design Editor
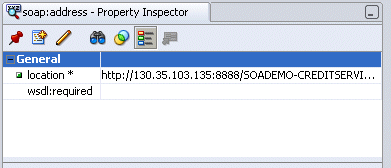
To see the actual value, select soap:address in the editor. The value is displayed in the property inspector, see Figure 5-10.
Figure 5-10 soap:address in the Property Inspector
To see the WSDL as formatted XML in the editor, click the Source tab, see Figure 5-11.
Figure 5-11 CreditService.wsdl in Source Editor

To create a top-down web service:
Open the New Gallery. Either:
Choose File > New, or
Click Ctrl+N
In the New Gallery dialog, expand Business Tier. Select Web Services and then double-click Java Web Service from WSDL.
In page Step 1 of 5: Web Service Description, enter or browse to the WSDL on which you want to base the web service.
Accept the defaults to complete the wizard.
The web service is generated (see Figure 5-12), and a deployment profile is created.
Figure 5-12 Generated Web Service Container in the Applications Navigator
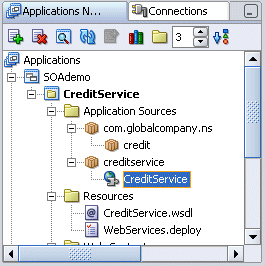
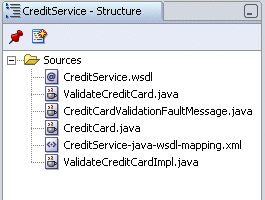
CreditService is the generated web service container. When you select it the Structure window lists the files comprising the web service, see Figure 5-13.
Figure 5-13 CreditService in the Structure Window
To deploy the web service:
In the Application Navigator, expand the project and the Resources folder.
Right-click WebServices.deploy to choose the application server connection.
You can create web services for deployment either to Oracle Application Server, or to an external instance of JDeveloper's OC4J. The web service wizard generates a web archive (WAR) deployment profile names WebServices.deploy that you can deploy by just choosing Deploy from the context menu of the web service container in the navigator.
|
Note: Web services for EJB 3.0 are created by annotating the bean class. When the EJB is deployed, the web service artifacts are created server-side. For more information, see Section 5.2.5, "How to Create a Web Service from EJB 3.0". |