| Oracle® SOA Suite Developer's Guide 10g (10.1.3.1.0) Part Number B28764-01 |
|
|
View PDF |
| Oracle® SOA Suite Developer's Guide 10g (10.1.3.1.0) Part Number B28764-01 |
|
|
View PDF |
JDeveloper makes it easy to use a web service in your application. You create a proxy to the service using the Create Web Service Proxy wizard, and call the methods in the client class in your application. You can launch the wizard wherever you have located or created a web service. Alternatively, you can launch the wizard directly and just enter the URL for the web service, or use the Find Web Service wizard to locate web services in a UDDI registry from a UDDI connection in the Connection Navigator. The UDDI connection allows you to search a UDDI registry using either the name or the category of the service. When you search by name, you can enter all or part of a name and you can use wildcards.
JDeveloper can interoperate with web services developed using other web service architectures. The Create Web Service Proxy wizard detects the type of web service, automatically generating the correct stub whether the service is an RPC-encoded, a document-encoded, or a document-literal type service.
Generating a web service proxy in JDeveloper is a simple procedure. To invoke the Create Web Services Proxy wizard, in the New Gallery, expand Business Tier and choose Web Services, and in the Items list, choose Web Services Proxy.
From a web service in JDeveloper. Choose Generate Web Service Proxy from the context menu of the web service container in the navigator. Alternatively, invoke the Create Web Services Proxy wizard and select or browse to the WSDL for the service.
From a WSDL in the file system. In the Create Web Service Proxy wizard select or browse to the WSDL for the service.
By pasting in the URL of the WSDL in the Create Web Service Proxy wizard when you have, for example, used Enterprise Manager to browse a running web service and discover the WSDL.
From a public registry such as XMethods. When you find a web service in a public registry, copy the URL of the WSDL for the service. In step 1 of the wizard paste the URL in WSDL Document URL.
From a public or private UDDI registry. In step 1 of the wizard, select UDDI to invoke the Find Web Services wizard.
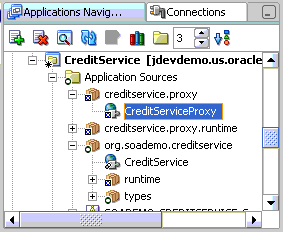
Figure 5-14 shows the Application Navigator and Structure window after generating a proxy to the CreditService web service.
|
Note: The SOA Order Booking application does not use a proxy to theCreditService web service. |
Figure 5-14 Generated Proxy in Application Navigator

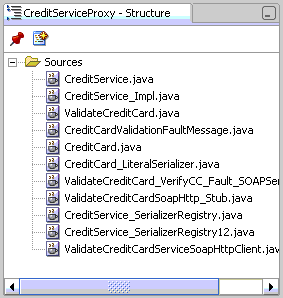
When you select the web service proxy container in the navigator, the files comprising the proxy are listed in the Structure window, see Figure 5-15. The file <serice_name>Client.java is generated with a main method for testing the call to the service.
Figure 5-15 Files Comprising the Proxy in the Structure Window

Other types of web service proxies that JDeveloper can create are:
Sample Java client. You can generate this client from the context menu of a web service container in the Application Navigator, or from the WSDL in the System Navigator. The sample Java client is designed for you to run against the web service running in the embedded OC4J server or against a remote instance of the OC4J server, and it contains a section for you to add your own code.
ADF data controls. You can use web services in applications designed using Oracle ADF. When you create the data controls for a web service, behind the scenes JDeveloper creates a stub to the service that is configured to work with the rest of the ADF framework. You can create data controls for a web service by dragging the web service or WSDL from the navigator onto the Data Control Palette. Or you can use the context menu of the web service container or WSDL. Or you can create the data control from the New Gallery. Expand Business Tier and choose Web Services, and in the Items list, choose Web Service Data Control.
Before you build the page to collect the data, you must first generate a proxy based on the web service.
|
Note: You must have local access or know the URL for the WSDL in order to create the service proxy. |
|
Tip: If you know the URL for the application server that hosts the WSDL, you can find the WSDL's URL using the WSIL Service Browser. The browser's URL ishttp://<host_name>:<port>//inspection.wsil. |
To create a web service proxy:
In the Applications Navigator of JDeveloper, right click on a project, and choose New.
This opens the New Gallery.
From the Categories pane, expand the Business Tier node, and select Web Services.
|
Tip: If Web Services is not available under this node, use the Filter By dropdown menu to choose All Technologies. |
From the Items pane, select Web Services Proxy.
This launches the Create Web Service Proxy Wizard.
Follow the instructions for the Wizard to create the proxy. Press F1 or Help for more information.
|
Tip: If you will be creating a data control for the web service, you must be sure to select the Copy WSDL Into Project option in the first step of the wizard. You will use this WSDL to create the data control. |
Once you complete the Wizard, you can use the WSDL to create a data control. You can then use the data control to declaratively create a JSF page that can collect the information. For more information, see Section 5.3.3, "How to Create a Data Control From a Web Service".
Note that the creation of data controls cannot take into account any complex data types. For example, in order to create a customer, an address might also be created. In this type of situation, you need to manually collect the data and invoke the service using a backing bean. For more information, see Section 9.6.3, "How to Invoke a Service Using a Backing Bean".
When you create a proxy to a web service using the Create Web Service Proxy Wizard, JDeveloper places the proxy by default into the view.proxy package in the Application Sources directory of the project. JDeveloper also generates source files based on the web service. You can view a list of these files in the Structure window when you click on the proxy in the Applications Navigator.
For example, Figure 5-16 shows the list of source files created when you create a proxy based on the CustomerService WSDL.
Figure 5-16 Generated Source Files for a Proxy are Displayed in the Structure Window

You can view the generated code by double-clicking any of the classes in the window.
By default, JDeveloper opens the <service-name>Client.java file in the Source editor. This generated file provides access to each of the operations on the web service, and can be used to test the connection to the service, using it's main method. For more information, see Section 5.4, "Debugging, Testing and Analyzing Web Services in JDeveloper". You can also use this class to invoke the web service directly. For more information, see Section 9.6.3, "How to Invoke a Service Using a Backing Bean". Example 5-1 shows the generated code for the CustomerServiceClient.java file.
Example 5-1 CustomerServiceClient.java Code
public class CustomerServiceClient {
    private project_test.proxy.CustomerService _port;

    public CustomerServiceClient() throws Exception {
        ServiceFactory factory = ServiceFactory.newInstance();
        _port = ((project_test.proxy.CustomerSvc)factory.loadService(project_
                test.proxy.CustomerSvc.class)).getCustomerService();
    }

    /**
     * @param args
     */
    public static void main(String[] args) {
        try {
            project_test.proxy.CustomerServiceClient myPort = new project_
                  test.proxy.CustomerServiceClient();
            System.out.println("calling " + myPort.getEndpoint());
            // Add your own code here

        } catch (Exception ex) {
            ex.printStackTrace();
        }
    }

    /**
     * delegate all operations to the underlying implementation class.
     */

    public String addNewCustomer(Customer customer) throws
                java.rmi.RemoteException {
        return _port.addNewCustomer(customer);
    }

    public Customer findCustomerByEmail(String email, String password) throws
              java.rmi.RemoteException {
        return _port.findCustomerByEmail(email, password);
    }

    public Customer findCustomerById(String custid) throws
                java.rmi.RemoteException {
        return _port.findCustomerById(custid);
    }

    public String getCustomerStatus(String customerID) throws
               java.rmi.RemoteException {
        return _port.getCustomerStatus(customerID);
    }


    /**
     * used to access the JAX-RPC level APIs
     * returns the interface of the port instance
     */
    public project_test.proxy.CustomerService getPort() {
        return _port;
    }

    public String getEndpoint() {
        return (String) ((Stub) _port)._getProperty(Stub.ENDPOINT_ADDRESS
                       _PROPERTY);
    }

    public void setEndpoint(String endpoint) {
        ((Stub) _port)._setProperty(Stub.ENDPOINT_ADDRESS_PROPERTY, endpoint);
    }

    public String getPassword() {
        return (String) ((Stub) _port)._getProperty(Stub.PASSWORD_PROPERTY);
    }

    public void setPassword(String password) {
        ((Stub) _port)._setProperty(Stub.PASSWORD_PROPERTY, password);
    }

    public String getUsername() {
        return (String) ((Stub) _port)._getProperty(Stub.USERNAME_PROPERTY);
    }

    public void setUsername(String username) {
        ((Stub) _port)._setProperty(Stub.USERNAME_PROPERTY, username);
    }

    public void setMaintainSession(boolean maintainSession) {
        ((Stub) _port)._setProperty(Stub.SESSION_MAINTAIN_PROPERTY,
                  Boolean.valueOf(maintainSession));
    }

    public boolean getMaintainSession() {
        return ((Boolean) ((Stub) _port)._getProperty(Stub.SESSION_MAINTAIN_
                PROPERTY)).booleanValue();
    }

    /**
     * returns the transport context
     */
    public ClientTransport getClientTransport() {
        return ((OracleStub) _port).getClientTransport();
    }

}
If you chose to copy the WSDL into the project, the WSDL file is placed in a directory named for the service.
In order to create a data control for a web service, you must first have the WSDL file located in a project directory.
To create a data control from a WSDL file:
In the Applications Navigator, right-click the WSDL file (located in the directory named for the service, if you had the Create Web Service Proxy Wizard copy it for you).
From the context menu, choose Create Data Control.
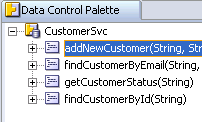
The data control is created and displays in the Data Control Palette. Figure 5-17 shows the data control created from the CustomerSvc WSDL file.
Figure 5-17 Data Control Created From the CustomerSvc WSDL

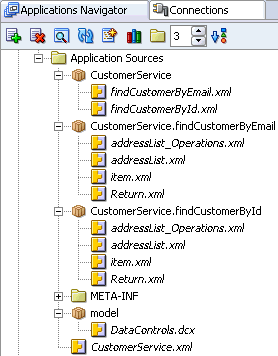
When you create a data control from a web service WSDL file, JDeveloper creates all the needed metadata files (such as the DCX file) needed to support the declarative creation of web pages. Figure 5-18 shows the packages and XML files created for the CustomerService data control.
Figure 5-18 Generated Web Service Data Control Files

For more information about the different files that are generated when you create a data control, see Section 4.7.2, "Understanding the Data Control Files". For more information about how the data control is represented in the Data Control Palette, see Section 4.7.3, "Understanding the Data Control Palette".