| Oracle Application Server Adapter for Oracle Applications User's Guide 10g (10.1.3.1.0) Part Number B28351-03 |
|
|
View PDF |
| Oracle Application Server Adapter for Oracle Applications User's Guide 10g (10.1.3.1.0) Part Number B28351-03 |
|
|
View PDF |
| Oracle Application Server Adapter for Oracle Applications User's Guide 10g (10.1.3.1.0) Part Number B28351-03 |
Contents |
Previous |
Next |
This chapter covers the following topics:
Oracle e-Commerce Gateway provides a common, standards-based approach for Electronic Data Interchange (EDI) integration between Oracle Applications and third party applications. EDI is the computer to computer exchange of business documents in a standard format. The EDI format is commonly used for e-commerce transactions between businesses.
Oracle e-Commerce Gateway is the EDI integration enabler for Oracle Applications. It provides a single integration framework for you to conduct e-business using EDI standards with everyone in your global supply chain. Oracle e-Commerce Gateway provides an application integration infrastructure that is flexible enough to accommodate the integration requirements of any and all applications that must integrate with Oracle Applications. This allows for seamless flow of information in an ever expanding trading partner base.
Oracle e-Commerce Gateway includes pre-built transactions of key business documents that can be implemented simply by defining a trading partner and enabling the transaction in test or production mode. You can implement a single transaction, a group of transactions, or a business flow. You can implement the pre-built transactions as is or configure them to meet your specific industry needs.
Oracle e-Commerce Gateway uses a metadata driven approach to dynamically generate outbound and consume inbound flat files based on user defined trading partner, mapping, transformation, and data validation rules. You can change a rule by changing the metadata stored in the repository. The updated rule takes effect at run-time without any code modifications.
Note: For detailed information about Oracle e-Commerce Gateway, see Oracle e-Commerce Gateway User's Guide. This guide is a part of the Oracle Applications documentation library. Oracle Applications documentation can be accessed from the following link:
http://www.oracle.com/technology/documentation/applications.html
OracleAS Adapter for Applications can be configured to use e-Commerce Gateway to interact with third party applications. e-Commerce Gateway, like XML Gateway, is primarily used for Business-to-Business (B2B) integration. While XML transactions are mostly based on a single transaction and are event based, EDI transactions are more batch oriented.
OracleAS adapter for Oracle Applications is deployed using the BPEL Process Manager (PM) in Oracle JDeveloper. The BPEL PM creates the WSDL interfaces for the e-Commerce Gateway.
This section describes configuring the OracleAS Adapter for Oracle Applications to use e-Commerce Gateway. It describes the tasks required to configure OracleAS Adapter for Oracle Applications using the Adapter Configuration Wizard in Oracle JDeveloper.
Prerequisites to Configuring e-Commerce Gateway
You need to populate certain variables in the BPEL PM in order to provide context information for Oracle Applications. The context information required for an EDI transaction includes the username and responsibility of an Oracle Applications user that has sufficient privileges to run the program. The default value passed for the username is SYSADMIN. The default value passed for responsibility is SYSTEM ADMINISTRATOR.
You can change the default values specified in the generated WSDL for the username and responsibility. This is a static way of changing the context information. These values would apply to all invocations of the deployed business process. However, if you need to provide different context information for different invocations of the business process, then you can dynamically populate the header variable with values for username and responsibility. The context information can be specified by configuring an Assign activity before the Invoke activity in the BPEL PM.
Following is a list of the procedures required to accomplish the design-time tasks.
The first configuration task is to create a new BPEL project.
To create a new BPEL project
Open JDeveloper BPEL Designer.
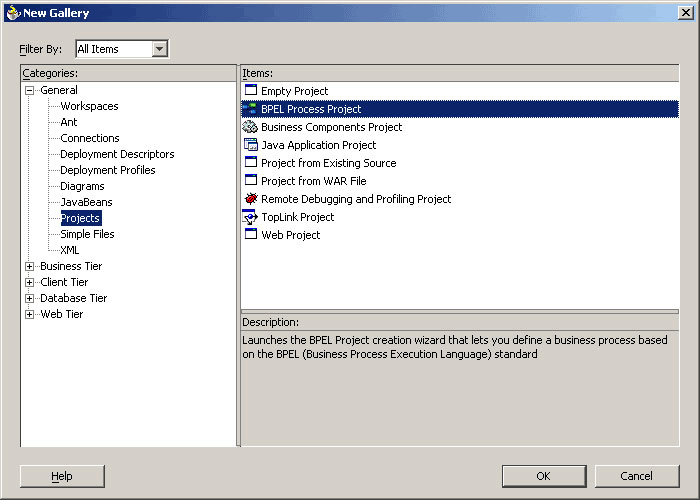
From the File menu, select New. The New Gallery dialog box appears.
Select All Items from the Filter By box. This displays a list of available categories.
Expand the General node, and then select Projects.
Select BPEL Process Project from the Items group.
Creating a New BPEL Process Project
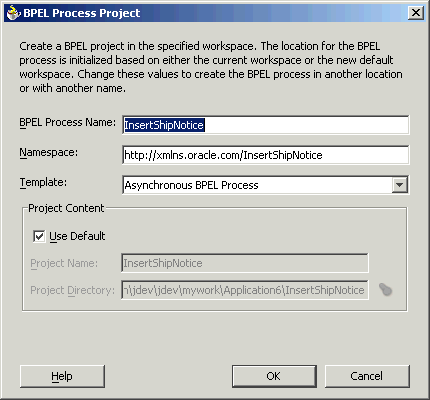
Click OK. The BPEL Process Project dialog box appears.
In the BPEL Process Name field, enter a descriptive name. For example, InsertShipNotice.
From the Template box, select Asynchronous BPEL Process. Keep the default selection for Use Default under Project Content.
Specifying a Name for the New BPEL Process Project
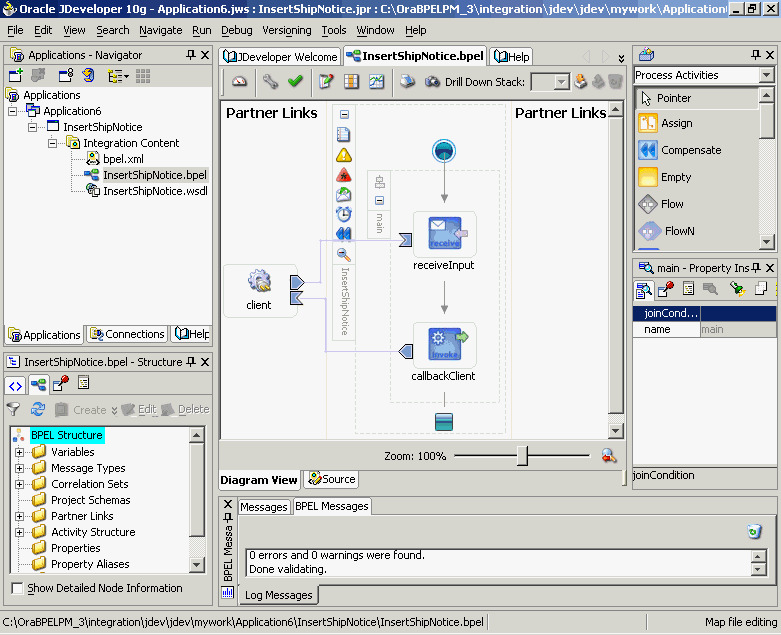
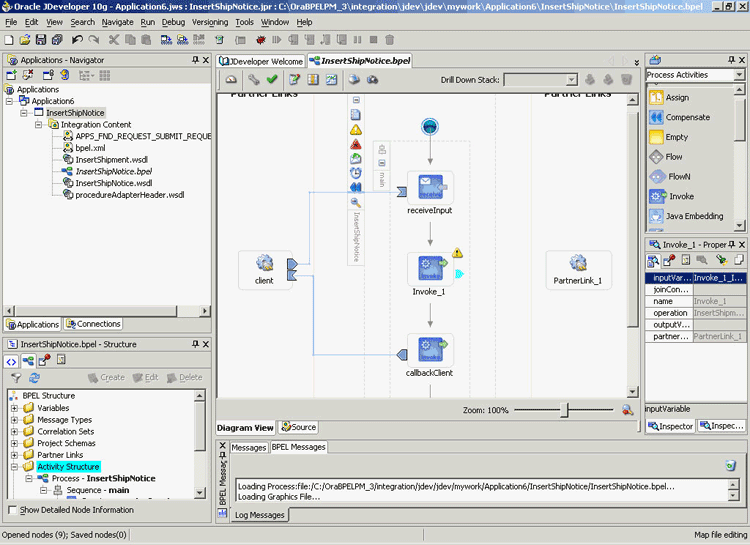
Click OK. A new BPEL process, with the required source files including bpel.xml, InsertShipNotice.bpel and InsertShipNotice.wsdl is created.
New BPEL Process Project
The next task is to add a partner link to the BPEL process. A partner link defines the link name, type, and the role of the BPEL process that interacts with the partner service.
To add a partner link
Drag and drop PartnerLink, from the Component Palette, into the border area of the process diagram. The Create Partner Link dialog box appears.
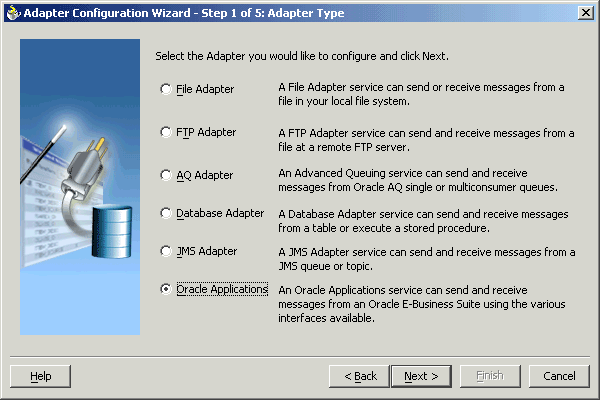
Click the Define Adapter Service icon in WSDL Settings. The Adapter Configuration Wizard appears.
Click Next. The Adapter Type dialog box appears.
Select Oracle Applications.
Selecting OracleAS Adapter for Oracle Applications
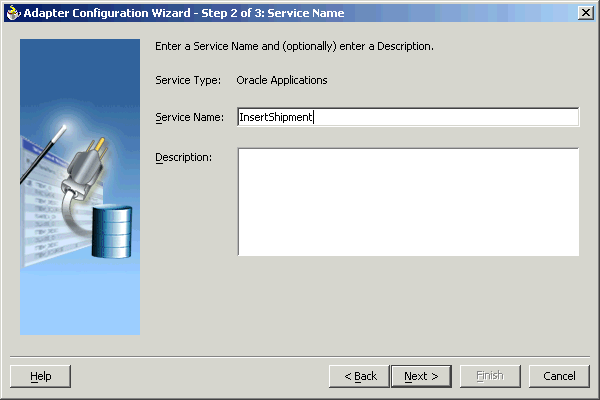
Click Next. The Service Name dialog box appears. Enter the following information:
In the Service Name field, enter a service name.
In the Description field, enter a description for the service. This is an optional field.
Specifying the Service Name
Click Next. The Service Connection dialog box appears.
Creating a New Database Connection
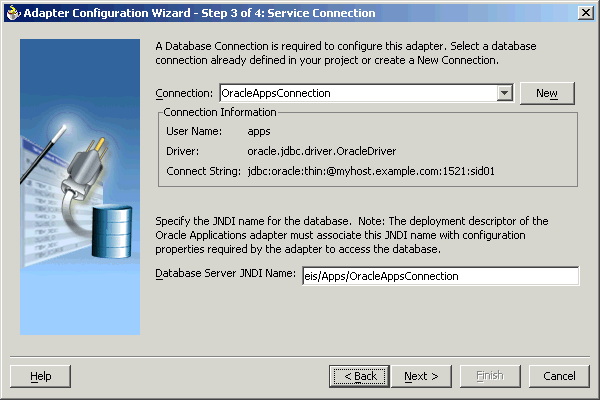
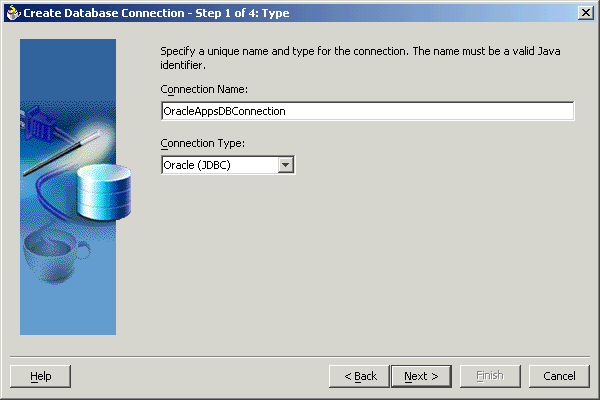
Click New to define a database connection. The Create Database Connection Wizard appears. Alternatively, you can select an existing database connection from the Connection list.
Note: You need to connect to the database where Oracle Applications is running.
Enter the following information in the Type dialog box:
In the Connection Name field, specify a unique name for the database connection.
From the Connection Type box, select the type of connection for your database connection.
Specifying the Connection Name and Type of Connection
Click Next. The Authentication dialog box appears.
Enter information in the following fields:
In the UserName field, specify a unique name for the database connection.
In the Password field, specify a password for the database connection.
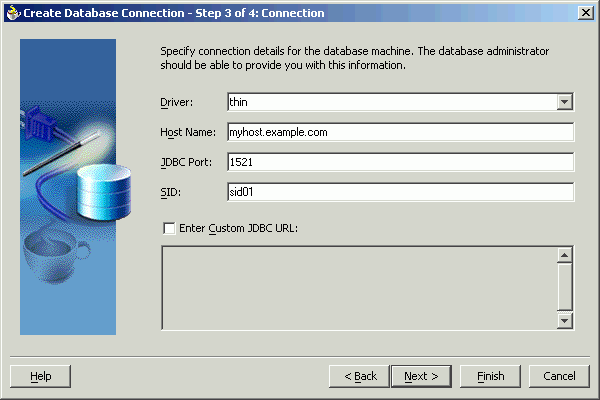
Click Next. The Connection dialog box appears.
Enter information in the following fields:
From the Driver list, select Thin.
In the Host Name field, specify the host name for the database connection.
In the JDBC Port field, specify the port number for the database connection.
In the SID field, specify a unique SID value for the database connection.
Specifying the New Database Connection Information
Click Next. The Test dialog appears.
Click Test Connection to determine whether the specified information establishes a connection with the database.
Click Next. The Service Connection dialog box appears, providing a summary of the database connection.
The JNDI (Java Naming and Directory Interface) name corresponding to the database connection appears automatically in the Database Server JNDI Name field. Alternatively, you can specify a different JNDI name.
Note: When you specify a JNDI name, the deployment descriptor of the Oracle Applications adapter must associate this JNDI name with configuration properties required by the adapter to access the database.
The JNDI name acts as a placeholder for the connection used when your service is deployed to the BPEL server. This enables you to use different databases for development and later for production.
Note: For more information about JNDI concepts, see Oracle Application Server Adapter Concepts.
Click Finish to complete the process of creating a new database connection.
Once you have completed creating a new connection for the service, you can select an e-Commerce Gateway interface by browsing through the modules available in Oracle Applications.
Click Next in the Service Connection dialog box. The Operation dialog box appears.
Note: If you are connecting to a pre-11.5.10 Oracle Applications instance, you must select the interface type in the Adapter Configuration Wizard. Select EDI Gateway to proceed. Select Inbound into Oracle Applications or Outbound from Oracle Applications depending on whether data is inbound into Oracle Applications or outbound from Oracle Applications. Next, click Get CP to choose the EDI concurrent program from the Oracle Applications Module Browser.
Click Get Object to open the Oracle Applications Module Browser.
Specifying the EDI Concurrent Program
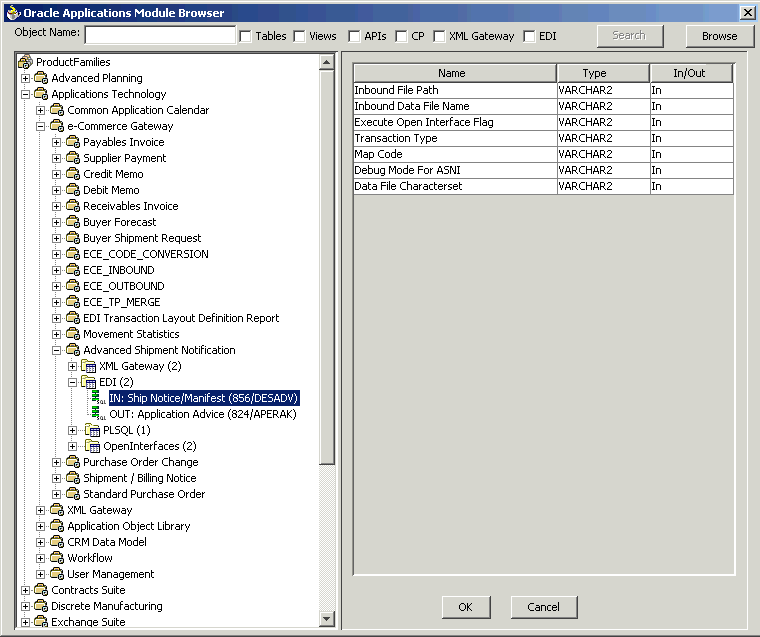
Oracle Applications Module Browser includes the various product families that are available in Oracle Applications. For example, Applications Technology or Order Management Suite are product families in Oracle Applications. The product families contain the individual products. For example, Applications Technology contains the e-Commerce Gateway product. The product contains the business entities associated with the product. For example, the e-Commerce Gateway product contains the Advanced Shipment Notification business entity.
Business entities contain the various application modules that are exposed for integration. These modules are grouped according to the interface they provide. EDI programs can be found under the EDI category.
Select an inbound or outbound EDI program. Click OK. You can select only one EDI program for each adapter service.
Note: You can also search for an EDI program by entering the name of the program in the Object Name field. Select the EDI check box and click Search.
The EDI program is added to Operation Objects. Click Next in the Operation dialog box.
Click Finish. When you click Finish, the wizard generates the WSDL file corresponding to the selected interface. This WSDL file is now available for the partner link.
Note: When you click Finish, two SQL files may be added to the project if a wrapper does not exist for the function. A wrapper is generated the very first time you create the e-Commerce Gateway based service. Subsequent services reuse the same wrapper.
Completing the Partner Link Configuration
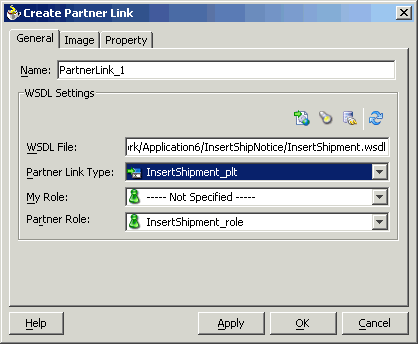
Click OK. The partner link is created with the required WSDL settings.
After adding and configuring the partner link, the next task is to configure the BPEL process itself. You can start by configuring the Invoke process activity to invoke the EDI concurrent program.
To configure the Invoke activity
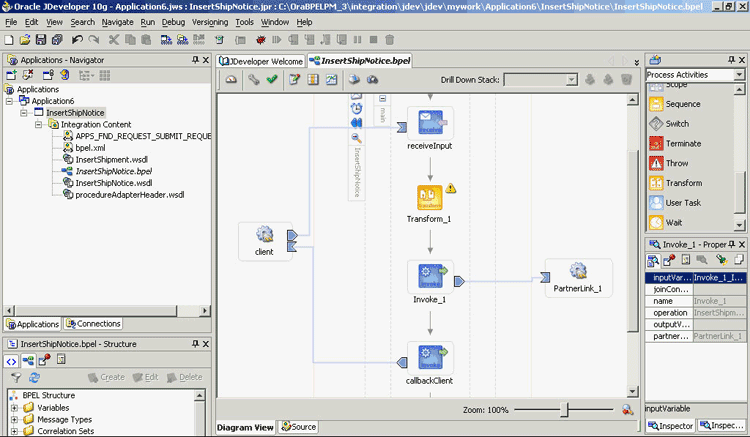
Drag and drop Invoke into the process map window. shows the Invoke activity after it has been added to the process map.
Adding the Invoke Activity
Double-click Invoke in the process map to open the Invoke dialog box. The General tab is selected by default.
Configuring the Invoke Activity
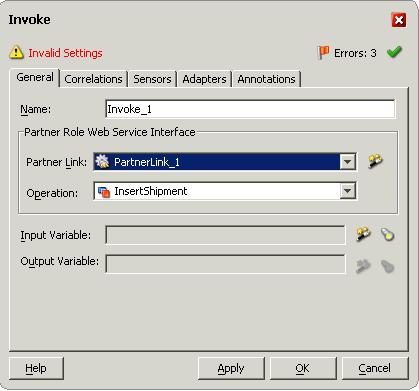
In the Partner Link box, select the partner link to invoke. This is the partner link that you configured in the previous section. The Operation is automatically selected, depending on the EDI concurrent program that you chose when configuring the partner link.
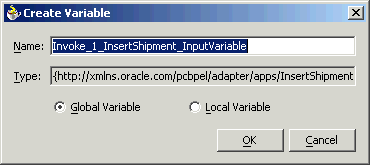
Click the Create icon next to the Input Variable field. Enter a descriptive name for the variable in the Create Variable dialog box that appears. You can also accept the default name. Click OK.
Creating the Input Variable
Click the Create icon next to the Output Variable field. Enter a descriptive name for the variable in the Create Variable dialog box that appears. You can also accept the default name. Click OK.
In the Invoke dialog box, click Apply, then click OK.
Note: You can define an Input Header Variable on the Adapters tab of the Invoke dialog box. This variable can be used to provide context information for Oracle Applications.
The Transform activity can be used to configure the parameters for the input and output variable. The Transform activity can also be used if variable values need to be transformed before updating them in Oracle Applications.
To configure the Transform Activity
Drag and drop Transform into the process map window between the Receive and Invoke activities.
Adding the Transform Activity
Double-click Transform in the process map to open the Transform dialog box. The Transformation tab is selected by default.
Configuring the Transform Activity
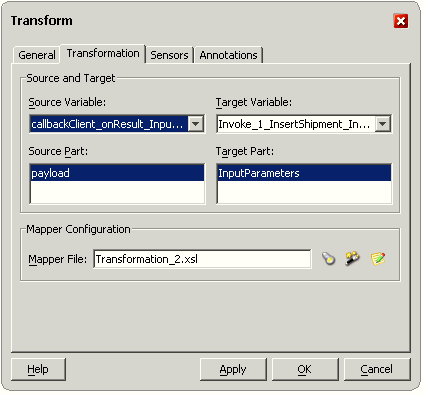
Select the Source Variable and Target Variable from the respective boxes. Elements are mapped from the Source Variable to the Target Variable.
Select the Source Part of the variable from which to map elements. For example, the source part may be a payload schema consisting of a purchase order request.
Select the Target Part of the variable to which to map elements. For example, the target part may be a payload schema consisting of a purchase order acknowledgment.
Mapper File specifies the file in which you create the mappings using the XSLT Mapper Transformation tool. Click the Create icon next to the Mapper File field to create a new transformation mapping file.
The transformation mapping file appears. Its Design view is displayed by default.
Editing the Transformation Mapping File
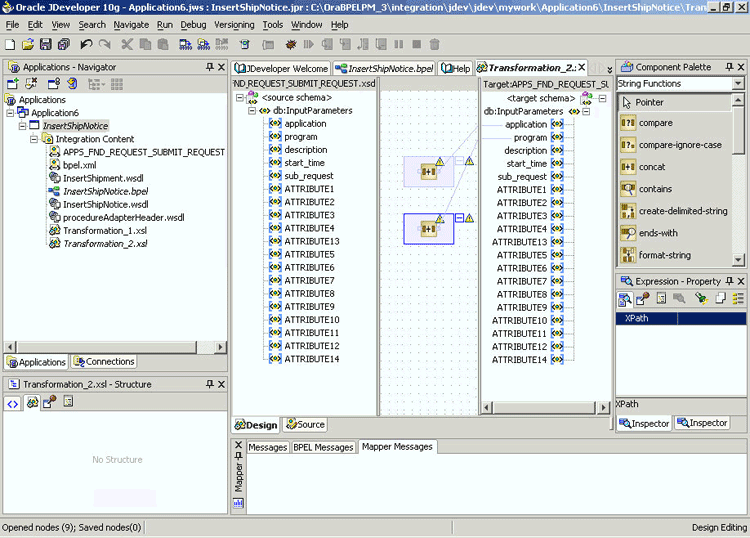
You can define the parameter values in the Design view. Drag a string function to the Design area. Connect the function to the appropriate parameter for which you want to define a value.
Note: You can use an input parameter value from the source variable, transform it using a string function, and use it as the input parameter value for the target variable.
Double-click the icon for the function. The Edit Function dialog box appears.
Supplying the Function Parameters
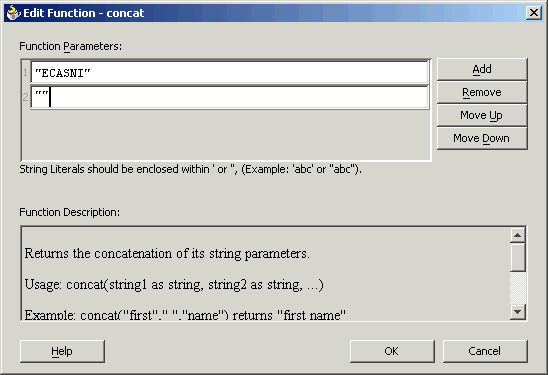
Repeat steps 8 and 9 for all the parameters that you need to supply.
Note: You can use both the Transform and Assign activities to configure the variables. If the number of mappings to be configured is less, say three or four, then you can use the Assign activity. The Transform activity is more suitable for situations where the number of mappings is large or where variable transformation is required.
After designing the BPEL process, the next step is to deploy, run and monitor it.
You need to deploy the BPEL process before you can run it. The BPEL process is first compiled and then deployed to the BPEL server.
To deploy the BPEL process
Select the BPEL project in the Applications window.
Right-click the project name, and then select Deploy from the menu that appears.
Select Local BPEL Server followed by Deploy to Default Domain, if you are deploying the process on the local BPEL server.
Deploying the BPEL Process
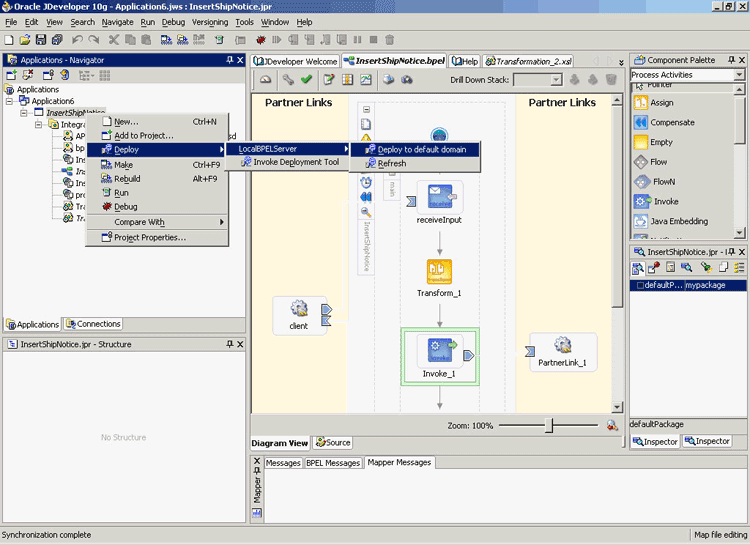
Note: You can select Invoke Deployment Tool if you want to deploy to a different BPEL server.
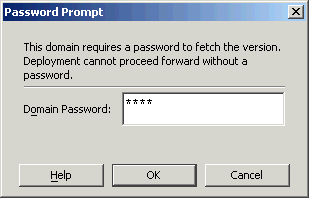
The Password Prompt dialog box appears. Enter the password for the default domain in the Domain Password field. Click OK.
Specifying the Domain Password
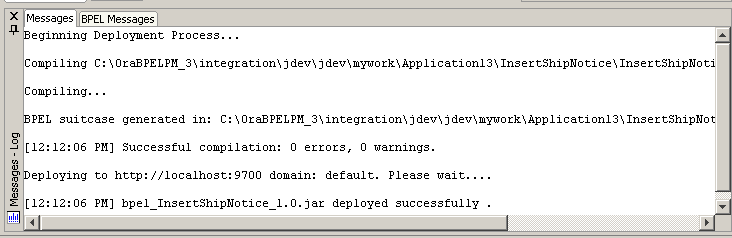
The BPEL process is compiled and deployed. You can check the progress in the Messages window.
Messages Window
Once the BPEL process is deployed, it can be seen in the BPEL Console. You can manage and monitor the process from the BPEL Console. You can also test the process and the integration interface by manually initiating the process.
To test the BPEL process
To open the BPEL Console, click Start, and choose Programs. In the Programs menu, select Oracle - ORACLE_HOME, Oracle BPEL Process Manager 10.1.3, and then select BPEL Console.
The BPEL Console login screen appears. Select Default in the Domain box. Enter the password for the default domain in the Password field. Click Login.
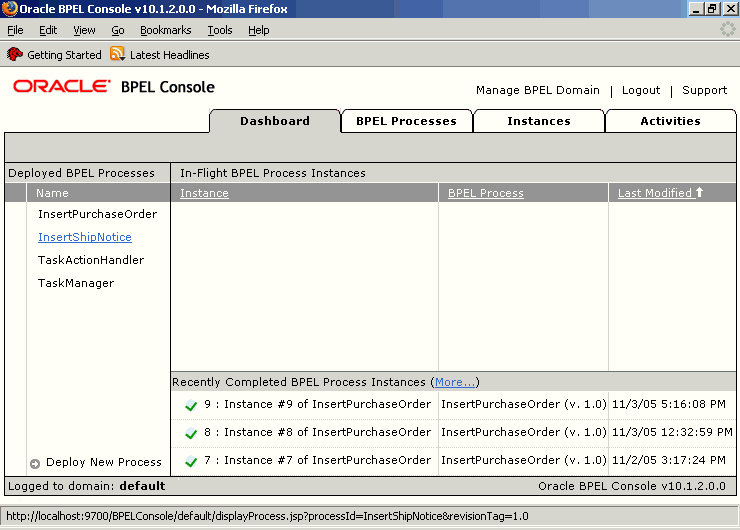
Oracle BPEL Console appears. The list of deployed processes is shown under Deployed BPEL Processes.
Deployed BPEL Processes
Click the BPEL process that you want to initiate. The Initiate page appears. Enter the input string required by the process.
Click Post XML Message to initiate the process.
The BPEL process is now initiated. You can check the process flow by clicking the Visual Flow icon.
BPEL Console Initiate Page
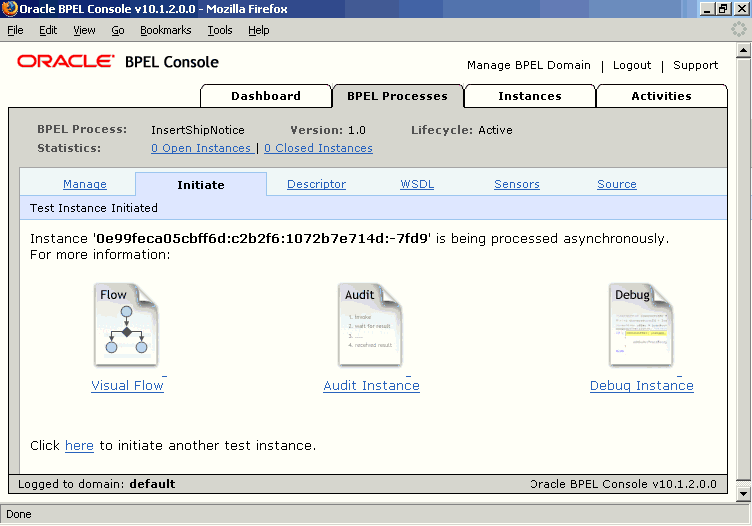
The audit trail provides information on the steps that have been executed. The audit trail also records the Request ID that is returned for the transaction. You can check the audit trail by clicking the Audit Instance icon.
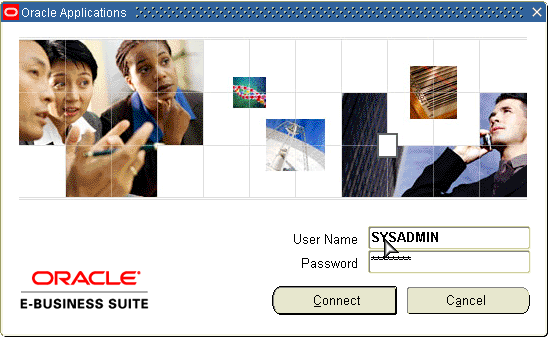
To verify records in Oracle Applications
Log in to Oracle Applications as the System Administrator.
Oracle Applications Login Dialog Box
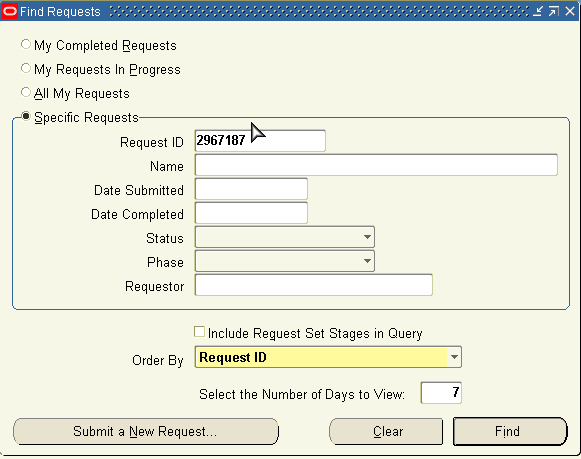
Select Requests from the View menu.
Search for the Request by entering the Request Id that you got from the audit trail, then click Find.
Find Requests Dialog Box
The Request details are displayed. You can check for details such as the Phase and Status of the request.
If the Status of the request is Complete, you can also query the appropriate table in Oracle Applications to search for the relevant records that have been inserted.
Querying Oracle Applications for a Record
