|
Applications Administration Guide > Creating and Administering iHelp >
Designing iHelp
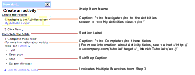
Assemble step-by-step iHelp instructions in the iHelp Designer by creating steps and connecting them with branches. Figure 5 shows an example of iHelp instructions displayed in the iHelp pane.
Figure 5. Relation Between iHelp and Components of iHelp Designer
|
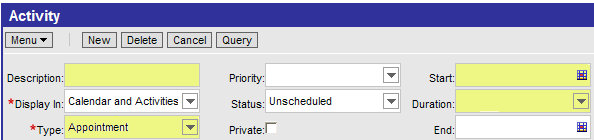
Figure 6 shows the fields listed in Step 3 of Figure 5, highlighted.
Figure 6. Fields Highlighted (Step 3)
|
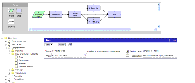
Figure 7 shows how the iHelp instructions appear in the iHelp Designer.
Figure 7. iHelp Designer Shows iHelp Steps That Correspond to Figure 5
|
To access the iHelp Designer
- Navigate to the Administration - iHelp screen > All iHelp Items view.
- Drill down on the name of the iHelp item.
To create an iHelp step
- In the iHelp Designer, drag the Step or Start icon onto the grid.
The first step in any iHelp must be Start. The start step should navigate the user to the correct view for the iHelp item. Only one Start step is allowed per iHelp item.
- In the Step form, complete the fields.
Some fields are described in the following table.
|
|
Name |
This name appear on the step's icon in the iHelp Designer. The user does not see this name. |
View |
Enter a view name if you want the step to:
- Provide a hyperlink to a view.
- Highlight buttons or fields on the view.
NOTE: If you provide a hyperlink to a screen which is different from the main screen for the iHelp, you may lose record context as you navigate to the other screen. For example, a user in the Contact Activities view of the Contacts screen, highlights an activity record and clicks an iHelp link to the Activities screen. In going to the Activities screen, the record context is broken. The highlighted activity is no longer selected, and the user must query for it again. If you remain in the same screen, context is generally maintained.
Only views that are common to all the applications specified in the Application field are available for selection. |
Caption |
This is the text that appears in the step. Use the following tags to format step captions:
- <b> and </b> for bold
- <i> and </i> for italic
- <u> and </u> for underlining
- <v> and </v> for view navigation links
- <a> and </a> for external hypertext links; for example, <a href='http://www.siebel.com' target='_blank'>Siebel Systems, Inc.</a>
(Use single quotes.)
|
Section Label |
(Optional) This text appears above the step. |
Description |
For the administrator's use only. This description is not visible in the iHelp pane. |
- (Optional) Highlight a button or field:
- Click the Field and Button Highlights folder.
- In the Field and Button Highlights list, create new records and complete the fields.
NOTE: Most buttons, column headings, and single-value fields can be highlighted. These are applet controls with HTML Type of Field or MiniButton (all MiniButton types). MVG fields and read-only fields cannot be highlighted.
- (Optional) Create substeps:
- Click the SubSteps folder.
- In the SubSteps list, create new records, and complete the Caption field.
NOTE: You cannot add view navigation links to substeps.
To connect steps with branches
- Drag the Branches icon onto the grid.
- Move the end points of the branch to connect two steps.
- If multiple branches leave one step, set conditions on the branches:
- Click the Branches folder for the step.
- In the Branches list, complete the fields.
No Condition Expression is required for the last branch in the sequence.
For information on the Branch Condition Expression Designer, see Siebel Business Process Designer Administration Guide.
|