|
Fundamentals > Sharing Information > Emailing, Faxing, Paging, and Wireless Messaging >
Using the Send Email Command
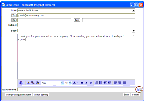
Using the Send Email command, you can send email messages from any context within your Siebel application. Depending on how the Siebel administrator has configured the application, you can use context-specific email message templates to improve efficiency and standardize replies for types of communications that occur frequently. Figure 46 provides an example of the Send Email dialog box. Your Siebel application supports individual user choice regarding the software used for Send Email. The choice of software is determined by the value of the Email Client user preference setting in your Siebel application.
Figure 46. Example of Send Email Dialog Box
|
To send an email from your Siebel application
- Navigate to the desired screen.
- Select the record from which you want to send the email.
Depending on the view you are in, data associated with the record may be inserted into the email.
- From the application-level menu, choose File > Send Email.
The Send Email dialog box appears.
NOTE: The Pick Recipients dialog box may appear, depending on the screen you are in when you invoke the Send Email command. If it does, select a recipient from the list (you may select None) and click OK.
Verify that the From field includes your profile name. If it does not, select a profile name from the From drop-down list. If no profile is available, contact your Siebel administrator.
- Fill in the appropriate fields. You can select a template containing predefined text for the email from the Body drop-down list.
- (Optional) Attach literature and other files to the email by clicking either the add literature or add attachment button (highlighted in step 3). Launching the email from an attachment record automatically attaches the file to the email.
NOTE: If you attach multiple documents to the email (either literature items or documents), only the last item you attached appears in the Attachments field. To see a list of all attached items, click the add attachment button.
- (Optional) If you selected HTML as your Default Message Format user preference, you can edit aspects of the message text such as font size, font color, paragraph justification, and so on. This formatting will be visible to the email recipient if the recipient's email client software supports HTML.
- (Optional) Click Check Spelling to run a spell check on the text of the email.
- Click Send to send the email.
Related Topics
Using the HTML Editor
Setting Outbound Communications Preferences for Send Email
|