|
Siebel Business Process Framework: Workflow Guide > Example Workflow Processes >
Example Workflow Process That Traverses a Record Set to Close Obsolete Service Requests
This topic gives one example of closing a set of obsolete service requests. You might use this feature differently, depending on your business model. It includes the following topics:
The business case in this example identifies then closes obsolete service request records. A service request is considered obsolete if it is more than one year old with a Status that is not Closed or Cancelled. The workflow process identifies obsolete service request records, then traverses the resulting record set, changing the Status for each obsolete service request record to Cancelled, the Sub-status to Resolved, the Close Date to the current date, and adds a message to the Description indicating the SR was cancelled due to obsolescence. For more information about the technique used in this example, see Using the Siebel Operation Step to Traverse a Record Set. Creating a New Business Component
Some requirements for this workflow process include:
- The workflow process must process a record from the primary business component of the business object on which the workflow process is based.
- A looping workflow process that processes a batch of records can loop only through the records of a non primary business component. This non primary business component must be based on the same business object that is defined for the workflow process. In this example, that business object is Service Request.
- The non primary business component must be established as a child of the primary business component's business object.
The Service Request business component is the primary business component of the Service Request business object. To satisfy these requirements you create a new, non primary business component, Service Request No Link. This new business component is a child of the primary Service Request business component. The child business component contains the minimum number of fields required to meet the needs of this business case, and those fields point to the same table columns as their counterpart fields in the primary business component. Thus, when a field is modified in the child, the same field is modified in the primary business component. Both the primary and the child business component modify the same business component record. A relationship must be established between the child and the primary business component's business object. To accomplish this, the child is defined as a Business Object Component on the primary business component's Business Object object definition. To create the child business component
- In the Object Explorer, click the Business Component object type.
- In the Business Component OBLE, right-click then choose New Record.
- Define the following properties for the new business component object definition. Accept default values for other properties, as described in the following table:
|
|
Name |
Service Request No Link |
Project |
Workflow Examples |
Class |
CSSBCBase |
Table |
S_SRV_REQ |
- With Service Request No Link chosen in the Business Components OBLE, expand the Business Component object type in the Object Explorer, then click the Field object type.
- In the Field OBLE, right-click then choose New Record to add each of the fields listed in the table below to the Service Request No Link business component. Accept default values for properties not described in the following table:
|
|
|
|
Status |
SR_STAT_ID |
30 |
DTYPE_TEXT |
Sub-Status |
SR_SUB_STAT_ID |
30 |
DTYPE_TEXT |
Closed Date |
ACT_CLOSE_DT |
(leave empty) |
DTYPE_UTCDATETIME |
Description |
DESC_TEXT |
2,000 |
DTYPE_TEXT |
Fields in the child business component correspond to fields with the same name in the primary business component. Since a field on the child references the same table and column as the field's counterpart on the primary business component, the field modifies the same record. Note that since Created is a system field, it is not explicitly defined as a field on the primary business component, and is therefore not defined on the child.
TIP: To reduce the number keystrokes you must perform, define the Column property first. When you define the Column property, then step out of the Column field in the OBLE, the Text Length and Type properties automatically populate.
Next, establish a relationship between the child and the primary business component's Business Object. To establish a relationship between the child and the primary's business object
- In the Object Explorer, click the Project object type.
- In the Project OBLE, locate then click the Service project.
- Make sure the Locked property for the Service project contains a check mark.
- In the Object Explorer, click the Business Object object type.
- In the Business Object OBLE, query for the Service Request business object.
- In the Object Explorer, expand the Business Object object type to expose the Business Object Component object type.
- In the Object Explorer, click the Business Object Component object type.
- In the Business Object Components OBLE, right-click then choose New Record.
- Set the Bus Comp property to Service Request No Link. Do not specify a link.
- From the Tools application-level menu, Choose Tools > Compile Projects.
- Choose Locked Projects, then compile to the repository that is used by your sample database.
This is typically [Siebel client root directory]\OBJECTS\[language]\siebel.srf.
Defining the Workflow Process
Actions this workflow process performs include:
- Accepts a record of the Service Request business component. This record is not processed.
- Identifies obsolete Service Requests by querying the Service Request No Link business component for records whose Created date is more than one year old and whose Status is not Closed or Cancelled.
- Traverses records in the query result set, modifying the Status, Sub-Status, Close Date and Description fields to reflect the record's obsolete condition.
To create the workflow process
- In Siebel Tools, create a new workflow process object definition using values described in the following table:
|
|
Process Name |
Close Obsolete SRs |
Workflow Mode |
Service Flow |
Business Object |
Service Request |
To view an example, see Creating a New Workflow Process Object Definition.
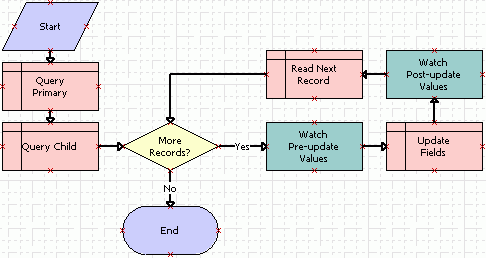
- Add steps and connectors until your workflow process resembles the workflow illustrated in the following diagram:
The two business service steps allows you to use the Watch window to debug the workflow. These are removed near then end of the configuration instructions for this example.
For more information, see About Workflow Process Steps and Connectors, and Diagramming a Workflow Process.
- Click anywhere on the canvas background to display the MVPW for the workflow process.
- Add seven new process property records using values described in the following table:
|
|
|
|
SR Close Date |
In/Out |
Service Request |
String |
SR Created Date |
In/Out |
Service Request |
String |
SR Description |
In/Out |
Service Request |
String |
SR Status |
In/Out |
Service Request |
String |
noRecord |
None |
Service Request |
String |
numAcceptedRecords |
None |
Service Request |
Number |
vRowId |
None |
Service Request |
Number |
The first four process properties in the table, SR Close Date, SR Created Date, SR Description and SR Status, are defined to provide a basis for using the Watch window in this example. They are not required to use the traverse record set technique. The last three records in the table, noRecord, numAcceptedRecords, and vRowId, are required to use the traverse record set technique. For more information, see About Process Properties.
TIP: To simplify creating a process property, create one process property record then fully define its properties. Right-click this newly defined process property then choose Copy Record. A new process property record is created with the same values as the original process property record. For the new record, modify only those properties that require modification from the original.
- Choose File > Save.
Next, define the Query Primary workflow step. To define the query primary workflow step
Click the Query Primary workflow step, then use the Properties window to define values described in the following table:
Property |
Value |
Business Component |
Service Request |
Operation |
Query |
Next, define the Query Child workflow step. To define the query child workflow step
- Click the Query Child workflow step.
- Use the Properties window to define values described in the following table:
Property |
Value |
Business Component |
Service Request No Link |
Operation |
Query |
- With the Query Child workflow step still chosen, click the MVPW, then click the Search Spec Input Arguments tab. Add a new record using values described in the following table:
Argument Field |
Value |
Expression Business Component |
Service Request No Link |
Filter Business Component |
Service Request No Link |
Search Specification |
"([Created] < Timestamp()-365.0) AND ([Description] = 'Test SR') AND ([Status] <> 'Closed') AND ([Status] <> 'Cancelled')" |
Enter the argument for the Search Specification exactly as displayed. The entire specification must be enclosed within double quotes. Each search string must be enclosed with single quotes. A space is required before and after operators, such as the equal sign (=) and not equal to (<>).
- Click the Output Arguments tab. Add a new record using values described in the following table:
Argument Field |
Value |
Property Name |
NumAcceptedRecords |
Type |
Output Argument |
Output Argument: |
NumAffRows |
The Query operation uses NumAffRows as a container to hold the total number of rows returned from the query. In this example, the value in NumAffRows is stored in NumAcceptedRecords, a process property, which makes the value available later in the workflow on the Yes connector to trap for the case where no records are returned in the query.
- Add a new output argument using values described in the following table:
Argument |
Value |
Property Name |
noRecord |
Type |
Literal |
Value |
false |
You initialize noRecord at this point in preparation for the Yes connector downstream of the decision point. When one or more records are returned in the query, the Yes condition uses the value in noRecord to check for the end of the record set being processed by the Read Next Record step.
- Add a new output argument using values described in the following table:
Argument |
Value |
Property Name |
vRowId |
Type |
Business Component |
Business Component Name |
Service Request No Link |
Business Component Field |
Id |
VRowId provides a way to display the record number in the Watch window while the workflow processes each record in the record set. It is used for debugging purposes in this example. The traversing a record set technique does not mandate this variable.
Next, define conditional logic for the decision point. To define conditional logical for the Decision Point
- Click the Yes connector.
- In the Properties window , set the Type property to Condition.
- Right-click the Yes connector, then choose Edit Conditions.
- Define the following condition, then click Add:
Property |
Value |
Compare To |
Process Property |
Operation |
Greater Than |
Object |
NumAcceptedRecords |
Value |
0 |
This condition traps for the instance where no records were returned from the query. If this condition is met, the workflow process takes the No connector.
- Define the following condition, then click Add:
Property |
Value |
Compare To |
Process Property |
Operation |
All Must Match (Ignore Case) |
Object |
noRecord |
Value |
false |
This condition determines when the workflow has reached the end of the record set in cases where at least one record was returned in the query. For more information, see Defining Conditional Logic on a Branch Connector.
- Click OK.
- Click the No connector. Make sure the Type property in the Properties window is set to Default.
Next, define the Watch Pre-update Values workflow step. To define the watch pre-update values workflow step
- Click the Watch Pre-update Values workflow step.
- Use the Properties window to define values described in the following table:
Property |
Value |
Business Service Name |
Workflow Utilities |
Business Service Method |
Echo |
The Workflow Utilities business service provides a way to view variables in the Watch window. For more information, see About the Workflow Utilities Business Service.
- In the MVPW, click the Output Arguments tab. Add four new output arguments using values described in the following table:
|
|
|
|
SR Close Date |
Business Component |
Service Request No Link |
Closed Date |
SR Description |
Business Component |
Service Request No Link |
Description |
SR Created Date |
Business Component |
Service Request No Link |
Created |
SR Status |
Business Component |
Service Request No Link |
Status |
This workflow step provides data the Workflow Utility business service uses to display field values for the business component record currently being processed. These values are displayed in the Watch window. Values displayed reflect their state prior to being updated.
Depending on your testing requirements, you can display more descriptive record data, such as data from the Abstract field. To display other record data, create another Field object definition, similar as you did with fields described in Step 5. In the workflow, define a process property that references that field, then add an Output Argument on the Workflow Utility business service that references the new process property.
Next, define the Update Fields workflow step. To define the update fields workflow step
- Click the Update Fields workflow step.
- Use the Properties window to define values described in the following table:
|
|
Business Component |
Service Request No Link |
Operation |
Update |
- In the MVPW, click the Field Input Arguments tab. Add three new input arguments using values described in the following table:
|
|
|
Closed Date |
Expression |
Timestamp() |
Description |
Literal |
This SR's Status set to Cancelled due to this SR's obsolescence |
Status |
Literal |
Cancelled |
Next, define the Watch Post-update Values workflow step. To define the watch post-update values workflow step
- Click the Watch Post-update Values workflow step.
- Use the Properties window to define values described in the following table:
Property |
Value |
Business Service Name |
Workflow Utilities |
Business Service Method |
Echo |
- In the MVPW, click the Output Arguments tab. Add four new output arguments using values described in the following table:
|
|
|
|
SR Close Date |
Business Component |
Service Request No Link |
Closed Date |
SR Description |
Business Component |
Service Request No Link |
Description |
SR Created Date |
Business Component |
Service Request No Link |
Created |
SR Status |
Business Component |
Service Request No Link |
Status |
Next, define the Read Next Record workflow step. To define the read next record workflow step
- Click the Read Next Record workflow step.
- Use the Properties window to define values described in the following table:
Property |
Value |
Business Component |
Service Request No Link |
Operation |
NextRecord |
- In the MVPW, click the Output Arguments tab, then add a new output argument using values described in the following table:
Argument Field |
Value |
Property Name |
noRecord |
Type |
Output Argument |
Output Argument |
NoMoreRecords |
- Add a second argument using values described in the following table:
Argument Field |
Value |
Property Name |
vRowId |
Type |
Business Component |
Business Component Name |
Service Request No Link |
Business Component Field |
Id |
- From the Tools application-level menu, choose File > Save.
Next, you use the Process Simulator and Watch window to test the workflow. Using the Process Simulator and the Watch Window to Test the Workflow
In this example, you first modify several service request records by using the Siebel client to delineate a set of test records the workflow process traverses. Then, you use the Process Simulator and Watch window to test the workflow process. For more information, see About the Process Simulator Watch Window. CAUTION: Although you are only simulating the workflow, the Update Fields step in this workflow process modifies records in the query results. It is important to remain cognizant of the fact that the traversing a record set technique processes a set of records. If you have a step in the workflow that modifies record values, the values for most if not all of the records in the database that meet the search criteria are modified.
To prepare service request test records
- Log into the Siebel client, connected to the Sample database.
- Navigate to Service Requests > Service Request List.
- Locate three records that have an Opened date that is more than one year from the date that the workflow process is tested. For example, if you test the workflow on February 15, 2008, make sure the Opened date for each service request is prior to February 15, 2007.
- Modify the three records so that there are three service requests in the database that have a Description of Test SR, and that one request is Open, one Closed and one Cancelled. Use the values described in the following table:
Status |
Description |
Open |
Test SR |
Closed |
Test SR |
Cancelled |
Test SR |
These modifications provide a way to test the workflow process on a small, constricted set of records.
- Create a new service request. Set Status to Open and enter Test SR in the Description.
- Log out of the Siebel client.
Next, test the workflow process. To test the workflow process
- Validate the workflow process.
For more information, see Validating the Workflow Process.
- In Siebel Tools, click anywhere in the background of the Process Designer, right-click, then choose Simulate.
For more information, see Preparing and Using the Process Simulator.
- Click the Start Simulation button. Wait for the Siebel client to launch, control to return to Siebel Tools, and for the simulator to automatically highlight the Query Primary workflow process step.
For caution information, see Using the Process Simulator and the Watch Window to Test the Workflow.
- From the Tools application-level menu, choose View Debug Windows > Watch, then click the push pin to dock the window.
Note that you must initiate the simulation, as described Step 3, prior to opening the Watch window.
- Click the expand icon located next to PS:Property Set, then expand the Process Properties entry in the Property Set list.
Process properties defined for this workflow process are displayed along with each property's current value. To check this list, stop the simulation then compare the list of properties in the Watch window to the list of records in the MVPW.
No values are displayed in the Process Properties section of the Watch window until after the simulator calls the Workflow Utilities business service when the simulator executes the Watch Pre-update Values step.
- Click the Simulate Next button, then expand the BusComp entry in the Watch window.
The simulator executes the Query Primary Step, then highlights the Query Child step.
The Query Primary step performs an unrestricted query on the Service Request business component, returning every service request record that exists in the database.
The Watch window now displays a BusComp entry that contains a list of record values for the current business component record.
- Click the Simulate Next button.
The simulator executes the Query Child step, then highlights the More Records decision point.
The search specification on the Query Child workflow process step results in the creation of a record set that contains four service request records. In essence, Query Child populates the Service Request No Link business component with these metadata records.
In addition to several system variables, the Process Properties section of the Watch window now contains values for two process properties that reference important variables used with the traversing a record set technique:
Property |
Value |
Explanation |
NumAcceptedRecords |
1 |
NumAcceptedRecords is a process property that references NumAffRows, which is a variable used with the traversing a record set technique. NumAffRows maintains a count of the number of rows returned from the query on the Query Child workflow step. In this example, one record met the conditions of the search specification defined on the Query Child step. |
noRecord |
false |
noRecord is a process property that references NoMoreRecords, which is a variable used with the traversing a record set technique. NoMoreRecords is a flag that indicates if records remain to be processed in the record set. The NextRecord operation sets NoMoreRecords to true when there are no more records to traverse in the record set. For every iteration through the record set, the NextRecord operation on the Read Next Record workflow step writes the value of NoMoreRecords to the noRecord process property. |
The BusComp section of the Watch window displays only record data from the query that was performed on the primary business component. This information does not change for the remainder of the simulation.
- Click the Simulate Next button.
The simulator executes logic associated with the More Records decision point, then highlights the Watch Pre-update Values step.
The Yes connector performs two tests to determine if flow continues or halts. A value of 0 in NumAcceptedRows indicates no records matched the search specification on the Query Child workflow step. A value of true in noRecord indicates there are no more records to process in the record set. If either case is true, the workflow process ends.
Since the value for NumAcceptedRecords is 1 and noRecord is false for your workflow, the Yes connector is taken.
- Click the Simulate Next button.
The simulator executes the Watch Pre-update Values step, then highlights the Update Fields step.
Several values under the Process Properties entry in the Watch window populate when this step is executed. Four service request fields that are modified during the example have been defined. Writing to the Watch window both before and after the Update Fields workflow step allows you to clearly determine if the business component fields are updated appropriately.
Property |
Value |
Explanation |
SR Close Date |
(empty) |
Since the search specification on the Query Child workflow step excludes Closed records, the Close Date is empty. |
SR Description |
Test SR |
Your test records include Test SR in the Description. This value is provided here to make sure only those records in test record set are evaluated. |
SR Status |
Open |
The search specification on the Query Child workflow step excludes Closed and Cancelled service requests, but allows Open, Pending, Field Visit, and Quoted. However, there is only one record in the resulting record set, and its value is Open. |
noRecord |
false |
Although there is only one record in the record set, the NextRecord operation has not yet been executed, so noRecord contains false. |
- Click the Simulate Next button.
The simulator executes the Update Fields workflow step, then highlights the Watch Post-update Values workflow step.
Although the Update Fields workflow step updated three service request fields, changes to values in those fields are not reflected until the workflow explicitly writes the updated information to the Watch window.
- Click the Simulate Next button.
The simulator executes the Watch Post-update Values workflow step, then highlights the Read Next Record workflow step.
The Watch window displays the updated values for the business component record:
Property |
Value |
Description |
SR Close Date |
11/12/2007 14:21:04 |
Set by the Input Argument on the Update Fields process step. |
SR Description |
This SR's Status set to Cancelled due to this SR's obsolescence |
Set by the Input Argument on the Update Fields process step. |
SR Status |
Cancelled |
Set by the Input Argument on the Update Fields process step. |
noRecord |
false |
NextRecord operation has not yet been executed, so noRecord still contains false. |
- Click the Simulate Next button.
The simulator executes the Read Next Record workflow step, then highlights the More Records decision point. In the Watch window, values for the process properties remain constant except for noRecord. Since there is only one record in the record set, the NextRecord operation sets noRecord to true.
- Click the Simulate Next button.
The simulator executes the logic associated with the Decision Point, then highlights the End workflow step.
Since this simulation modifies records in the record set, to run the simulation again you must first reset values that were changed in the record set. In this case, for the record that the workflow process modified, you must reset SR Description to SR Test, and reset Status to Open.
This example tests a small set of service request records. For a more thorough test, create more service request records that meet or do not meet the conditional logical defined in the workflow process. Simulate the workflow again, using the Watch window to confirm the modifications accurately reflect the workflow's required outcomes. Preparing the Workflow for Production
To prepare the workflow for a production environment, you can remove some of the configuration that is specific to supporting debugging activities. CAUTION: The traversing a record set technique has the potential to modify a large number of records in your database. To avoid unneeded modifications to numerous records, when using this technique be very careful your workflow is fully tested and achieves the required results. In this example, removing the Description condition from the Search Specification broadens the search to consider and possibly modify every Service Request that is over one year old and is not Closed or Cancelled.
To prepare the workflow process for a production environment
- Delete the Watch Pre-update Values and Watch Post-update Values workflow steps.
- In the Multi Value Properties Window, you can delete SR Close Date, CR Created Date, SR Description, and SR Status.
- Click the Query Child workflow step.
- In the Multi Value Properties Window, click the Search Spec Input Arguments tab.
- In the Search Specification, delete the Description string:
Test Search Specification |
Production Search Specification |
"([Created] < Timestamp()-365.0) AND ([Description] = 'Test SR') AND ([Status] <> 'Closed') AND ([Status] <> 'Cancelled')" |
"([Created] < Timestamp()-365.0) AND ([Status] <> 'Closed') AND ([Status] <> 'Cancelled')" |
For caution information, see the caution at the beginning of this topic.
- If required, restore your test records to their original data.
- If you made modifications to the Service Request No Link business component, such as adding new fields, compile your work again.
- Identify then implement a way to invoke the workflow process.
This example is based on a maintenance administrative task that should occur on a regularly scheduled interval, such as daily, weekly or monthly. One way to invoke it is to configure a repeating component job for the Workflow Process Manager component. For more information on how to configure a component to run repeatedly at specific times over specific intervals, see About the Repeating Component Request.
|