|
Siebel Business Process Framework: Workflow Guide > Example Workflow Processes >
Example Workflow Process That Manages Service Request Creation
This topic gives one example of using a workflow to manage a new Service Request. You might use this feature differently, depending on your business model. It includes the following topics:
In this example, tasks that the workflow automatically performs include:
- Detects when an end-user creates a new service request.
- Assigns the new service request to the creator.
- Changes the SR Sub-status to Assigned to reflect the ownership.
- Sets the commit time on the SR, depending on the priority.
- Creates an activity with a description of research steps the SR owner can follow to resolve the SR.
You create a simple workflow process that is initiated by a run-time event. You become familiar with elements involved in setting up this workflow process, and you observe how a workflow process works in conjunction with a run-time event to make several modifications to a service request record. Creating the Workflow Process
To create the workflow process
- In Siebel Tools, create a new workflow process object definition using values described in the following table:
|
|
Process Name |
Manage New SR |
Business Object |
Service Request |
Group |
(Leave this field empty.) |
Workflow Mode |
Service Flow |
Auto Persist |
No |
Description |
For new SRs, automatically modifies several SR fields. Considers SR priority during modifications. |
To view an example, see Creating a New Workflow Process Object Definition.
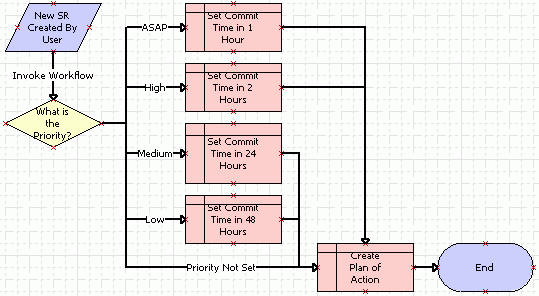
- Add steps and connectors until your workflow process resembles the workflow illustrated in the following diagram:
For more information, see About Workflow Process Steps and Connectors, and Diagramming a Workflow Process.
Next, define the connectors for this workflow process. Defining Connectors for the Workflow Process
This topic describes how to define connectors for the workflow process. To define the connectors for this workflow process
- Click the Invoke Workflow connector, then use the Properties window to define values described in the following table:
Property |
Value |
Type |
Condition |
Event Object Type |
BusComp |
Event |
WriteRecordNew |
Event Object |
Service Request |
This configuration invokes the workflow process whenever a WriteRecordNew run-time event is detected on a Service Request.
- Click each connector in succession that is emanating from the Decision Point.
In the diagram in Step 2, these are labeled ASAP, High, Medium, and Low. As you click each connector, make sure the Type property in the Properties window is set to Condition.
- Click the connector labeled Priority Not Set, then specify properties using values described in the following table:
Property |
Value |
Type |
Default |
- Right-click the ASAP connector, then choose Edit Conditions.
- In the Compose Condition Criteria dialog box, define the condition using values described in the following table:
|
|
Compare To |
Business Component |
Operation |
All Must Match (Ignore Case) |
Object |
Service Request |
Field |
Priority |
Value |
1-ASAP |
Conditions in this workflow are defined for the ASAP, High, Medium and Low connectors. Each conditional statement corresponds to a Priority value. Depending on how each priority evaluates in the priority connector condition logic, the workflow adjusts the Commit Time in the Subsequent Siebel Operation step.
For more information, see Defining Conditional Logic on a Branch Connector.
- Right-click the High connector, then choose Edit Conditions to access the Compose Condition Criteria dialog box.
- In the Compose Condition Criteria dialog box, define the condition using values described in the following table:
|
|
Compare To |
Business Component |
Operation |
All Must Match (Ignore Case) |
Object |
Service Request |
Field |
Priority |
Value |
2-High |
- Right-click the Medium connector, then choose Edit Conditions to access the Compose Condition Criteria dialog box.
- In the Compose Condition Criteria dialog box, define the condition using values described in the following table:
|
|
Compare To |
Business Component |
Operation |
All Must Match (Ignore Case) |
Object |
Service Request |
Field |
Priority |
Value |
3-Medium |
- Right-click the Low connector, then choose Edit Conditions to access the Compose Condition Criteria dialog box.
- In the Compose Condition Criteria dialog box, define the condition using values described in the following table:
|
|
Compare To |
Business Component |
Operation |
All Must Match (Ignore Case) |
Object |
Service Request |
Field |
Priority |
Value |
4-Low |
TIP: For clarity, in this example you are directed to create several connectors, placing them on the canvas consecutively. You can use an alternative technique when your workflow has multiple connectors, and where each of these connectors contain similar definitions.
In this example, you can create a single branch connector, define the conditional logic, then copy and paste this connector for use elsewhere in the workflow. You can then define the variance on each connector, in this case the Value. The Siebel Operation steps in this workflow can also be defined using the same cut and paste technique.
- From the application-level menu, choose File > Save.
- Close the workflow process designer.
Next, define properties for the Siebel Operation steps. Defining Properties for the Siebel Operation Steps
This topic describes how to define properties for the Siebel Operation steps. To define properties for the Siebel Operation steps
- From the application-level menu, choose View > Options.
- Click the Object Explorer tab, then scroll down to the Workflow Process entry in the Object Explorer Hierarchy window.
- In the Object Explorer Hierarchy window of the Development Tools Options dialog box, expand the Workflow Process hierarchy, then expand the WF Step hierarchy.
- Make sure there is a check mark next to the WF Step I/O Argument hierarchy, then click OK.
- in the Workflow Processes OBLE, query the Process Name property for the Manage New SR workflow process object definition.
- Expand the Workflow Process object type in the Object Explorer (OE), then click the WF Step object type in the OE.
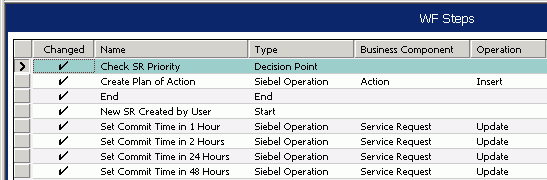
- Right-click in the blue banner of the WF Steps OBLE, then choose Columns Displayed. Arrange columns to reflect the order displayed in the screen print in Step 8.
- Set the Business Component property and the Operation property for each of the Siebel Operation steps in the workflow. The resulting properties must resemble those displayed in the following image:
Defining Properties in the Process Designer and the OBLE
Some workflow properties can be defined in the process designer or the OBLE, depending on your personal preference. In this procedure, you use the OBLE to define several properties for workflow steps. To define these properties by using the workflow process designer, you use the Properties window. Next, define input arguments for the Set Commit Time Siebel operation steps. To define input arguments for the set commit time Siebel Operation steps
- In the Workflow Processes OBLE, locate then right-click the Manage New SR workflow process. Choose Edit Workflow Process to open the process designer.
- Click the Set Commit Time in 1 Hour Siebel Operation step.
- In the MVPW, create three new input arguments using values described in the following table:
Field Name |
Type |
Value |
Business Component Name |
Business Component Field |
sub-status |
Literal |
Assigned |
(Leave this field empty.) |
(Leave this field empty.) |
Owner |
Business Component |
(Leave this field empty.) |
Service Request |
Created By Name |
Commit Time |
Expression |
[Created]+0.4166 |
(Leave this field empty.) |
(Leave this field empty.) |
For more information, see About Process Properties.
These arguments provide instructions to the Siebel Operation the actions the operation takes when the ASAP branch is satisfied. In this case, the sub-status field is set to Assigned, the Owner field is assigned to the value in Created By Name, and the Commit Time is set to one hour after the time the SR was created.
Commit Time has a Type property of DTYPE_UTCDATETIME, which is a datetime field. Created contains a time stamp of when the SR record was created. When a number is entered in a datetime field, days are represented by integers and hours, and minutes and seconds are represented by fractions. For more information, see Using the Timestamp.
NOTE: The entire expression in the Value property for the Commit Time Field Input Argument must be enclosed in double quotes. A space must precede and follow the plus sign ( + ).
- Click the Set Commit Time in 2 Hours Siebel Operation step.
- In the MVPW, create three new input arguments using values described in the following table:
Field Name |
Type |
Value |
Business Component Name |
Business Component Field |
sub-status |
Literal |
Assigned |
(Leave this field empty.) |
(Leave this field empty.) |
Owner |
Business Component |
(Leave this field empty.) |
Service Request |
Created By Name |
Commit Time |
Expression |
[Created]+0. |
(Leave this field empty.) |
(Leave this field empty.) |
- Click the Set Commit Time in 24 Hours Siebel Operation step.
- In the MVPW, create three new input arguments using values described in the following table:
Field Name |
Type |
Value |
Business Component Name |
Business Component Field |
sub-status |
Literal |
Assigned |
(Leave this field empty.) |
(Leave this field empty.) |
Owner |
Business Component |
(Leave this field empty.) |
Service Request |
Created By Name |
Commit Time |
Expression |
[Created]+24 |
(Leave this field empty.) |
(Leave this field empty.) |
- Click the Set Commit Time in 48 Hours Siebel Operation step.
- In the MVPW, create three new input arguments using values described in the following table:
Field Name |
Type |
Value |
Business Component Name |
Business Component Field |
sub-status |
Literal |
Assigned |
(Leave this field empty.) |
(Leave this field empty.) |
Owner |
Business Component |
(Leave this field empty.) |
Service Request |
Created By Name |
Commit Time |
Expression |
[Created]+48 |
(Leave this field empty.) |
(Leave this field empty.) |
Next, define Input Arguments for the Set Commit Time Siebel Operation steps. To define input arguments for the create plan of action Siebel Operation step
- Click the Siebel Operation step named Create Plan of Action.
This step creates an activity for the service request with a description that contains a set of actions the owner can follow.
- In the MVPW, create two new input arguments using values described in the following table:
Field Name |
Type |
Value |
Type |
Literal |
Research |
Comment |
Literal |
Plan of Action: 1. Make sure customer logged description. 2. Reproduce the behavior. 3. Request logs. |
- Save your work, then close the Process Designer.
Next, deploy the workflow process. Testing, Deploying and Verifying the Workflow Process
This topic describes how to test and deploy the workflow process, then verify the process implements the required functionality. To test and deploy the workflow process
- Validate then simulate the workflow process.
For more information, see Process of Testing a Workflow Process.
- Deploy the workflow process.
For more information, see Process of Deploying a Workflow Process.
While performing the deploy procedure, make sure you reload run-time events.
Next, verify workflow process functionality. To verify workflow process functionality
- In the Siebel client, navigate to Service Requests > All Service Requests, then create a new service request record.
- Set a value for the Priority field, or leave it blank.
- Save the record.
When you step off the record, notice that the Siebel client delays slightly, and an hourglass is displayed. This indicates the workflow process is being executed.
- Choose the service request record you just saved, then examine the Owner, Substatus and Date Committed fields. Verify they have been populated correctly.
- Click the Activities tab.
Notice that the new activity record created by the workflow process is displayed.
- Examine the Comments field to verify it is populated according to the input arguments you specified on the Siebel Operation named Create Plan of Action.
- Test out a few scenarios by creating service request records with different Priority values and see how the workflow process Decision Point behaves.
|