|
Siebel Marketing Installation and Administration Guide > Configuring Marketing Module Metadata > Setting Up Marketing Segmentation Metadata >
Setting Up Saved Result Sets for Target Levels
Typically, you use saved result sets to study the changing behavior of customers. Results of a segment or a segment tree node can be saved from time to time and analysis can be performed on the remaining and new targets. Although the saving operation is very similar to caching, the following list explains the differences that apply to saved result sets:
- Saved Result sets are permanent and do not expire.
- Saved Result sets have to be specifically purged.
- The ability to purge is available to all segmentation users, not just the administrator.
- Multiple saved result sets can be created for a segment or segment tree.
- Saved result sets can be specifically used when nesting segments inside another segment or in segment tree reports.
The information in a saved result is stored in a database schema. There is one table that captures the header information in a saved result set, and one table for every target level that stores the Target-Level ID information for each saved result set. Table 24 contains the information about the saved result set header table.
Table 24. Header Information in a Saved Result Set
|
|
GUID |
Unique identifier to identify the saved result set |
PATH |
Path name of the segment report in the Siebel Analytics Web Catalog |
SR_CUSTOM_LABEL |
A user-created text literal for the saved result set |
PRIORITY |
Node priority |
NODE_PATH |
|
NODE_LABEL |
|
TARGET_LEVEL |
Name of the target level for which the saved result is being created |
CREATED_BY |
Login ID of the user who created the saved result set |
COUNT |
Number of target level IDs in the Saved result set |
DATE_TIME |
Date and Time when the Saved result set was created |
SR_PATH |
Refers to the Saved result set list format that was used |
CONNECTION_POOL |
Connection pool that was used to write the saved result set |
Table 25 contains the header information about the Target-Level ID for each saved result set.
Table 25. Target-Level ID information for Each Saved Result Set
|
|
GUID |
Unique identifier of the saved result set. This is the same as that in the header table |
TARGET_LEVEL_ID |
Column that stores the target level IDs that qualified for this saved result set |
OFFER_CODE |
Standard attributes |
CHANNEL |
|
VALUE |
|
CONTROL_CODE |
|
REGION |
|
SEGMENT |
|
TAG_01
..
TAG_15 |
Extra columns to hold custom attributes or columns |
Use this information to help you understand and maintain the Marketing Server saved result sets. Repeat the following topics in this section for every target level that needs to be enabled for saved segment results:
Managing Saved Result Sets
If you purchased the Siebel Data Warehouse version 7.7.1, the data warehouse tables have been preconfigured and appropriately modeled in the Administration Tool. Use this topic to support users, troubleshoot issues, and maintain the saved result set tables. Perform the steps outlined in this topic if you create new target levels that were not preconfigured with the product. About Marketing SQL Files and Saved Result Sets
In the Siebel Analytics install directory, there is a directory named schema. This directory contains the preconfigured Marketing SQL files: MKTG.DB2.sql, MKTG.MSSQL.sql, and MKTG.Oracle.sql. These files contain the DDL (data definition language) statements for creating the cache and the saved result set tables. Depending on the database that you use for segmentation, the appropriate file is opened and the DDL statements is executed against the database. For more information about the SQL files and cache, see About Marketing SQL Files and Cache. Guidelines for Creating Saved Result Set Tables in the Database
The following guidelines apply to using the Marketing SQL files with saved result sets:
- Make sure that the statements are syntactically correct for the version of the database that is being used. For example, the MKTG.DB2.sql file might not contain the appropriate syntax for the specific version of DB2 that is being used.
- Do NOT modify the name of the result Set header table and its columns. Do not change the data type of the columns unless absolutely necessary.
- Make sure that the data types of the TARGET_LEVEL_ID column matches the data type of the target level. For example, if a cache table is being created for the target-level Household and the Household ID in the database is of type INT, then the TARGET_LEVEL_ID must be of the same type.
- For every target level a separate table needs to be created. The naming convention for the table is M_SR_<target level>. Although the cache table can be named with any name that is database supported, for the purposes of the following discussion the existing naming convention is assumed.
- Do not change the name and type of the GUID column.
- Execute the statement that relates to creating the Saved Result header and the saved result set table and the corresponding index.
Mapping and Joining Saved Result Tables
Use this topic to map saved result tables and join them to target-level dimension tables. To map saved result tables and join the tables to target-level dimension tables
- In the Siebel Administration Tool, in the Physical Layer, map the header table and the result set table using the following illustration as a guide.
- Create an Alias of the header table. There must be one alias for each target level.
In the illustration, the tables M_SR_HEADER (Account) and M_SR_HEADER (Contact) are examples of this type of alias.
- When naming the alias table, use the following naming convention:
M_SR_HEADER <target level>
- Join the tables in the Physical Layer using the following formats:
Join 1: <target level Table>.<Unique ID>=M_SR_<target level>.TARGET_LEVEL_ID
Join 2: M_SR_HEADER (Target Level).GUID=M_SR_<target level>.GUID
Using the previous illustration as a guide, replace the values in the example with the values in the following list:
- Contact (W_PERSON_D) with the Target Level table
- M_SR_HEADER (Contact) with M_SR_HEADER <target level> alias
- M_SR_CONTACT with M_SR_<target level> table.
- Create a business model using the following guidelines:
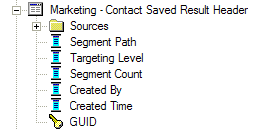
- Map the M_SR_HEADER (Target Level) table as a Logical Dimension Marketing - <target level> Saved Result Header. Use the following illustration as a guide.
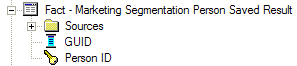
- Map the M_SR_(Target Level) table as a Logical Fact using the following illustration as a guide, and then name your table using the following convention:
Fact - Marketing Segmentation <target level> Saved Result
- Create Logical Joins in the Business model layer, using the following illustration as a guide.
- Replace Contact (logical dimension table) with the logical dimension table name of your target level.
- Replace Marketing - Contact Saved Result Header with your Marketing <target level> Saved Result Header logical dimension table name.
- Replace Fact - Marketing Segmentation Person Saved Result with your Fact - Marketing Segmentation <target level> Saved Result Logical Fact table name.
- Create a presentation catalog and folders using the following illustration as a guide. The cache presentation catalog and the saved result presentation catalog can be the same catalog.
Rename the presentation folders, replacing Contact with your target level name. The following list explains the way you create your catalog and folders:
- Check Global Consistency, resolve any issues, and save your repository before continuing.
Associate Mapping with a Target Level
Follow the guidelines in this topic to associate mapping with a target level.
- In the Administration Tool, from the Manage menu, select Marketing.
- In the left pane, select Target Levels and double-click the target level for which you want to enable Saved Result Sets.
- In the Target Level dialog box, click the Saved Result Sets tab, and click the ellipsis button.
- In the Presentation Layer section, complete the following information:
- Saved Result Catalog. Select the presentation catalog created in Step 4.
- GUID Column. Select the GUID presentation column as shown in Step 4.
This is the GUID column in the <target level> Results Data folder.
CAUTION: Do not select the GUID column form the <target level> Results Header folder.
- Target Id Column. Select the Target Level ID or a corresponding column from the <target level> Results Data folder.
- In the Physical Layer section of this dialog box the following information is automatically populated:
- Physical Table Name. This is the name of the physical table that stores the result set for that target level. Verify that it is M_SR_<target level>.
- Connection Pool. This is the connection pool in which M_SR_<target level> was mapped.
- Click Default SQL statements. The following information is automatically populated.
- Physical SQL to insert the Saved Result Header.
This is the SQL that the Marketing Server uses when a user tries to save a result set. The @... variables is substituted by the Marketing Server.
- Physical SQL to delete the saved result set header.
When a user Purges a Saved result set this SQL is issued to delete the header information.
- Physical SQL to delete the saved result data set.
When a user Purges a Saved result set this SQL is issued to delete the header information.
- Verify the column names in the SQL statements and test these SQL statements by executing against the database to make sure the syntax is correct.
These table names might need to be fully qualified, depending on the database syntax.
|