| Bookshelf Home | Contents | Index | Search | PDF | |
Developing and Deploying Siebel eBusiness Applications > Pick Lists, Drilldowns, and MVGs > Configuring Pick Lists >
Static Pick Lists
A static pick list is a list of predefined values that the user invokes from a field in an applet. When the user clicks the drop-down arrow to the right of the field, a single-column pick list appears. The user selects a value from the list, and then clicks Save to enter the value for the field. The values in the pick list are predefined by an administrator or developer and stored in the list of values table.
A pick list can be bounded or unbounded. A bounded pick list allows the user to select values from the list only. An unbounded pick list allows users to select values from the list or type values directly into the field.
NREC's requirement is to have pick lists for the following fields on the Opportunity business component.
The following procedure uses the Price Range field on the Opportunities business component as an example. To complete the NREC configuration, you would create pick lists for the remaining fields as well.
To create a new static pick list
- Choose File > New Object.
The New Objects Wizard appears.
- Under the General tab, select the Pick List icon, and then click OK.
The Pick List wizard opens.
- On Pick List dialog box, enter the following and then click Next:
The field is one you created in Adding Additional Columns to the Opportunity Base Table.
- In the Pick List Definition dialog box, select the Static Pick List radio button and then click Next.
The Pick List Type dialog box displays all the controls that map to the field you selected in Step 3.
- In the Pick List dialog box, select the New radio button and then click Next.
- In the next Pick List Definition dialog box, enter Price Range as the name of the pick list, select the Create New List of Values radio button, and then click Next.
If there is a list of values already defined for the pick list, the wizard allows you to select them here.
- In the List of Values dialog box, enter a name for the list and then, for each value that you want to appear in the list, enter the value and then click Enter.
- In the next Pick List Definition dialog box, enter a comment in the Comment field and leave the Search Specification and Bounded Pick List check boxes blank.
A bounded pick list forces the user to enter a value that's been predefined on the list. Not selecting the Bounded check box allows the user to type in a value or select one from the list.
- In the Finish dialog box, review the information and then click Finish.
The wizard creates the Pick List object and related objects and adds the list of values to the database.
- Compile and Test.
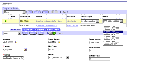
The pick list appears as a drop-down list on the Price fields in the user interface. See Figure 21. Notice that the pick list is available on the Price field in both the list and the form applet.
| Bookshelf Home | Contents | Index | Search | PDF | |
Developing and Deploying Siebel eBusiness Applications Published: 18 April 2003 |