| Bookshelf Home | Contents | Index | Search | PDF | |
Siebel Reports Administration Guide > Installing the Siebel Reports Server for Microsoft Windows > Postinstallation Tasks for the Siebel Reports Server >
Installing Actuate e.Report Designer
Actuate e.Report Designer lets developers for the Windows platform design and create reports, using its graphical user interface.
You may install Actuate e.Report Designer on any client machine.
NOTE: Installation of Actuate e.Report Designer is not required to run the Siebel Reports Server.
To install Actuate e.Report Designer
- Insert the Web Client Ancillary Programs CD 1 of 2 into your CD-ROM drive of your chosen computer.
- Navigate to the following directory:
Thirdpty\actuate\language\erd
Where:
language= the Siebel code for the Language Pack you installed; for example, enu for U.S. English.- Double-click Setup.exe.
For the remaining installation steps, refer to Installing e.Report Designer release 6 on the Siebel eBusiness Third-Party Bookshelf under Actuate.
Postinstallation Tasks for Actuate e.Report Designer
The following are the postinstallation steps for Actuate e.Report Designer.
Setting Internal Basic Source Encoding
After Actuate e.Report Designer is installed, the setting for Internal Basic source encoding must be set to Unicode (UCS-2LE). To make sure that Internal Basic source encoding is set properly, perform the same task as stated earlier.
To make sure Internal Basic source encoding is set properly
- From the Start menu, open Actuate e.Report Designer.
- From the menu, choose View > Options and click the General tab.
- In the Internal Basic source encoding section, make sure that Unicode (UCS-2LE) is selected.
Creating Reports Using Siebel Report Libraries
To create reports using Siebel Report Libraries (sssiebel.rol file) in Actuate e.Report Designer, perform the following tasks.
The Actuate solution to enable Siebel reporting in Actuate e.Report Designer is based on two files, siebel_report_building.xml and wizard.rod.
These files reside on the system drive. The following locations are examples of where to locate these files:
- C:\sea7.x.x\tools\RPTSRC\siebel_report_building.xml
- C:\sea7.x.x\tools\RPTSRC\STANDARD\wizard.rod
Using these files, administrators can use Actuate e.Report Designer without any additional changes.
You can also develop simple reports in Actuate e.Report Designer, based on new or existing reports.
To create a new report in Actuate e.Report Designer
- Open Actuate e.Report Designer.
- Navigate to the siebel_report_building.xml file:
- From the menu, choose View > Options.
- Click File Settings and in the Configuration file section, click browse button (...).
- From the Locate Configuration File window, navigate to the siebel_report_building.xml file and click Open.
- While still in the Options window, choose the Global Search Path tab.
- Click New.
- Click browse button (...) and navigate to the following location:
C:\sea7.x.x\RPTSRC\language\LIB file
Where:
language = the Siebel code for the Language Pack you installed; for example, enu for U.S. English.
- Click Open.
- Click OK to close the Options window.
- Select File > New > Siebel Report Template.
- Include custom libraries and controls in the same manner as for Actuate e.Report Designer Professional.
To enable an existing report in Actuate e.Report Designer
- To enable existing projects, first perform Step 1 through Step 3 from To create a new report in Actuate e.Report Designer.
- From the menu, choose File > Open to select an existing Siebel report.
NOTE: No way exists to recompile ROX files separately with the exception of clicking the run button from the tool bar in Actuate e.Report Designer.
Custom controls and custom code must be added in Actuate e.Report Designer Professional first before using them in Actuate e.Report Designer.
Adding Sorting to Reports
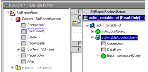
You can add sorting and grouping capability to a report designed with Actuate e.Report Designer by using a custom ROL prepared in Actuate e.Report Designer Professional (for example, aclist_sorteable.rol for account list report). The ROL file is based on slightly modified Siebel Tools-generated ROL that includes ssMemoryDataSorter on top of an existing DataStream (see Figure 1). This allows you to build entire reports enabled with wizard-based sorting and grouping.
To add sorting to a report
- Remove the dummy (or existing DataStream) data source.
- Choose Tools > Library Organizer and include aclist_sorteable.rol (as an example) that was created in Actuate e.Report Designer Professional.
- Drag and drop the Memory Sort control in the data stream slot of the Report section.
- Choose Tools > Sorting & Grouping.
- The Grouping tab of the Sorting and Grouping dialog box displays the fields available for grouping. These are fields in those report tables and views that have not yet been specified as group keys.
- On the left side of the dialog box, double-click the field to group, or select the field and click >.
- Actuate e.Report Designer adds a grouping field, removing the field from both the Available Fields list and the detail frame of the report.
| Bookshelf Home | Contents | Index | Search | PDF | |
Siebel Reports Administration Guide Published: 18 July 2003 |