| Bookshelf Home | Contents | Index | Search | PDF | |
Siebel Tools Reference > Adding Custom Extensions to the Data Model > Dock Objects >
Creating a New Dock Object
If you create a new dock object for a standalone customer table, you need to lock the project where you want the new dock object to reside. If you create a new dock object for a non-standalone customer table, you not only need to lock the project where you want the new dock object to reside, but also lock all the projects containing the dock objects in which the parent tables of the customer table reside.
If you invoke the Docking Wizard from a standalone custom table, only the Create a New Dock Object option is activated. The Add the Table to an Existing Dock Object option will be deactivated. When the Docking Wizard creates rules, it creates rules on associated dock objects. If any other project needs a rule added to a dock object in that project, a dialog box appears warning you that other projects need to be locked, if they are not already locked.
NOTE: You must select a custom extension table (that is, beginning with CX_), and then right-click to access the Docking Wizard.
To create a table for the new dock object
- Lock the project that will contain your new table, for example Newtable.
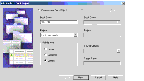
- Select File > New Object.
- Select the Table icon under the General tab.
- In the first General dialog box enter the name of your new table beginning with CX_, select the project, and then select the radio button for the type of table you want.
For example, create a standalone custom extension table called CX_TEST_PRI.
- Click Next.
- Click Finish to accept the entries.
You are taken to the Tables Object List Editor, where you see your new table displayed.
- Lock the project that will contain the dock object, for example Dock Opportunity.
- In the Tables Objects List Editor, select the table for which you want to create a dock object (for example, CX_TEST_PRI created above).
- Right-click, and then select Docking Wizard from the menu options.
NOTE: The Docking Wizard can be launched from entries in the Tables Object List Editor in Table > Column, Table > Index, or Table > User Key object types.
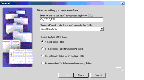
The Add Table to Dock Object dialog box appears.
NOTE: If you invoke the Docking Wizard from a standalone table, only the Create a New Dock Object option is activated. The Add the Table to an Existing Dock Object option is deactivated. When the Docking Wizard creates rules, it creates rules on associated dock objects. If a rule needs to be added to a dock object in a different project that is unlocked, a dialog box appears warning you that other projects should also be locked.
- In the Dock Object field, enter the name of the dock object, for example,
DOX PRI.- In the Project field, all locked projects are listed in the picklist.
- Choose the project for the dock object.
- In the Visibility level section, choose Private, Enterprise, or Limited.
NOTE: If you chose Limited, the employee, employee manager, position, and position manager rules are created on the new dock object, depending on the structure of the table. Dock object rules are created on both the new dock objects and the parent tables' dock objects.
- Click Next.
- If the information displayed is correct, click Finish.
| Bookshelf Home | Contents | Index | Search | PDF | |
Siebel Tools Reference Published: 20 October 2003 |