| Oracle Business Intelligence Publisher User's Guide Release 10.1.3.2 Part Number B40017-01 |
|


|
View PDF |
| Oracle Business Intelligence Publisher User's Guide Release 10.1.3.2 Part Number B40017-01 |
|
|
View PDF |
| Oracle Business Intelligence Publisher User's Guide Release 10.1.3.2 Part Number B40017-01 |
 Contents |
 Previous |
 Next |
This chapter covers the following topics:
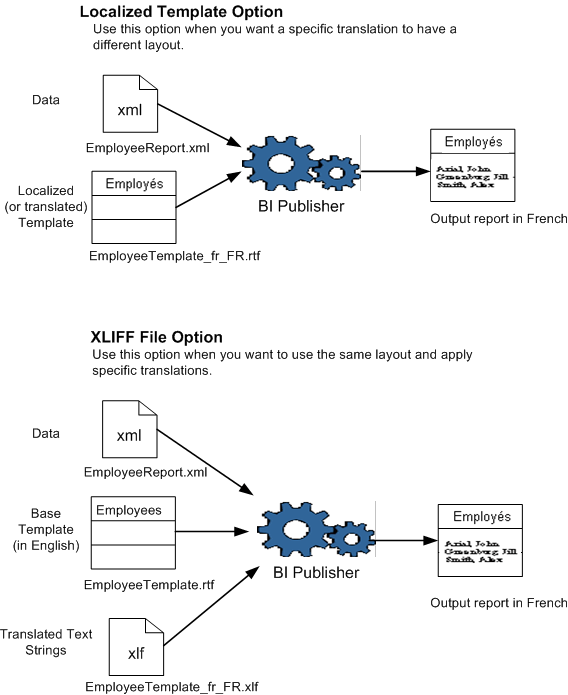
There are two options for adding translated templates to your report definition:
Create a separate RTF template that is translated (a localized template)
Generate an XLIFF file from the original template (at runtime the original template is applied for the layout and the XLIFF file is applied for the translation)
Use the first option if the translated template requires a different layout from the original template.
If you only require translation of the text strings of the template layout, use the XLIFF option.
Important: Regardless of which option you choose, you must name your translated templates according to the naming standard for BI Publisher to recognize it at runtime. See Naming Standards for Translated Files.
The following diagrams illustrate the translation concepts
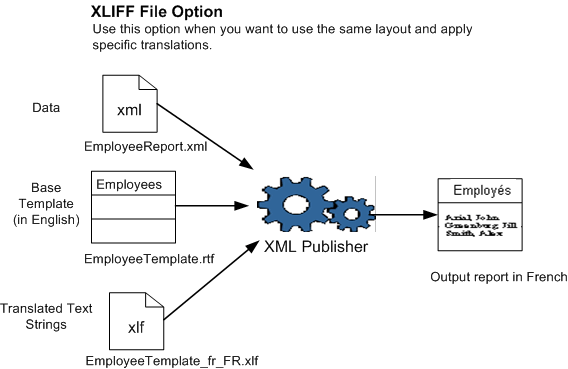
To generate an XLIFF file from an RTF template
Open your template in Microsoft Word with the Template Builder for Word installed.
From the Template Builder menu, select Tools > Translations > Extract Text.
BI Publisher extracts the translatable strings from the template and exports them to an XLIFF (.xlf) file.
Save the file to the desired location.
This XLIFF file can then be sent to a translation provider, or using a text editor, you can enter the translation for each string. See Structure of the XLIFF File for instructions on how to edit the XLIFF file.
Note: XLIFF is the XML Localization Interchange File Format. It is the standard format used by localization providers. For more information about the XLIFF specification, see http://www.oasis-open.org/committees/xliff/documents/xliff-specification.htm
A "translatable string" is any text in the template that is intended for display in the published report, such as table headers and field labels. Text supplied at runtime from the data is not translatable, nor is any text that you supply in the Microsoft Word form fields.
You can translate the template XLIFF file into as many languages as desired and then associate these translations to the original template. See Uploading Translated Files.
The XLIFF file generated by BI Publisher has the following structure:
<xliff>
  <file>
    <header>
      <body>
        <trans-unit>
          <source>
          <target>
          <note>
The following figure shows an excerpt from an untranslated XLIFF file:
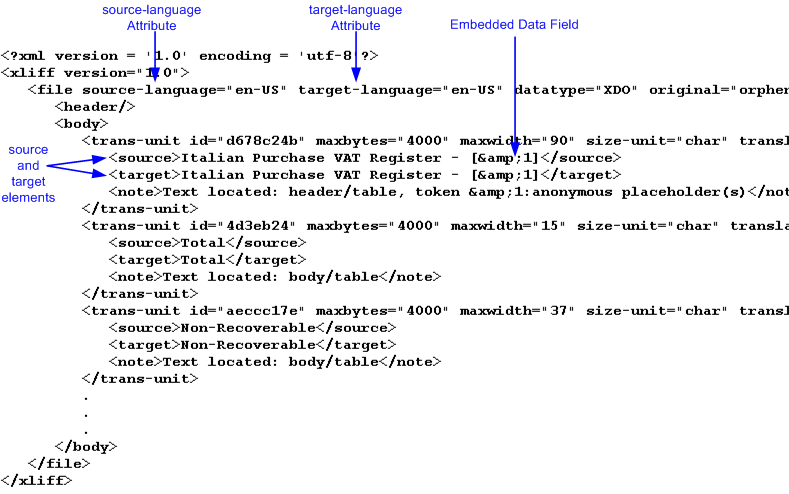
The <file> element includes the attributes source-language and target-language. The valid value for source-language and target-language is a combination of the language code and country code as follows:
the two-letter ISO 639 language code
the two-letter ISO 3166 country code
Note: For more information on the International Organization for Standardization (ISO) and the code lists, see International Organization for Standardization.
For example, the value for English-United States is "en-US". This combination is also referred to as a locale.
When you edit the exported XLIFF file you must change the target-language attribute to the appropriate locale value of your target language. The following table shows examples of source-language and target-language attribute values appropriate for the given translations:
| Translation (Language/Territory) | source-language value | target-language value |
|---|---|---|
| From English/US To English/Canada |
en-US | en-CA |
| From English/US To Chinese/China |
en-US | zh-CN |
| From Japanese/Japan To French/France |
ja-JP | fr-FR |
Some templates contain placeholders for data fields embedded in the text display strings of the report. For example, the title of the sample report is
Italian Purchase VAT Register - (year)
where (year) is a placeholder in the RTF template that will be populated at runtime by data from an XML element. These fields are not translatable, because the value comes from the data at runtime.
To identify embedded data fields, the following token is used in the XLIFF file:
[&n]
where n represents the numbered occurrence of a data field in the template.
For example, in the preceding XLIFF sample, the first translatable string is
<source>Italian Purchase VAT Register - [&1]<source>
Warning: Do not edit or delete the embedded data field tokens or you will affect the merging of the XML data with the template.
Each <source> element contains a translatable string from the template in the source language of the template. For example,
<source>Total</source>
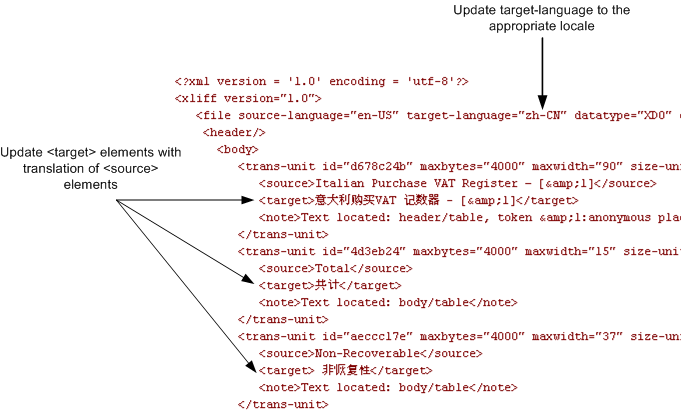
When you initially export the XLIFF file for translation, the source and target elements are all identical. To create the translation for this template, enter the appropriate translation for each source element string in its corresponding <target> element.
Therefore if you were translating the sample template into German, you would enter the following for the Total string:
<source>Total</source>
<target>Gesamtbetrag</target>
The following figure shows the sample XLIFF file from the previous figure updated with the Chinese translation:
Your translated XLIFF and RTF files must be named according to the following standard:
TemplateName_<language code>_<TERRITORY CODE>.xlf or .rtf
or
TemplateName_<language code>.xlf or .rtf
where TemplateName is the original template name
language code is the two-letter ISO language code (in lower case)
TERRITORY CODE is the two-letter ISO country code (must be in upper case)
For example, if your original template is named EmployeeTemplate and you are uploading a translation for Japanese-Japan, name the file:
EmployeeTemplate_ja_JP.xlf
In the report Editor, select the Layouts page to upload the translated XLIFF files. See Define Layouts.
BI Publisher applies a translation based on the user's selected Report Locale. BI Publisher will first try to match an RTF template named for the locale, then an XLIFF file named for the locale. If an exact match on language-territory is not found, BI Publisher will try to match on language only.
For example, if you have a report for which the base template is called EmployeeTemplate.rtf and the locale selected is French (France), BI Publisher will select the translation to apply according to the following hierarchy:
EmployeeTemplate_fr_FR.rtf
EmployeeTemplate_fr_FR.xlf
EmployeeTemplate_fr.rtf
EmployeeTemplate_fr.xlf
EmployeeTemplate.rtf
Note that with the same set of translations, if the locale selected is French (Switzerland), the EmployeeTemplate_fr.rtf would be applied. Now if the available translations were limited to the following set:
EmployeeTemplate_fr_FR.rtf
EmployeeTemplate_fr_FR.xlf
EmployeeTemplate.rtf
and the locale selected is French (Switzerland), then the EmployeeTemplate.rtf will be applied. Even though there is a language match, BI Publisher will not match the different locales.
Therefore, if you want to ensure that a French language translation is used when French is the selected language, regardless of the selected locale, then you must include either an rtf or xlf file named for the language only (that is, EmployeeTemplate_fr.rtf or EmployeeTemplate_fr.xlf).
You can add translated report description files so that your users can view the report description and any parameter labels in the language they selected for their UI preference. Upload translated report description files to the same location as the translated template files. Note that the translated report description files follow a naming standard that is slightly different than the translated template file standard.
For information on setting the UI language preference, see Setting Preferences.
To add a report file translation
In the report Editor, select Generate XLIFF.
Save the .xlf file to a local directory.
Send the file to a localization provider, or add the translated text (see Structure of the XLIFF File for information on editing the XLIFF file).
Name the translated report file according to the following standard for all languages except Chinese and Portuguese (Brazil):
ReportName_<language_code>.xlf
Where ReportName is the report file name and
language_code is the two-letter ISO language code (in lower case).
Important: Except for the three locales noted below, do not include the territory code in the file name.
For Chinese (China), Chinese (Taiwan), and Portuguese (Brazil) you must use the language code and territory code in the translated file name as follows:
ReportName_zh_CN.xlf
ReportName_zh_TW.xlf
ReportName_pt_BR.xlf
In the report Editor, select the Layouts page to upload the translated XLIFF files. See Define Layouts.
