| Oracle® Distributed Document Capture/Oracle® Document Capture Administrator's Guide Release 10gR3 E13871-01 |
|
 Previous |
 Next |
| Oracle® Distributed Document Capture/Oracle® Document Capture Administrator's Guide Release 10gR3 E13871-01 |
|
 Previous |
 Next |
This chapter contains information about the user interface for Capture Administration. The following screens are described in this chapter:
Use this screen to select index settings for this workstation. (This screen applies to Oracle Document Capture only.)
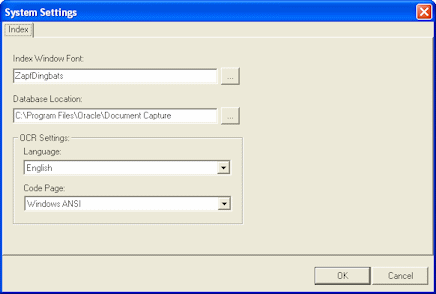
To display this screen, choose Settings from the System menu of Oracle Document Capture.
| Element | Description |
|---|---|
| Index Window Font | Select the font you want displayed to the user in index field entries in the Indexing screen. |
| Database Location | Specify the location of the index database. The index database (indexing.mdb) stores index profiles. In a network environment with multiple index workstations, sharing the index database is recommended. |
| OCR Settings | In the Language field, select the language in which you want OCR text captured. In the Code Page field, change the character set to be used for storing OCR text, if needed. |
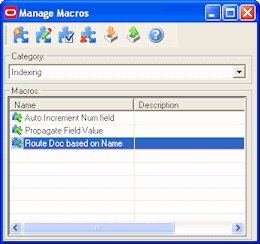
Use this screen to customize functionality through Visual Basic for Applications (VBA) compatible macros.
| Element | Description |
|---|---|
| Category | Select a category. For example, in Oracle Document Capture, you can choose Electronic Document Provider, Index or Scan; in Recognition Server, you can choose Recognition Server or Electronic Document Provider. |
| Macros | Lists macros for the category you selected. |
| New | Creates a new macro. Prompts you to enter a name and description, then creates a macro of the type selected in the Category field. |
| Design | Displays the Macro Editor for writing macros. |
| Setup | Opens a setup screen previously created in the Macro Editor. |
| Delete | Deletes the selected macro. |
| Import | Displays options for importing a macro (.bas) file and creating a new macro. |
| Export | Displays options for exporting the selected macro to a macro (.bas) file. |
|
Note: Press F1 to view help in the Macro Editor. The Macro Editor allows you to design macros. Each Oracle Document Capture program exposes one or more event objects that you can select from the Object list. Once selected, the corresponding events (i.e., procedures) appear in the Proc list. The macro editor supports intellisense, which automatically displays the parameters needed for functions and procedures. Once you have developed a macro, you can quickly test to see if it will compile, by clicking the Start button. If an error is encountered within the macro, a message is displayed with the error description and line number. In addition, the line with the error number is highlighted in red. |
To display this screen, choose Manage Macros from the System menu of Oracle Document Capture. In Recognition Server and Import Server, choose Pause from the Server menu, then choose Macro Manager from the Setup menu.
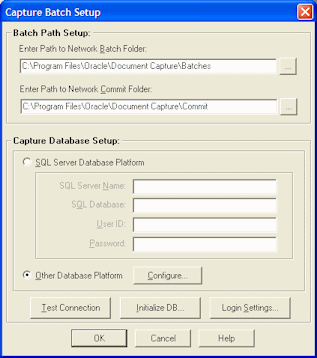
Use this screen to specify where Capture batches are stored and committed, and to configure and initialize the Capture database.
| Element | Description |
|---|---|
| Enter Path to Network Batch Folder | Enter or select the folder's path. (Capture creates the folder if it doesn't already exist.) Since this folder is the location of the Capture batches, its path must be accessible by all Capture workstations. If the path is on a network, we recommend using a UNC (Universal Naming Convention) Path. However, you can also use a mapped driver letter. |
| Enter Path to Network Commit Folder | Enter or select the folder's path. (Capture creates the folder if it doesn't already exist.) After a batch has been indexed and committed, the document index information and batch images are moved to this commit folder. This setting specifies the default commit folder for the Commit Text File driver. It is possible to change this path on a per commit profile basis. |
| Capture Database Setup | Select a database to use for the Capture database. For single user systems, you can configure Capture to use a Microsoft Access database. Otherwise, it is recommended that you configure the Capture database on a client/server database server platform, such as Oracle or Microsoft SQL. |
| SQL Server Database Platform | Complete the fields to configure a SQL Server database:
|
| Other Database Platform, Configure | Select this option to configure a Microsoft Access or Oracle database. Click Configure to select and configure an OLE Database Provider to connect to the database. |
| Test Connection | Click this button to verify that Capture can access the selected database file. |
| Initialize DB | Click this button to create the table schema within the database.
WARNING: If the Capture database already exists and you are configuring a new Capture workstation, do NOT click the Initialize DB button, since it will destroy all data and recreate the database schema. |
| Login Settings | Provides user login options for configurations using Windows domain security. This button is disabled when Capture security is selected. |
To display this screen, choose Batch Setup from the System menu in the Oracle Document Capture screen or from the Setup menu in the server applications.
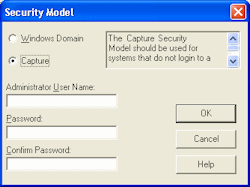
Use this screen to select the type of security you want to use in Capture and to create an administrator if Capture security is selected.
| Element | Description |
|---|---|
| Windows Domain | Choose this model to use the current user's domain or domain group information for login and Capture rights. Depending on settings, users may or may not be required to log in each time they activate Capture. This method allows you to add groups to Capture to quickly assign Capture rights to all members of a domain group. |
| Capture | Choose this model to maintain individual users and their rights in Capture Administration. Users must log in each time they activate Capture or any of its components. |
| Administrator User Name, Password | If you selected Capture security, complete these fields to add an administrator for logging into Capture. |
This screen is automatically displayed after the database is initialized in the Capture Batch Setup dialog box. You can also display it by initializing the database in the Capture Batch Setup screen (see "Capture Batch Setup Screen"). However, doing so erases all data in the database and recreates the database schema.
Use this screen to add, edit, or delete file cabinets. For more information, see "About File Cabinets".
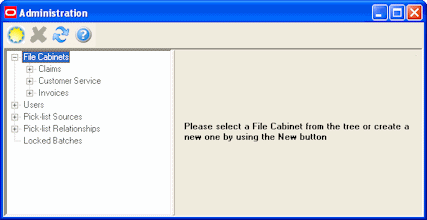
Display this screen by clicking File Cabinets from the Admin menu. File cabinets are listed below the File Cabinets heading in the side pane. Click a file cabinet's plus (+) sign to view its associated settings (batch statuses, commit profiles and database lookup profiles). Click a file cabinet to view its index fields.
| Element | Description |
|---|---|
| New | Click the sun button with the File Cabinets heading selected to add a file cabinet, and enter its name. |
| Delete | Click to delete a selected file cabinet, then confirm the deletion. Deleting a file cabinet makes scan and index profiles and server jobs associated with it unavailable. Deleting also removes all index fields, batch statuses, commit profiles, and database lookup profiles associated with it.
Caution: If batches are assigned to the file cabinet at the time you delete it, the batches and associated images are deleted. |
| Refresh | Click to refresh a selected file cabinet's contents. |
Use this screen to define index fields for the selected file cabinet. For more information, see "About Index Fields".
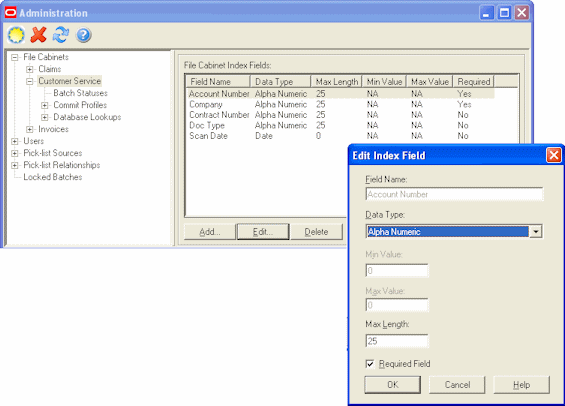
Display this screen by clicking File Cabinets from the Admin menu and selecting a file cabinet in the side pane.
| Element | Description |
|---|---|
| Add | Click to add an index field to the file cabinet in the Add/Edit Index Fields Screen. |
| Edit | Select an index field in the File Cabinet Index Fields list to edit it in the Add/Edit Index Fields Screen. |
| Delete | Click to delete an index field selected in the File Cabinet Index Fields list. Users can no longer assign index values to deleted index fields. |
| Element | Description |
|---|---|
| Field Name | Enter a descriptive name for the index field. This field may have the same name as an existing field in your content management system. |
| Data Type | Select the type of data the field will contain. You can choose Alpha Numeric, Numeric, Date or Float. |
| Min Value, Max Value | Use these fields to specify a range of acceptable numeric values by defining a minimum and/or maximum value. If the user types a number outside this range, the value is not accepted during a document commit. (These fields are available only if Numeric is selected in the Data Type field.) |
| Max Length | Specify the maximum number of characters a user can enter into this index field. (The default is 25.) |
| Required Field | Select this field to make the field required. Users must complete all required index fields before a document can be committed.
|
Use this screen to define batch statuses for a selected file cabinet. For more information, see "About Batch Status".
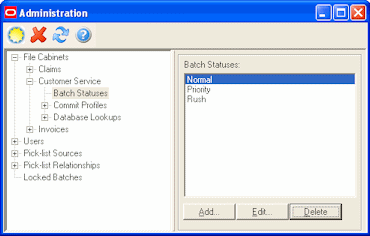
Display this screen by clicking the Batch Status heading in the side pane for a selected file cabinet.
| Element | Description |
|---|---|
| Batch Statuses | Lists batch statuses defined for the file cabinet. |
| Add | Click to add a batch status by entering its description. |
| Edit | Click to edit a selected batch status. |
| Delete | Click to delete a selected batch status, then confirm the deletion. Deleting a batch status makes it unavailable for users to assign to batches within a Capture program. If a status was previously assigned to a batch, it remains, but is no longer available for selecting. |
The Commit Profiles option includes the following screens:
Use this screen to activate or deactivate commit profiles and order their processing.
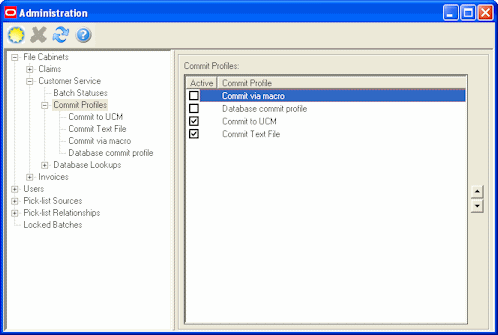
Display this screen by selecting the Commit Profiles heading in the side pane for a selected file cabinet.
| Element | Description |
|---|---|
| Active | Select this field to make a commit profile active or inactive for processing. A checkmark indicates an active profile. |
| Up, Down | Use these arrow buttons to order the commit profiles. Because documents could be committed more than once when using multiple commit profiles, it is recommended that you position the commit profile most likely to fail first. |
Use this screen to configure a commit profile, selecting its general settings on this screen and selecting and configuring its commit driver. For more information, see "About Commit Profiles".
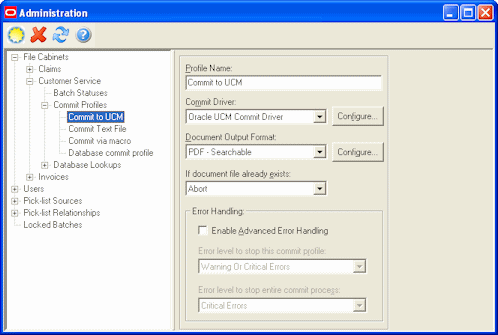
Display this screen by selecting a commit profile under the Commit Profiles heading in the side pane for a selected file cabinet. Add a commit profile by clicking the New (sun) button with a commit profile selected.
| Element | Description |
|---|---|
| Profile Name | Displays the profile's name, which you can change. |
| Commit Driver, Configure | Specify the method by which you want documents committed. Click Configure to select driver settings. Depending on installation, drivers may include:
|
| Document Output Format, Configure | Specify the format in which you want documents committed using this profile output. Click Configure to select export settings for the selected output format. By default, document images are committed in their native format. To convert them, choose a new format:
|
| If document file already exists | Specify what happens if a document file being committed already exists. You can choose Overwrite, Abort (default) or Append.
Note: The Append option is available only when Multi Page TIFF or PDF (Image Only) is selected in the Document Output Format field. Not all commit drivers support document appending functionality. If the document file already exists and the option is set to Abort, Capture stops committing the document and generates an error with the message, Document file [full path to file] already exists, document commit has been aborted. |
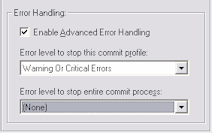
| Error Handling | Select the Enable Advanced Error Handling field to activate custom error handling according to the level you choose from its two options. For more information, see "About Commit Error Handling" and "Error Handling Examples". It is recommended that you not enable this setting. |
Below are examples of how error levels control the commit process if errors are encountered:
If a warning or critical error occurs, cancel the commit process: To immediately cancel the commit process in the case of any error, set the error level for both the commit profile and the commit process to Warning or Critical Errors. Note that this is the default option, whether advanced error handling is activated or not.

If a warning error occurs, continue with the commit profile: In this case, the commit profile's error level is set to Critical Errors. If a Warning error occurs, the document in which the error occurred is skipped, and the commit process proceeds to the next document for the commit profile.
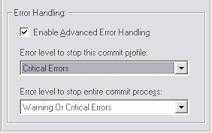
If a warning or critical error occurs, cancel the current commit profile but proceed using the next commit profile: Setting the commit process error level to None means that, regardless of the error, Capture proceeds to the next commit profile.
Use this screen to select output format settings. For example, you may choose to automatically generate a text file of a selected format containing all text found in documents via Optical Character Recognition (OCR). Depending on the capabilities of your content management system, the full text file can be used for document searching and retrieval.
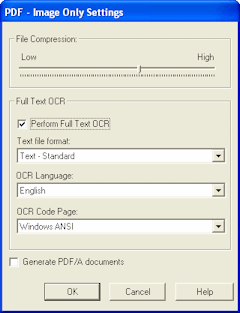
Display this screen by clicking the Configure button adjacent to the Document Output Format field on the Commit Profile Settings Screen. The settings displayed depend on the output format selected.
|
Note: The Full Text OCR options apply to Oracle Document Capture, but not Oracle Distributed Document Capture. |
| Element | Description |
|---|---|
| Perform Full Text OCR | Select this field to create a text file along with the selected output file that contains all text captured during the full-page OCR process. The text file is named with the same name as the output file, except for a .TXT extension.
Note: The commit drivers included with Capture do not utilize the Full Text OCR file. This file is intended for use with a custom EDP macro. To facilitate full-text documents in Oracle I/PM and Oracle UCM, use the PDF (Searchable) document output format. |
| Text file format | Select a format for the OCR text file. The available options are:
|
| OCR Language | Select the language in which you want the OCR text file created. |
| OCR Code Page | Select the character set to be used for storing OCR text. |
| File Compression | Specify a file compression and image quality setting for images. This option is available only when PDF (Image Only) is selected as the output format. You can specify a number from 1 to 100, where 65 is the default. Note that the higher the file compression and image quality setting, the larger the image file size. |
| Generate PDF/A documents | Select this field to generate PDF/A compliant PDF files. (This option is available only when PDF-Image Only is selected in the commit profile's Document Output Format field.) |
| Optional text file format | This option is available only when PDF (Searchable) is selected as the output format and is available for Oracle Document Capture only. To create a text file along with the PDF (Searchable) output file that contains all text captured during the OCR process, choose Text - Standard. The text file is named with the same name as the output file, except for a .TXT extension. Selecting (None) No text file will be created skips creating the text file. |
Use this screen to configure an Oracle UCM commit profile, which commits documents directly into Oracle UCM. Display this screen by creating a commit profile, selecting Oracle UCM Commit Driver in the Commit Driver field and clicking Configure to configure driver settings. Select settings on these tabs:
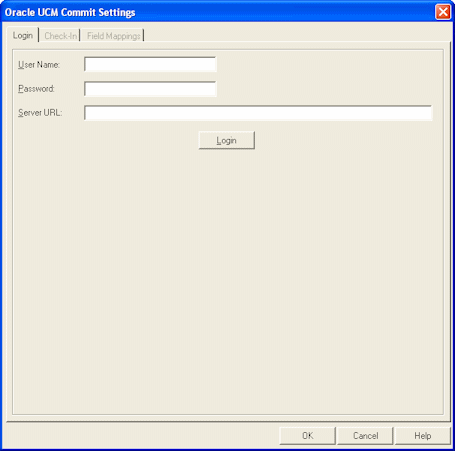
Use the Login tab to specify Oracle UCM login information. When the user commits in Capture with the Oracle UCM commit driver active, Capture will commit to Oracle UCM.
| Element | Description |
|---|---|
| User Name | Enter ID for accessing the UCM Content Server. |
| Password | Enter password for accessing the UCM Content Server. |
| Server URL | Enter the URL of the UCM Content Server to which to commit. |
| Login | Click this button. Capture logs into Oracle UCM to authenticate the user. After a successful login, the Check-In and Field Mappings tabs become available. |
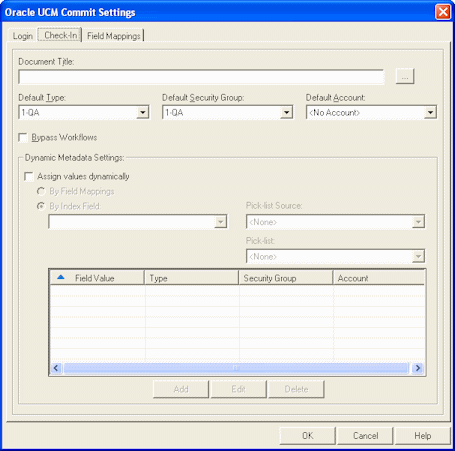
Use the Check-In tab to specify where documents will be visible in Oracle UCM, how they will be named, and who can view and access them.
| Element | Description |
|---|---|
| Document Title | Specify how you want the committed documents named in Oracle UCM. Also see "Oracle UCM Commit Settings Screen, Title Builder". |
| Default Type | Select the Oracle UCM category to which you want the documents committed. For example, you might choose from departments such as Accounting, Human Resources or Manufacturing.
If assigning metadata values dynamically, this field's value is used if the Type field is not mapped or <Default Type> is selected in metadata mapping. |
| Default Security Group | Select the security group to which to allow access to documents committed using this commit driver. Only users with permission to the selected security group will be able to work with these content items.
If assigning metadata values dynamically, this field's value is used if the Security Group field is not mapped or <Default Security Group> is selected in metadata mapping. |
| Default Account | Select the account (if specified) to which to allow access to documents committed using this commit driver. Only users with permission to the selected account will be able to work with these content items.
If assigning metadata values dynamically, this field's value is used if the Account field is not mapped or <Default Account> is selected in metadata mapping. |
| Bypass Workflows | Select this field to directly check in documents committed using this profile, bypassing any workflow processing. |
| Assign values dynamically | Select this field to assign type, security, and account values dynamically based on a Capture field value or a Capture user's pick-list selection. |
| By Field Mappings | Select this option to assign values based on Capture field values. See "Oracle UCM Commit Settings, Field Mappings Tab". |
| By Index Field | Select this option to assign values based on a pick-list value a Capture user selects. Select the Capture field whose pick-list value assigns type, security group, and account. |
| Pick-list Source | Select the source of the pick-list to be used to dynamically assign metadata values. You can choose Capture Native Pick-list or a previously created database pick-list. |
| Pick-list | Select the pick-list from those available for the source you selected. |
| Add | Click to add a dynamic metadata mapping. The Add Metadata Mappings screen displays; see "Oracle UCM Commit Settings Screen, Add Metadata Mappings". |
| Edit | Click to edit a selected dynamic metadata mapping in the table. To assign the same Type, Security Group, or Account values to multiple mappings, hold down the Ctrl key and select them, click Edit and select new values. |
| Delete | Click to delete a selected dynamic metadata mapping in the table. |
Use this screen to configure Capture to dynamically assign a type, security group, and account based on a pick-list value. For example, if a user selects a value of Invoice from a pick-list while indexing, the document might be assigned a combination of three values (ACCTG for Type field, Finance for Security Group, and <No Account> for Account). Use this screen to set up Type, Security Group, and Account value mappings for listed pick-list field values. As you add them, they are added to the table on the Check-In tab.
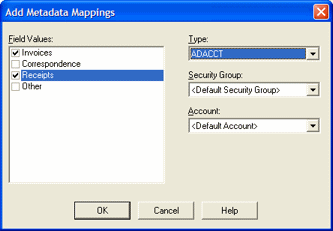
Display this screen by selecting dynamic metadata settings on the Check-In tab of the Oracle UCM 10g Commit Settings Screen and clicking Add.
| Element | Description |
|---|---|
| Field Values | Lists values in the pick-list not already mapped. Select one or more field values. |
| Type | Select a type for the selected field values. For example, if the document type is Invoices or Receipts, the Type might be Accounting.
If you select <Default Type>, the value shown in the Default Type field on the Check-In tab will be used. This makes it easy to change the default for many mappings by changing the default value on the Check-In tab. The Type, Security Group, and Account fields each contain a default option (as in <Default Security Group>). If <Default Security Group> is selected, the value shown in the Default Security Group field on the Check-In tab is used. |
| Security Group | Choose a group for the selected field values.
If you select <Default Security Group>, the value shown in the Default Security Group field on the Check-In tab will be used. This makes it easy to change the default for many mappings by changing the default value on the Check-In tab. |
| Account | Select an account for the selected field values. If you select <Default Account>, the value shown in the Default Account field on the Check-In tab will be used. This makes it easy to change the default for many mappings by changing the default value on the Check-In tab. |
Use this screen to specify how you want the committed documents named in Oracle UCM.
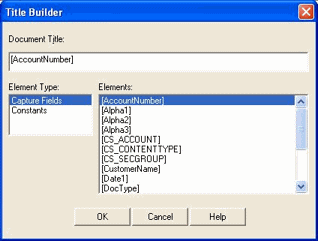
Display this screen by clicking the Browse button adjacent to the Document Title field on the Check-In tab of the Oracle UCM 10g Commit Settings Screen.
| Element | Description |
|---|---|
| Document Title | Build the title in this field. You can include the following elements:
|
| Element Type | Select the type of element you want to add to the document title. Choose Capture Fields to add a Capture index field from those available in the profile's file cabinet. Choose Constants to add a dash or space. |
| Elements | Double-click a Capture field or constant to add it to the document title. |
Use the Field Mappings tab to map Capture index fields to Oracle Content Server fields. As documents are committed using this driver, values entered in Capture will be written into the specified Content Server fields for document retrieval.
When By Field Mappings is selected on the Check-In tab, the following additional fields are displayed in the Content Server Field column: <Account>, <Content Type>, and <Security Group>. Mapping these fields allows metadata values to be dynamically assigned at commit, based on these Capture field values at commit.
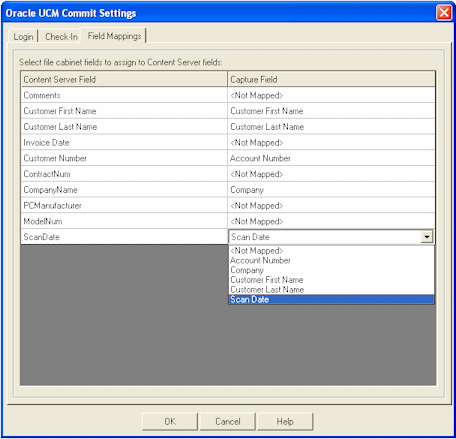
| Element | Description |
|---|---|
| Content Server Fields | Lists all available Content Server fields. |
| Capture Fields | Select an index field from those listed for the file cabinet to map to the adjacent Content Server field. |
Use this screen to configure an Oracle UCM 11g commit profile, which commits documents directly into Oracle UCM.
Display this screen by creating a commit profile, selecting Oracle UCM 11g Commit Driver in the Commit Driver field, and clicking Configure to configure driver settings.
Select settings on these tabs and screens:
"Oracle UCM 11g Commit Settings Screen, Add Metadata Mappings"
"Oracle UCM 11g Commit Settings Screen, Add/Edit Custom Fields"
Use the Login tab to specify Oracle UCM login information. When the user commits in Capture with the Oracle UCM commit driver active, Capture commits to Oracle UCM.
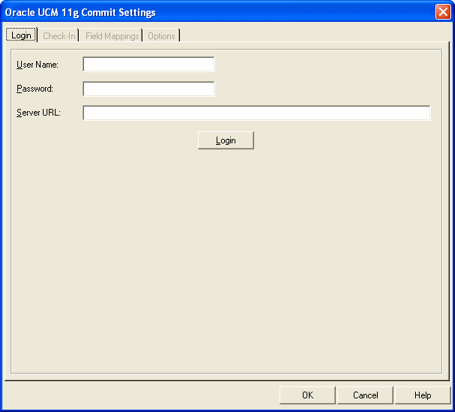
To display this screen, open a commit profile in Capture Administration, select Oracle UCM 11g Commit Driver in the Commit Driver field, and click the adjacent Configure button.
| Element | Description |
|---|---|
| User Name | Enter an ID for accessing the Oracle UCM Content Server. This field is case sensitive. |
| Password | Enter a password for accessing the Oracle UCM Content Server. This field is case sensitive. |
| Server URL | Enter the URL of the Oracle UCM Content Server in which to commit. For example:
|
| Login | Click this button to log Capture into Oracle UCM and authenticate the user. After a successful login, the other tabs become available. |
Use the Check-In tab to specify where documents are visible in Oracle UCM, how they are named in Oracle UCM, and who can view and access them.
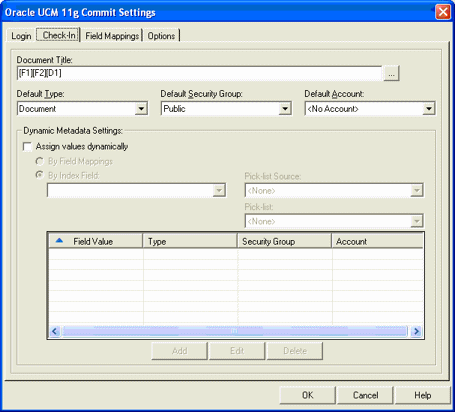
To display this screen, open a commit profile in Capture Administration, select Oracle UCM 11g Commit Driver in the Commit Driver field, click the adjacent Configure button, and click the Check-In tab.
| Element | Description |
|---|---|
| Document Title | Specify how to name committed documents in Oracle UCM. Click the adjacent Browse button and specify the title in the Title Builder screen, as described in "Oracle UCM 11g Commit Settings Screen, Title Builder". |
| Default Type | Select the Oracle UCM category in which to commit documents. For example, you might choose Document.
If assigning metadata values dynamically, this field's value is used if the Type field is not mapped or <Default Type> is selected in metadata mapping. |
| Default Security Group | Select a security group for documents committed using this commit driver. Only users with permission to the selected security group can work with these content items.
If assigning metadata values dynamically, this field's value is used if the Security Group field is not mapped or <Default Security Group> is selected in metadata mapping. |
| Default Account | Select an account (if specified) for documents committed using this commit driver. Only users with permission to the selected account can work with these content items.
If assigning metadata values dynamically, this field's value is used if the Account field is not mapped or <Default Account> is selected in metadata mapping. |
| Assign values dynamically | Select this field to dynamically assign type, security, and account values based on a Capture field value or a Capture user's pick-list selection. |
| By Field Mappings | Select this option to assign values based on Capture field values. See "Oracle UCM 11g Commit Settings Screen, Field Mappings Tab". |
| By Index Field | Select this option to assign values based on a pick-list value a Capture user selects. Select the Capture field whose pick-list value assigns type, security group, and account. |
| Pick-list Source | Select the source of the pick-list to be used to dynamically assign metadata values. You can choose Capture Native Pick-list or a previously created database pick-list. |
| Pick-list | Select the pick-list from those available for the selected source. |
| Add | Click to add a dynamic metadata mapping. The Add Metadata Mappings screen is displayed. See "Oracle UCM 11g Commit Settings Screen, Add Metadata Mappings". |
| Edit | Click to edit a selected dynamic metadata mapping in the table. To assign the same Type, Security Group, or Account values to multiple mappings, hold down the Ctrl key and select them, click Edit, and select new values. |
| Delete | Click to delete a selected dynamic metadata mapping in the table. |
Use this screen to configure Capture to dynamically assign a type, security group, and account based on a pick-list value. For example, if a user selects a value of Invoice from a pick-list while indexing, the document might be assigned a combination of three values (ACCTG for Type field, Finance for Security Group, and <No Account> for Account). Use this screen to set up Type, Security Group, and Account value mappings for listed pick-list field values. As you add them, they are added to the table on the Check-In tab.

Display this screen by clicking Add in the Oracle UCM 11g Commit Settings Screen, Check-In Tab.
| Element | Description |
|---|---|
| Field Values | Lists values in the pick-list not already mapped. Select one or more field values. |
| Type | Select a type for the selected field values. For example, if the document type is Invoices or Receipts, the Type might be Accounting.
If you select <Default Type>, the value shown in the Default Type field on the Check-In tab is used. This makes it easy to change the default for many mappings by changing the default value on the Check-In tab. The Type, Security Group, and Account fields each contain a default option (as in <Default Security Group>). If <Default Security Group> is selected, the value shown in the Default Security Group field on the Check-In tab is used. |
| Security Group | Choose a group for the selected field values.
If you select <Default Security Group>, the value shown in the Default Security Group field on the Check-In tab is used. This makes it easy to change the default for many mappings by changing the default value on the Check-In tab. |
| Account | Select an account for the selected field values. If you select <Default Account>, the value shown in the Default Account field on the Check-In tab is used. This makes it easy to change the default for many mappings by changing the default value on the Check-In tab. |
Use this screen to specify how documents are named, either in Oracle UCM or as document files.

Display this screen in one of two ways:
By clicking the Browse button adjacent to the Document Title field on the Oracle UCM 11g Commit Settings Screen, Check-In Tab.
By clicking the Browse button adjacent to the Document File Name field on the Oracle UCM 11g Commit Settings Screen, Options Tab.
| Element | Description |
|---|---|
| Document Title | Build the title in this field. You can include the following elements:
|
| Element Type | Select the type of element you want to add to the document name. Choose Capture Fields to add a Capture index field from those available in the profile's file cabinet. Choose Constants to add a dash or space. |
| Elements | Double-click a Capture field or constant to add it to the document name. |
Use the Field Mappings tab to map Capture index fields to Oracle Content Server fields. As documents are committed using this driver, values entered in Capture are written into the specified Content Server fields for document retrieval.
|
Note: When By Field Mappings is selected on the Check-In tab, the following additional fields are displayed in the Content Server Field column:
Mapping these fields allows metadata values to be dynamically assigned at commit, based on these Capture field values. |
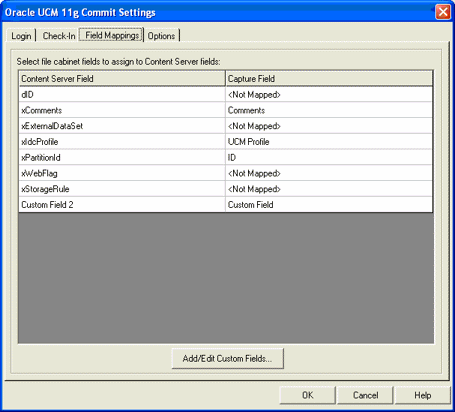
To display this screen, open a commit profile in Capture Administration, select Oracle UCM 11g Commit Driver in the Commit Driver field, click the adjacent Configure button, and click the Field Mappings tab.
| Element | Description |
|---|---|
| Content Server Fields | Lists all available Content Server fields. |
| Capture Fields | Select an index field from those listed for the file cabinet to map to the adjacent Content Server field. |
| Add/Edit Custom Fields | Click this button to add, edit, or delete custom Content Server fields for mapping to Capture fields. |
Use this screen to add, edit, or delete custom Content Server fields and descriptions. You might add custom fields, for example, when you have custom code running on the Content Server that specifically references these fields. (Without custom code, these custom fields are ignored.) After you add one or more custom fields in this screen, they become available for mapping on the Field Mappings tab.
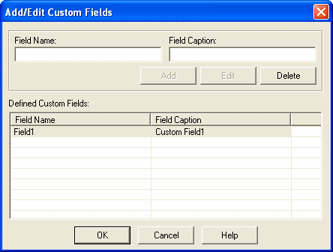
Display this screen by clicking the Add/Edit Custom Fields button on the Oracle UCM 11g Commit Settings Screen, Field Mappings Tab.
| Element | Description |
|---|---|
| Field Name | Enter the name of a custom field to add. The name must match the custom code that references it. |
| Field Caption | Specify a description of the custom field. |
| Add | Click to add the specified custom Content Server field. |
| Edit | Click to save changes to the selected Content Server field. |
| Delete | Click to delete the selected Content Server custom field. Any Capture fields previously mapped to a deleted custom field are no longer mapped. |
Use the Options tab to customize the document check-in process.
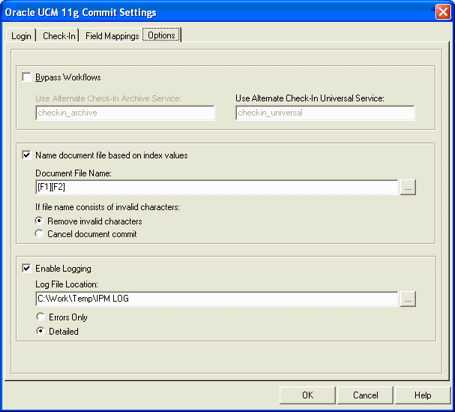
To display this screen, open a commit profile in Capture Administration, select Oracle UCM 11g Commit Driver in the Commit Driver field, click the adjacent Configure button, and click the Options tab.
| Element | Description |
|---|---|
| Bypass Workflows | Select this field to directly check in documents committed using this profile, bypassing any workflow processing.
|
| Use Alternate Check-In Archive Service | Specify a custom archive service to check in documents to Oracle UCM instead of the default CHECKIN_ARCHIVE service. This field is available when Bypass Workflows is selected. |
| Use Alternate Check-In Universal Service | Specify a custom check-in service to check in documents to Oracle UCM instead of the default CHECKIN_UNIVERSAL service. This field is available when Bypass Workflows is not selected. |
| Name document file based on index values | Select this field to name document files using selected Capture index fields specified in the Document File Name field and options shown on this tab. (You can also include literal characters by typing alphanumeric characters in this field, or separate words or index values by typing a space or dash.)
If this field is deselected, document files retain the names assigned by Capture, which consists of a default naming scheme that combines the internal batch ID, an underscore, and a numeric identifier. Note that this setting defines how output files are named; the Document Title field on the Oracle UCM 11g Commit Settings Screen, Check-In Tab defines how documents are titled in Oracle UCM. Note: This setting applies to Multi-page TIFF and PDF output formats only, and is grayed out if another format is selected. |
| Document File Name | Specify how you want the committed document files named. Click the adjacent Browse button and specify the title in the Title Builder screen, as described in "Oracle UCM 11g Commit Settings Screen, Title Builder". |
| If file name consists of invalid characters | Specify what happens if Capture detects invalid characters in a file name. This might occur, for example, if a user entered an index value containing a question mark or a slash character. You can choose to either remove the invalid characters or cancel the document commit. |
| Enable Logging | Select this field to activate logging for the commit profile. One log file per day is created. The filename uses the format UCMyymmdd.log. |
| Log File Location | Specify a folder in which to store log files as they are created. |
| Errors Only/Detailed | Select Errors Only to write to the log only if an error occurs. Select Detailed to log all related actions. |
Use this screen to configure an Oracle I/PM commit profile, which commits documents directly into Oracle I/PM.
Display this screen by creating a commit profile, selecting Oracle I/PM Commit Driver in the Commit Driver field and clicking Configure to configure driver settings. Select settings on these tabs and dialog boxes:
Use this tab to select general settings for the I/PM commit profile.
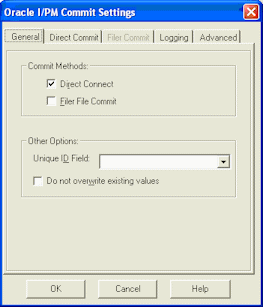
| Element | Description |
|---|---|
| Commit Method | Specify how you want documents archived.
You can choose both methods. Doing so allows you to keep a backup of the document indexes and images in the format of an I/PM Filer file. |
| Unique ID Field | This field allows you to select a file cabinet field whose value will be replaced at commit time with a unique value. The unique value is in the form of: Capture Batch ID + the numeric file extension of the first page in the document + the number of seconds past midnight. A new unique value is generated for each document within the batch.
Note: This value is unique to a Capture database. Note: This field must also be mapped to an I/PM application field within the Index Field Mappings dialog box (or have the same name) in order for it to be written into Oracle I/PM. |
| Do not overwrite existing values | If this field is selected, the specified Unique ID will retain any value that was populated by a user or Index macro. If deselected (default), the Unique ID field will be auto-populated regardless of any value already in the field. |
Use this tab to select direct commit options, including field mappings and process integration. Note that this tab is available when Direct Connect is selected on the General tab (see "Oracle I/PM Commit Settings Screen, General Tab").
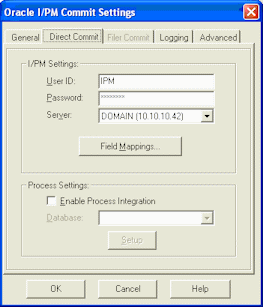
| Element | Description |
|---|---|
| User ID, Password, Server | Enter a valid I/PM User ID, Password (case sensitive) and Server to use when archiving documents into Oracle I/PM. The account you specify must have Create Index rights to any applications being used. |
| Field Mappings | Click to associate Capture file cabinet fields with I/PM application fields. By default, the Oracle I/PM commit driver commits documents into an I/PM application based on the name of the respective Capture file cabinet. For more information, see "Oracle I/PM Commit Settings Screen, Direct Commit Tab, Field Mappings". |
| Enable Process Integration | Select this field to enable the Process functionality.
Note: You must have Process administrator rights. The user account is used exclusively by the Process integration as a service account to create and append Process packages. |
| Database | Specify a Process database. |
| Setup | Click to specify detailed Process configurations. |
Use this dialog box to map a Capture file cabinet to an Oracle I/PM application. This dialog box is displayed when you click the Field Mappings button on the Direct Commit tab of the Oracle I/PM Commit Settings dialog box.
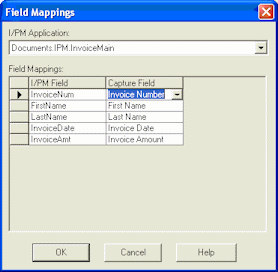
| Element | Description |
|---|---|
| I/PM Application | Select the I/PM application you want to map. |
| I/PM Field | Lists fields in the selected I/PM application. |
| Capture Field | Select Capture fields to map to the I/PM fields. |
Use this screen to set up a Process configuration.
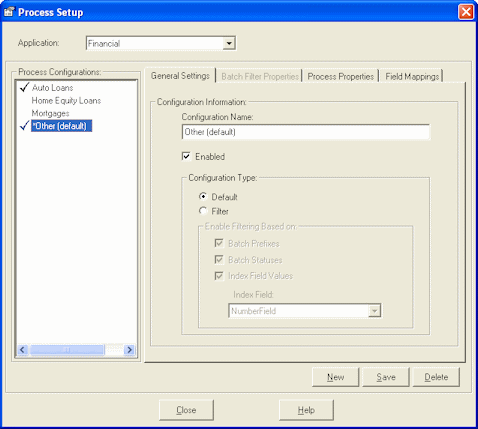
Display this screen by checking the Enable Process Integration field on the Direct Commit tab in the Oracle I/PM Commit Settings screen, then clicking Setup. See "Oracle I/PM Commit Settings Screen, Direct Commit Tab".
| Element | Description |
|---|---|
| Application | Select another I/PM application, if needed. |
| Process Configurations | Lists Process configurations for the selected Oracle I/PM application. A check mark indicates that the configuration is enabled. An asterisk identifies the default configuration. |
| New | Click to create a configuration. Each document is processed by the first Process configuration whose filter criteria it matches. Be sure to create configurations that do not conflict. If a document can be matched by more than one configuration, Capture cannot control which configuration will be used. |
| Save | Click to save changes made to the selected configuration. |
| Delete | Click to delete the selected configuration. Deleting a configuration means it is no longer available for processing documents. |
This screen includes the following tabs:
Use this tab to enable a configuration and identify its name and type.
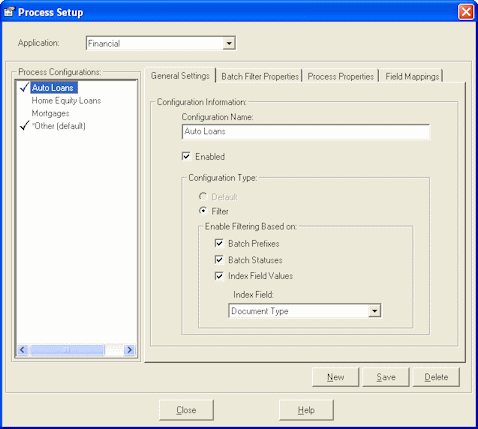
| Element | Description |
|---|---|
| Configuration Name | Enter a name for the configuration. Names must be unique for the selected application. |
| Enabled | Select this field to activate or deactivate the configuration. A deactivated configuration is temporarily unavailable for processing. |
| Configuration Type | Specify the configuration type (Default or Filter). A filter-type configuration processes batches that match its specified filter. The default configuration provides a catch-all configuration that processes any batches that do not match any other configuration's filters. Note that you can create only one default configuration for an application. (An asterisk displays before its name in the Process Configurations list.) |
| Enable Filtering Based on | Specify the basis on which you want documents filtered. You can choose Batch Prefixes, Batch Statuses and/or Index Values Field. (If you select multiple fields, documents that match any of the criteria are processed by the configuration.) After selecting one or more fields, you specify the actual criteria on the Batch Filter Properties tab, as described in "Process Setup Screen, Batch Filter Properties Tab". If you choose to filter based on a document index value, select the Index Field Values field and select the Capture index field on which you want to search in the Index Field field. |
Use this tab to specify which documents are processed by the selected configuration, based on their batch prefix, batch status or index field value.
|
Note: In order to specify filter criteria on this tab, you must select the corresponding filter on the General Settings tab (see "Process Setup Screen, General Settings Tab"). For example, to filter documents by batch prefix, you must select Batch Prefixes on the General Settings tab and specify the prefixes on this tab. |
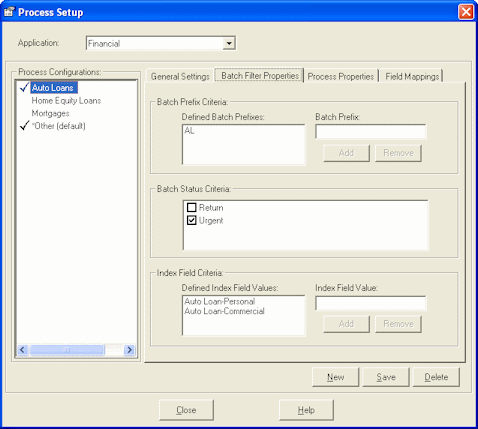
| Element | Description |
|---|---|
| Batch Prefix Criteria | To specify a batch prefix, enter it in the Batch Prefix field and click Add. It is added to the Defined Batch Prefixes list. You can enter multiple prefixes. To remove a batch prefix from the defined list, select it and click Remove. If multiple prefixes are added, a batch that matches any of the prefixes will be processed. |
| Batch Status Criteria | To specify a batch status, select it from the list of statuses defined for the application. You can select multiple statuses. A batch matching any of the selected statuses will be processed. |
| Index Field Criteria | To specify an index value, enter it in the Index Field Value field and click Add. It is added to the Defined Index Field Values list. You can enter multiple index values. A batch matching any of the specified index field values will be processed. To remove an index value from the defined list, select it and click Remove. |
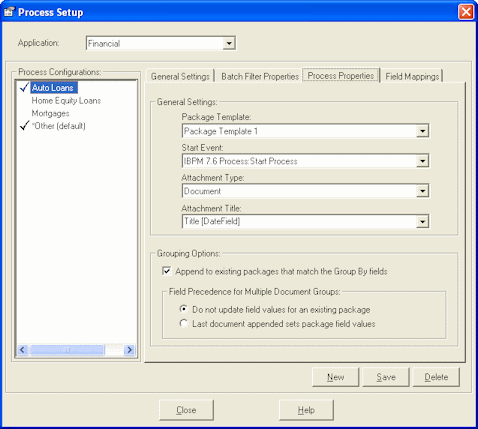
Use this tab to specify how documents are processed using the selected configuration.
| Element | Description |
|---|---|
| Package Template | Specify the Process package template to use. |
| Start Event | Specify the Process start event to place packages into. |
| Attachment Type | Specify the attachment type (if any). |
| Attachment Title | Specify the attachment title, by selecting one or more Capture index field names or entering characters. (Index field names are listed in brackets.) Upon commit, the index value of the selected field becomes the attachment title of the package. To select an index field, click the dropdown and choose an index field. Select additional fields to append them to the title. You can also type characters as literals. For example, if the title is [Field 1][Field 2], you could type between the two fields, as in [Field 1] - [Field 2]. |
| Grouping Options | Use these options to determine how packages are grouped together. To specify Group By fields, see "Process Setup Screen, Field Mappings Tab".
|
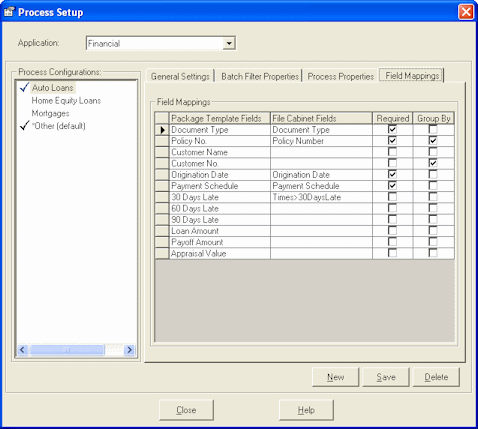
Use this tab to specify required index fields and index fields whose values are used to group packages together. (You map package fields to file cabinet index fields in the Package Template.)
| Element | Description |
|---|---|
| Required | When checked, the file cabinet (application) index field must contain a value in order for the document to be placed into a Process package. Documents with missing required index values are committed but not placed in a Process package. |
| Group By | Use this box to specify if an index field is used to group packages together. For example, checking the Customer No. field means that packages with the same Customer No. value will be appended into existing packages. Note that the Grouping Options you select on the Process Properties tab (see "Process Setup Screen, Process Properties Tab" determine whether documents are actually appended in packages: If this option is checked, documents are appended to all packages in Process whose Group By field values match.
Checking multiple Group By fields create an AND condition, where a matching value must be found for each checked Group By field in order for the package to be grouped with other packages. |
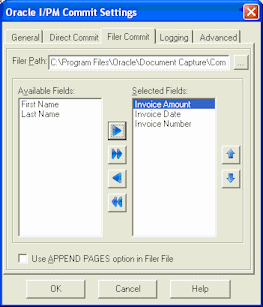
Use this tab to select settings for committing documents via Filer files. Note that this tab is available when Filer File Commit is selected on the General tab (see "Oracle I/PM Commit Settings Screen, General Tab".
| Element | Description |
|---|---|
| Filer Path | Enter the I/PM Filer path that Filer uses for processing Filer files.
Note: This path can be either a mapped drive letter or a UNC path; however, Oracle I/PM prefers a mapped drive letter. It is recommended that the path be configured the same on all Capture workstations, and the Oracle Filer program must have access to the path. |
| Available Fields, Selected Fields | Select and order the Capture fields you want committed to the Filer file. Use the left and right arrow keys to move fields to the Selected Fields box. Use the up and down arrow keys to change their order. |
| Use APPEND PAGES option in Filer File | Select this field to instruct Filer to search for documents with the same index values, and if found, append the document's pages to the existing Filer file document. |
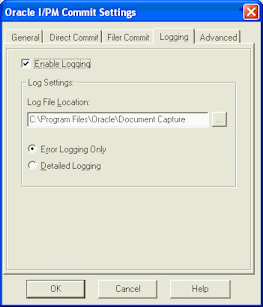
Use this tab to set logging options. When enabled, two log files are generated each day and written to the same location: a log file for the Oracle I/PM commit (whose filename uses the format EDPmmddyy.log) and a log file for Oracle process (whose filename uses the format SCPmmddyyyy.log).
| Element | Description |
|---|---|
| Enable Logging | Select this field to activate logging for the Oracle I/PM commit profile. |
| Log File Location | Specify a folder in which to store log files as they are created. |
| Error Logging Only/Detailed Logging | Select Error Logging Only to write to the log only if an error occurs. Select Detailed Logging to log all related actions. |
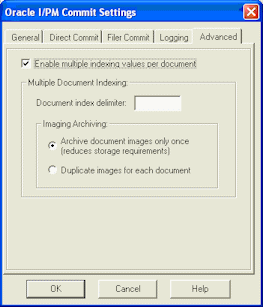
Use this tab's options to specify how multiple documents can be created for one or more batch pages. You might use this functionality, for example, to allow users to index insurance policy documents under more than one policy number. For example, indexing users might enter 12345!67890 in a Policy Number field (where ! is specified as the delimiter) to create two separate documents-one with policy number 12345, and the other with 67890.
| Element | Description |
|---|---|
| Enable multiple indexing values per document | Select this field to allow multiple indexing (where one batch page can be associated with multiple documents). This option is typically combined with an Index macro. |
| Document index delimiter | Enter the delimiter that is used to separate different sets of index values. For example, enter a | (pipe) character. |
| Imaging Archiving | Select options as needed.
|
Use the Oracle I/PM 11g Commit Settings screen to configure an Oracle I/PM 11g commit profile.
Use this tab to select general settings for the Oracle I/PM commit profile, including its commit method.
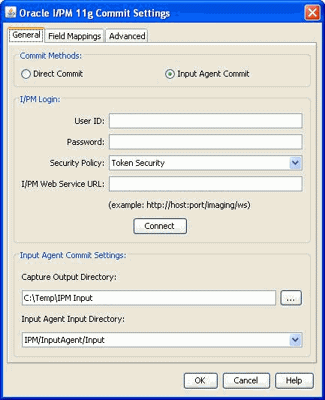
To display this screen, open a commit profile in Capture Administration, select Oracle I/PM 11g Commit Driver in the Commit Driver field, and click the adjacent Configure button.
| Element | Description |
|---|---|
| Direct Connect | Choose this commit method to commit documents directly into Oracle I/PM. See "About Direct Committing". |
| Input Agent Commit | Choose this commit method to create an Oracle I/PM input file for each committed batch to bulk upload into Oracle I/PM using input agent. See "About Input Agent Committing". |
| User ID | Enter a valid user name to use when committing documents into Oracle I/PM. |
| Password | Enter a valid password (case sensitive) to use when committing documents into Oracle I/PM. |
| Security Policy | Specify the security policy configured on the Oracle I/PM server being used for the commit. For example, select Token Security if token security is configured on the server. If no policy is configured, select Basic Security. |
| I/PM Web Service URL | Specify the server to use (for example, http://host:port/imaging/ws). The account you specify must have Create Index rights to any applications being used. |
| Connect | Click this button to connect to the specified Oracle I/PM server using the login and security information provided. |
| Capture Output Directory | If committing using an input agent, use this field and the Input Agent Input Directory field to specify where input files are output and located by the input agent. The fields identify the same directory in different ways. This field specifies the physical location in which to write the delimited input files and associated images. For example, the Capture output directory (running on Windows) might be:
\\Server_IPM1\InputAgent\Input |
| Input Agent Input Directory | If committing using an input agent, use this field and the Capture Output Directory field to specify where input files are output and located by the input agent. (The fields identify the same directory in different ways.)
Select the input directory listed for the Oracle I/PM instance that the Input Agent monitors for matching input files. This field lists input directories configured in Oracle I/PM administration for the input agent. For example, an input agent input directory (running on Linux) might be: IPM/InputAgent/Input |
Use this tab to map Capture index fields to a selected Oracle I/PM application's fields.
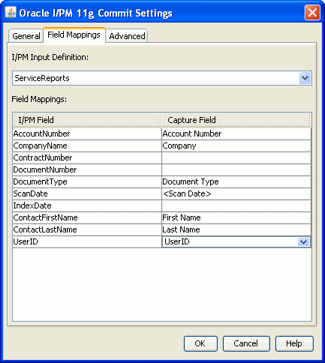
To display this screen, open a commit profile in Capture Administration, select Oracle I/PM 11g Commit Driver in the Commit Driver field, click the adjacent Configure button, and click the Field Mappings tab.
| Element | Description |
|---|---|
| I/PM Application, I/PM Input Definition | Select the Oracle I/PM application or input definition with which to map Capture fields, from those available on the specified Oracle I/PM system.
After you make a selection, the table is automatically populated with fields from the selected or referenced Oracle I/PM application. |
| I/PM Field | Lists fields in the selected Oracle I/PM application or input definition. |
| Capture Field | Select Capture index fields to write their values as metadata values to corresponding Oracle I/PM fields. For example, to map a document type field, you might select a Capture field called Doc Type adjacent to an Oracle I/PM field called DocumentType.
Capture fields enclosed in <> characters are system fields provided by Capture. |
Use this tab to specify logging options, and if configuring a direct commit, to specify search and append options.
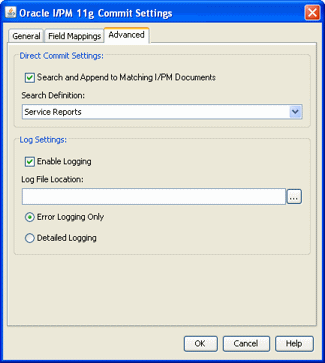
To display this screen, open a commit profile in Capture Administration, select Oracle I/PM 11g Commit Driver in the Commit Driver field, click the adjacent Configure button, and click the Advanced tab.
| Element | Description |
|---|---|
| Search and Append to Matching I/PM Documents | Select this field to search for Oracle I/PM documents with matching metadata values, and if found, append to the existing document instead of creating a new one. Whether a match is found is based on search criteria specified in the selected Oracle I/PM search definition.
This field is available for direct committing only, with multiple page TIFF as the selected document output format. |
| Search Definition | Select a search definition (previously created in Oracle I/PM) to use to search for matching documents. |
| Enable Logging | Select this field to activate logging for the commit profile. The log filename uses the format IPMMMDDYY.log. |
| Log File Location | Specify a folder in which to store log files as they are created. |
| Error Logging Only/Detailed Logging | Select Error Logging Only to write to the log only if an error occurs. Select Detailed Logging to log all commit-related actions. |
Use this screen to change the commit text file's default settings. By default, Capture creates a quotation, comma-separated text file that contains the full path to each image file, followed by document index data. The images are extracted from the batch and inserted into a folder beneath the commit folder. The text file and new batch folder are created under the Commit folder you specified during batch setup.
Display this screen by selecting the Commit Text File commit profile in the side pane and clicking Configure to configure driver settings. Select settings on these tabs:
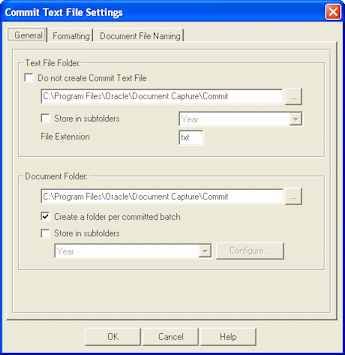
Use this tab to specify how commit text files and document files are written.
| Element | Description |
|---|---|
| Do not create Commit Text File | Select this field to create document files but no commit text file. When this option is selected, it is typically combined with options on the Document File Naming tab so that document files are named using index field values. |
| Text File Folder | Select the folder in which you want commit text files written. By default, this field displays the commit folder specified during batch setup (see "Capture Batch Setup Screen"). |
| Store in subfolders | Select this field to store commit text files in subfolders named by commit date. Select a date option in the adjacent field. Along with Year, you can choose Year and Month or Year, Month and Day to create further subfolders for documents. |
| File Extension | If needed, enter a different file extension for the commit file(s). The default extension is .TXT. |
| Document Folder | Select the folder in which you want document files written. By default, this field displays the commit folder specified during batch setup (see "Capture Batch Setup Screen"). |
| Create a folder per committed batch | Select this field to create a folder for each committed batch, where folders are named using the syntax BatchID.FileCabinetID (internal IDs assigned by Capture). |
| Store in subfolders | Select this field to store document files in subfolders named by commit date or index value, then select a subfolder storage option.
|
Use this dialog box to store documents files in subfolders named by index value.
For example, you might configure documents to be written to a company subfolder (within the specified commit folder), and within that, by type of document. The commit destination for a document with a company name of Acme and a file type of Financial might be: \\Commit\Acme\Financial
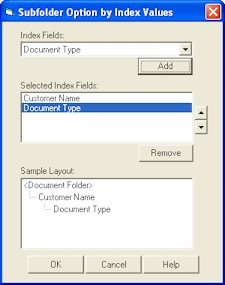
Display this dialog box by clicking Configure on the General tab of the Commit Text File Settings screen.
| Element | Description |
|---|---|
| Index Field, Add | Select an index field whose value will be used to name the subfolder. Click Add to add it to the Selected Index Fields list. |
| Selected Index Fields, Remove | Use the arrow buttons to change the order of subfolders. |
| Sample Layout | Displays the folder hierarchy for current settings. |
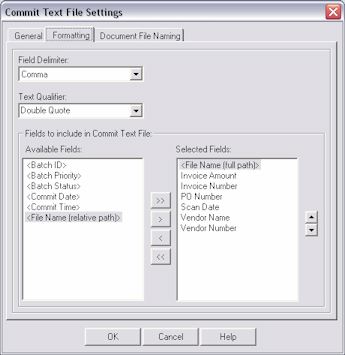
Use this tab to specify the fields and delimiters used in the commit file.
| Element | Description |
|---|---|
| File Delimiter | Define the character to use to separate fields within the commit file. You can choose: Comma (default), Semicolon, Tab or Other. If you choose Other, an Other Character field displays, allowing you to enter a delimiter character. |
| Text Qualifier | Specify the character mark used to identify the beginning and end of text fields. This text qualifier is used if needed, regardless of the file cabinet field's data type. You can choose: Double quote (“) (the default), Single quote (') or None. |
| Fields to include in Commit Text File | Use this option to customize the fields included in the commit file and their order. To include a field, select it in the Available Fields list and click the right arrow to move it to the Selected Fields list. By default, all file cabinet fields are included, in the order in which they appear within the file cabinet. Below are additional system fields you can include:
|
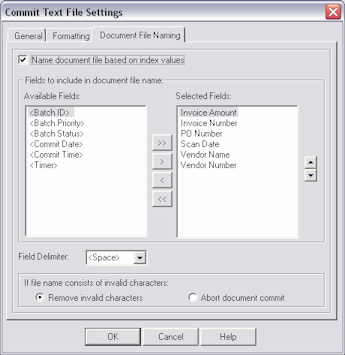
Use this tab to customize how document files are named.
| Element | Description |
|---|---|
| Name document file based on index files | Select this field if you want document files named using selected fields and options shown on this tab. If deselected, Capture names document files using a default naming scheme that combines the internal batch ID, an underscore and a numeric identifier. |
| Fields to include in document file name | Select one or more fields whose values will comprise the file name. Use the up/down arrows to specify the order in which the selected fields will make up the document file name, separated by the selected field delimiter. All file cabinet fields are available, along with the following system level fields:
|
| Field Delimiter | Specify a character to use to separate fields within the file name. You can select {space} (the default), or type in a character such as a - (dash). |
| If file name consists of invalid characters | Specify what happens if Capture detects invalid characters in a file name. This might happen, for example, if a user entered an index value containing a question mark or a forward slash character. You can choose to either remove the invalid characters or abort the document commit. |
Use this screen to select an EDP (Electronic Document Provider) macro for committing batches directly to a content management system. Display this dialog box by creating a commit profile, selecting Electronic Document Provider in the Commit Driver field and clicking its Configure button.
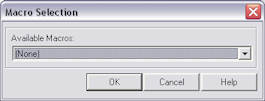
| Element | Description |
|---|---|
| Available Macros | Select an EDP macro. |
Use this screen to configure a database commit profile, which commits from Capture to a variety of databases. In the commit driver settings, specify where the document files are stored and which document index values are written to the database.
Display this screen by creating a commit profile, selecting Database Commit Driver in the Commit Driver field and clicking Configure to configure driver settings. Select settings on these tabs:
Use the Database tab to configure the database connection, select the database table and maps fields, including parent fields (optional).
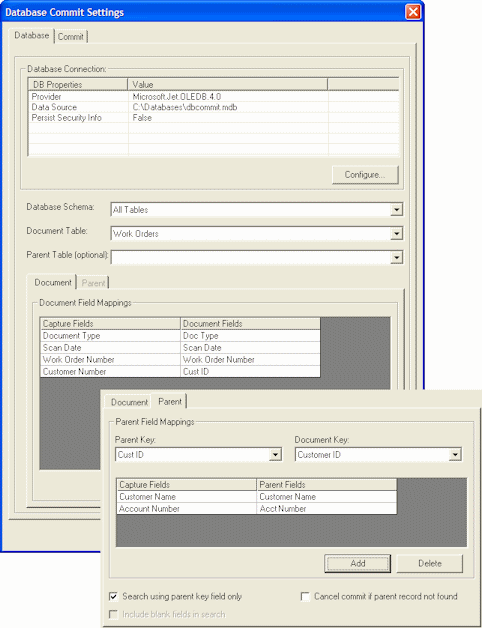
| Element | Description |
|---|---|
| Database Connection, Configure | Click Configure to configure the database connection. |
| Database Schema | Select a database schema if applicable or select All Tables. |
| Document Table | Select the database table to which you want to commit. |
| Parent Table | Select the parent table to which you want to commit. This optional setting allows you to search and write index values to a parent table while committing to the document table. |
| Document tab, Document Field Mappings tab | Map Capture fields to fields from the document table. Click the Add button. In the Add Document Field Mapping dialog box that displays, select the fields you want to map from the Capture and document fields. Repeat to map additional fields. Remove a mapping by selecting it and clicking Delete. |
| Parent tab | This tab is available when a parent table is selected in the Parent Table field. |
| Parent Key, Document Key | Select a key field for each field. These fields must be of the same data type. You do not need to designate the key fields as primary keys or define a join relationship between them in the database. |
| Mapping table | Map Capture fields to fields from the parent table. Click the Add button. In the Add Parent Field Mapping dialog box that displays, select the fields you want to map from the Capture and parent fields. Repeat to map additional fields. Remove a mapping by selecting it and clicking Delete. |
| Search using the parent key field only | This field controls how Capture searches the parent table. For more information, see "Linked Tables Searching".
|
| Include blank fields in search | This field controls whether records are matched when Capture searches the parent table and finds null values for mapped fields. For more information, see "Blank Fields Searching". |
| Cancel commit if parent record not found | Select this field to skip document commit if no matching parent record is found. For more information, see "Linked Tables Searching". |
How the parent table is searched depends on the Search using the parent key field only field's setting.
Selected
When selected, Capture searches for a matching value in the key field only of the parent table.
If an exact match is found on the parent key field, Capture inserts the document record into the document table using the values mapped on the Document tab. If other fields are mapped on the Parent tab, they are ignored.
If an exact match is NOT found on the parent key field, the action Capture takes depends on the Cancel commit if parent record not found field.
If unchecked (default), Capture creates a new record in both tables that contains the key field values as well as mapped field values.
If checked, Capture skips committing that document but continues committing the batch. A message saying the document could not be committed is displayed to users.
|
Note: When searching, Capture uses the first matching record it finds. |
|
Note: Since only one field is searched when the Search using parent key only field is checked, null values are not allowed. For that reason, the Include blank fields in search field is disabled. |
Deselected
Capture searches the parent table using all mapped fields. This creates an AND condition, where all mapped fields must match.
If an exact match is found, Capture does not write any values to the parent table, but uses the parent key value as the foreign key in the document table and inserts the document record into the document table using the values mapped on the Document tab.
If an exact match is NOT found, one of the following occurs, depending on whether the Cancel commit if parent record not found field is selected:
If NOT selected (default), Capture creates a new record in both the parent and document tables that includes the key field value and mapped field values.
If selected, Capture skips committing the document, continues committing other documents in the batch, and displays a message to the user that the document was not committed.
|
Note: When searching, Capture uses the first matching record it finds. |
|
Note: When searching this way, you can use a primary key in the parent table that is not used as a document index field (for example, an auto-increment field). |
The Include blank fields in search field determines if a match is found when Capture is searching for a null value because the Capture index user left an indexing field blank.
Suppose a Capture index user entered the following values in Cust ID and Cust Name fields that match a record in the parent table, but left the SSN field blank.
Cust ID = 12345
Cust Name = John Doe
SSN = <blank>
Table 18-1 lists possible parent table database values for this example. The Matched column indicates whether Capture will find a match based on the Include blank fields in search option.
Table 18-1 Example: Parent Table Values when Blank Fields Included in Searches
| Cust ID database field value | Cust Name database field value | SSN database field value | Include blank fields in search? | Matched? |
|---|---|---|---|---|
|
12345 |
John Doe |
111-11-1111 |
No |
Yes |
|
12345 |
John Doe |
111-11-1111 |
Yes |
No |
|
12345 |
John Doe |
Null |
No |
Yes |
|
12345 |
John Doe |
Null |
Yes |
Yes |
The table shows that when the Include blank fields in search option is checked and a mapped Capture field is left blank, Capture searches the mapped database field for a null value, and matches the record only if it finds a null value. If the option is NOT checked, Capture excludes the blank mapped field(s) from the search.
Use the Commit tab to specify how you want document files stored. You can commit document files to a folder and/or a database table. To save document values to a database but not document files, leave the options on this tab blank.
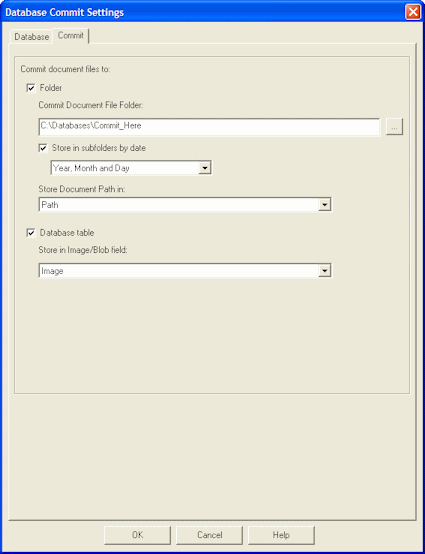
| Element | Description |
|---|---|
| Folder | Select this field to commit document files to a folder. |
| Commit Document File Folder | Specify where you want the document files written. To browse to a folder, click the Browse button and select a folder. |
| Store in subfolders by date | Select this field to store document files in subfolders named by commit date and select a date option in the dropdown field below. Along with Year, you can choose Year and Month or Year, Month and Day to create further subfolders for documents. |
| Store Document Path | Select the field in which you want the document file's full path stored. This field lists all fields in the database. |
| Database table | Select this field to commit document files to a specified a database field. |
| Store in Image/Blob | Select the database field in which you want the document files stored. The data type for this field must support long binary data. |
Database lookups include the following screens:
Use this screen to define a database lookup profile for use in Capture. For more information, see "About Database Lookups".
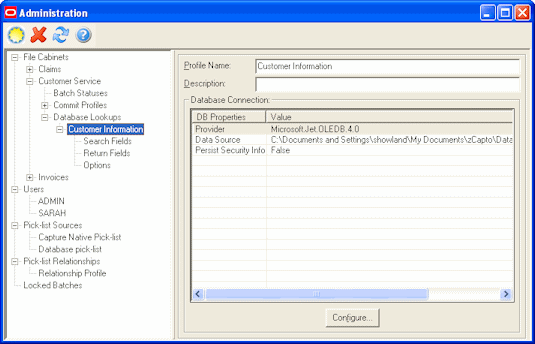
Display this screen by clicking the Database Lookups heading in the side pane for a selected file cabinet. Click the New (sun) button on the toolbar to add a database lookup.
| Element | Description |
|---|---|
| Pick-list Source Name | Displays the name of the database lookup. You can change it if needed. |
| Description | Enter a description of the database lookup for reference purposes. |
| Database Connection | Displays database connection information. |
| Configure | Click to configure a connection to the database to be searched. Click Help in the database configuration screens for more information. |
Use this screen to identify search fields. For example, you might identify an Account Number Capture field as a search field so that when the user does a database lookup for a specific number, Capture searches an Account Number database field for a matching value.
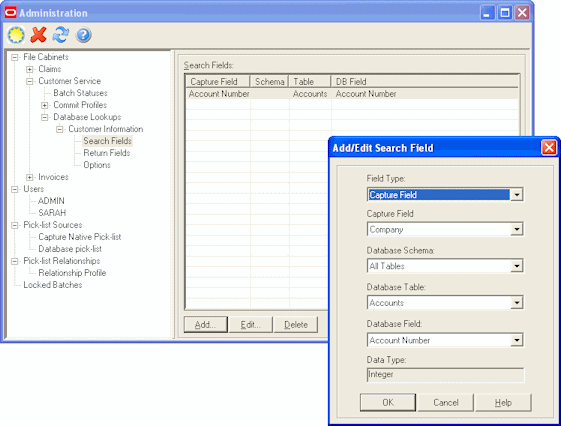
Display this screen by selecting Search Fields in the side pane within a database lookup.
| Element | Description |
|---|---|
| Search Fields | This table lists search fields configured for the selected database lookup. |
| Add | Click to add a search field in the Add/Edit Search Fields Screen. |
| Edit | Click to edit a selected search field in the Add/Edit Search Fields Screen. |
| Delete | Click to delete a selected search field, then confirm the deletion. |
Use this screen to add or edit search fields. By specifying multiple search fields, you can provide users with more than one way to search database records and return different information. For example, you could return basic information if a user matches a customer name, but return detailed information if a user matches a Purchase Order number.
| Element | Description |
|---|---|
| Field Type | Select the type of field you want to search. You can choose Capture Field (the default) or Custom Field. Custom fields cannot be mapped to an index field. However, they can be displayed in a hit-list or they can be used to search on. For example, Recognition Server can use a Custom field to search on using a bar code value. |
| Capture Field/Custom Field | If you selected Capture Field in the Field Type field, select the Capture field you want to search on from the list of file cabinet fields. If you selected Custom Field in the Field Type field above, enter a field name to display in the hit-list.
Note: The search index field you select must have the same data type as the database field whose values will be searched. |
| Database Schema | If the database you selected contains multiple schemas, select a schema; otherwise, choose All Tables. |
| Database Table | From the list of tables in the specified database, select the table you want to search. |
| Database Field | From the list of fields in the specified table, select the field you want to search. |
| Data Type | Displays the data type of the field you selected in the Database Field above. This field is for reference only and cannot be edited. |
Use this screen to specify return fields for each search field you defined.
You can also add display only fields. Display only fields allow you to display other data from the external database to help in indexing a document. These fields are displayed in a hit list for validation purposes.
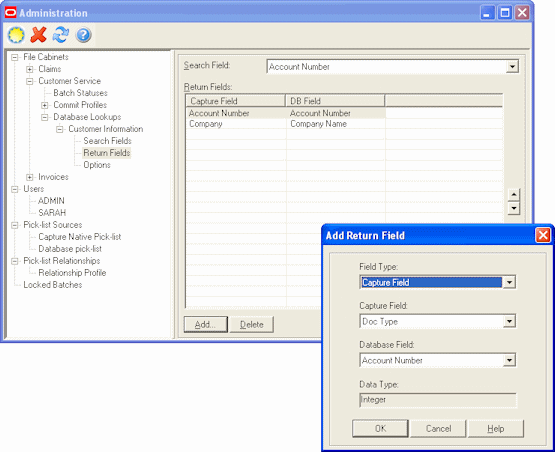
Display this screen by selecting Return Fields in the side pane within a database lookup.
| Element | Description |
|---|---|
| Search Field | From the list of defined search fields, select one for which to define a return field. |
| Add | Click to add a return field for the selected search field in the Add Return Field Screen. |
| Delete | Click to delete a return field selected in the Return Fields table. |
Display this screen by clicking Add on the Return Fields section of the Administration page.
| Element | Description |
|---|---|
| Field Type | Select the type of field you want to return. You can choose Capture Field (the default) or Display Field. A display field displays data only on the hit-list. |
| Capture Field/Display Field | If you selected Capture Field in the Field Type field, select the Capture field you want to populate from the list of file cabinet fields. If you selected Display Field, enter a field name. For example, you might want to display a database field called CUS NO as Customer Number to users. |
| Database Field | From the list of fields in the specified table, select the field you want to return. |
| Data Type | Displays the data type of the field you selected in the Database Field above. This field is for reference only and cannot be edited. |
Use this screen to specify how you want Capture to search database fields when a user activates a database lookup profile.
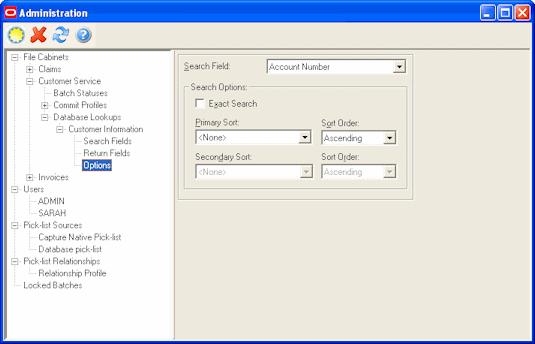
Display this screen by selecting Options in the side pane within a database lookup.
| Element | Description |
|---|---|
| Search Field | Select a previously defined search field on which to apply search options. |
| Exact Search | Select this field to require the user to enter a matching value exactly as it is stored in the database. If this box is not checked (the default), the user can enter the first one or more characters, activate the search and Capture will match all values beginning with the specified characters.
Note: The Exact Search option applies only to alphanumeric database search fields. When searching numeric or date database fields, Capture always performs an exact search. |
| Primary Sort/Secondary Sort, Sort Order | Use these options to specify how you want values for the selected search field displayed in the hit-list, if a hit-list is displayed. For example, if searching for a Customers field, you might want customer records sorted in ascending order by a contact's last name in the hit-list. |
Use this screen to manage users, assigning them Capture access to specific file cabinets and administration rights. For more information, see "About Users in Capture".
The security model chosen during configuration affects how you manage users in Capture:
With Capture security, you add and manage users in Capture Administration on the Users screen.
With Windows Domain security, users are created and assigned to groups in the Windows Domain. You use the Users screen to assign them administration rights or access to specific file cabinets.
Display this screen by selecting Users from the Admin menu. Click the New (sun) button on the toolbar to add a user. See "Add User Screen (Capture Security)" or "Add User or Group Screen (Windows Domain Security)".
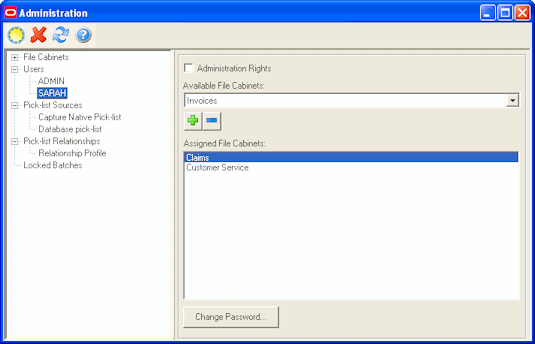
Select a user or group in the side pane, and make changes to settings in the right pane.
| Element | Description |
|---|---|
| Administration Rights | Select this field to give the user administrator access, including all Capture administration options. Users must have administration rights to manage batch scanning and index profiles, manage Capture macros, and access setup options. Administrators have access to ALL file cabinets. |
| Available File Cabinets | Use to assign a user access to a file cabinet. In order to use scan and index profiles, a user must have access to their assigned file cabinet. Select a file cabinet and click the plus (+) button to move it to the Assigned File Cabinets field. |
| Assigned File Cabinets | Lists assigned file cabinets for the selected user. To remove access to a file cabinet, select it and click the minus (-) button. |
| Change Password | Click to enter a new password for the selected user. This option is available for Capture security users only. |
Use this screen to add users, when Capture security is used. For more information, see "About Users in Capture".
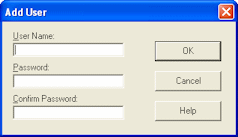
Display this screen by selecting Users from the Admin menu, and clicking the New (sun) button on the toolbar.
| Element | Description |
|---|---|
| User Name | Enter the user name the user will type to log in to Capture and its components. User names are not case sensitive. |
| Password, Confirm Password | Enter the password the user will type to log in. |
Use this screen to add users and groups for a selected domain, when Windows Domain security is used. For more information, see "About Users in Capture".
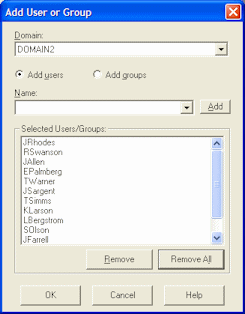
Display this screen by selecting Users from the Admin menu, and clicking the New (sun) button on the toolbar.
| Element | Description |
|---|---|
| Domain | Select the domain from which you want to add users or groups to the Selected Users/Groups list. |
| Add users | Select to add users. |
| Add groups | Select to add groups of users. All users assigned to this group will be assigned the group's Capture rights. |
| Name, Add | Choose a domain user or group and click Add. |
| Remove, Remove All | Click to remove a selected user or group from the Selected Users/Groups list. Click Remove All to remove all users and groups. |
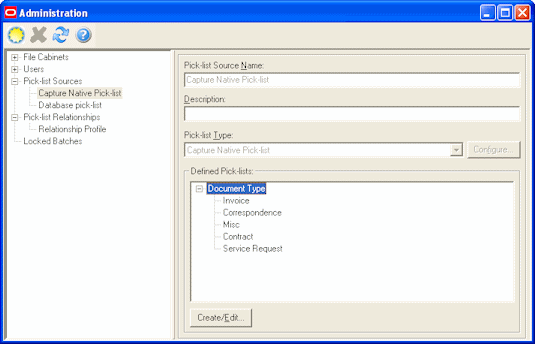
Use this screen to add or edit pick-list sources. This is the first step in creating a pick-list.
Display this screen by choosing Pick-list Sources from the Admin menu.
Pick-lists can have one of two sources:
Capture Native Pick-list, which are stored within Capture. You do not need to create a pick-list source for this type. Instead, select Capture Native Pick-list in the side pane and click the Create/Edit button to create a pick-list. See "Capture Pick-list Management Screen".
A database source. To add a database pick-list source, select Pick-list Sources in the side pane and click the New (sun) button in the toolbar. After entering a name, choose Database Pick-list in the Pick-list Type field. See "Pick-list Configuration Screen".
| Element | Description |
|---|---|
| Pick-list Source Name | Displays the name of the pick-list source. For Capture native pick-lists, this source name cannot be changed. |
| Description | Enter a description of the pick-list's purpose or contents for reference purposes. |
| Pick-list Type | Identifies the pick-list type. Select Database Pick-list to identify a new source as a database pick-list. You cannot change the Capture Native Pick-list source's type. |
| Configure | Click to configure the database connection and pick-list definitions for a database pick-list. This button is not available when creating Capture native pick-lists. See "Pick-list Configuration Screen". |
| Defined Pick-lists | Displays the contents of pick-lists. Select a pick-list, then click the plus sign to view a pick-list's items. |
| Create/Edit | Click to add, edit or delete Capture Native pick-lists, as described in "Capture Pick-list Management Screen". This button is not available when creating database pick-lists. |
Use this screen to add, edit or delete Capture Native pick-lists.
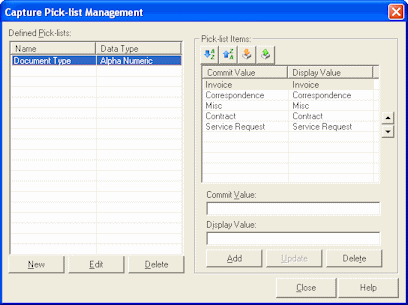
Display this screen by choosing Pick-list Sources from the Admin menu, selecting Capture Native Pick-list in the side pane, and clicking the Create/Edit button.
| Element | Description |
|---|---|
| Defined Pick-lists | This table lists pick-lists and their data type. The items contained in the selected pick-list are displayed in the Pick-list Items table. |
| New | Click to create a new pick-list. When prompted, enter its name and database type. Types include: Alphabetic, Alpha Numeric, Date, Float, and Numeric. |
| Edit | Click to change a selected pick-list's name or database type. |
| Delete | Click to delete the selected pick-list or selected pick-list item. |
| Pick-list Items | This table lists the items contained in the pick-list selected in the Defined Pick-lists table. Their order determines the order in which they are displayed to users. |
| Sort Ascending, Sort Descending | Click to sort the items in ascending or descending order, based on their data type. |
| Up, Down | Click these up and down arrow buttons to move a selected item up or down in the item list. |
| Import | Click to import a delimited text file's values into the pick-list selected in the Defined Pick-lists table. |
| Export | Click to export values in the pick-list selected in the Defined Pick-lists table to a delimited text file. |
| Commit Value | Enter a pick-list value and click Add to add the pick-list item. A commit value is an index value committed with the document. It is often the same as the display value, but can be different. |
| Display Value | If needed, enter an alternate value to display to users in the pick-list. Leave this field blank to use the same value for display and commit values. The corresponding commit value will be committed with the document. For example, you might display a user name to users in the pick-list, but commit a Social Security Number. |
| Add | Click to add the value entered in the Commit Value field to the list of pick-list items. |
| Update | Click to edit a selected pick-list item. Double-click the item in the Pick-list Items table to select it, make changes in the Commit Value and Display Value fields and click Update. |
Use this screen to import a delimited text file's values into a selected pick-list.
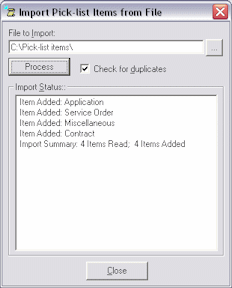
Display this screen by choosing Pick-list Sources from the Admin menu, selecting Capture Native Pick-list in the side pane, and clicking Create/Edit. Select a pick-list in the Defined Pick-lists table and click the Import button on the toolbar.
| Element | Description |
|---|---|
| File to Import | Select a text delimited file to import. Capture imports standard ASCII text files delimited with carriage return/line feeds. Each line within the text file is imported as a pick-list item. |
| Check for Duplicates | Check for and eliminate duplicate values. Note that importing large pick-lists takes longer when this option is selected. |
| Process | Click to import the values and displays items added and errors encountered in the Import Status area. |
Use this screen to configure a pick-list linked to a database. For this type of pick-list, you first connect to the database and then identify how you want the database's values used. Select settings on the screen's tabs:
Display this screen by choosing Pick-list Sources from the Admin menu, selecting or creating a database pick-list, and clicking Configure. See "Pick-list Sources Screen".
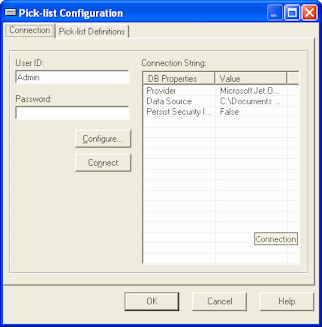
| Element | Description |
|---|---|
| User ID, Password | If needed, complete these fields to connect to the specified database. |
| Configure | Click to configure the OLE DB provider for the type of data you want to access. |
| Connect | If needed, click to reconnect to the specified database. |
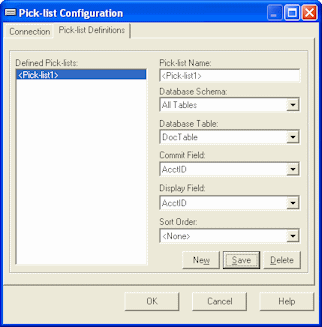
| Element | Description |
|---|---|
| Pick-list Name | Enter a new name for the database pick-list. |
| Database Schema | If the selected database contains multiple schemas, select a schema; otherwise, choose All Tables. |
| Database Table | From the list of tables in the specified database schema, select the table to which you want to link. |
| Commit Field | From the list of fields in the specified table, select the field whose selected values will be committed with the document. Administrators often select the same database field for this field and the Display Field below. However, you might want to display one field's values, but commit another field's values; for example, you might display customer names to the user, but actually commit selected customers' account numbers. |
| Display Field | From the list of fields in the specified table, select the field whose values will be displayed to the indexing user. This is often the same field as that selected for the Commit Field above. |
| Sort Order | Specify the order in which you want database records displayed in the pick-list to the user (ascending or descending). |
| New | To add a new pick-list, click New, complete the pick-list fields and click Save. |
| Save | Saves the selected settings in a pick-list and displays its name in the Defined Pick-lists list. |
| Delete | Click to delete the pick-list selected in the Defined Pick-lists list. |
Use this screen to create parent/child relationships between previously created pick-lists. In a parent/child relationship, a parent field is linked to one or more child pick-lists, one of which is displayed after the user makes a selection in the parent field.
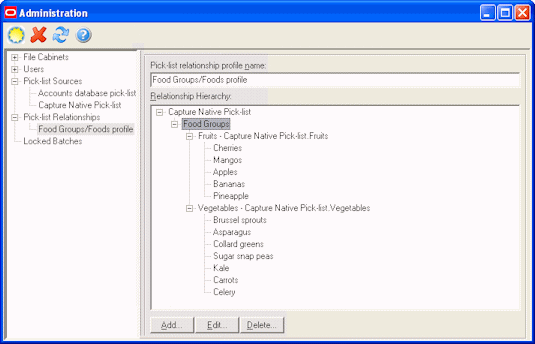
Display this screen by choosing Pick-list Relationships from the Admin menu and selecting or adding a pick-list relationship profile. To add a relationship profile, click the New (sun) button in the toolbar.
| Element | Description |
|---|---|
| Pick-list Relationship Profile Name | Displays the name assigned to the profile. Enter a new name, if needed. |
| Relationship Hierarchy | Displays the hierarchy of two or more pick-lists linked in the profile. |
| Add | Click to link pick-lists in the Add/Edit Pick-list Relationships Screen. |
| Edit | Click to make changes to a selected pick-list hierarchy in the Add/Edit Pick-list Relationships Screen. |
| Delete | Click to delete the selected hierarchy from the profile. |
Use this screen to add or edit a pick-list relationship that links two previously created pick-lists. After identifying the parent pick-list and its source, you map the child pick-list to be displayed when the user selects each item in the parent pick-list.
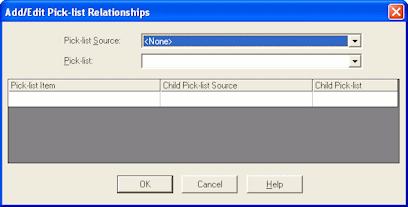
Display this screen by choosing Pick-list Relationships from the Admin menu, selecting a pick-list relationship profile and clicking Add or Edit.
| Element | Description |
|---|---|
| Pick-list Source | Select the source of the parent pick-list. You can select Capture Native Pick-list or a specific database pick-list source. |
| Pick-list | Select the parent pick-list from those listed for the selected pick-list source. |
| Pick-list Item | This display only column lists pick-list values in the selected parent pick-list. |
| Child Pick-list Source | Select the source of the pick-list to be displayed when the parent pick-list item is selected. |
| Child Pick-list | Select the pick-list to be displayed when the parent pick-list item is selected. |
Use this screen to view user activity and, if needed, unlock a batch.
To display this screen, choose Locked Batches from the Admin menu.

The table lists current Capture users by ID and workstation, along with the file cabinet and batch they are accessing.
| Element | Description |
|---|---|
| Unlock Batch | Unlocks the selected batch. |
| Refresh | Loads the list of batches in use again. |
The Import/Export Utility includes the following screens:
Main screen (shown below)
Use this screen to import or export Capture elements. For more information, see "About the Import/Export Utility".
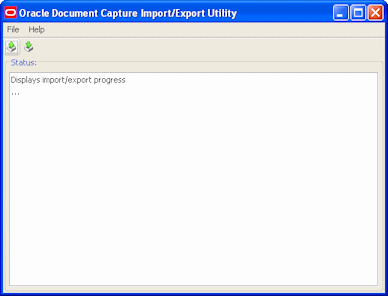
To display this screen, choose Oracle Document Capture from the Start menu, then choose Import-Export Utility.
| Element | Description |
|---|---|
 |
Select Capture elements for export from a tree view of all Capture components, then specify a name and location for the export file. |
 |
Review and import a previously exported zipped file containing Capture elements. |
Use this screen to select the elements for each component to export.

To display this screen, click the Export button (Ctrl+E) in the Import/Export Utility Screen.
| Element | Description |
|---|---|
| Export File/Browse | Click Browse and specify a location and name for the export file to be written. |
| Oracle Document Capture Components | For each component, select elements to export to the specified export file. For example, select Index to select all index profiles and macros for export, or click an individual index profile to export.
Because all file cabinet-related elements are exported and imported together, be sure to export all file cabinet elements to retain for the file cabinet at the same time. Importing any exported file cabinet element (such as a database lookup profile) overwrites the entire file cabinet of the same name. |
| Export | Begin writing the export file, using selected settings. |
| Cancel | Exit the screen without exporting or saving changes. |
Use this screen to import a previously exported file containing Capture elements.
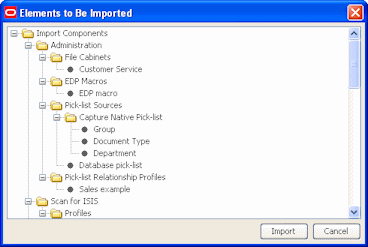
To display this screen, click the Import button (Ctrl+I) in the Import/Export Utility Screen.
|
Caution: Before importing, it is recommended that you back up the corresponding Capture elements in the target system. |
| Element | Description |
|---|---|
| Import Components | Lists all Oracle Document Capture components contained in the export file for import. |
| Import | After reviewing elements to be imported, click this button to import them into Oracle Document Capture.
Note that importing any exported file cabinet element (such as a database lookup profile) overwrites the entire file cabinet of the same name. Before importing, ensure that you are importing all file cabinet elements needed. If not, export again before importing. |
| Cancel | Exit the screen without importing Capture components. |