| Oracle® Business Intelligence New Features Guide Release 10.1.3.3.3 Part No. E10416-04 |
|
 Previous |
 Next |
| Oracle® Business Intelligence New Features Guide Release 10.1.3.3.3 Part No. E10416-04 |
|
 Previous |
 Next |
The 10.1.3.3.2 release of the Oracle Business Intelligence Enterprise Edition introduces the following new BI Server features:
Section 9.1, "Support for Hyperion Essbase as a Data Source"
Section 9.2, "Using BI EE OC4J Components with IIS via the IIS Plug-in"
Oracle Business Intelligence Enterprise Edition 10.1.3.3.2 now supports Hyperion Essbase as a physical data source. This topic describes the process to import Essbase structures into the Oracle BI Server metadata repository, as well as usage guidelines and limitations.
At the time of this release, Hyperion Essbase version 7.1.6 and later can be used as a data source with Oracle BI EE 10.1.3.3.2. For the most current information regarding supported versions, please see the System Requirements and Supported Platforms for Oracle Business Intelligence Suite Enterprise Edition.
This section describes the steps required to enable Essbase as a data source.
Oracle BI Server connectivity to Essbase is through the Essbase client libraries. The client libraries must be installed on the Oracle BI Server. Please see the most current System Requirements and Supported Platforms for Oracle Business Intelligence Suite Enterprise Edition document for the supported versions of the Essbase Client for connectivity to the Oracle BI Server.
Perform the following configuration steps to access the Essbase client libraries through the BI server on UNIX and Linux Platforms:
Define ARBORPATH = <Essbase Client installation folder>
For example:
export ARBORPATH=/export/home/Hyperion/AnalyticServicesClient
export ARBORPATH
Add the Essbase Client Libraries folder to LD_LIBRARY_PATH:
LD_LIBRARY_PATH_64=$LD_LIBRARY_PATH_64:<Essbase Client Libraries folder>
For example:
LD_LIBRARY_PATH_64=$LD_LIBRARY_PATH_64:$ARBORPATH/bin
export LD_LIBRARY_PATH_64
Define ARBORPATH = <Essbase Client installation folder>
For example:
ARBORPATH=/export/home/Hyperion/AnalyticServicesClient
export ARBORPATH
Add the Essbase Client Libraries folder to LD_LIBRARY_PATH:
LD_LIBRARY_PATH=$LD_LIBRARY_PATH:<Essbase Client Libraries folder>
For example:
LD_LIBRARY_PATH=$LD_LIBRARY_PATH$ARBORPATH/bin
export LD_LIBRARY_PATH
Define ARBORPATH = <Essbase Client installation folder>
For example: ARBORPATH=/export/home/Hyperion/AnalyticServicesClient
export ARBORPATH
Add the Essbase Client Libraries folder to SHLIB_PATH:
SHLIB_PATH=$SHLIB_PATH:<Essbase Client Libraries folder>
For example:
SHLIB_PATH=$SHLIB_PATH$ARBORPATH/bin
export SHLIB_PATH
Define ARBORPATH = <Essbase Client installation folder>
For example:
ARBORPATH=/export/home/Hyperion/AnalyticServicesClient
export ARBORPATH
Add the Essbase Client Libraries folder to SHLIB_PATH:
SHLIB_PATH=$SHLIB_PATH:<Essbase Client Libraries folder>
For example:
SHLIB_PATH=$SHLIB_PATH:$ARBORPATH/bin
export SHLIB_PATH
Define ESSLANG and LANG
For example:
ESSLANG=English_UnitedStates.UTF-8@Binary
export ESSLANG
LANG=en_US.utf8
export LANG
Comment out the following three lines from the NQSConfig.ini file:
[ GENERAL ]
// Localization/Internationalization parameters.
LOCALE="English-usa";
SORT_ORDER_LOCALE="English-usa";
SORT_TYPE="binary";
Define ARBORPATH = <Essbase Client installation folder>
For example:
ARBORPATH=/export/home/Hyperion/AnalyticServicesClient
export ARBORPATH
Add the Essbase Client Libraries folder to LIBPATH:
LIBPATH=$LIBPATH:<Essbase Client Libraries folder>
For example:
LIBPATH=$LIBPATH:$ARBORPATH/bin
export LIBPATH
Define ARBORPATH = <Essbase Client installation folder>
For example:
ARBORPATH=/export/home/Hyperion/AnalyticServicesClient
export ARBORPATH
Add the Essbase Client Libraries folder to LD_LIBRARY_PATH:
LD_LIBRARY_PATH=$LD_LIBRARY_PATH:<Essbase Client Libraries folder>
For example:
LD_LIBRARY_PATH=$LD_LIBRARY_PATH:$ARBORPATH/bin
export LD_LIBRARY_PATH
Essbase cube structures are imported via the "Import from Multi-dimensional" option in the Oracle BI Administration tool, shown in the following figure:

In the "Import from Multi-Dimensional" dialog, select Essbase as the provider type. Input the server and authentication information.
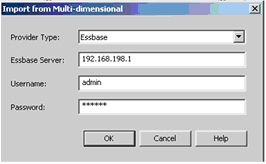
After selecting "OK", the list of Applications and Cubes available on the Essbase Server will be presented as shown in the following figure:
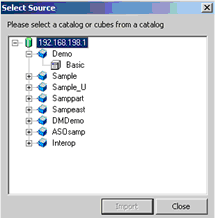
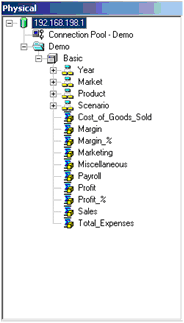
Select the Applications or Cubes to import. Note that Applications will be mapped as Physical Catalogs. The following figure shows an example of the physical layer representation:
Once the physical cubes are imported, they can be dragged to the Business Model and Mapping Layer to automatically create a Business Model that includes associated dimensions. The Business Model can now be customized to take advantage of Oracle BI Server capabilities such as aggregate and fragment navigation.
This section describes some unique aspects to Essbase connectivity that the administrator or end user should be aware of when configuring and using Essbase as a data source.
The default Aggregation Rule for imported measures will be set to Aggr_External. It is recommended that you change this setting to an explicit Aggregation Rule if the rule is known for the given measure and a corresponding rule is available for the BI Server. This will allow the BI Server to compute the aggregate when necessary.
Essbase supports the concept of measure hierarchies. This enables end users to drill from a measure to components that make up the measure, for example, profit drills to revenue and costs. At this time Oracle BI EE does not support measure hierarchies. Oracle BI EE will import measures as a flat list of children to the cube itself independent of the measure hierarchy.
When member names (including aliases) are unique in a given hierarchy, the Oracle BI Server can take advantage of specific MDX syntax to optimize performance. To enable this capability, select the "Use unqualified member name for better performance" box in the Hierarchy dialog as illustrated in the following figure. 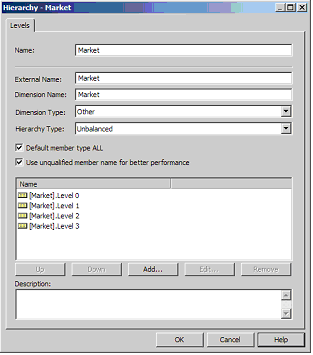
The import process will not be able to identify that member names are unique for a given hierarchy, so it is the responsibility of the Administrator to confirm uniqueness. Note that query errors may result if a hierarchy is specified as having unique members when it does not.
Oracle BI Server Time Series functions, "Ago" and "ToDate", are supported for use with Essbase.
In Oracle BI EE 10.1.3.3, Evaluate functions were introduced to provide the ability to leverage unique source-specific functions. This capability was limited to relational sources. In 10.1.3.3.2, you now can leverage Evaluate functions for Essbase. Support for Evaluate does not extend across all multi-dimensional sources at this time.
Sample use cases are described in the following sections. Consider the following examples using the EVALUATE_AGGREGATE and EVALUATE functions. Note that expressions are applied to columns in the Logical Table Source that refers to the physical cube.EVALUATE_AGGREGATE is used to implement custom aggregations. For example, you may want to compare overall regional profit to profits for the top three products in the region. A new measure can be defined to represent the profits for top three products resulting in the logical SQL statement:
Select Region, Profit, EVALUATE_AGGREGATE('SUM(TopCount(%1.members, 3, %2), %3)', Products, Profit, Profit) Top_3_prod_Profit From SampleBasic
The Oracle BI Server will generate the following expression for the custom aggregation:
member [Measures].[MS1] as 'SUM(Topcount([Product].Generations(6).members,3,[Measures].[Profit]),[Measures].[Profit])'
Similarly, use the EVALUATE function to implement scalar functions that are computed post-aggregation. EVALUATE will change the grain of the query, if its definition makes explicit references to dimensions (or attributes) that are not in the query.
For example, if you would like to see the Profits for the top five products ranked by Sales sold in a Region, after creating the applicable measure, the resulting Logical SQL statement is as follows
Select Region, EVALUATE('TopCount(%1.members, 5, %2)' as VARCHAR(20), Products, Sales), Profits From SampleBasic
The Oracle BI Server will generate the following expression to retrieve the top five products:
set [Evaluate0] as '{Topcount([Product].Generations(6).members,5,[Measures].[Sales]) }'
Essbase supports the concept of user-defined attributes (UDAs). A UDA is essentially any arbitrary textual string that can be associated with any member from a dimension. A member can have multiple strings associated to it. Oracle BI EE will suppress UDAs upon import.
Users can still query using UDAs by leveraging the EVALUATE function. Consider the following example where "Major Market" is a UDA:
After creating the applicable column, the resulting logical SQL statement is as follows:
Select EVALUATE('FILTER( %1.Members, isUDA([%2.Dimension, "Major Market"))', State, State), SalesFrom SampleBasic
The Oracle BI Server will generate the following expression for the custom column:
set [Evaluate0] as '{FILTER([Customer].Generations(3).members,isUDA([Customer].Generations(3).Dimension,"Major Market")) }'
Essbase substitution variables are automatically retrieved and populated into corresponding BI Server dynamic system variables.
Depending on the scope of the Essbase variable, the naming convention for the BI Server variable is as described below.
Server instance scope
<server name>:<var name>
Application scope
<server name>:<app name>:<var name>
Cube scope
<server name>:<app name>:<cube name>:<var name>
The refresh interval should be set appropriately to reflect anticipated update cycles for Essbase variables.
Member attributes are not automatically associated to corresponding dimensions and levels during the import process. To manually create the association, the Oracle BI Administrator may choose one of the following:
Map the member attribute to the appropriate Logical Table in the Business Model Layer Include the attribute in the appropriate Presentation Table in the Presentation Layer
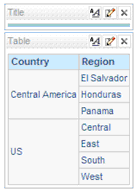
Oracle BI EE 10.1.3.3.2 supports unbalanced hierarchies for Essbase sources. The following is an illustration of how unbalanced hierarchies will be represented to end users in the Answers interface.
Given a selection of Country, Region as shown in the following image:
Now add "State" to the query. We know that for "Central America," Regions do not have States.
The resulting Answers request is shown in the following image:
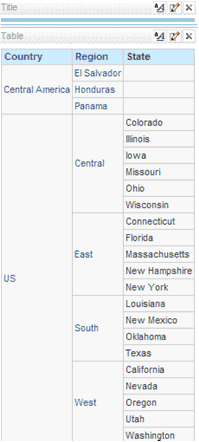
Note that for the unbalanced branch, for columns below the leaf level, nulls will be displayed.
There are two components of the BI EE installation that require Oracle Containers for Java (OC4J) and will not run natively on Microsoft's Internet Information Server (IIS), those components are:
Oracle BI Publisher
Oracle BI Office Server
IIS can be configured as a listener for OC4J. This is accomplished via an IIS proxy plug-in that is provided with the BI EE installation files. When configured, the requests are routed from IIS to OC4J so that it appears to the user that everything is being executed by IIS.
Following are the prerequisites to use the IIS plug-in:
Certified Windows Operating System as documented in the System Requirements and Supported Platforms for Oracle Business Intelligence Suite Enterprise Edition (SRSP).
Certified version of IIS as documented in the SRSP.
Oracle BI EE version 10.1.3.3.1 or later, installed and running with default configuration.
The Oracle Application Server Proxy Plug-in is called oracle_proxy.dll and is located in your Oracle BI EE installation files. The following steps describe how to configure your system to use the IIS plug-in:
From your BI EE install files, locate oracle_proxy.dll. The navigation path is as follows:
<CD-Drive>\Server\Oracle_Business_Intelligence\oc4jproxy\oracle_proxy.dll
Create a folder on an accessible drive, for example: c:\proxy. Copy oracle_proxy.dll to this folder.
In the same folder, create a configuration file called "proxy.conf ". This configuration file is for the OracleAS Proxy Plug-in which will be used to define the proxy server behavior. Following is a sample configuration file:
# Server names that the proxy plug-in will recognize.oproxy.serverlist=ias1 # Hostname to use when communicating with a specific server. oproxy.ias1.hostname=hostname.domain # Port to use when communicating with a specific server. oproxy.ias1.port=9704# Description of URL(s) that will be redirected to this server. oproxy.ias1.urlrule=/xmlpserver/* oproxy.ias1.urlrule=/xmlpserver oproxy.ias1.urlrule=/bioffice/* oproxy.ias1.urlrule=/bioffice
When you complete this Step, there will be two files (oracle_proxy.dll and proxy.conf) in the folder that you created in Step 2.
Define the OracleAS Proxy Plug-in Registry as follows:
Edit your registry to create a new registry key named HKEY_LOCAL_MACHINE\SOFTWARE\Oracle\IIS Proxy Adapter.
Specify the exact location of your configuration file with the name server_defs, and a value pointing to the location of your configuration file, for example: c:\proxy\proxy.conf.
(Optional) Specify a log_file and log_level: Add a string value with the name log_file, and the desired location of the log file, for example, c:\proxy\plugin.log. Add a string value with the name log_level, and a value for the desired log level. Valid values are "debug", "inform", "error", and "emerg".
Create the "oproxy" virtual directory in IIS as follows:
Using the IIS management console, add a new virtual directory to your IIS Web site with the same physical path as that of oracle_proxy.dll. Name the directory "oproxy" and give it execute access.
Using the IIS management console, add oracle_proxy.dll as a filter in your IIS Web site. The name of the filter should be "oproxy" and its executable must point to the directory that contains oracle_proxy.dll, for example, c:\proxy\oracle_proxy.dll.
Restart IIS (stop and then start the IIS server), ensuring that the filter is marked with a green arrow pointing up.
Check the following configuration files to remove the port 9704 because now IIS is routing all the calls to OC4J.
To access BI Servlets from the IIS / OracleAS Proxy Plug-in, you must specify the complete URL for example:
http://localhost/xmlpserver/login.jsp
or
http://localhost/bioffice/about.jsp
and
http://localhost/analytics/saw.dll?Answers.