


|
|
You can add product component functionality, or additional applications and services to an existing domain by extending it using the Configuration Wizard. For example, if you created a base WebLogic Server domain and you want to add the Avitek Medical Records Examples functionality, you must extend the domain by adding the medrec.jar template to it.
The Configuration Wizard simplifies the task of extending an existing domain by using extension templates. BEA delivers a set of predefined extension templates, which are described in Domain Template Reference at the following URL:
http://e-docs.bea.com/common/docs102/tempref/index.html
The following topics describe the steps required to extend an existing domain using the Configuration Wizard:
| Note: | Make sure that the servers in the domain are not running; you cannot extend an active domain using the Configuration Wizard. |
The Welcome window prompts you to choose whether you want to create a new domain or extend an existing domain by adding product component functionality, applications and services.
Choose Extend an existing WebLogic domain and click Next.
The Select a WebLogic Domain Directory window prompts you to select an existing domain that you want to update with additional applications or services.
To select a WebLogic domain directory:
The Select Extension Source window prompts you to select the source from which to extend your domain. You can select product components to add to your domain, or extend your domain using an existing extension template.
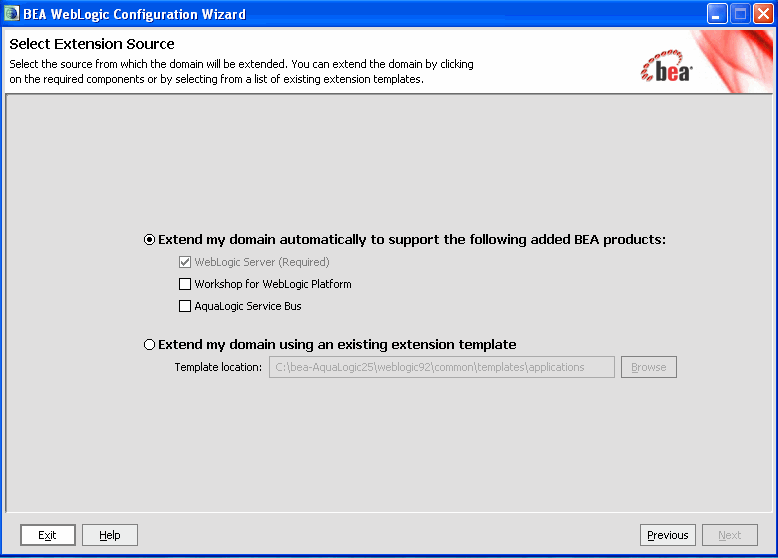
To select the source from which to extend your domain:
To use this option, simply check the boxes for the components you want to add to your domain. The components already included in your domain are indicated by a grayed-out check box.
To use this option, you can manually enter the pathname to the extension template in the Template location field and click Next.
Alternatively, you can click Browse to invoke the Select a Template dialog box. The default directory lists the predefined extension templates provided with your product installation. Use the drop-down arrow in the Look In: field to navigate to an alternate directory if desired. Select the desired extension template and click OK to return to the Select Extension Source window.
The Customize JDBC and JMS Settings window gives you the option to modify existing JDBC and JMS file store settings. If you choose not to customize any JDBC or JMS settings by accepting the default (No), you proceed directly to extending the domain.
The following topics summarize the settings you can change:
You can edit the settings for the JDBC Data Sources configured in your domain. For more information about the settings in this window, see Configure JDBC Data Sources.
If your domain contains a JMS file store, this window prompts you to configure JMS file stores as required for your domain. For more information about the settings in this window, see Configure JMS File Stores.
The Extend WebLogic Domain window displays the read-only name and location for your domain. If your domain contains an applications directory and the domain extension does not contain application files, the location for that directory is also displayed. However, if your domain extension contains application files, you are prompted to provide the pathname to the applications directory in the Applications Location field.
The Creating Domain window is opened to display status messages during the update process. The Configuration Wizard updates the config.xml file and other application-specific components in the domain directory, as defined by the domain template.
When the process is complete, the updated domain is ready.


|
 icon.
icon.