Creating WebLogic
Domains Using the
Configuration Wizard
Customizing JDBC and JMS Settings in AquaLogic Service Bus Domains
When you are creating or extending a domain using the Configuration Wizard, you have the option to modify JDBC data source and JMS file store settings if they were previously defined in your domain or template.
The following topics describe the steps required to change the JDBC and JMS file store settings in your domain:
A JDBC data source contains a pool of database connections that are created when the data source instance is created—when it is deployed or targeted, or at server startup. Applications look up a data source on the JNDI tree, and then request a connection. When finished with the connection, the application returns the connection to the connection pool in the data source.
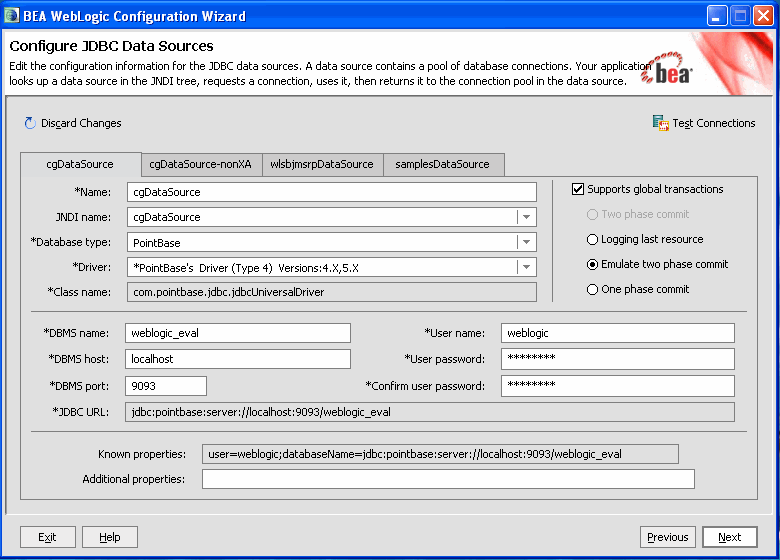
The Configure JDBC Data Sources window prompts you to configure the JDBC data sources defined in your domain source. This step is optional. If desired, you can also test the connections to the database using the Test Connections button.
Note:
The values that you specify for your database in this window must match the actual configuration of the database. For example, if you change the name of the PointBase database for a preconfigured domain in the DBMS name field, there must be an actual PointBase database configured with that name.
To configure JDBC data sources:
Review the current list of JDBC data sources. Each data source is represented by a tab. You can view the information for a particular data source by selecting the corresponding tab. Default values may vary, based on the domain source you selected in the Select A Domain Source window.
Add or modify entries as required by your domain, using the guidelines provided in the following table. When you finish updating your settings, do one of the following:
If you want to test the data source connections to the specified databases, click Test Connections. The Test Data Source Connections window is displayed. For more information, see Test Data Source Connections.
If you do not want to test the connections to the database, click Next.
Figure 8-1 illustrates the JDBC Data Sources window for AquaLogic Service Bus domains.
Figure 8-1 Configure JDBC Data Sources window
Note:
Fields marked with an asterisk are required.
Table 8-1 Configure JDBC Data Sources Window - Fields
In this field . . .
Do the following...
Name*
Enter a valid name for a JDBC data source: a string of characters that can include spaces.
The name of the JDBC data source must be unique among all component names within the domain.
JNDI name*
From the drop-down list, select a JNDI name to which this data source is bound.
To add a new JNDI name, select Add New and enter a valid JNDI pathname.
To modify an existing JNDI name, select the name and edit as required.
Note:
You can associate multiple JNDI names with a single data source.
When an application looks up a JNDI path, a javax.sql.DataSource instance corresponding to the data source is returned.
Database type*
From the drop-down list, select the type of database to which you want to connect. If your DBMS is not listed, select Other.
Driver*
From the drop-down list, select the JDBC driver you want to use to connect to the database. The list includes common JDBC drivers for the selected DBMS.
If you selected Other in the Database type field, this field is not available.
Class name*
If you selected a DBMS in the Database type field, no action is required.
If you selected Other in the Database type field, enter the full package name of the class that implements the java.sql.Driver interface for your DBMS.
DBMS name*
Enter the name of the database.
If you selected Other in the Database type field, this field is not available.
DBMS host*
Enter the name of the server machine hosting the database.
If you selected Other in the Database type field, this field is not available.
DBMS port*
Enter the port to be used to connect to the server. The default setting associated with the database selected is displayed.
If you selected Other in the Database type field, this field is not available.
JDBC URL*
If you selected a DBMS in the Database type field, no action is required. If the Driver Name has been set and a default URL exists, that URL is used as the value of this field.
If you selected Other in the Database type field, enter the URL for the database that is used to create the connections in the connection pool in the data source.
User name*
Enter the account login name required for connecting to the database.
If you selected Other in the Database type field, this field is not available. This value can be specified in the Additional Properties field.
User password*
Enter a password that is valid for accessing the database. Valid values consist of a string of alphanumeric characters. The hyphen (-) and underscore ( _ ) characters are supported.
This password overrides the password entered as part of the JDBC Properties.
The value is encrypted.
Confirm user password*
Re-enter the user password.
Known properties
If you selected a DBMS in the Database type field, no action is required. This field displays the properties list passed to the JDBC driver for use in the creation of physical database connections.
If you selected Other in the Database type field, this field is blank.
Additional properties
Enter any additional properties to be passed to the JDBC driver.
If you specified Other in the Database type field, enter any properties to be passed to the JDBC driver, such as the property needed to specify the user.
Supports global transactions
If you selected an XA driver in the Driver field:
Supports global transactions and Two-phase commit protocol are selected by default and cannot be changed.
If you selected a non-XA driver in the Driver field:
Supports global transactions may be selected, if desired.
If Supports global transactions is selected, select one of the following protocols:
Logging Last Resource—With this option, the transaction branch in which the connection is used is processed as the last resource in the transaction and is processed as a one-phase commit operation. The result of the operation is written in a log file on the resource itself, and the result determines the success or failure of the prepare phase of the transaction. This option offers some performance benefits with greater data safety than Emulate Two-Phase Commit, but it has some limitations. For more information, see "Understanding the Logging Last Resource Transaction Option" in Configuring and Managing WebLogic JDBC at: http://e-docs.bea.com/wls/docs100/jdbc_admin/jdbc_datasources.html#llr.
Emulate two-phase commit—With this option, the transaction branch in which the connection is used always returns success for the prepare phase of the transaction. It offers performance benefits, but also has risks to data in some failure conditions. Select this option only if your application can tolerate heuristic conditions. For more information, see "Understanding the Emulate Two-Phase Commit Transaction Option" in Configuring and Managing WebLogic JDBC at: http://e-docs.bea.com/wls/docs100/jdbc_admin/jdbc_datasources.html#emulate2pc.
One-phase commit (default)—With this option, a connection from the data source can be the only participant in the global transaction and the transaction is completed using a one-phase commit optimization. If more than one resource participates in the transaction, an exception is thrown.
The Test Data Source Connections window allows you to test the connection to the database for each of the data sources defined in your domain, using the JDBC URL defined for the database. This window is only displayed if you clicked Test Connections on the Configure JDBC Data Sources window.
A list of the data sources and the associated JDBC URLs is displayed.
To test the connections to the database:
Make sure that the database to which you want to test the connections is running.
Click Test for the data source connection that you want to test.
Note:
When you press Test for a data source, the button changes to Cancel. You can press Cancel at any time to cancel the test. Once a test is in progress, all other Test buttons are disabled.
If the status field is empty, the test has not been initiated.
Review the results of the test in the Connection Result Log pane.
Repeat for each data source, as desired.
Click OK to return to the Configure JDBC Data Sources window.
Run Database Scripts
The Run Database Scripts window prompts you to set up the database content for each of the data sources defined in your domain using pre-existing SQL or database loading files. A domain template may contain a set of SQL files organized by database type. This window is displayed only if the domain template contains one or more SQL files.
Note:
There are no databases defined in wls.jar: therefore, the Configure JDBC Data Sources dialog box is not displayed when you select WLS template to create a domain. If you select the WebLogic Platform template, the Configure JDBC Data Sources dialog box is displayed, but the Load Database dialog box is not displayed.
Note:
While using PointBase in Development Mode it is optional to click Run Scripts to load the scripts, and it is mandatory to click Run Scripts in the Production Mode to load scripts.
Note:
If you are using the default PointBase database, you do not need to start the database server before running the scripts. For all other databases, your database server must be running to execute the SQL scripts.
To set up the database content:
In the Available JDBC Data Sources pane, select the data source for which you want to run the scripts. The scripts that will be executed are displayed in the Available SQL Files and Database Loading Options.
If you are using the Portal template:
Choose p13n DataSource, and then click Run Scripts.
If you are maintaining Application GroupSpace data in a different database, choose apps GroupSpace DataSource, and then click Run Scripts.
If you are using the WebLogic Service Bus Extension (ALSB template), choose wlsjmsrpDataSource.
If you are using scripts that you have created and loaded along with your application already, choose any of the available datasources.
Select the database version from the DB Version drop-down menu.
Click Run Scripts.
All the scripts displayed in the Available SQL Files and Database Loading Options pane for the selected data source are executed, and the results are displayed in the Results pane. If you prefer to capture test output in a log file, select the Log File check box and manually enter the location of the log file or click Browse to navigate to the name of the desired log file.
Repeat steps 1 through 3 for each data source for which you want to execute SQL scripts.
Click Next to proceed to the next configuration window.
Configure JMS File Stores
A JMS file store is a disk-based file in which persistent messages can be saved.
The Configure JMS File Stores window allows you to modify JMS file stores that are configured in your domain. This step is optional.
To configure JMS file stores:
Review the current list of JMS file stores. Default values may vary based on the domain source you selected earlier.
Note:
The wizard provides two display modes: a concise tabular view of all the defined components, and an individual view, in which each component is represented by a tab, and you view a particular component by selecting the corresponding tab. To toggle the display mode between table and tab formats, click Switch Display.
Modify entries, as required by your domain, using the guidelines provided in the following table. When you finish updating your settings, click Next.
Note:
Fields marked with an asterisk are required.
Table 8-2 Configure JMS File Stores Window
In this field...
Do the following...
Name*
Enter a name for the JMS file store: a string of characters that can include spaces.
The name of the JMS file store must be unique among all component names within the domain.
Directory
Enter the pathname of the directory on the file system where the JMS file store is kept. This directory must reside on your system.
Synchronous
From the drop-down list, select one of the following synchronous write policies to determine how the file store writes data to disk:
Cache-Flush—specifies that transactions cannot be completed until all their write operations have been flushed down to disk.
Disabled—specifies that transactions are complete as soon as their writes are cached in memory. When this policy is active, the completion of transactions does not depend on waiting for writes to reach the disk.
Direct-Write—specifies that write operations are performed directly to disk. This policy is supported on Solaris and Windows. If this policy is active on an unsupported platform, the file store automatically switches to the Cache-Flush policy.
Unspecified (default)
This parameter setting affects performance, scalability, and reliability.
Note:
Although the use of the Direct-Write policy is transactionally reliable on Solaris systems, Windows systems may leave transaction data in the on-disk cache without writing it to disk immediately. This is not considered to be transactionally reliable, since a power failure can cause loss of on-disk cache data—possibly resulting in lost and/or duplicate messages. For reliable writes using Direct-Write on Windows, either disable all write caching for the disk (enabled by default), or use a disk with a battery-backed cache. Some file systems, however, do not allow this value to be changed (for example, a RAID system that has a reliable cache).
Note:
If the JMS file store is used exclusively for paging non-persistent messages to disk, the synchronous write policy is ignored.
The Review WebLogic Domain window allows you to review the detailed configuration settings of your domain before the Configuration Wizard creates it.
To review the domain settings:
Select an item in the Domain Summary pane on the left and review the associated details in the Details pane on the right. You can make limited adjustments by clicking Previous to return to a prior window.
Note:
You can limit the type of information displayed in the Domain Summary pane by selecting a filter from the View drop-down list