| Oracle® Enterprise Service Bus Developer's Guide 10g (10.1.3.3.0) Part Number E10295-01 |
|
|
View PDF |
| Oracle® Enterprise Service Bus Developer's Guide 10g (10.1.3.3.0) Part Number E10295-01 |
|
|
View PDF |
This chapter introduces routing services and routing rules.
This chapter contains the following topics:
A routing service is the key component for moving a message across the enterprise service bus – from its entry point to its exit point. Oracle JDeveloper provides tools that assist you in creating a routing service
The following are the key components that define a routing service:
WSDL file
Target services and operations
Transformation definition
Filter Expression
Execution type (synchronous or asynchronous)
The ESB systems from which the routing service accepts messages
The WSDL specifies how other services (either within or outside of the enterprise service bus) call the routing service. The remaining items, referred to as routing rules, determine where the routing service sends each message it receives, how it sends it, and what, if any, changes it makes to the message structure prior to sending it to the target service.
Oracle JDeveloper provides tools that assist you in creating the routing service WSDL and defining the routing rules.
The following sections provide an overview of concepts and how the routing service and routing rules are specified. "Creating and Modifying Routing Services" provides step-by-step instructions on performing these tasks.
To create a routing service, you can drag and drop an ESB routing service from the Component Palette into the Design tab. You can also right-click in the Design tab, then select Create ESB Service > Routing Service as illustrated in Figure 5-1.
When you create a routing service, Oracle JDeveloper opens a dialog box, as shown in Figure 5-2.
Figure 5-2 Create Routing Service Dialog Box
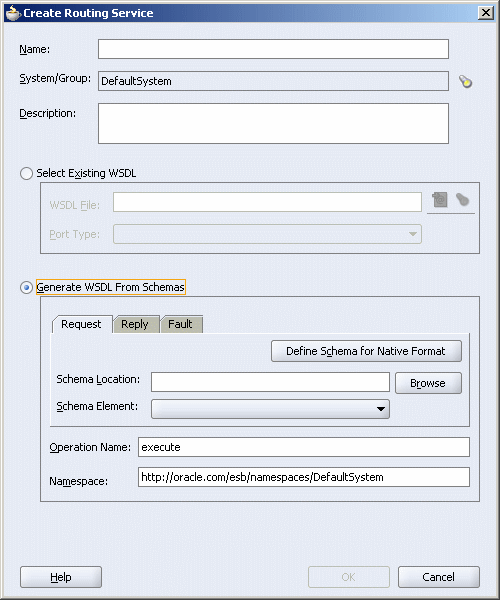
As Figure 5-2 indicates, there are two main ways you can create the routing service WSDL:
By specifying an existing WSDL file and one of the port types defined within that WSDL
This option enables you to use an existing WSDL file (on the local file system or at a Oracle JDeveloper connection) to define the routing service. Oracle JDeveloper parses the WSDL you specify to present the list of port types from which you make a selection.
If you want to edit an existing WSDL for the routing service, edit it using a WSDL editor (such as Oracle JDeveloper) prior to specifying it in this dialog box.
By generating the WSDL from a schema file (XSD)
This option enables you to use an existing XSD file or a file in a native file format (such as a comma-delimited value (CSV) file, a fixed-length file, a document type definition (DTD) file or a COBOL copybook file) to define the routing service.
You can specify the same or different schema files for the request, response, and fault message schemas, which Oracle JDeveloper converts into WSDL input, output, and fault elements in the WSDL. Minimally, you must specify the schema for the request message. You cannot specify a fault message schema, unless you also specify a response.
In addition, you specify the operation and namespace. Oracle JDeveloper converts the operation into a operation element in the WSDL file and the namespace you specify is defined as the tns namespace in the WSDL file.
The operation element describes how input to the operation is defined.
Note:
WSDLs with multiple faults are not supported.When you complete the Create Routing Service dialog box, an icon is added to the Design tab, as shown in Figure 5-1. The name of the routing service appears at the top of the icon, the name of the routing service operation appears below that. A yellow triangle with the question mark indicates that the routing rules for this routing service have not been specified yet. When you double-click the routing service icon, the routing service Property Sheet is displayed as shown in Figure 5-3.
You can modify the WSDL file for a service by adding or removing operations. Oracle JDeveloper provides a WSDL editor that can be used to modify the WSDL file. You can open the WSDL editor by double-clicking the WSDL file in Application Navigator. After modifying the file, you can use the Refresh Operation From WSDL icon shown in Figure 5-3 to synchronize the routing service with changes made to the WSDL.
Note:
it is not recommended that you make modifications to a WSDL file other than adding or deleting operations. For example, if you change the message schema type, then a transformation in a routing rule that is expecting the old schema will fail.When you click the Refresh Operation From WSDL icon, the Refresh WSDL dialog is displayed as shown in Figure 5-4.
Click the Find existing WSDLs icon to the right of WSDL File field to select the WSDL file. The Refresh WSDL dialog is updated as shown in Figure 5-5.
The CustIn_RS routing service shown in Figure 5-3 is updated as shown in Figure 5-6.
You can add and modify routing service properties by using the Properties panel of the routing service property sheet shown in Figure 5-6. For example, you can specify priority of a routing rule. The priority determines the order in which the message for a routing rule gets processed. You can access the priority property of a routing rule in following way:
OperationName.priority
For example: ReadCustomerData.priority
The priority value can range from 0 to 9. The message with priority 9 has a highest priority during dequeue. The default priority is set to 4.
Perform the following steps to specify properties of a routing service:
Click the + next to Properties to open the panel.
Click the large Green Plus Sign (+) in upper right.
A new line is added where you can specify property name and value.
Specify a property name in the Name column.
Specify value for the property in the Value field.
Save the changes.
Figure 5-7 shows how you can specify priority for a routing rules.
After you have created a routing service and at least one of the targets to which that routing service will send messages, you can specify the routing rules to that target or targets. You can specify routing rules using Oracle JDeveloper at design time or using the Oracle ESB Control at run time. The interface for specifying routing rules is similar in both interfaces; this section presents screen captures from Oracle JDeveloper.
You can access the page for specifying routing rules using Oracle JDeveloper by double-clicking the icon on the Design tab that corresponds to the routing service for which you want to specify routing rules. The property page has several sections, including one labeled Routing Rules, as shown in Figure 5-8.
Clicking the large green + icon to the far right of the routing service operation, shown in Figure 5-8, creates a routing rule and launches the service browser, allowing you to choose the target service and operation for this new rule. When you click the small + icon to the left of Routing Rules, fields such as shown in Figure 5-9 are presented.
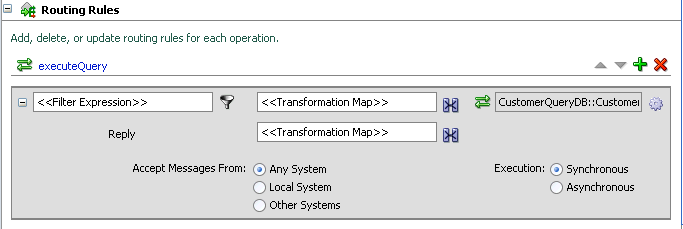
Note that the operation specified when the routing service was defined appears with a green arrow next to it. The green arrow indicates that only a request message schema was specified for the routing service. If request, reply, and fault message schemas were specified, three arrows would appear, such as shown in Figure 5-9. If a fault message schema is not specified, then the red arrow is not presented.
Figure 5-9 Routing Rules – Request/Reply/Response Schema
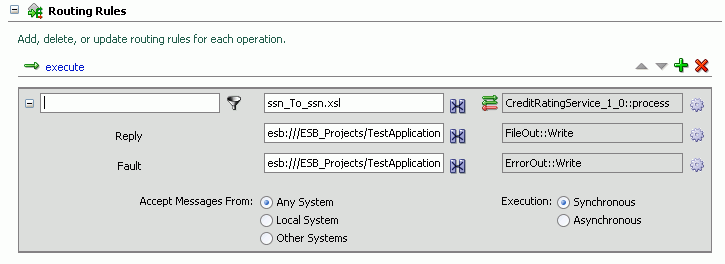
Figure 5-10 describes the icons on the Routing Rules panel.
Figure 5-10 Routing Rules Icons, Fields, and Options
The following sections provide an overview of the routing rules options.
Note:
You must specify the target service and operation for each routing rule before you can specify a transformation. Because the service browser is launched when a new rule is created, the only time you will see a rule without a target is when the target service is deleted.The service where message instances that the routing service receives will be sent. This is referred to as a target service
The operation that will be executed on the message instances received by the target service.
Later, if you specify a filter expression, you can prevent particular message instances from being sent to a given target service on the basis of each message instance's payload.
For each routing rule, you can specify only one target service and operation. Therefore, if you want to specify multiple target operations for a given target service, you must specify one routing rule for each target service operation.
For example, suppose you specify a database adapter service as a target service and you want the operation applied to a message instance to be one of the following, depending on the message payload:
Insert
Update
Delete
To do so, you create three routing rules, one for each operation. Later, when you specify a filter expression, you can specify which target service and operation is applied to each message instance on the basis of the message payload.
When you click the gear icon to the right of the target operation field (shown in Figure 5-9), the Browse Target Service Operation dialog box opens, such as shown in Figure 5-11.
After you have registered an ESB project, the services are listed under both Services in project and Services at an ESB Connection. When selecting a target service, you can navigate to the target service and operation at either of the locations as they are the same.
Services in project
This branch lists all the ESB systems and the target services and operations within each ESB system in the local Oracle JDeveloper project. In Figure 5-11, for example, you could select target services and operations from the ESB system named DefaultSystem.
Services at an ESB Server Connection
This branch lists all the ESB systems and the target services and operations within each ESB system defined at an ESB Server connection. See "Registering ESB Projects and Services with the ESB Server".
Figure 5-11 Browse Target Service Operation
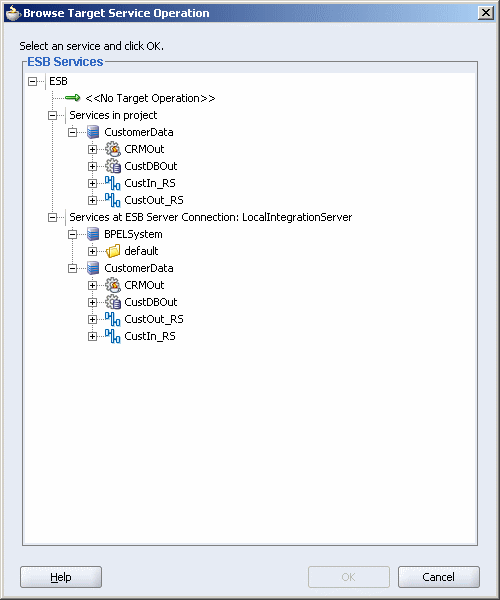
If, for example, you want to select a target service and operation in the local Oracle JDeveloper project, you expand the desired ESB system under Services in Project, expand the desired service, and then select the desired operation.
For step-by-step instructions on specifying the target service in the routing rules, see "Specifying Routing Rules".
The filter expression routing rule enables you to have the ESB Server filter messages based on their payload. If the expression filter for a given message instance evaluates to true, then the message is not delivered to the target service /operation pair specified within the routing rule.
Suppose, for example, that you want notices of new product launches from headquarters to be routed to three different stores: one in New York, one in Houston, and one in San Francisco. However, you only want notices regarding the product line of type MOBILE to be sent to the New York store.
To do so, you define a routing rule for each service/operation pair that sends messages to the target stores. In addition, for the routing rule (or rules) that send messages to the New York store, you specify a filter expression.
When you click the icon to the right of the filter expression field, shown in Figure 5-9, the Expression Builder window opens, as shown in Figure 5-12.
Figure 5-12 Expression Builder Window – Initial View
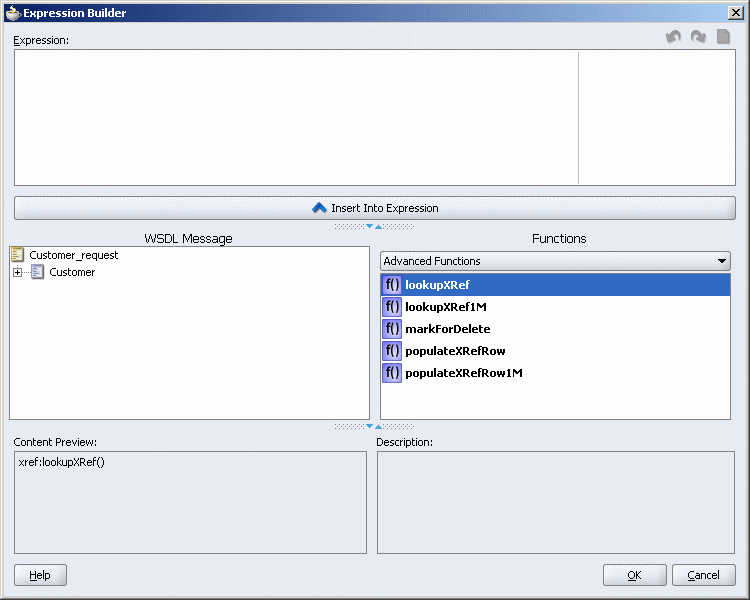
The Expression Builder Window contains the components and controls that assist you in designing a filter expression. Briefly, you double-click a value in the WSDL Message navigation tree or the Functions palette, to add the value to the Expression field. Using a combination of WSDL Message elements, functions, and manually entered text, you use this window to build an expression by which you want message payloads to be filtered for a given routing rule.
The following list describes each of the fields in the Expression Builder window:
Expression field
This field is where you enter the filter expression – either manually, or by using the WSDL Message navigation tree and the Functions palette.
The icons that appear to the upper right of this field enable you to validate the expression, undo the last edit made, redo the last edit made, or clear the entire Expression field, respectively.
WSDL Message Navigation Tree
This field contains the WSDL for the message defined for the routing service. When you select an element from the navigation tree, it is presented in the Content Preview field and described in the Description field. For example, Figure 5-19 shows how the Expression Builder window appears when you select an element and click Insert into Expression.
Functions Palette
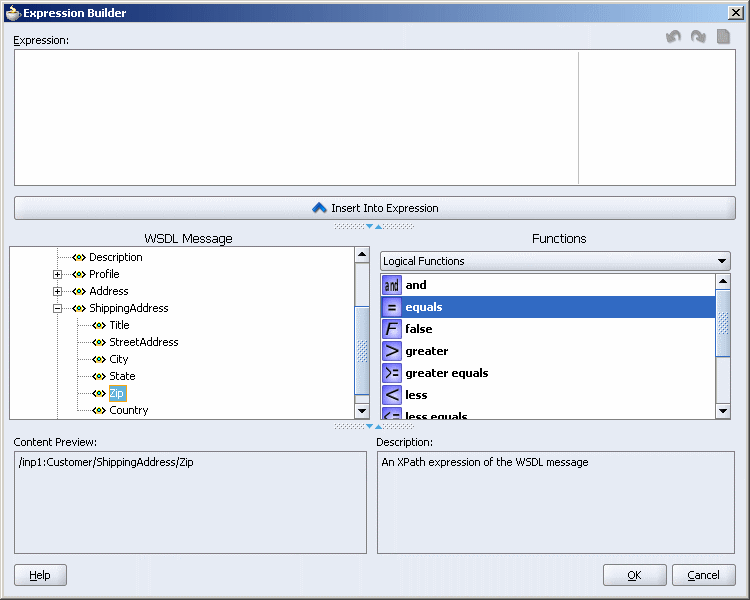
This list enables you to select different functions to include in an expression. When you select a function, a preview of how that function will appear when added to the Expression field is presented in the Content Preview field, and a description of the function is presented in the Description field, as shown in Figure 5-13.
Figure 5-13 Expression Builder Window – Function Preview and Description
Content Preview
This field indicates how a value selected from the WSDL Message or Functions palette will appear when it is inserted into the Expression field.
Description
This field provides a description of a value selected from the WSDL Message or Functions palette.
See "Using An Expression for Filtering Messages Based on Payload" for step-by-step instructions on building a filter expression.
A transformation map enables you to transform data from one XML schema to another, enabling data interchange among applications using different schemas.
For example, suppose an inbound adapter service picks up a comma-delimited file from a file system. A routing service receives that message and, using a transformation, changes the file structure to the table structure as required by an outbound database adapter service.
When you click the transformation map icon to the right of the Transformation Map field in the routing rules panel of the routing service properties page, the Request Transformation Map dialog displays. In that dialog, you can select an existing mapper file (xsl) or create a new xsl file with the Data Mapper tool to perform the required transformation. For information about the Data Mapper tool, see Chapter 6, "XSLT Data Mapper and Transformations".
You can specify the ESB systems from which the target service will accept messages. The options are any system, the local system only, or systems other than the one in which the target service is defined. See "Specifying the ESB Systems From which Messages are Accepted".
You can choose to execute the message instance synchronously or asynchronously in the routing rules. Synchronous messaging provides an immediate response. Asynchronous messaging is useful for environments in which a service can take a long time to process a client request. Asynchronous services also provide a more reliable fault-tolerant and scalable architecture than synchronous services. See "Specifying Synchronous or Asynchronous Execution".
You can choose the priority of the routing rules of a routing service by ordering the rule in the ascending and descending order. The priority determines the order in which the rules are applied during message processing. See "Specifying Routing Rules Priority".
You create routing services using Oracle JDeveloper, but you can create and modify routing rules using Oracle JDeveloper or the Oracle ESB Control.
This section contains the following topics:
To create a routing service, you complete the Create Routing Service dialog box available in Oracle JDeveloper. You can access this dialog box using either of the following two methods:
Schematically, using the Design tab, by following these steps
In the Applications navigator, navigate to the ESB project for which you want to create a routing service, expand the Resources folder and double click project-name.esb, where project-name is the name of the project to which you want to add the routing service.
The Design tab for the project is displayed.
In the Component Palette, click the down arrow and select ESB services if they are not already selected.
Drag and drop Routing Service into the Design tab.
The Create Routing Services dialog box opens.
Using dialog boxes only, by following these steps:
To create the routing service using dialog boxes only, follow these steps:
In the Applications navigator, right-click the ESB project for which you want to create a routing service, and then click New.
The New Gallery dialog box opens.
In the Categories panel, expand Business Tier, and then click Web Services.
In the Items panel, click ESB Routing Service, and then click OK.
The Create Routing Service dialog box opens.
The Create Routing Service dialog box provides three methods for specifying the WSDL for the routing service, as described in the following sections. Each of these sections provides step-by-step instructions on completing the Create Routing Service dialog box for the method you want to use:
Generating the WSDL for a Routing Service from an Existing XSD File
Generating the WSDL to Create a Routing Service Based on a Sample File
Use this method to provide an existing WSDL for the routing service. After you specify the file, Oracle JDeveloper parses it to determine the defined schema elements and presents them in a drop-down list from which you can make a selection.
If you have not already done so, open the Routing Service dialog box, as described in "Creating and Modifying Routing Services".
In the Name field, enter a name for the routing service.
The name must be unique within the scope of the project in which the routing service is being created. Spaces are not allowed.
For the System/Group field, click Browse to open the ESB Service Group Browser dialog box, select the system (and service group, if desired) to which you want to add the routing service, and then click OK.
To create a new system or service group to contain the routing service you are creating, click Create New at the top of the ESB Service Group Browser dialog box. See "Creating ESB Systems and Service Groups" for information about creating a new ESB system or service group.
In the Description field, enter a description for the routing service, if desired. This field is optional.
Choose Generate WSDL from Schemas.
This option includes the Request, Reply, and Fault tabs.
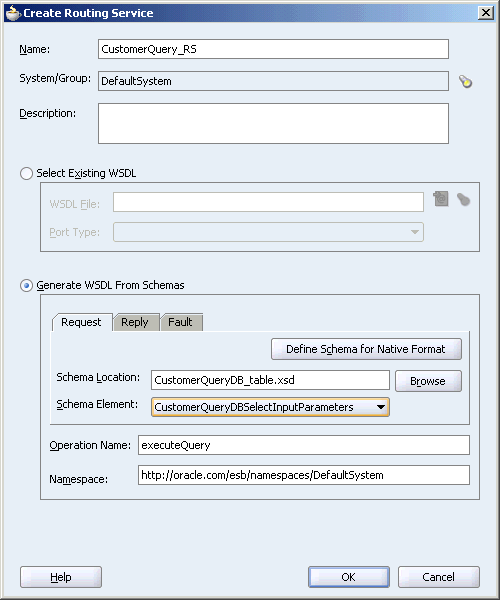
On the Request tab, click Browse to access the Schema Location.
The Type Chooser dialog box, shown in Figure 5-14, opens and presents the schema files (XSD files) from which you can choose to generate the WSDL. Expand the trees under Project Schema Files, Project WSDL Files, and ESB to locate the schema. Navigate to the root element of the XSD file for the message instance that you want this routing service to process. Select the element and click OK.
Note:
If you want to use a schema XSD file that resides on your local file system, ensure that the XSD file, and any XSD files that it imports, all reside in the JDeveloper project directory.You can import a schema XSD file or WSDL file into a project by clicking on the Import Schema File or Import WSDL icon that appears at the top right of the Type Chooser dialog box. For information about importing schemas into an ESB project, see "Importing Files into a Project".
In the Request tab Schema Element field, select the root element for the message that you want this routing service to process if not already selected.
On the Reply tab, repeat the steps for the Request tab if entering any information.
On the Fault tab, repeat the steps for the Request tab if entering any information.
In the Operation Name field, enter the operation name. Spaces are not allowed.
For example: executeQuery
In the Namespace field, enter a namespace or accept the current value.
For example: http://oracle.com/esb/namespaces/DefaultSystem
Click OK.
Figure 5-15 Create Routing Service - Request Tab
The routing service is created and an icon is added to the Design tab of the ESB project.
Oracle JDeveloper provides a wizard that assists you in creating the XSD representation of various file formats (such as CSV file, fixed-length file, DTD, and Cobol copybooks) based on a sample file and details that you provide about the file's structure. You can then direct Oracle JDeveloper to generate the WSDL for the routing service from that XSD file.
To use this method, follow these steps in the Create Routing Service dialog box:
If you have not already done so, open the Routing Service dialog box, as described in "Creating and Modifying Routing Services".
In the Service Name field, enter a name for the routing service.
The name must be unique within the scope of the project in which the routing service is being created. Spaces are not allowed.
For the System/Group field, click Browse to open the ESB Service Group Browser dialog box, select the system (and service group, if desired) to which you want to add the routing service, and then click OK.
Click Help for assistance in using the ESB Service Group Browser dialog box.
In the Description field, enter a description for the routing service, if desired. This field is optional.
Choose Generate WSDL from Schema.
This option includes the Request, Reply, and Fault tabs.
On the Request tab, click Define Schema for Native Format.
The Native Format File Builder wizard opens.
Follow the steps through the wizard.
If you need assistance on a wizard page, click Help.
In the Schema Element field on the Request tab, select the root element for the message that you want this routing service to process.
Reply tab
Fault tab
Operation Name
Spaces are not allowed in the operation name.
Namespace
Click OK.
The routing service is created and an icon is added to the Design tab of the ESB project.
If you use this method to provide the WSDL for the routing service, the existing WSDL must exist on the local file system. After you specify the file, Oracle JDeveloper parses it to determine the defined port types and presents them in a drop-down list from which you can make a selection.
To use this method, follow these steps in the Create Routing Service dialog box:
If you have not already done so, open the Routing Service dialog box, as described in "Creating and Modifying Routing Services".
In the Service Name field, enter a name for the routing service.
The name must be unique within the scope of the project in which the routing service is being created. Spaces are not allowed.
For the System/Group field, click Browse to open the ESB Service Group Browser dialog box, select the system (and service group, if desired) to which you want to add the routing service, and then click OK.
Click Help for assistance in using the ESB Service Group Browser dialog box.
In the Description field, enter a description for the routing service, if desired. This field is optional.
Choose Select Existing WSDL.
To the right of the WSDL Location field, click the icon.
The Open dialog box opens.
In the Open dialog box, navigate to the existing WSDL file, and then click OK. (If you need assistance with this dialog box, click Help.)
In the Port Type field, click the down arrow, and then select the port type for the routing service.
Click OK.
After you complete the process for creating a routing service, an icon for the service appears in the Design tab of the project. For an example, see Figure 5-1. In the Applications Navigator, files with esbsvc and wsdl extensions are created in the Resources folder of the project. The esbsvc file provides the definition of the ESB service. The WSDL file defines the input and output messages for this instance flow, the supported client interface and operations, and other features.
After you define a routing service, by specifying its WSDL, you can specify the rules that determine how a message processed by the routing service gets to its next destination. Routing rules can be defined using a property sheet in Oracle JDeveloper or a property sheet in the Oracle ESB Control.
To access the Routing Rules property sheet inOracle JDeveloper, use either of the following two methods. For information about accessing the Routing Rules property sheet in the Oracle ESB Control, see "Viewing Routing Rules".
From the Applications Navigator:
In the Applications Navigator, expand the ESB project, followed by the Resources folder.
In the Resources folder, double click the name of the routing service for which you want to specify routing rules.
Click the plus symbol (+) to expand the Routing Rules information.
From the Design tab:
Double-click the icon that represents the routing service for which you want to specify routing rules.
Click the plus symbol (+) to expand the Routing Rules information.
The Routing Rules property sheet is displayed, as shown in Figure 5-8.
The icons on the Routing Rules property sheet are summarized in Figure 5-16.
Figure 5-16 Routing Rule Property Sheet Icons
The following sections describe each of the available routing rules and how to specify them:
The target operation is the only routing rule you must specify to make use of a routing service. This routing rule tells the routing service the next service, known as the target service, to which the message should be sent and the operation to perform on that message when it reaches the target service.
You can specify multiple target service and target operation pairs for each routing service. In addition, for request/reply message flows, you can forward the reply message to another target, and specify a target service in the event that a message fault occurs. Note that a fault is simply a special reply that can be directed to the requester.
You can specify the following target operations for routing rules:
Specifying the Target Operation for a One-Way Configuration
Specifying the Target Operation to Return a Reply to the Source Service
Specifying the Target Operation to Forward a Reply to a Non-Source Service
Specifying the Target Operation for a Faulted Message
Note:
WSDLs with multiple faults are not supported.Follow these steps to specify a target service and operation:
If you have not already done so, expand the Routing Rules information, as described in "Specifying Routing Rules".
Click the large green plus (+) button.
The Browse Target Service Operation dialog box opens. For information about the target service and operation, see "Target Service and Operation Overview".
In the Browse Target Service Operation dialog, follow these steps:
Navigate to, and then expand the desired target service.
Select the target service operation in the Browse Target Service Operation dialog. See Figure 5-11.
Click OK.
The Routing Rules panel is updated to reflect the newly added target service and operation, with the value expressed as target_service.target_operation, as shown in Figure 5-17. Depending on the target selected, the rule includes a combination of Request, Reply, or Fault fields.
Repeat steps two and three if you want to add an additional target service and target operation pair. You can specify the same target service and a different operation, if desired.
Note:
To modify the target service and target service operation, click the Browse for Target Service Operation icon, as shown in Figure 5-16.Figure 5-17 Routing Rules for Request/Reply with Target Service Specified
Oracle JDeveloper provides an XSLT Data Mapper tool that enables you to specify an xsl file to transform data from one XML schema to another. This enables data interchange among applications using different schemas. For example, you can map incoming source purchase order schema to an outgoing invoice schema. After you define an xsl file, you can reuse it in multiple routing rule specifications.
You can specify an expression to filter messages based on their payload. You can, for example, route messages for a customer record to different offices, based on that customer's postal code.
To specify a filtering expression, follow these steps:
If you have not already done so, expand the Routing Rules information, as described in "Specifying Routing Rules".
Click the Add Filter Expression icon, as shown in Figure 5-16.
The Expression Builder opens.
Specify the filter expression, and then click OK.
Information about using the Expression Builder is described in the text following these steps.
When the Expression Builder opens, it appears similar to Figure 5-13. Notice that Oracle JDeveloper parses the routing service WSDL and presents the message definition in the WSDL Message box.
You build the expression for filtering as follows:
In the WSDL Message box, expand the message definition and select the message element on which you want to base the expression.
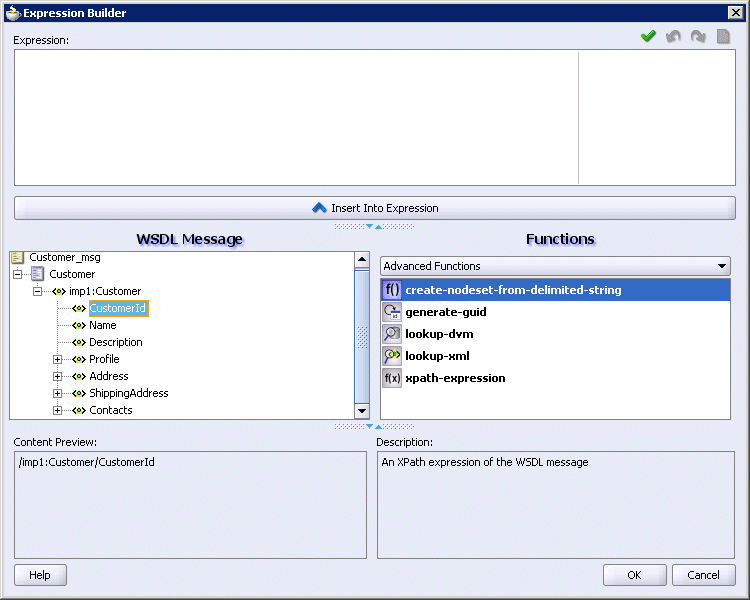
Notice that the Content Preview box indicates the XPath expression for the selected WSDL message element, an example of which is shown in Figure 5-18.
Figure 5-18 Sample Expression Builder Tool – WSDL Message Element Selected
Click Insert Into Expression.
The expression is presented in the Expression box, as shown in Figure 5-19.
Figure 5-19 Sample Expression Builder Tool – WSDL Message Element Inserted
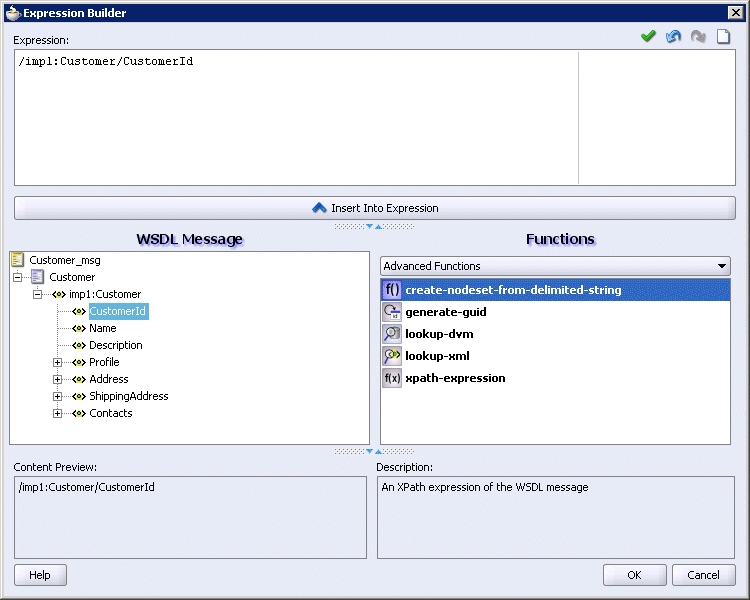
From the Function box, select the function that you want to apply to the WSDL Message payload.
Functions are listed within categories that are listed when you click the down arrow within the Functions box. For example, if you click the down arrow and select Logical Functions, the list appears as shown in Figure 5-20. Notice that if you select a function within the Logical Functions list, a description of that function is presented in the Explanation box.
Figure 5-20 Sample Expression Builder Tool – Function Selected
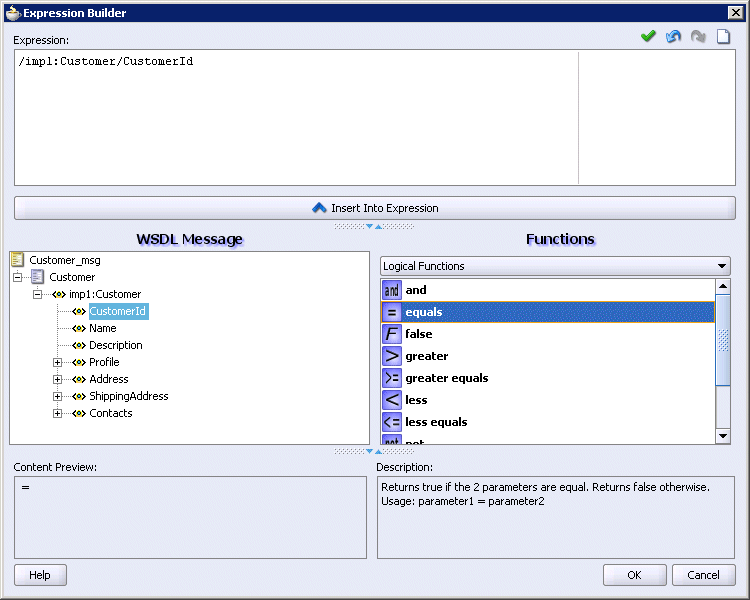
Click Insert Into Expression.
The XPath expression for the selected function is inserted in to the Expression box. Notice that because the expression requires editing by hand to complete the expression, a red squiggle appears at the end of the line, as shown in Figure 5-21.
Figure 5-21 Sample Expression Builder Tool – Function Inserted
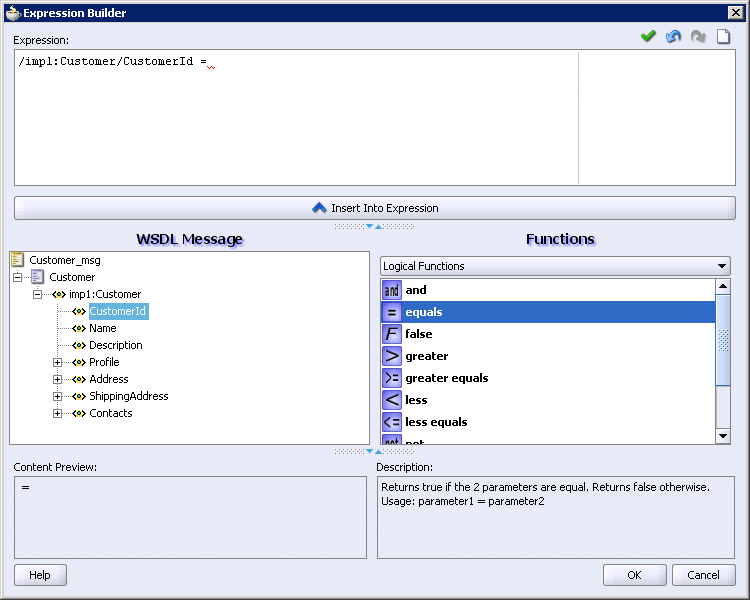
Complete the expression. In this example, a value of 5 is entered, as shown in Figure 5-22.
Figure 5-22 Sample Expression Builder Tool – Value Entered
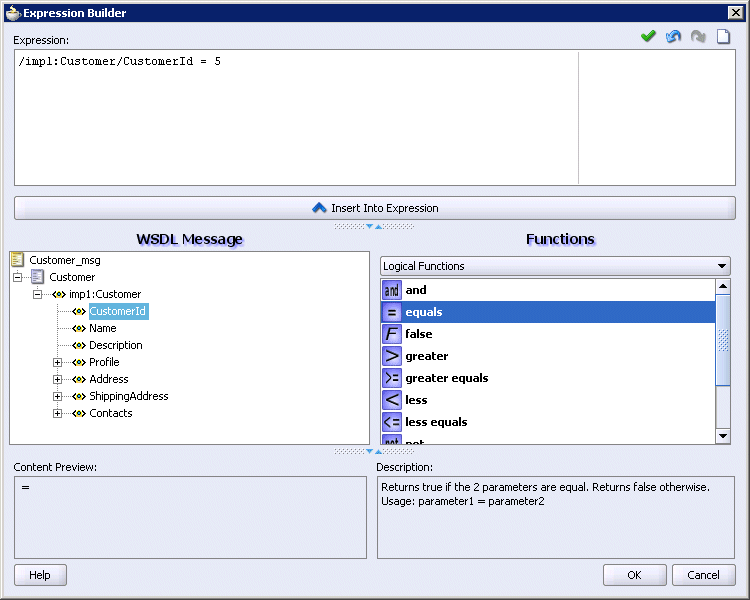
Validate the expression by clicking the green check mark.
If the expression is invalid or you need to make a change, you can edit the expression manually, or use the expression editing icons, which are summarized in Figure 5-23.
Click OK.
The expression is added to the Routing Rule property sheet.
Note that in addition to the XPath expression generated by the Expression Builder, namespace definitions are automatically provided by Oracle Enterprise Service Bus to create an extended syntax. If you place the cursor on a non-empty filter icon of a routing service in the Design tab, the extended syntax displays.
To modify or delete a filter expression, double-click the Add Filter Expression icon, and then modify or delete the expression in the Expression panel of the Expression Builder.
You can also use user-defined extension functions in the Expression builder dialog box. Perform the following steps to use a user-defined extension function:
Write a function that implements the javax.xml.xpath.XPathFunction interface. A sample function is shown in the following example:
public class ExtnFunc implements XPathFunction
{
           public Object evaluate(List args) throws XPathFunctionException
          {
              return "helloworld";
          }
}
Modify the extn_xpath_functions_config.xml file in the ORACLE_HOME/integration/esb/config folder to add the user-defined extension function details.
A sample extn_xpath_functions_config.xml is shown in the following example.
<?xml version="1.0" encoding="UTF-8"?>
<!-- ===================================================================== -->
<!--  XPath extension functions available to ESB 10.1.3 -->
<!-- ===================================================================== -->
<esb-xpath-functions xmlns="http://xmlns.oracle.com/soa/config/esb" version="10.1.3.1">
  <!-- function id="function id which will be used in xpath" arity="1">
        <classname>your class name including package</classname>
          <namespace-uri>
             your namespace
          </namespace-uri>
  </function -->
</esb-xpath-functions>
You can use the user-defined extension function to build an expression in the Expression builder dialog box in following way:
NamespaceName:ExtensionFunctionName
The NameSpace refers to the namespace defined in the extn_xpath_functions_config.xml file. The ExtensionFunctionName refers to the extension function. For example,
{ns1:MyExtensionFunction= 'US'};
To indicate the ESB systems from which the routing service will accept messages, follow these steps:
If you have not already done so, open the Routing Rules properties, as described in "Specifying Routing Rules".
Choose one of the following options:
Any System
Choose this option to specify that the routing service accept messages that originate from any ESB system, including the one in which the routing service was created.
Same System
Choose this option to specify that the routing service accept messages that originate only from the same ESB system as the one in which the routing service was created.
Other Systems
Choose this option to specify that the routing service accept messages that originate only from ESB systems other than the one in which the routing service was created.
Synchronous execution provides an immediate response to a request; asynchronous does not. Asynchronous execution is useful for environments in which a service can take a long time to process a request. Asynchronous services also provide a more reliable fault-tolerant and scalable architecture than synchronous services.
To indicate whether the routing service invokes the target service as synchronous or asynchronous execution, follow these steps:
If you have not already done so, open the Routing Rules properties, as described in "Specifying Routing Rules".
Click the plus (+) button to expand the routing rules information.
The Execution options display on the right side of the property sheet.
Specify Synchronous or Asynchronous execution with the appropriate button. For an illustration of the property sheet, see Figure 5-17.
You can choose the priority of multiple routing rules of a routing service by placing the rules in ascending order, with the top rules having the highest priority.
After you have selected a rule by clicking on the + on the left of the rule, you can click the up or down triangles in the upper right of the routing rules panel to move the selected rule to order of the correct priority. For an illustration of the property sheet, see Figure 5-17.
Oracle Enterprise Service Bus provides limited support for header-based transformation and filtering (routing).
This section includes the following topics:
In ESB, the headers are referred to as follows:
A request header goes to a service and leaves as an outbound header.
Filtering and transformation can be used with the request header. If a transformation is not specified, the header is copied as-is (pass-through).
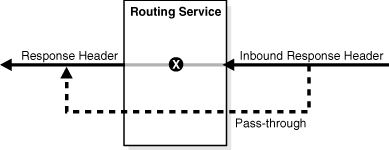
An inbound response header goes to an outbound routing service and leaves as a response header.
Transformation can be used with the response header. If a transformation is not specified, the header is copied as-is (pass-through).
Figure 5-25 Response and Inbound Response Headers
For information about the adapter inbound and outbound header WSDL files, see Oracle Application Server Adapter for Files, FTP, Databases, and Enterprise Messaging User's Guide.
ESB header-based transformation is supported with XSLT extension functions for:
Reading request headers:
String getRequestHeader(String xpathExpression, String namespaceDecl)Writing outbound headers:
void setOutboundHeader(String xpathExpression, String value, String namespaceDecl)Reading inbound response headers to a routing service:
String getInboundResponseHeader(String xpathExpression, String namespaceDecl)Writing response headers:
void setResponseHeader(String xpathExpression, String value, String namespaceDecl)The following applies to the syntax of the XSLT function declarations:
xpathExpression - the XPath expression to get or set in the header
value - the value to be set for the xpathExpression
namespaceDecl - namespace declarations in the form 'prefix=namespace;'
Note the semi-colon (;) at the end of the namespace declaration.
The namespace for the XSLT extension functions is: http://www.oracle.com/XSL/Transform/java/oracle.tip.esb.server.headers.ESBHeaderFunctions
To set up a header-based transformation, follow these steps:
Create a data transformation with the XSLT Data Mapper tool if one does not already exist.
Right click <target> in the data map, then select Add Variable from the menu to display the Create Variable dialog, shown in Figure 5-26.
In the Create Variable dialog, complete the fields for each variable as follows:
Local Name:
Enter a name for the variable
XPath Expression:
Enter the expression using one of the header transformation functions.
To display the header-based transformation functions, you can enter ehdr: and then Ctrl+Spacebar in the field. Double-click the function that you want to add to the expression, then add the required parameters to complete the function.
When you are entering the XPath expression for an adapter, you need to check the source of the adapter header schema definition for values of the parameters, shown in Example 5-1. Oracle JCA adapter headers are defined in a separate WSDL file. For information about the adapter inbound and outbound header WSDL files, see Oracle Application Server Adapter for Files, FTP, Databases, and Enterprise Messaging User's Guide.
Figure 5-26 Create Variable Dialog With a Header Transformation Function
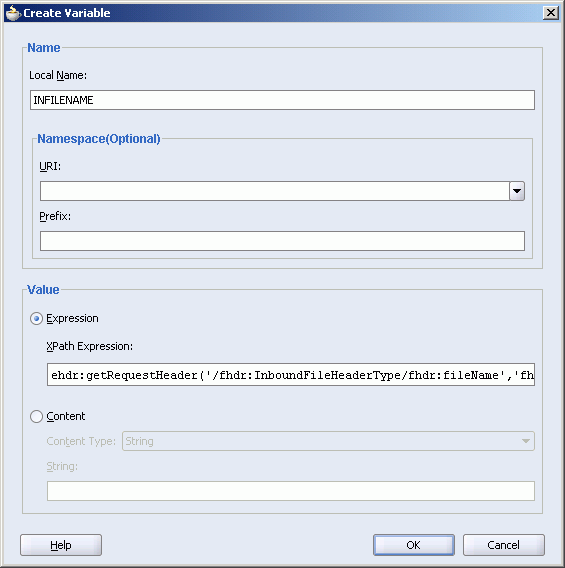
Example 5-1 is an example of a an adapter schema file.
Example 5-1 Sample fileAdapterInboundHeader.wsdl
<definitions
     name="fileAdapter"
     targetNamespace="http://xmlns.oracle.com/pcbpel/adapter/file/"
     xmlns:tns="http://xmlns.oracle.com/pcbpel/adapter/file/"
     xmlns="http://schemas.xmlsoap.org/wsdl/" >

    <types>
        <schema attributeFormDefault="qualified" elementFormDefault="qualified"
                targetNamespace="http://xmlns.oracle.com/pcbpel/adapter/file/"
                xmlns="http://www.w3.org/2001/XMLSchema"
                xmlns:FILEAPP="http://xmlns.oracle.com/pcbpel/adapter/file/">
          <element name="InboundFileHeaderType">
                <complexType>
                    <sequence>
                        <element name="fileName" type="string"/>
                        <element name="directory" type="string"/>
                    </sequence>
                </complexType>
            </element>
        </schema>
    </types>

    <!-- Header Message -->
    <message name="InboundHeader_msg">
      <part element="tns:InboundFileHeaderType" name="inboundHeader"/>
   </message>

</definitions>
For Example 5-1, the corresponding getRequestHeader call in the Xpath expression would be in the following form:
ehdr:getRequestHeader('/fhdr:InboundFileHeaderType/fhdr:fileName',
                      'fhdr=http://xmlns.oracle.com/pcbpel/adapter/file/;')
If you are writing the fileName to an outbound file adapter, you could use the following in the XPath expression when creating a variable, where INFILENAME is the variable name corresponding to getRequestHeader call:
ehdr:setOutboundHeader('/fhdr:OutboundFileHeaderType/fhdr:fileName', $INFILENAME,
'fhdr=http://xmlns.oracle.com/pcbpel/adapter/file/;')
Note:
When using the set header functions, you must set values in the order that is expected by the target service. This means that in Example 5-1, you would need to first set thefileName before setting the directory element.You can route a message based on the message headers using filtering. ESB header-based filtering is supported for request and inbound response headers with XPath extension functions:
Reading request headers:
String getRequestHeader(String xpathExpression)Reading inbound response headers to a routing service:
String getInboundResponseHeader(String xpathExpression)The following applies to the syntax of the XPath function declarations:
xpathExpression - the XPath expression to get in the header
The syntax of the filter expression in Expression Builder is:
{filterExpression};{namespaceDeclaration}
The namespace for the XSLT extension functions is: http://www.oracle.com/XSL/Transform/java/oracle.tip.esb.server.headers.ESBHeaderFunctions
To set up a header-based filtering (routing), follow these steps:
Launch the Expression Builder tool from the routing service.
Select Header Functions under Functions to display the XPath extension functions.
Select the function you want and click Insert Into Expression.
Check the source of the adapter schema file for values of the parameters, then edit the function to the correct syntax. For information about the adapter inbound and outbound header WSDL files, see Oracle Application Server Adapter for Files, FTP, Databases, and Enterprise Messaging User's Guide.
When creating the expression, it might be easier to edit the expression in a text editor and paste the completed expression into Expression Builder.
Figure 5-27 Expression Builder With a Header Transformation Function
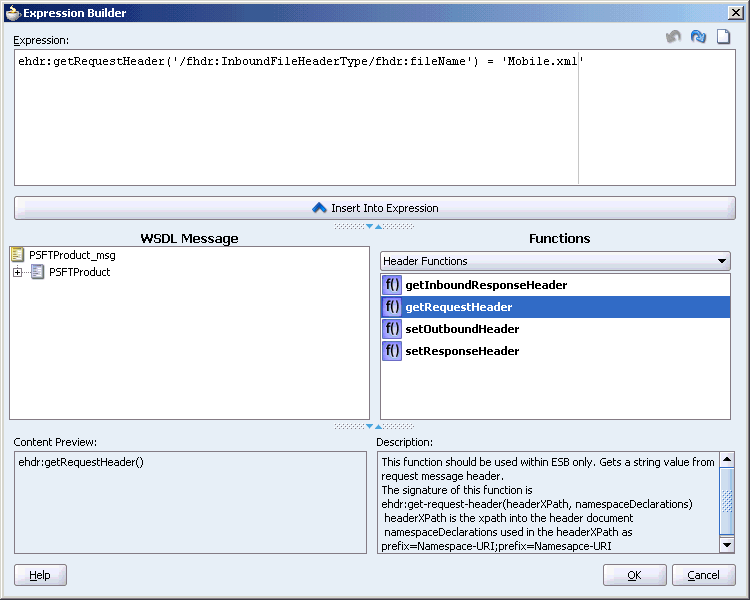
For example, if you want to check if the fileName is payload.xml, then you use the following in Expression Builder after checking the values in fileAdapterInboundHeader.wsdl file shown in Example 5-1.
{ehdr:getRequestHeader('/fhdr:InboundFileHeaderType/fhdr:fileName') = 'payload.xml'};
                { namespace fhdr=http://xmlns.oracle.com/pcbpel/adapter/file/ namespace ehdr=http://www.oracle.com/XSL/Transform/java/oracle.tip.esb.server.headers.ESBHeaderFunctions
                }
See Also:
The samples for the Header-Based Filtering are available on the Oracle Enterprise Service Bus page on the Oracle Technology Network site (http://www.oracle.com/technology/products/integration/esb/index.html).These are the limitations when using ESB header transformation and routing:
The setXHeader functions only support the following types of Xpath expressions:
Absolute path, such as /Customer/Address/Zip.
Indexed, such as /Customer/Address[2]/Zip. If Address[1] is not already created in the target document, it is created.
Multiple headers are not supported.
When using SOAP with headers, SOAP Header elements are set as header. Xpath expressions must start with the Header element, such as /env:Header/Message/Priority.
There is limited GUI tools support.
Does not support setting attributes.
To edit an existing routing service, perform the following steps:
Double click the routing service in the Application Navigator or in the Design tab.
Make your changes to the routing service information. Note that the name of the service cannot be changed.
Save your changes.
To delete a routing service, perform the following steps:
Select the routing service icon in the Design tab.
Click the large red X at the top of Design tab to delete the selected routing service.
Confirm that you want to delete the selected service.
Save your changes.
Note:
Do not delete routing services in the Application Navigator.