| Oracle® Web Services Manager Administrator's Guide 10g (10.1.3.3.0) Part Number E10299-01 |
|
|
View PDF |
| Oracle® Web Services Manager Administrator's Guide 10g (10.1.3.3.0) Part Number E10299-01 |
|
|
View PDF |
This chapter describes the process for creating and editing the policies that enforce security on policy enforcement points, and for attaching those policies to Web services that are registered with the Oracle WSM Gateways and Oracle WSM Agents. This chapter includes the following sections:
Oracle WSM policies are sets of operational tasks that are performed at specified policy enforcement points during the processing of Web service requests between a service client and service provider. Each operational task is implemented as a policy step that addresses a specific operation, such as authentication and authorization, encryption and decryption, security signature, token, or credential verification, and transformation, that is performed on either a Web service request or a response to a Web service request.
Oracle WSM separates each operational policy into a request pipeline and a response pipeline.
A Request Pipeline – A set of policy steps that is executed during the processing of a Web service request.
A Response Pipeline – A set of policy steps that is executed during the processing of a response to a Web service request.
Note:
The PreRequest and PostResponse pipelines are disabled and will be discarded in future releases of Oracle WSM.As the administrator, you can assemble policies from the prepackaged policy steps that come with Oracle WSM, or create custom policy steps.You can assign these created policies to the desired Oracle WSM policy enforcement points—either an Oracle WSM gateway or agent. The Oracle WSM Policy Manager lets you enforce policies in a consistent manner across multiple gateways or agents, throughout the system. You can specify operational policies as needed for each Web service or group of services.
Oracle WSM comes with a predefined set of configurable policy steps to use in creating your pipelines. This section describes the predefined Oracle WSM policy steps, organized by their intended use. It includes steps for integrating third-party products and technologies, where appropriate.
The predefined policy steps fall into the following general categories:
Credential Management
Authentication
Authorization
Integrity and Confidentiality
Federation
Log messages
Custom fault messages
Message transformation using XSLT
Refer to Appendix A, "Oracle Web Services Manager Policy Steps" for more information on each of the policy steps.
Supported SOAP Versions
Oracle Web Services Manager supports SOAP version 1.1 only.
You can view the available policy steps and their properties for the different policy enforcement points.
To view the available policy steps
From the navigation pane of Web Services Manager Control, select Policy Management, then select Manage Policies.
A list of registered Oracle WSM gateways and agents is displayed.
In the row for a particular gateway or agent, click Steps.
Oracle WSM displays a list of policy steps for the gateway or agent and a brief description of what the step does.
To view the properties for a particular policy step, click Details.
The name, data type, and default values for the properties for the step are displayed. Click the question mark (?) for help on how to configure the properties.
Message credentials, in this case user name and password combinations, are delivered in various ways; through the HTTP transport headers, SOAP headers, or in the XML body. The first step in building a policy that enforces Web service security, is usually to include the Extract Credentials Step. This step is configured to extract the message credentials that are being delivered through different methods: the HTTP transport headers, SOAP headers, or through XML. Oracle WSM then extracts the user name and password credentials to be used in the next step, which is usually authentication.
Note:
When you deploy Oracle Access Manager in conjunction with Oracle WSM, do not use the Extract Credentials step in Oracle WSM request pipelines. This is because Oracle Access Manager sends user credentials to the managed Web service by means of an obSSOCookie when the user logs in. Therefore, Oracle WSM must not duplicate this action.The steps in Table 5-1 are used to locate the credentials, and extract, add, or manipulate the credential information so that it is presented in an acceptable form for a common means of authentication.
Table 5-1 Credential Management Steps
| Step Name | Description |
|---|---|
|
Extract Credentials |
Extracts credentials from HTTP transport layer headers, SOAP headers, or XPath. |
|
Insert Oracle Access Manager Token |
Inserts an ObSSOCookie in the SOAP security header. |
|
Insert WSBASIC Credentials |
Inserts WS-BASIC credentials. |
Refer to Appendix A, "Oracle Web Services Manager Policy Steps" for more information on each of the policy steps.
Authentication is used to establish proof of identity. A user's credentials, usually a user name and password combination, are checked against a database or LDAP directory, before granting or denying access. In Oracle WSM, you can check credential information against Oracle WSM's native authentication store, Oracle Access Manager, or against a third-party security database such as CA or an LDAP directory. Authentication may also be presented and verified in the form of an X.509 certificate.
Table 5-2 Authentication Steps
| Step Name | Description |
|---|---|
|
Active Directory Authenticate |
Authenticates client's credentials with Active Directory. |
|
File Authenticate |
Verifies the sender's identity by checking against entries in a file. |
|
LDAP Authenticate |
Performs authentication with an LDAP directory. |
|
Oracle Access Manager Authenticate Authorize |
Authenticates and authorizes requests against an installed Oracle Access Manager Identity System. (See Oracle Web Services Manager Deployment Guide for configuration details.) |
|
SiteMinder Authentication |
For use with CA eTrust SiteMinder authentication system. |
|
Verify Certificate |
Verifies if a certificate path is valid by validating the trusted root and intermediate certificates. |
Note:
The LDAP Certificate Authenticate policy step is no longer supported. However, similar functionality can be achieved by using the Oracle Access Manager Authenticate Authorize policy step.Refer to Appendix A, "Oracle Web Services Manager Policy Steps" for more information on each of the policy steps.
Note:
To use the SiteMinder Authentication step, you must install the CA eTrust SiteMinder SDK (software development kit) and have the files required by the Oracle WSM gateway or agent. See Oracle Web Services Manager Deployment Guide for more information.Authorization steps ensure that once a client's principal identity is established, the client has permission to access resources. Authorization may also be described as verification of a role. Oracle WSM steps support authorization through a variety of authorization services: LDAP, Oracle Access Manager, CA eTrust SiteMinder, and file-based authorization.
Table 5-3 Authorization Steps
| Step Name | Description |
|---|---|
|
Active Directory Authorize |
Authorizes the request by retrieving the client's role from Active Directory and checking against the roles allowed by the service. |
|
File Authorize |
Grants or denies access to an authenticated client using a local roles file. |
|
Oracle Access Manager Authenticate Authorize |
Authenticates and authorizes requests against an installed Oracle Access Manager Identity System. (See Oracle Web Services Manager Deployment Guide for configuration details.) |
|
LDAP Authorize |
Authorizes the request by retrieving the client's role from the LDAP store and checking against roles allowed by the service. |
|
SiteMinder Authorize |
Authorizes clients using CA eTrust SiteMinder. This step is used after the SiteMinder Authentication step. |
Refer to Appendix A, "Oracle Web Services Manager Policy Steps" for more information on each of the policy steps.
Note:
To use the SiteMinder Authorize step, you must install the CA eTrust SiteMinder SDK and have the files required by the corresponding Oracle WSM gateway or agent. See the Oracle Web Services Manager Deployment Guide for more information.Oracle WSM enables message confidentiality through message encryption and message integrity through digital signatures. The Web Services Security (WS-Security) specification provides a standard set of SOAP extensions that can be used when building secure Web services. Web Services Security specifications protect message content by encrypting or digitally signing the message body, a header, an attachment, or any number of these elements in any combination. Security tokens can also be created and inserted to verify authentication.
The following code sample shows the typical structure of a signature included in the Security header in conformance with the WS-Security 1.0 standards. In this example, the body element of the SOAP message is signed. The elements that are particularly significant are indicated in bold.
<soap:Envelope ...>
  <soap:Header>
   <wsse:Security ...>
     <wsse:BinarySecurityToken wsu:Id="bst-id" ValueType="...#X509v3" ...>MIICtjCCAnQCBET...
     </wsse:BinarySecurityToken>
     <dsig:Signature ...>
       <dsig:SignedInfo>
         <dsig:CanonicalizationMethod ... />
            <dsig:SignatureMethod ... />
              <dsig:Reference URI="#body-id">
               <dsig:Transforms>
                 <dsig:Transform Algorithm="...xml-exc-c14n#" />
               </dsig:Transforms>
               <dsig:DigestMethod Algorithm="...#sha1" />
               <dsig:DigestValue>205Oyy...=</dsig:DigestValue>
              </dsig:Reference>
       </dsig:SignedInfo>
       <dsig:SignatureValue>Y8yo94k8Xp...</dsig:SignatureValue>
       <dsig:KeyInfo>
         <wsse:SecurityTokenReference ...>
        <wsse:Reference URI="#bst-id" />
         </wsse:SecurityTokenReference>
       </dsig:KeyInfo>
     </dsig:Signature>
   </wsse:Security>
  </soap:Header>
 <soap:Body wsu:Id="body-id" ... >
     ....
 </soap:Body>
</soap:Envelope>
Example of Message Confidentiality
The following code sample is an example of the typical structure of encryption elements included in the Security header in conformance with the WS-Security 1.0 standards. In this example, the body element is encrypted. The elements that are particularly significant are indicated in bold.
<soap:Envelope ...>
 <soap:Header>
  <wsse:Security ...>
   <wsse:BinarySecurityToken wsu:Id="bst-id" ValueType="...#X509v3" ...>MIICtjCCAnQCBET...
   </wsse:BinarySecurityToken>
   <xenc:EncryptedKey ...>
     <xenc:EncryptionMethod Algorithm="..." />
      <dsig:KeyInfo ...>
       <wsse:SecurityTokenReference ... >
        <wsse:Reference URI="#bst-id" ValueType="...#X509v3" />
       </wsse:SecurityTokenReference>
      </dsig:KeyInfo>
      <xenc:CipherData>
       <xenc:CipherValue>YV19Qkq79Tub...=</xenc:CipherValue>
      </xenc:CipherData>
     <xenc:ReferenceList>
      <xenc:DataReference URI="#body-id" />
     </xenc:ReferenceList>
   </xenc:EncryptedKey>
  </wsse:Security>
 </soap:Header>
 <soap:Body>
  <xenc:EncryptedData Type="...#Content" Id="body-id" ... >
   <xenc:EncryptionMethod Algorithm="..." />
    <xenc:CipherData>
     <xenc:CipherValue>0h3XxkxLKAROdbd...=</xenc:CipherValue>
    </xenc:CipherData>
   </xenc:EncryptedData>
 </soap:Body>
</soap:Envelope>
Oracle WSM provides the steps shown in Table 5-4 for message integrity and confidentiality. The steps are listed in logical order rather than in alphabetical order.
Table 5-4 Integrity and Confidentiality Steps
| Step Name | Description |
|---|---|
|
Sign Message |
Digitally signs the message. |
|
Verify Signature |
Verifies the signature of the XML message that was signed to protect the integrity of the message. |
|
XML Encrypt |
Enciphers an XML message. |
|
XML Decrypt |
Decrypts the XML message or parts of the message that were encrypted for confidentiality. |
|
Sign Message and Encrypt |
Attaches a signature to an XML message and enciphers the message. |
|
Decrypt and Verify Signature |
Decrypts the XML message and verifies that the signature is valid. |
Refer to Appendix A, "Oracle Web Services Manager Policy Steps" for more information on each of the policy steps.
When using multiple Web services to complete a single transaction, it is important to propagate the identity of the original requester throughout the transaction. For example, a user may invoke a procurement application to place a purchase order (Figure 5-1). Once the user has filled out the purchase order, the procurement application takes care of formatting the request in a SOAP message, and sends that SOAP message to a provider (for example, an office supplies vendor). When the office supplies vendor has successfully processed the purchase order, it sends a request to a shipping company to deliver the purchased items to the original requester. In this case, the original requester's identity must be propagated throughout the entire transaction for security and audit/compliance purposes. This is achieved by creating a session ticket on behalf of the user, in the form of a SAML assertion, including authentication credentials and possibly attributes to be used for authorization.
Figure 5-1 Propagating Requester's Identity Throughout a Transaction

To implement use cases involving identity propagation, Oracle WSM supports the WS-Security SAML Security Token Profile's "Sender-Vouches" scenario. "Sender-Vouches" allows the SOAP message producer to sign the SAML assertion and the envelope body (containing the purchase order, for example), with the original requester's company's private key. In other words, the company "vouches for" the original requester. In this case, the business payload in the SOAP envelope body may be the purchase order used in the example described above.
Figure 5-2 shows how the use case described above can be implemented in a standards-based way:
A Security Service authenticates the user request (at the Purchasing Web Service site).
The Security Service generates a SAML assertion and inserts it in the WS-Security header as part of the SOAP message.
The Security Service signs both the SAML assertion and the body of the message with the Enterprise private key. In this case, the Enterprise is the site that is exposing the Purchasing Web service.
The Purchasing Web service processes the request and then posts a SOAP request to the Shipping Web service.
At the Shipping Web service, the Security Service authenticates the request. The Security Service checks the signature covering the SAML assertion and the message body, validates that the SAML assertion was issued by a trusted partner, and validates that the user is in the user store.
Figure 5-2 SAML Assertion Within a SOAP Envelope
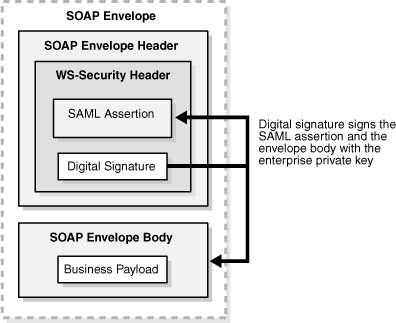
Oracle WSM can be the Security Service mentioned above, both at the Purchasing site and Shipping site, or at either site. Because WS-Security is an industry standard, Oracle WSM can produce and sign SAML assertions that are consumed by another security service, and it can consume SAML assertions produced by the security service.
Oracle WSM has policy steps that are specifically designed for use with SAML security systems.
Table 5-5 Identity Propagation Steps
| Step Name | Description |
|---|---|
|
SAML – Insert WSS 1.0 Sender-Vouches Token |
Secures SOAP message by inserting SAML assertions. |
|
SAML – Verify WSS 1.0 Token |
Verifies the SAML token according to the Web Services Security SAML Token Profile 1.0 (WSS STP 1.0) standard. |
Refer to Appendix A, "Oracle Web Services Manager Policy Steps" for more information on each of the policy steps.
Oracle WSM also provides policy step templates for some common processing functions of Web services messaging, including; logging, message persistence, message duplication, and XSLT translation.
Oracle WSM includes a default logging step in its default gateway and agent policy pipelines. As Web services are registered to gateways, or agents are installed into application servers, Oracle WSM creates a default policy pipeline.
Table 5-6 Nonsecurity Steps
| Step Name | Description |
|---|---|
|
Handle Generic Fault |
Provides custom message in the SOAP fault when errors are encountered. |
|
Log |
Logs the current message as received in the policy step. |
|
XML Transform |
Modifies the incoming XML using an XSLT file. |
Refer to Appendix A, "Oracle Web Services Manager Policy Steps" for more information on each of the policy steps.
To enable policy enforcement for a Web service at a gateway, you must first register the Web service with the desired gateway. Each registered Web service has its own policy and associated policy steps. When the Web service is registered, Oracle WSM sets up a default policy for the Web service. You can edit the default policy, create a new policy for the service, or create policy pipeline templates, for each Web service. You must have at least Oracle WSM Service Administration permissions to edit policy steps.
To add policy steps to a Web service
From the navigation pane of Web Services Manager Control, select Policy Management, then select Manage Policies.
A list of registered Oracle WSM gateways and agents is displayed.
In the row for a specific gateway, click Policies.
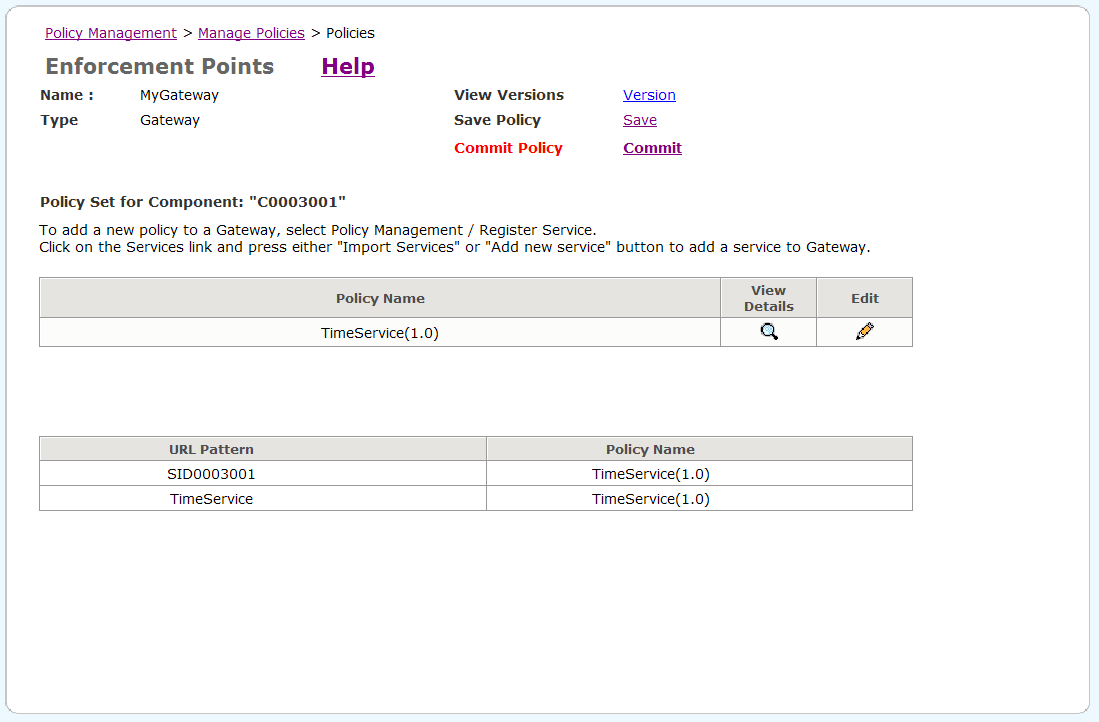
Oracle WSM displays a list of the current policies registered with the gateway. By default, Oracle WSM creates a policy with the same name and version number as the registered service. In Figure 5-3, the default policy name is TimeService (1.0), which is the same as the name and version of the service that is registered with the gateway.
In the row of the policy you want to update, click Edit.
Web Services Manager Control displays the definition for the selected policy, that is, the steps in the Request and Response policy pipelines (Figure 5-4). Scroll down the page to see the policy pipelines.
Figure 5-4 Policy Definition Page for a Gateway Policy
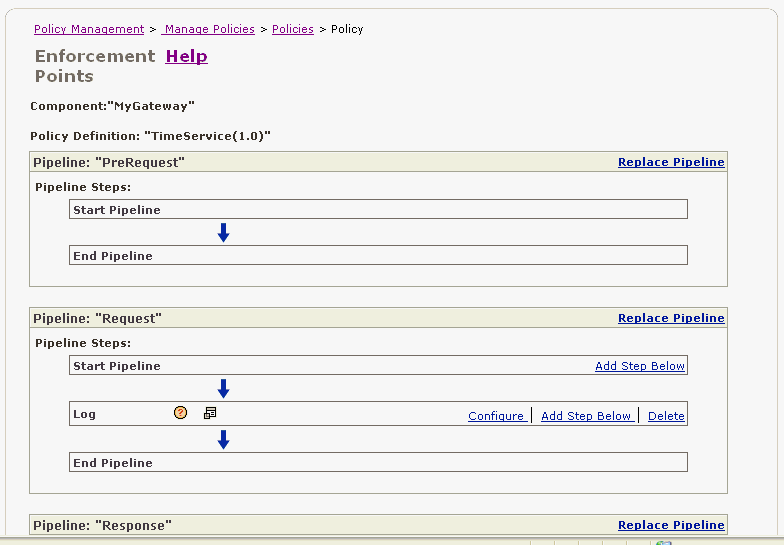
In the pipeline to which you want to add a policy step, click Add Step Below.
The page refreshes and the New Step box appears.
Select a step from the Select Step Template list.
The selected policy step is added to the pipeline.
Click Configure to configure the properties for the step.
Note:
Click the question mark (?) next to the name of the policy step for help on how to configure the properties.Click Environment Properties to display a list of properties that appear in the form ${propertyName} and a description of the properties. You may use items from this list in setting properties in text fields. For example, for the XML Encrypt policy, you could specify the keystore environment property ${acme.keystore} in the keystore location field.
When you are finished editing the properties, click OK.
Continue to add and configure policy steps.
When you are finished, click Next.
You can either accept the default name of the policy, or enter a different name, then click Save.
The Commit Policy field appears in red, alerting you to commit your changes (Figure 5-5). Click Commit to update the policy for the associated gateway.
Figure 5-5 Committing Changes to the Policy
The Policy is committed message is displayed.
Note:
You can click Save to save the policy to a file. You can then open this file to see the XML representation of the policy. Or you can configure the agent or gateway to run in disconnected mode and refer to this file for the policies, rather than run in connected mode where the policy enforcement point (PEP) connects to the Oracle WSM Policy Manager.Each Oracle WSM agent has its own policy and associated policy steps. Oracle WSM assigns a Default Policy when you first register an agent. This policy, by default, is applied to all services hosted by Oracle Application Server. In most instances, Oracle Application Server hosts one Web service. If you want one policy to be used for all Web services, you simply edit the Default Policy.
Less common is a situation where the Application Server hosts multiple Web services, and you may want a different policy to be applied to each Web service. In this situation, you would create as many policies as necessary, then map the policy to the appropriate Web service. See "Assigning Policies to Web Service URLs for Agents".
This section describes how to define policies for Oracle WSM Agents.
To define a policy for an Oracle WSM agent
In the left navigation pane of Web Services Manager Control, select Policy Management, then select Manage Policies.
A list of registered gateways and agents is displayed.
In the row for a specific agent, click Policies.
Oracle WSM displays the policies for the selected agent. If no policies have been created for the agent, only the Default Policy appears in the list (Figure 5-6).
Figure 5-6 List of Policies for Oracle WSM Agent
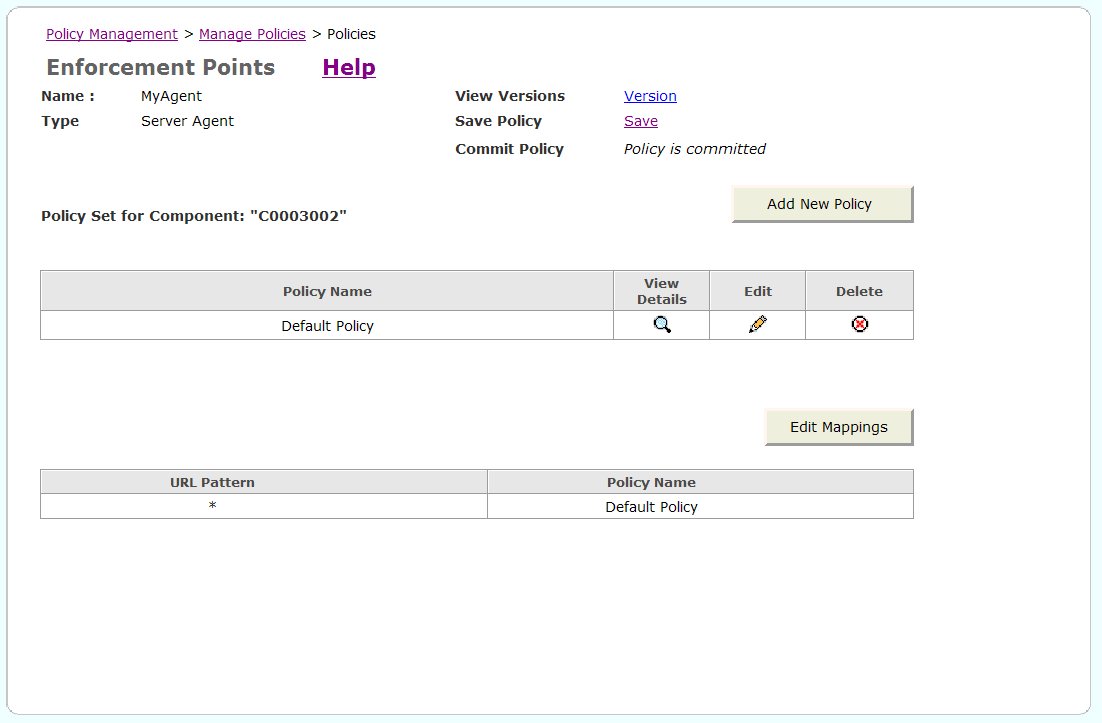
You can either click the Edit icon to edit the Default Policy, or click Add New Policy to create a new policy.
In the pipeline where you want to add a policy step, click Add Step Below.
The page refreshes and the New Step box appears (Figure 5-7).
Figure 5-7 Add Step Below Page with the Select Step Template List
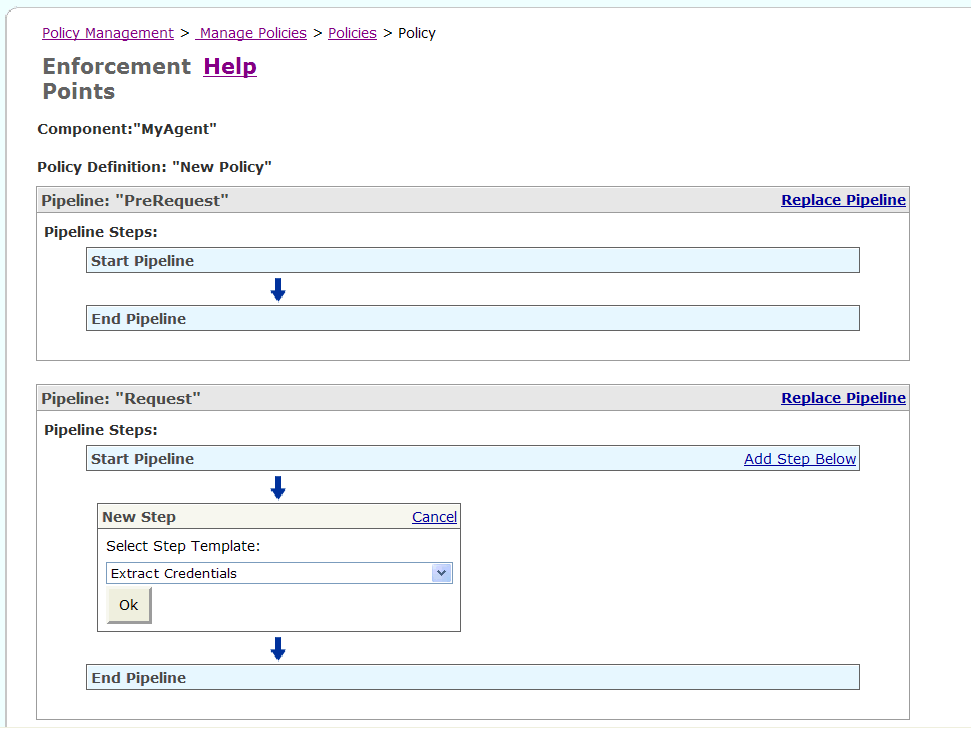
Select a policy step from the Select Step Template list, and click OK.
The selected policy step is added to the pipeline.
Click Configure to configure the properties for this step.
Note:
Click the question mark (?) next to the name of the policy step for help on how to configure the properties.Click Environment Properties to display a list of properties that appear in the form ${propertyName} and a description of the properties. You may use items from this list in setting properties in text fields. For example, for the XML Encrypt policy, you could specify the keystore environment property ${acme.keystore} in the keystore location field.
When you are finished editing the properties, click OK.
Continue to add and configure policy steps.
When you are finished, click Next.
Enter the name of the policy and click Save.
The Commit Policy field appears in red, alerting you to commit your changes (Figure 5-8). Click Commit to update the policy for the associated agent.
Figure 5-8 Committing Changes to the Policy
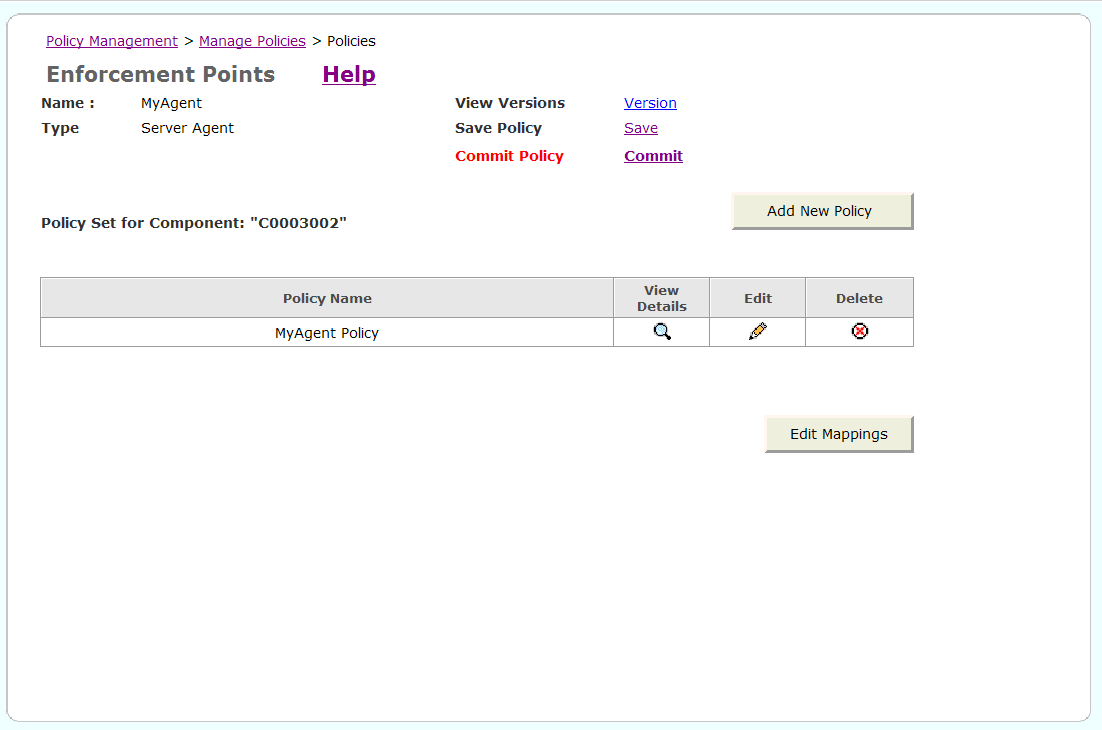
The Policy is committed message is displayed.
Note:
You can click Save to save the policy to a file. You can then open this file to see the XML representation of the policy. Or you can configure the agent or gateway to run in disconnected mode and refer to this file for the policies, rather than run in connected mode where the policy enforcement point (PEP) connects to the Oracle WSM Policy Manager.By default, the Default Policy is applied to all services hosted by Oracle Application Server. There may be situations where there are multiple services, and you want to assign different policies to each Web service. In this situation, assign the policy to the appropriate Web service.
To assign a policy to a Web service URL
From the navigation pane of Web Services Manager Control, select Policy Management, then select Manage Policies.
A list of registered gateways and agents is displayed.
In the row for a specific agent, click Policies.
Oracle WSM displays the policy set for the agent.
Click Edit Mapping.
The Enforcement Points/Mappings page is displayed (Figure 5-9).
Figure 5-9 Assigning a Web Service URL to an Oracle WSM Agent
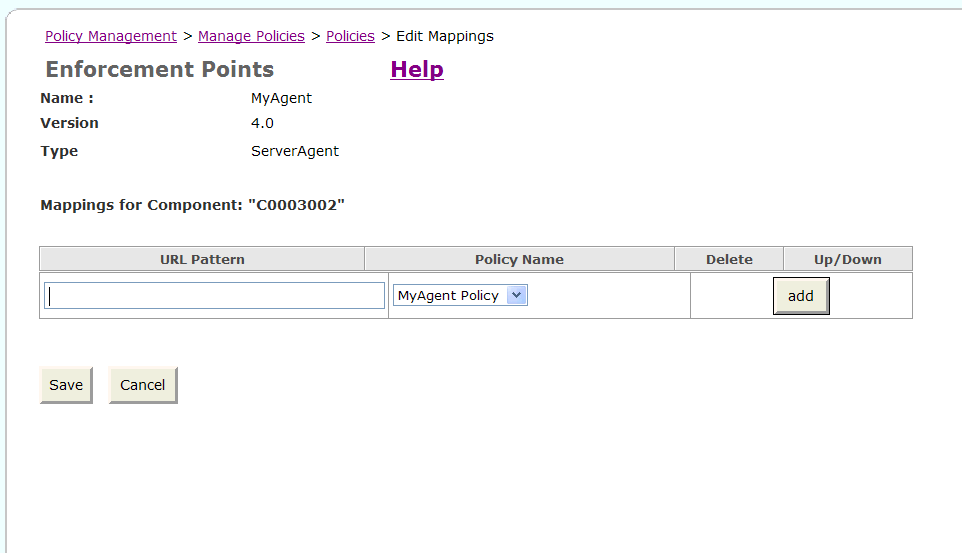
Enter the URL for the Web service to which this policy applies, and click Save.
Oracle WSM displays a confirmation message to confirm that the mapping was successfully updated.
The request and response pipelines of the default policy include a log step that causes policy enforcement points (PEP) to record SOAP messages to either a database or a component-specific local file. When you create a new policy to replace the default, you must configure the Log step in each pipeline to enable SOAP message recording.
You can configure logging for each policy by using one or both of the following:
Log Step in the Request Pipeline – Logs information from the service request.
Log Step in the Response Pipeline – Logs information from the service response.
The logging level can be configured in the Log step. You can choose from among the following log levels:
Header – Only the SOAP header is recorded.
Body – Only the message content (body) is recorded.
Envelope – The entire SOAP envelope, which includes both the header and the body, is recorded. Any attachments are not recorded.
All – The full message is recorded. This includes the SOAP header, the body, and all attachments, which might be URLs existing outside the SOAP message itself.
You can send the SOAP messages to the default Oracle WSM database or to a database dedicated just to SOAP messages.
In order to send SOAP messages to a file, you must specify the location of the log files using the cfluent.messagelog.file.logDirectory property of the policy enforcement point. Specify an absolute path location to the file. The log file is in Multipurpose Internet Mail Extensions (MIME) format. You can edit the cfluent.messagelog.file.maxFileSize property for the policy enforcement point and specify that the file be rotated automatically when it reaches a specified size. See "Making Changes to Your Policy Enforcement Points" for more information on editing these properties.
Note:
To transfer previously recorded SOAP messages from a local file to a database, use the data import tools provided by your RDBMS application.Typically, system performance improves when log files are located in topological proximity to the enforcement component. Therefore, Oracle recommends multiple distributed logs in a highly distributed environment.
Log files are stored in a logs directory; each log file name includes the time that the log reached its maximum size and log messages that were written to the file. Set the location for the log files using the cfluent.messagelog.file.logDirectory property. See "Making Changes to Your Policy Enforcement Points" for more information on editing this property.
Pipeline templates are reusable policy pipelines. A pipeline template can be created for a specific section of a particular policy enforcement point. For example, you can create a pipeline template for the request pipeline for a server agent.
Pipeline templates allow you to apply consistent policy enforcement for Web services deployed across an enterprise.
This section describes how to create a pipeline template.
To create a pipeline template
From the navigation pane of Web Services Manager Control, select Policy Management, then select Pipeline Templates.
A list of the pipeline templates for the default choices, Gateway component and PreRequest pipeline, is displayed.
To add a new pipeline template, click Add New Pipeline Template.
Select the type of component for which you want to create a pipeline template from the Component Type list.
Select the pipeline for which you want to create a template from the Pipeline Type list.
Specify a name for the template in the Pipeline Template Name field.
Click Next.
The Web Services Manager Control displays a second page where you specify policy steps for the new policy template.
Click Add Step Below.
Select a policy step from the Select Step Template list and click Ok.
Configure the properties for the policy.
Continue adding and configuring policy steps.
When you are through making changes to the pipeline template, click Save, then click Ok.
You may substitute sections of a pipeline template with previously created pipeline templates.
To use a pipeline template in a policy
From the navigation pane of Web Services Manager Control, select Policy Management, then select Manage Policies.
Click Policies for the gateway or agent whose policy you want to edit.
Click Edit for the policy you want to edit.
Click Replace Pipeline.
Choose the template you want to use from the New Pipeline Template list, and click Replace.
The steps in the pipeline template are added to the policy.
Note:
If the pipeline contains any policy steps, these policy steps are deleted and replaced with the policy steps from the selected template.Add, delete, and configure additional steps for the pipeline.
When you are finished editing your policy, click Save.
Enter a name for your policy, and click Save, then click Commit.
Each time you make a change to a policy and commit the change, a new version of the policy is created. The most current version is the policy that is enforced. This policy is called the working version. If necessary, you can return to an earlier version of the policy and restore it to the working version.
To restore an earlier policy
From the navigation pane of Web Services Manager Control, select Policy Management, then select Manage Policies.
In the List of Components, click Policies for the component whose policy you want to restore.
In the View Version field, click Version to view the policy version history for the component.
In the List of Policy Versions for Component: component_ID, the policy versions are listed in descending order. The working version is the same policy as the one that is identified as the enforced version.
Click the View icon, then click the View Details icon to see the policy definition.
From the List of Policy Versions for Component: component_ID page, click Restore for the version you want to restore as the working policy.
A message appears prompting you to confirm the change. Click OK.
Click Ok.
Note:
If you have added or deleted a Web service for the component, or changed the URL mappings to a later policy version, the policy in the previous configuration will no longer apply, and the policy cannot be automatically restored. To restore the policy, you will have to reassign the current URLs to the policy and enter it as a new policy version.In the Commit Policy field, click Commit to commit the change.
The message Policy is committed appears in the Commit Policy field.
Click Version in the View Version field to return to the policy version history. You will see that the version number of the enforced policy has increased by 1.
A new version of the policy is created each time you commit a change to the policy. Over time, you can accumulate policy versions that have become obsolete. You can purge, that is, permanently delete, obsolete policies that you no longer need.
To purge obsolete policy versions
From the navigation pane of Web Services Manager Control, select Policy Management, then select Manage Policies.
In the List of Components, click Policies for the component whose policy versions you want to purge.
In the View Version field, click Version to view the policy version history for the component.
Click Purge Policy Set Versions.
In the Purge all policy set versions prior to version box, enter the policy version.
Note:
All versions of the policy set up to the version you enter will be purged. For example, if you enter 25, then any versions that exist up to and including version 24 will be purged.Click Purge.
A message appears asking you to confirm the purge. Click Ok.
A message appears confirming that the purge was successful.