| Oracle® BPEL Process Manager Developer's Guide 10g (10.1.3.1.0) Part Number B28981-03 |
|
|
View PDF |
| Oracle® BPEL Process Manager Developer's Guide 10g (10.1.3.1.0) Part Number B28981-03 |
|
|
View PDF |
A company's business processes drive the integration of systems and people that participate in it. The business process and associated systems have a life cycle and certain behavior. The users who participate in the business process have roles and privileges to perform tasks in the business process. Using the workflow services of Oracle BPEL Process Manager, you can blend the integration of systems and services with human workflow into a single end-to-end process flow, while providing visibility and enabling exception handling and optimization at various levels.
This chapter contains the following topics:
Oracle BPEL Process Manager Workflow Services 10.1.2 and 10.1.3.1.0 Compatibility
Task 1: Creating the Human Task Definition with the Human Task Editor
Workflow Service and Identity Service Related XPath Extension Functions
See Also:
Oracle BPEL Process Manager Administrator's Guide for the organizational hierarchy of the demonstration user community used in examples throughout this chapter
SOA_Oracle_Home\bpel\system\xmllib\workflow for workflow service WSDL files
Oracle BPEL Process Manager Workflow Services API Reference available in SOA_Oracle_Home\bpel\docs\workflow\index.html
Workflows that you designed in 10.1.2 with the workflow wizard can be deployed and run in 10.1.3.1.0. However, you must use the old worklist URL to access these tasks:
http://localhost:9700/integration/oldworklistapp/Login
For release 10.1.3.1.0, the workflow wizard has been replaced by a Human Task editor. This editor enables you to specify task settings such as task outcome, payload structure, task participants, assignment and routing policy, expiration and escalation policy, notification settings, and so on.
You cannot use the Human Task editor to edit 10.1.2-based workflows. To use any new 10.1.3.1.0 functionality, the task scope of the workflow must be manually migrated to use the new workflow metadata.
Note also that this is the last release in which you can deploy workflows designed with 10.1.2.
See Also:
Appendix E, "Workflow Services Changes Between 10.1.2 and 10.1.3.1" for specific detailsWorkflow services enable you to interleave human interactions with connectivity to systems and services within an end-to-end process flow. As shown in Figure 15-1, workflow services are linked to a BPEL process through a WSDL contract, like any other Web service. The process assigns a task to a user or role and waits for a response. The users act on the task using Oracle BPEL Worklist Application.
Figure 15-1 High-Level View of Workflow Services in Oracle BPEL Process Manager

Terms used in workflow services include:
Notification—an e-mail, voice, fax, pager, or short message service (SMS) message that is sent when a user is assigned a task or informed that the status of the task has changed
Worklist—an enumeration of the tasks, or work items, assigned to or of interest to a user
Human Task editor—A tool that enables you to specify task settings such as task outcome, payload structure, task participants, assignment and routing policy, expiration and escalation policy, notification settings, and so on
.task file —The metadata task configuration file that stores the task settings specified with the Human Task editor
routing slip—Contains information about the flow pattern for the workflow, assignees, escalation policy, expiration duration, signature policy, sequence in which the participants interact in the task, and so on.
Features of workflow services include:
Work queues
Standard work queues — high priority tasks, tasks due soon, new tasks, and so on
Custom work queues — Users can define new work queues based on specific search criteria
Proxy work queues — can grant access to other users to selected work queues. Other users can act on your behalf on those tasks
User rules — can define custom delegation, auto-approval, or vacation rules
Group rules — can define auto-assignment rules for roles or groups; for example, round-robin, least-busy, and so on.
Task assignment and routing—includes creating tasks from the business process and assigning the tasks to users or roles. Other task assignment and routing features include:
Support for task expiration and automatic renewal
Support for task delegation, escalation, and reapproval
Storage of task history information for auditing, extending workflows to include other workflows, and the ability to archive and purge task details based on specified policies
Support for creating custom task escalation rule functions
Override and restrict default system actions
Specify callback classes on task status
JSP-based forms for viewing and updating task details
Dynamic assignment functions
Built-in reports — Priority reports, productivity reports, cycle time reports, and unattended tasks report
Participant types—consists of single approver, group vote, management chain, sequential list of approvers, FYI assignees, and external routing services.
See Also:
"Participant Types in Workflow Services"Identity service—interacts with back-end identity management systems to capture all user information from Java AuthoriZatioN (JAZN) and LDAP. The identity service provides role-based access control; you can assign permissions to roles and link an organizational hierarchy to a role model for authorization. You can also do the following:
Assign worklist privileges to users, roles, or groups
Maintain user properties such as name, location, phone, fax, and e-mail.
Capture organizational hierarchy (reporting structure) and group information
Integrate with standard (for example, LDAP-based) directory services for user and role provisioning
See Also:
"Identity Service" for identity service concepts
Oracle BPEL Process Manager Administrator's Guide for identity service configuration instructions
Send notifications to specified users on specified task changes
Notifications through different delivery channels (e-mail, phone, fax, voice, and SMS)
Ability to customize content of notifications for different types of tasks
Perform actions on tasks through e-mail
See Also:
"Notification Service" for notification service concepts
Chapter 14, "Oracle BPEL Process Manager Notification Service"
Oracle BPEL Process Manager Administrator's Guide for notification service configuration instructions
The Oracle BPEL Worklist Application
Out-of-the-box fully customizable worklist
Support for various user profiles – end user, supervisor, task owner, group owner, administrator
View tasks based on user or role ability to perform authorized actions on tasks in the worklist
Ability to filter tasks in worklist view based on various criteria
Ability to acquire and check out shared tasks
Support for custom work queues
Define custom vacation rules and delegation rules
Provide access to selected worklist views to other users (proxy support)
Complete workflow history and audit trail
Out-of-the-box productivity reports
See Also:
Chapter 16, "Worklist Application"The functionality of workflow services can be illustrated using a simple order approval business process to approve or reject an order, as shown in Figure 15-2. requested items. Approval and rejection is a two-step process involving an initial approver and the manager of the initial approver. The order is first assigned to the Supervisor role. Once a user belonging to the Supervisor role approves the order, it is sent to this user's manager for final approval.
See Also:
Oracle BPEL Process Manager Order Booking Tutorial for instructions on designing an order approval business process to approve or reject an orderFigure 15-3 shows the following workflow services components:
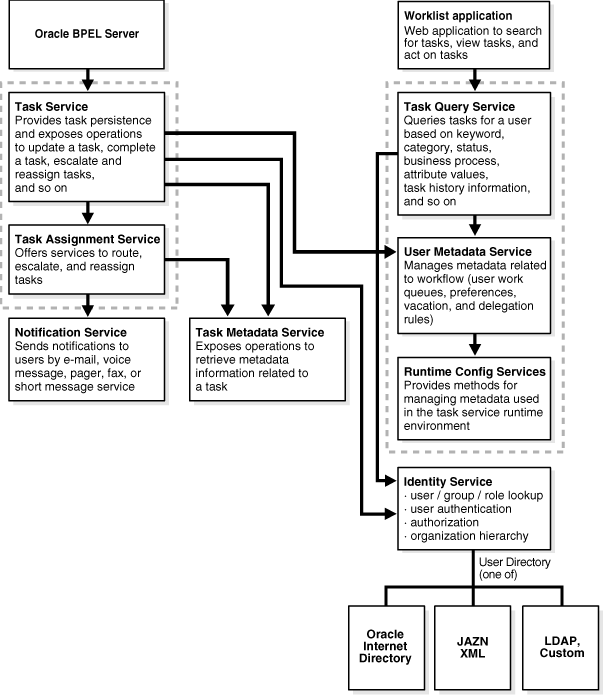
The task service provides task state management and persistence of tasks. In addition to these services, the task service exposes operations to update a task, complete a task, escalate and reassign tasks, and so on. The task service is used by the Oracle BPEL Worklist Application to retrieve tasks assigned to users. This service also determines if notifications are to be sent to users and groups when the state of the task changes. The task service consists of the following services.
The task routing service offers services to route, escalate, and reassign the task. The service makes these decisions by interpreting a declarative specification in the form of the routing slip.
The task query service queries tasks for a user based on a variety of search criterion such as keyword, category, status, business process, attribute values, history information of a task, and so on.
The task metadata service exposes operations to retrieve metadata information related to a task.
The identity service is a thin Web service layer on top of the Oracle Application Server 10g security infrastructure or any custom user repository. It enables authentication and authorization of users and the lookup of user properties, roles, group memberships, and privileges.
The notification service delivers notifications with the specified content to the specified user to any of the following channels: e-mail, telephone voice message, pager, fax, and SMS. See "Notifications from Workflow Services" for more information.
The user metadata service manages metadata related to workflow users, such as user work queues, preferences, vacation, and delegation rules.
The runtime config service provides methods for managing metadata used in the task service run time environment. It principally supports management of task payload flex field mappings.
Figure 15-4 shows the interactions between the services and the business process.
Figure 15-4 Workflow Services and Business Process Interactions
See Also:
Oracle BPEL Process Manager Administrator's Guide for identity service detailsUsing workflow services is demonstrated in the VacationRequest, AutoLoanDemo, ExpenseRequestApproval, LoanDemoPlus, DocumentReview, HelpDeskServiceRequest, and OrderApproval demos.
See Also:
SOA_Oracle_Home\bpel\samples\demos
The following sections describe multiple use cases for workflow services.
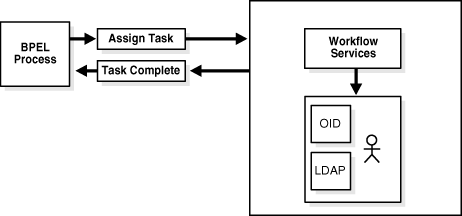
A vacation request process may start with getting the vacation details from a user and then routing the request to their manager for approval. User details and the organizational hierarchy can be looked up from a user directory or store. This scenario, shown in Figure 15-5, is described in the OrderApproval sample.
Figure 15-5 Assigning Tasks to a User or Role from a Directory
A task can be routed through multiple users with a group vote, management chain, or sequential list of approvers participant type. For example, consider a loan request that is part of the loan approval flow. The loan request may first be assigned to a loan agent role. After a specific loan agent acquires and accepts the loan, the loan may be routed further through multiple levels of management if the loan amount is greater that $100,000. This scenario, shown in Figure 15-6, is described in the LoanDemoPlus sample.
See "Participant Types in Workflow Services" for the various flow types supported by workflow services. You can use these types as building blocks to create complex workflows.
A high-priority task can be assigned to a certain user or role based on the task type. However, if the user does not act on it in a certain time, the task may expire and in turn be escalated to the manager for further action. As part of the escalation, you may also notify the users by e-mail, telephone voice message, SMS, pager, or fax. Similarly, a manager may delegate tasks from one reportee to another to balance the load between various task assignees. All tasks defined in BPEL have an associated expiration date. Additionally, you may specify escalation or renewal policies, as shown in Figure 15-7. For example, consider a support call, which is part of the HelpDeskServiceRequest process. A high-priority task may be assigned to a certain user and if the user does not respond in two days, then the task is routed to the manager for further action.
A user may decide to have another user perform tasks on their behalf. Tasks can be explicitly delegated from the Oracle BPEL Worklist Application or can be automatically delegated. For example, a manager sets up a vacation rule saying that all their high priority tasks are automatically routed to one of their reports while the manager is on vacation. In some cases, tasks can be routed to different individuals based on the content of the task. Another example of automatic routing is to allocate tasks among multiple individuals belonging to a group. For example, a help desk supervisor decides to allocate all tasks for the western region based on a round robin basis or assign tasks to the individual with the lowest number of outstanding tasks (the least busy).
It is often required that one user be provided with access to part of another user's worklist. For example, an executive decides to provide access to expense approvals within a certain limit to their secretary. Work queues allow you to create a custom view to group a subset of tasks in the worklist (say high priority tasks, tasks due in 24 hours, expense approval tasks, and so on). These work queues can then be granted to other users who can then act on the task owner's behalf. For example, in the scenario described above, the executive can create a delegated expense approvals work queue for expenses below $5000.
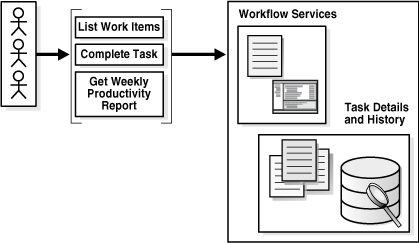
Users typically access tasks assigned to them by using the Oracle BPEL Worklist Application, as shown in Figure 15-8. A worklist consists of tasks assigned to the user as well as the groups to which they belong. A task may also include forms and attachments in addition to other task details such as history, comments, and approval sequence. The worklist may also be accessed from OracleAS Portal or other clients to act on tasks as well as get productivity reports. The Oracle BPEL Worklist Application can be customized and extended based on the specific needs of an application. See Chapter 16, "Worklist Application" for details about worklist functionality and the sample Oracle BPEL Worklist Application.
Figure 15-8 Oracle BPEL Worklist Application—Access Tasks, Forms, Attachments, and Reports
Oracle BPEL Process Manager provides a library of participant types (known in previous releases as workflow patterns). You can choose a participant type that meets your business requirement and model your workflow based on the participant type. Oracle BPEL Process Manager supports the following participant types:
Single Approver — used for a single user to act on a task. If the task is assigned to a role or group with multiple users, one of the members must claim the task and act on it. Based on the user's action, you define what the business process does.
Group Vote — used when multiple users, working in parallel, must take action simultaneously, such as in a hiring situation when multiple users vote to hire or reject an applicant. You specify the voting percentage that is needed for the outcome to take effect, such as a majority vote or a unanimous vote.
Management Chain—used to route tasks for approval to multiple users in a management chain hierarchy. You specify the task participants as a management chain list or a list of users.
Sequential list of approvers (extension of a sequential workflow)—used to create a list of sequential participants for a workflow. This type is similar to the management chain participant type, except that with that type, the users are part of an organization hierarchy. For the sequential list of approvers participant type, they can be any list of users or groups.
FYI assignee — used when a task is sent to a user, but the business process does not wait for a user response; it just continues. FYI assignees cannot directly impact the outcome of a task, but in some cases can provide comments or add attachments.
External Routing Service —used to configure an external routing service that dynamically determines the participants in the workflow. If this participant type is specified, all other participant types are ignored. It is assumed that the external routing service provides a list of participant types (single approver, list of approvers, group vote, and so on) at run time to determine the routing of the task.
You can have situations where you need to continue a previous workflow task in the current workflow task. Oracle BPEL Process Manager enables you to include the task history, comments, and attachments from the previous task. This provides you with a complete end-to-end audit trail.
The modeling process consists of creating a human task, associating it with a BPEL process, and generating the format for displaying the human task during run time in the Oracle BPEL Worklist Application. This section provides a brief overview of these modeling tasks and provides references to specific modeling instructions.
The Human Task editor enables you to define the metadata for the task. This editor enables you to specify human task settings, such as task outcome, payload structure, task participants, assignment and routing policy, expiration and escalation policy, notification settings, and so on. This information is saved to a metadata task configuration file with a .task extension.
See Also:
"Task 1: Creating the Human Task Definition with the Human Task Editor" for specific instructionsYou associate the .task file that consists of the human task settings with a BPEL process. Association is made with a human task activity that you drag and drop into your BPEL process for configuring. You also define the task definition, task initiator, task priority, and map the task parameter that carries the input data to a BPEL variable. You can also define advanced features, such as the scope and global task variables names (instead of accepting the default names), task owner, identification key, BPEL callback customizations, and whether to extend the human task to include other workflow tasks.
When association is complete, a Task Service partner link is created. The Task Service exposes the operations required to act on the task.
See Also:
"Task 2: Associating the Human Task with a BPEL Process" for specific instructionsYou generate the layout of the task display form used for displaying the task header, body (task payload), and footer details at run time in Oracle BPEL Worklist Application. The task display form defines the display mechanism for the task payload (data in the task) in the Oracle BPEL Worklist Application. Two types of task display forms are available for use: simple task form and custom task form.
See Also:
"Task 3: Generating the Task Display Form" for specific instructionsThe Human Task editor enables you to define the metadata for the task. This editor enables you to specify human task settings, such as task outcome, payload structure, task participants, assignment and routing policy, expiration and escalation policy, notification settings, and so on.
When human task creation is complete, the following folder and file are created:
A folder with the human task name you specify in the Human Task Name field in "Accessing the Human Task Editor" is created under the Integration Content folder of your BPEL process in the Application Navigator
The human task settings specified in the Human Task editor are saved to a metadata task configuration file with a .task extension. This file is stored in the human task name folder. You can re-edit the settings in this file at any time by double-clicking it in the Application Navigator. This reopens the .task file in the Human Task editor.
This section contains the following topics:
When you are ready to begin creation of a human task, the Human Task editor can be accessed in several ways in Oracle JDeveloper:
This method enables you to create a human task that you can later associate with a BPEL process through use of a human task activity.
Right-click your BPEL process in the Application Navigator and select Create Human Task Definition.
The Add a Human Task window appears.
Enter a name in the Human Task Name field.
The name you enter is added to the directory path in the Location field.
SOA_Oracle_Home/jdev/mywork/my_application/my_process/bpel/
Human_task_directory/Human_task_name.task
Click OK.
The Human Task editor appears.
Go to section "Reviewing the Sections of the Human Task Editor".
Note:
You can also create a human task that you later associate with a BPEL process by selecting New from the File main menu, then selecting Integration Tier > Human Tasks > Human Task Definition.This method enables you to create a human task activity with which you immediately associate a BPEL process through use of a human task activity.
Select Process Activities from the Component Palette.
Drag and drop a Human Task activity into your BPEL process.
The Add a Human Task window appears.
Click the second icon to the right of the Task Definition field.

Enter a name in the Human Task Name field.
The name you enter is added to the directory path in the Location field.
SOA_Oracle_Home/jdev/mywork/my_application/my_process/bpel/
Human_task_directory/Human_task_name.task
Click OK.
The Human Task editor appears.
Go to section "Reviewing the Sections of the Human Task Editor".
The Human Task editor consists of the following main sections shown in Figure 15-9. These sections enable you to create a human task.
Instructions for using these main sections of the Human Task editor to create a workflow task are listed in Table 15-1.
Table 15-1 Human Task Editor
| For This Main Section... | See... |
|---|---|
| Task Configuration
(title, outcomes, priority, and owner) |
"Specifying the Task Title, Priority, Outcome, and Owner" |
| Parameters | "Specifying the Task Payload Data Structure" |
| Assignment and Routing Policy | "Assigning Task Participants" |
| Expiration and Escalation Policy | "Escalating, Renewing, or Ending the Task" |
| Notification Settings | "Specifying Participant Notification Preferences" |
| Advanced Settings
(for specifying custom escalation rules, custom style sheets for attachments, multilingual settings, custom task actions, error messages, and callback classes) |
"Specifying Advanced Settings" |
Figure 15-10 shows the Task Configuration section of the Human Task editor.
This section enables you to specify details such as the task title, task priority, task outcomes, and task owner.
Figure 15-10 Human Task Editor — Task Configuration Section

Instructions for configuring the following subsections of the Task Configuration section are listed in Table 15-2:
Table 15-2 Human Task Editor — Task Configuration Section
| For This Subsection... | See... |
|---|---|
| Title
Priority |
"Specifying a Task Title and Priority" |
| Outcomes | "Specifying a Task Outcome" |
| Owner | "Specifying a Task Owner" |
Enter the following details.
| Field | Description |
|---|---|
| Title | Enter an optional task title. The task title displays in the Oracle BPEL Worklist Application. If you enter a title in the Task Title field of the General tab of the Human Task window described in "Specifying the Task Title", the title you enter here is overridden. |
| Priority | Specify the priority of the tasks. Priority can be 1 through 5, with 1 being the highest. By default, the priority of a task is 3. The priority can be used to sort tasks in the Oracle BPEL Worklist Application. This priority value is overridden by any priority value you select in the General tab of the Add a Human Task window.
See Also: "Specifying the Task Initiator and Task Priority" for instructions on specifying a priority value in the Add a Human Task window |
Task outcomes capture the possible outcomes of a task. The Oracle BPEL Worklist Application displays the outcomes you specify here as the possible actions to perform during run time. You can specify the following types of task outcomes:
Select a seeded outcome
Enter a custom outcome
The task outcomes can also have run time display values that are different from the actual outcome value specified here. This permits outcomes to be displayed in a different language in the Oracle BPEL Worklist Application. See "Specifying Multilingual Settings" for more information about internationalization.
Click the flashlight icon to the right of the Outcomes field.
The Outcomes window displays the possible outcomes for tasks. APPROVE and REJECT are selected by default.
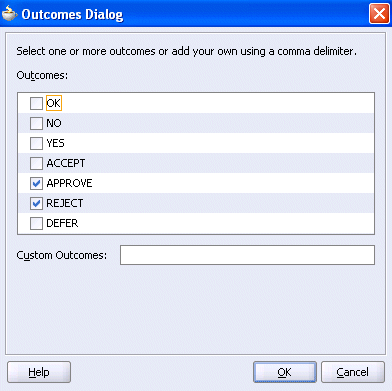
Select additional task outcomes or deselect the default outcomes.
Enter any custom outcomes separated by commas in the Custom Outcomes field.
Click OK to return to the Human Task editor.
Your selections display in the Outcomes field.
The seeded and custom outcomes selected here display for selection in the Majority Voted Outcome section of the group vote participant type.
See Also:
"Specifying Group Voting Details"The method by which you create a human task definition determines whether custom outcomes initially display in a switch activity. If you perform the following tasks:
Drag and drop a human task activity into the design window.
Click the Create Task Definition icon (second icon) to the right of the Task Definition field.
Create a human task definition with custom outcomes.
Expand the human task activity.
Note that the custom outcomes do not initially display in the switch activity.
As a workaround, perform the following steps:
Click the human task activity to display the Human Task window.
Click OK.
Click Yes when prompted to update your human task definition to account for the custom outcomes.
Click Source.
Click Diagram.
Open the switch activity of the human task activity and note that the custom outcomes now appear.
Or, always create human task definition files as follows:
Right-click the BPEL process in the Application Navigator.
Select Create Human Task Definition.
Design a human task definition.
Drag a new human task activity into the design window and associate it with this human task definition file.
Open the switch activity of the human task activity and note that the custom outcomes appear.
The task owner can view the tasks belonging to business processes they own and perform operations on behalf of any of the assigned task participant types. Additionally, the owner can also reassign, withdraw, or escalate tasks. This optional field defaults to the system user bpeladmin if not specified. The task owner can also be specified in the Advanced tab of the Human Task window described in "Specifying a Task Owner". The task owner specified in the Advanced tab overrides any task owner you enter here.
Select a method for specifying the task owner:
Task owners can be selected by browsing the user directory (Oracle Internet Directory (OID), JAZN/XML, LDAP, and so on) that is configured for use with Oracle BPEL Process Manager.
Click the first icon to the right of the Owner field to display the Identity lookup dialog.
Search for the owner by entering a search string such as jcooper, j*, *, and so on. Clicking Lookup fetches all the users that match the search criteria.
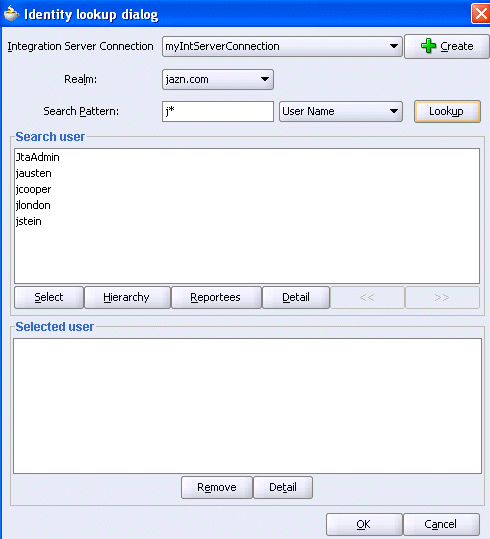
One or more users or groups can be highlighted and selected by clicking Select.
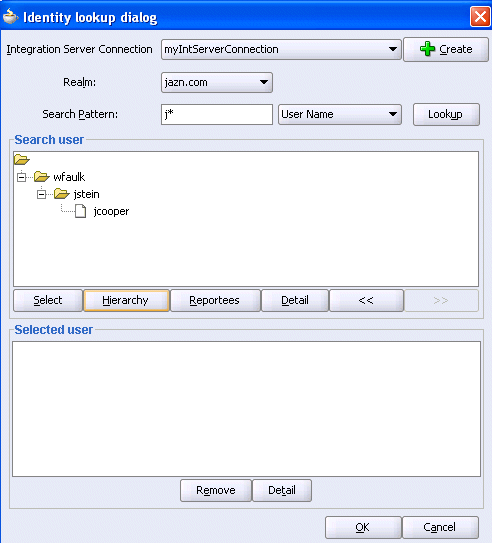
View the hierarchy of a user by highlighting the user and clicking Hierarchy. Similarly, clicking Reportees displays the reportees of a selected user or group.
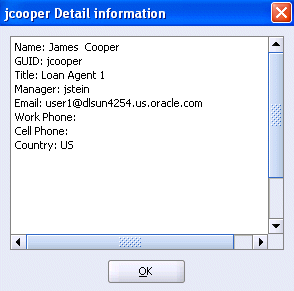
View the details of a user or group by highlighting the user or group and clicking Detail.
Click OK to return to the Identity lookup dialog.
Click Select to add the user to the Selected user section.
Click OK to return to the Human Task editor.
Your selection displays in the Owner field.
Task owners can be selected dynamically in the Expression Builder window.
Click the second icon to the right of the Owner field to display the Expression Builder window:
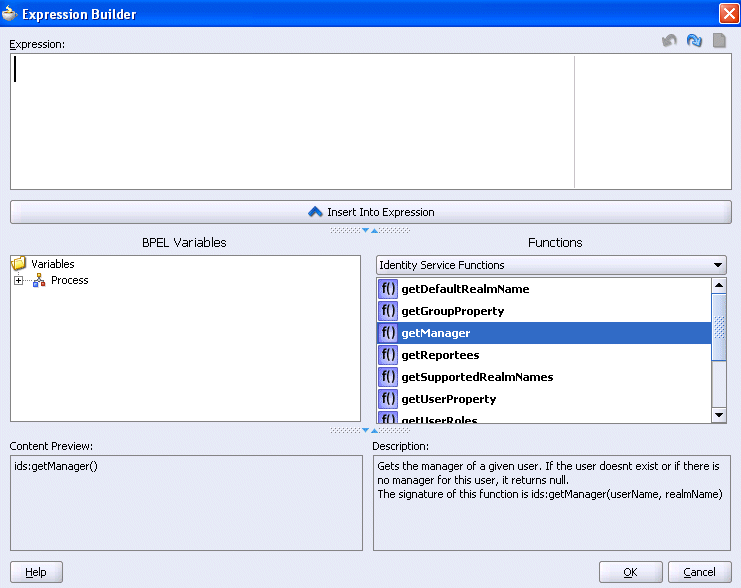
Browse the available variable schemas and functions to create a task owner.
Click OK to return to the Human Task editor.
You selection displays in the Owner field.
See Also:
Click Help for instructions on using the Expression Builder window and XPath Building Assistant
"Workflow Service and Identity Service Related XPath Extension Functions" and Appendix D, "XPath Extension Functions" for information about workflow service dynamic assignment functions and identity service functions
Figure 15-11 shows the Parameters section of the Human Task editor.
This section enables you to define the structure (message attributes) of the task payload (the data in the task). Task payload data consists of one or more elements or types. Based on your selections, an XML schema definition is created for the task payload.
Click the + sign to display the Add Task Parameter window.
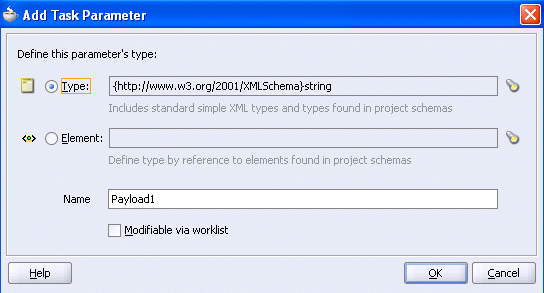
Enter the following details:
| Field | Description |
|---|---|
| Parameter Type | Select Type or Element and click the flashlight icon to display the Type Chooser window for selecting the task parameter. |
| Name | Accept the default name or enter a custom name. This field only displays if Type is the selected parameter type. |
| Modifiable via worklist | Select this check box to enable users to edit task payload data in the footer of the Oracle BPEL Worklist Application. For example, the approver in the application may need to add approver comments. |
Note:
You can only define payload flex field mappings in the Oracle BPEL Worklist Application for payload parameters that are simple XML types.Click OK to return to the Human Task editor.
Your selection displays in the Parameters section.
If you want to edit your selection, highlight it and click the first icon in the upper right part of the Parameters section.
Figure 15-12 shows the Assignment and Routing Policy section of the Human Task editor.
This section enables you to select a participant type that meets your business requirement. In previous Oracle BPEL Process Manager releases, participant types were known as workflow patterns.
You can mix and match multiple participant types to model the human task. This enables you to extend the functionality of a previously configured human task to model more complex workflows.
Each of the participant types has an associated editor that you use for configuration tasks. The sequence in which the assignees are added indicates the execution sequence.
Figure 15-12 Human Task Editor — Assignment and Routing Policy Section

Click the + sign to display the Add Participant Type window.
This enables you to select a specific participant type.
Select a participant type from the Type list.
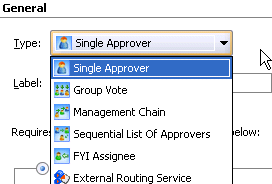
The configuration tasks for each participant type are described in subsequent sections.
See the following section based on your selection:
| For This Subsection... | See... |
|---|---|
Add Participant Type
|
"Configuring the Single Approver Participant Type" "Configuring the Group Vote Participant Type" "Configuring the Management Chain Participant Type" "Configuring the Sequential List of Approvers Participant Type" "Configuring the FYI Assignee Participant Type" "Configuring the External Routing Service Participant Type" |
See the following task assignment and routing policy sections shown in Figure 15-12 after you have configured a participant type. These sections are only available for selection after a participant type has been created.
| For This Subsection... | See... |
|---|---|
| Allow all participants to invite other participants | "Allowing All Participants to Invite Other Participants" |
| Enable abrupt completion condition | "Abruptly Completing a Condition" |
Users and groups for each of the participant types can be specified either statically or dynamically.When the users and groups are specified statically (or by browsing the identity service), the values can be either of the following:
A single user or group (for example, jstein), which in the case of a single approver, is captured as follows:
<participant name="Assignee1">
  <resource isGroup="false" type="STATIC">jstein</resource>
 </participant>
A delimited string of users or groups (for example, jstein, wfaulk, cdickens), which in the case of a single approver, is captured as follows:
<participant name="Assignee1">
 <resource isGroup="false" type="STATIC">jstein, wfaulk, cdickens</resource>
</participant>
You may have a business requirement to create a dynamic list of task approvers specified in a payload variable. This XPath expression can resolve to zero or more XML nodes. Each node value can be either of the following:
A single user or group
A delimited string of users or groups. For example, the following task shows that the payload message attribute is of type xsd:String and its value is a comma-delimited string of approvers. This node can be used to specify the participants.
<task>
 . . .
 <payload>
   <approvers>jstein,wfaulk,cdickens</approvers>
 </payload>
</task>
The default delimiter for the assignee delimited string is a comma (,). This delimiter can be changed using the assigneeDelimiter XML element in the wf-config.xml file. This delimiter applies to all workflows in the system.
Specifying participants in this manner is applicable to all participant types, although they are interpreted differently for each type. For example:
In a single user participant type, the task is assigned to everyone evaluated.
In a sequential list of approvers participant type, the task is sequentially assigned to users and groups evaluated in the list.
In a group vote participant type, a task is created for each user and group evaluated in the list.
This interpretation of resource XPath expressions provides orcl:create-nodeset-from-delimited-string-equivalent functionality to enable you to specify a dynamic list of one or more task approvers (resource element members) from the payload variable.
Figure 15-13 displays the Single Approver window.
This participant type requires a single user to act on a task. If the task is assigned to a role or group with multiple users, one of the members must claim the task and act on it. Based on the user's action, you define what the business process does.
For example, a vacation request is assigned to a manager. The manager must act on the request task three days before the vacation starts. If the manager formally approves or rejects the request, the employee is notified with the decision. If the manager does not act on the task, the request is treated as rejected. Notification actions similar to the formal rejection are taken.
Figure 15-13 Add Participant Type — Single Approver
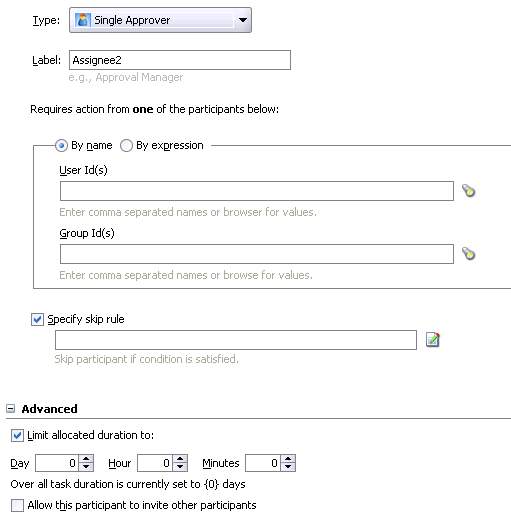
Enter a recognizable label for this participant in the Label field. This label must be unique within this workflow (for example, Approval Manager, Primary Reviewers, and so on).
Instructions for configuring the following subsections of the Add Participant Type - Single Approver window are listed in Table 15-3:
Table 15-3 Add Participant Type — Single Approver
| For This Subsection... | See... |
|---|---|
| Requires action from one of the participants below | "Assigning Participants to the Single Approver Task" |
| Specify skip rule | "Bypassing a Task Participant" |
| Limit allocated duration to | "Specifying a Time Limit for Acting on a Task" |
| Allow this participant to invite other participants | "Inviting Additional Participants to a Task" |
Select a method for assigning a user or group to participate in performing actions on this task.
By name
Enter a user or group name or click the first icon (flashlight) to the right of the field to display a window for selecting a user or group configured through the identity service. The identity service enables user authorization and the lookup of user properties, roles, group memberships, and privileges. User information is obtained from Java AuthoriZatioN (JAZN) or an LDAP server such as Oracle Internet Directory. You can use wild cards (*) to search for IDs.
Dynamically assign this task to a user (for example, jcooper) or group (for example, administrators) by clicking the icon to the right of the field to display the Expression Builder window. Users who are members of a group are assigned this task. For a user to act on a task assigned to a group, they must first claim the task in the Oracle BPEL Worklist Application during run time.
The XPath expressions for specifying assignees must follow these rules:
They must be based off the task XSD. This includes the payload as defined in the payload section. For example, /task:task/task:payload/order:orderAssignee is an example of an XPath expression based of the task XSD.
The XPath expressions cannot contain BPEL-specific XPath functions such as bpws:getVariableData(), and so on because these XPath expressions are not evaluated from the context of a BPEL instance.
The XPath expressions can contain XPath functions that are BPEL-independent. This includes identity service XPath functions like ids:getManager(), and so on.
Select the Specify skip rule check box if you want the user or group to be bypassed if a specific condition is satisfied. This action displays an icon for accessing the Expression Builder window for building a condition. For example, if a user submits a business trip expense report that is below a specific amount, no approval is required by their manager.
The expression to bypass a task participant must evaluate to a Boolean value. For example, /task:task/task:payload/order:orderAmount < 1000 is a valid XPath expression for skipping a participant.
Click the + sign to expand the Advanced section shown in Figure 15-13.
Specify the amount of time a user or group receives to act on a task. If the user or group does not act in the time specified, the global escalation and renewal policies that you set in the Expiration and Escalation Policy section (known as the routing slip level) of the Human Task editor are applied. For example, if the global policy is set to escalate the task and this participant does not act in the duration provided, the task is escalated to the manager or another user, as appropriate.
See Also:
"Escalating, Renewing, or Ending the Task" for instructions on setting the global escalation and renewal policies in the Expiration and Escalation Policy section of the Human Task editorClick the + sign to expand the Advanced section (if not already expanded).
Select the Allow this participant to invite other participants check box if you want this task assignee to invite other participants into the workflow before routing it to the next assignee in this workflow. For example, assume the approval workflow goes from James Cooper to John Steinbeck. If this option is checked, James Cooper can decide to first route it to Irving Stone before it goes to John Steinbeck.
Figure 15-14 displays the Group Vote window.
This participant type is used when multiple users, working in parallel, must take action simultaneously, such as in a hiring situation when multiple users vote to hire or reject an applicant. You specify the voting percentage that is needed for the outcome to take effect, such as a majority vote or a unanimous vote.
For example, a business process collects the feedback from all interviewers in the hiring process, consolidates it, and assigns a hire or reject request to each of the interviewers. At the end, the candidate is hired if the majority of interviewers vote for hiring instead of rejecting.
Enter a recognizable label for this participant in the Label field. This label must be unique within this workflow (for example, Approval Manager, Primary Reviewers, and so on).
Instructions for configuring the following subsections of the Add Participant Type - Group Vote window are listed in Table 15-4:
Table 15-4 Add Participant Type — Group Vote Window
| For This Subsection... | See... |
|---|---|
| Required consensus between the participants below: 50 | "Assigning Participants to the Group Vote Task" |
| Specify skip rule | "Bypassing a Task Participant" |
| Share attachments and comments | "Sharing Attachments and Comments with Task Participants" |
| Default Outcome
Consensus Percentage Immediately trigger voted outcome when minimum percentage is met Wait until all votes are in before triggering outcome |
"Specifying Group Voting Details" |
| Limit allocated duration to | "Specifying a Time Limit for Acting on a Task" |
Select a method for assigning a user or group to participate in this task. The assigned participants must establish a consensus on when a task is considered complete.
By name
Enter a user or group name or click the first icon (flashlight) to the right of the field to display a window for selecting a user or group configured through the identity service. The identity service enables user authorization and the lookup of user properties, roles, group memberships, and privileges. User information is obtained from Java AuthoriZatioN (JAZN) or an LDAP server such as Oracle Internet Directory. You can use wild cards (*) to search for IDs.
Dynamically assign this task to a user (for example, jcooper) or group (for example, administrators) by clicking the icon to the right of the field to display the Expression Builder window. Users who are members of a group are assigned this task. For a user to act on a task assigned to a group, they must first claim the task in the Oracle BPEL Worklist Application during run time.
See Also:
"Assigning Participants to the Single Approver Task" for rules to follow when specifying assignees with XPath expressionsSelect the Specify skip rule check box if you want the user or group to be bypassed if a specific condition is satisfied. This action displays an icon for accessing the Expression Builder window for building a condition. For example, if a user submits a business trip expense report that is below a specific amount, no approval is required by their manager. The expression must evaluate to a Boolean value.
See Also:
"Bypassing a Task Participant" for an example of a valid XPath expression for skipping a participantSpecify a method for selecting the outcome for the final task. If you select By Expression from the lists below, you can dynamically specify the details by clicking the icon to the right of the field to display the Expression Builder window.
Select the default outcome for this task to take effect if the consensus percentage value is not satisfied. This happens if there is a tie or if all participants do not respond before the task expires. Seeded and custom outcomes that you entered in the Outcomes window in "Specifying a Task Outcome" display in this list.
Select a percentage value required for the outcome of this task to take effect; for example, a majority vote (51) or a unanimous vote (100). For example, assume there are two possible outcomes (ACCEPT and REJECT) and five subtasks. If two subtasks are accepted and three are rejected, and the required acceptance percentage is 50%, the outcome of the task is rejected.
Specify additional group voting details:
Immediately trigger voted outcome when minimum percentage is met
If selected, the outcome of the task can be computed early with the outcomes of the completed subtasks, enabling the pending subtasks to be withdrawn. For example, assume four users are assigned to act on a task, the default outcome is APPROVE, and the consensus percentage is set at 50. If the first two users approve the task, the third and fourth users do not need to act on the task, since the consensus percentage value has already been satisfied.
Wait until all votes are in before triggering outcome
If selected, the workflow waits for all responses before an outcome is initiated.
Click the + sign to expand the Advanced section shown in Figure 15-14.
Select Limit allocated duration to.
Specify the amount of time a user or group receives to act on a task. If the user or group does not act in the time specified, the global escalation and renewal policies that you set in the Expiration and Escalation Policy section (known as the routing slip level) of the Human Task editor are applied. For example, if the global policy is set to escalate the task and this participant does not act in the duration provided, the task is escalated to the manager or another user, as appropriate.
See Also:
"Escalating, Renewing, or Ending the Task" for instructions on setting the global escalation and renewal policies in the Expiration and Escalation Policy section of the Human Task editorFigure 15-15 displays the Management Chain window.
This participant type routes tasks for approval to multiple users in a management chain hierarchy. You specify the task participants as a management chain list or a list of users.
For example, a purchase order is assigned to a manager. If the manager approves the order, it is assigned to their manager. If that manager approves it, it is assigned to their manager, and so on until three managers approve the order. If any of the managers reject the request or the request expires, the order is rejected.
Figure 15-15 Add Participant Type — Management Chain
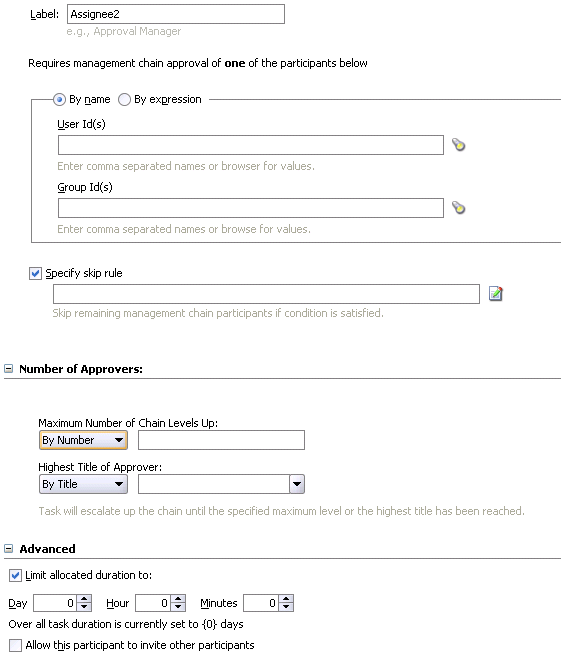
Enter a recognizable label for this participant in the Label field. This label must be unique within this workflow (for example, Approval Manager, Primary Reviewers, and so on).
Instructions for configuring the following subsections of the Add Participant Type - Management Chain window are listed in Table 15-5:
Table 15-5 Add Participant Type - Management Chain
| For This Subsection... | See... |
|---|---|
| Requires management chain approval of one of the participants below | "Assigning Participants to the Management Chain Task" |
| Specify skip rule | "Bypassing a Task Participant" |
| Maximum Number of Chain Levels Up
Highest Title of Approver |
"Specifying the Number of Approvers" |
| Limit allocated duration to | "Specifying a Time Limit for Acting on a Task" |
| Allow this participant to invite other participants | "Inviting Additional Participants to a Task" |
Select a method for assigning a user or group to participate in this task.
By name
Enter a user or group name or click the first icon (flashlight) to the right of the field to display a window for selecting a user or group configured through the identity service. The identity service enables user authorization and the lookup of user properties, roles, group memberships, and privileges. User information is obtained from Java AuthoriZatioN (JAZN) or an LDAP server such as Oracle Internet Directory. You can use wild cards (*) to search for IDs.
Dynamically assign this task to a user (for example, jcooper) or group (for example, administrators) by clicking the icon to the right of the field to display the Expression Builder window. Users who are members of a group are assigned this task. For a user to act on a task assigned to a group, they must first claim the task in the Oracle BPEL Worklist Application during run time.
See Also:
"Assigning Participants to the Single Approver Task" for rules to follow when specifying assignees with XPath expressionsSelect the Specify skip rule check box if you want the user or group to be bypassed if a specific condition is satisfied. This action displays an icon for accessing the Expression Builder window for building a condition. For example, if a user submits a business trip expense report that is below a specific amount, no approval is required by their manager. The expression must evaluate to a Boolean value.
See Also:
"Bypassing a Task Participant" for an example of a valid XPath expression for skipping a participantSpecify the following task routing parameters. When both parameters are specified, task routing is determined by both parameters. The routing continues until one of these parameters is satisfied. If you select By Expression from the lists below, you can dynamically specify the details by clicking the icon to the right of the field to display the Expression Builder window.
Maximum Number of Chain Levels Up
Enter a value for the number of levels in the management chain to include in this task. For example, if set to 2 and the task is initially assigned to user jcooper, both the user jstein (manager of jcooper) and the user wfaulk (manager of jstein) are included in the list (apart from jcooper, the initial assignee). This is a mandatory field.
Select the title of the last (highest) user in the management chain. The title is retrieved from the identity service.
Click the + sign to expand the Advanced section shown in Figure 15-15.
Select Limit allocated duration to.
Specify the amount of time a user or group receives to act on a task. If the user or group does not act in the time specified, the global escalation and renewal policies that you set in the Expiration and Escalation Policy section (known as the routing slip level) of the Human Task editor are applied. For example, if the global policy is set to escalate the task and this participant does not act in the duration provided, the task is escalated to the manager or another user, as appropriate.
See Also:
"Escalating, Renewing, or Ending the Task" for instructions on setting the global escalation and renewal policies in the Expiration and Escalation Policy section of the Human Task editorClick the + sign to expand the Advanced section (if not already expanded).
Select Allow this participant to invite other participants if you want this task assignee to invite other participants into the workflow before routing it to the next assignee in this workflow. For example, assume the approval workflow goes from James Cooper to John Steinbeck. If this option is checked, James Cooper can decide to first route it to Irving Stone before it goes to John Steinbeck.
Note:
For the management chain participant type, the additional participants can be invited only by the last user in the management chain.Figure 15-16 displays the Sequential List of Approvers window.
This enables you to create a list of sequential participants for a workflow. For example, if you want a document to be reviewed by John, Mary, and Scott in sequence, use this participant type. This is similar to the management chain participant type, except that with that type, the users are part of an organization hierarchy. For the sequential list of approvers participant type, they can be any list of users or groups.
Figure 15-16 Add Participant Type — Sequential List of Approvers
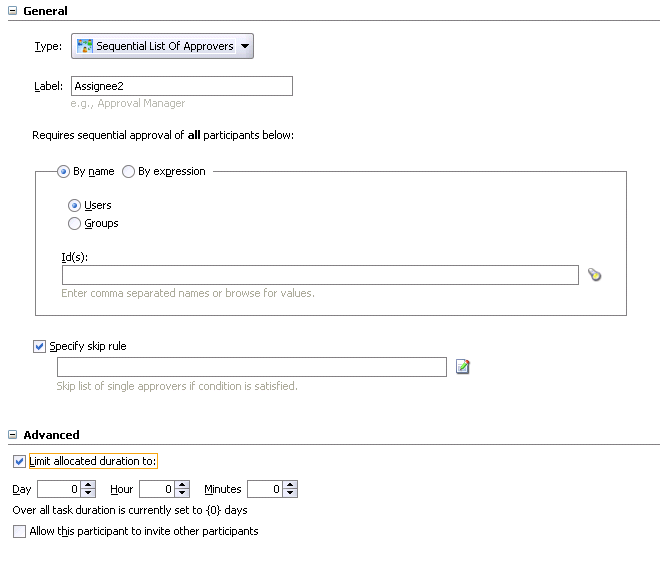
Enter a recognizable label for this participant in the Label field. This label must be unique within this workflow (for example, Approval Manager, Primary Reviewers, and so on).
Instructions for configuring the following subsections of the Add Participant Type - Sequential List of Approvers window are listed in Table 15-6.
Table 15-6 Add Participant Type — Sequential List of Approvers
| For This Subsection... | See... |
|---|---|
| Requires sequential approval of all participants below | "Assigning Participants to the Sequential List of Approvers Task" |
| Specify skip rule | "Bypassing a Task Participant" |
| Limit allocated duration to | "Specifying a Time Limit for Acting on a Task" |
| Allow this participant to invite other participants | "Inviting Additional Participants to a Task" |
Select a method for assigning a user or group to participate in this task.
By name
Enter a user or group name or click the first icon (flashlight) to the right of the field to display a window for selecting a user or group configured through the identity service. The identity service enables user authorization and the lookup of user properties, roles, group memberships, and privileges. User information is obtained from Java AuthoriZatioN (JAZN) or an LDAP server such as Oracle Internet Directory. You can use wild cards (*) to search for IDs.
Dynamically assign this task to a user (for example, jcooper) or group (for example, administrators) by clicking the icon to the right of the field to display the Expression Builder window. Users who are members of a group are assigned this task. For a user to act on a task assigned to a group, they must first claim the task in the Oracle BPEL Worklist Application during run time.
See Also:
"Assigning Participants to the Single Approver Task" for rules to follow when specifying assignees with XPath expressionsSelect the Specify skip rule check box if you want the user or group to be bypassed if a specific condition is satisfied. This action displays an icon for accessing the Expression Builder window for building a condition. For example, if a user submits a business trip expense report that is below a specific amount, no approval is required by their manager. The expression must evaluate to a Boolean value.
See Also:
"Bypassing a Task Participant" for an example of a valid XPath expression for skipping a participantClick the + sign to expand the Advanced section shown in Figure 15-16.
Click Limit allocated duration to.
Specify the amount of time a user or group receives to act on a task. If the user or group does not act in the time specified, the global escalation and renewal policies that you set in the Expiration and Escalation Policy section (known as the routing slip level) of the Human Task editor are applied. For example, if the global policy is set to escalate the task and this participant does not act in the duration provided, the task is escalated to the manager or another user, as appropriate.
See Also:
"Escalating, Renewing, or Ending the Task" for instructions on setting the global escalation and renewal policies in the Expiration and Escalation Policy section of the Human Task editorClick the + sign to expand the Advanced section (if not already expanded).
Select Allow this participant to invite other participants if you want this task assignee to invite other participants into the workflow before routing it to the next assignee in this workflow. For example, assume the approval workflow goes from James Cooper to John Steinbeck. If this option is checked, James Cooper can decide to first route it to Irving Stone before it goes to John Steinbeck.
Note:
For the sequential list of approvers participant type, the additional participants can be invited only by the last user in the management chain.Figure 15-17 displays the FYI Assignee window.
This participant type is used when a task is sent to a user, but the business process does not wait for a user response; it just continues. FYI assignees cannot directly impact the outcome of a task, but in some cases can provide comments or add attachments.
For example, a magazine subscription is due for renewal. If the user does not cancel the current subscription before the expiration date, the subscription is renewed. This user is reminded weekly until the request expires or the user acts on it.
Enter a recognizable label for this participant in the Label field. This label must be unique within this workflow (for example, Approval Manager, Primary Reviewers, and so on).
Instructions for configuring the following subsections of the Add Participant Type - FYI Assignee window are listed in Table 15-7:
Table 15-7 Add Participant Type - FYI Assignee
| For This Subsection... | See... |
|---|---|
| Send an FYI copy of this task to all participants below | "Assigning Participants to the FYI Assignee Task" |
| Share attachments and comments | "Sharing Attachments and Comments with Task Participants" |
Select a method for assigning a user or group to participate in this task.
By name
Enter a user or group name or click the first icon (flashlight) to the right of the field to display a window for selecting a user or group configured through the identity service. The identity service enables user authorization and the lookup of user properties, roles, group memberships, and privileges. User information is obtained from Java AuthoriZatioN (JAZN) or an LDAP server such as Oracle Internet Directory. You can use wild cards (*) to search for IDs.
Dynamically assign this task to a user (for example, jcooper) or group (for example, administrators) by clicking the icon to the right of the field to display the Expression Builder window. Users who are members of a group are assigned this task. For a user to act on a task assigned to a group, they must first claim the task in the Oracle BPEL Worklist Application during run time.
See Also:
"Assigning Participants to the Single Approver Task" for rules to follow when specifying assignees with XPath expressionsFigure 15-18 displays the External Routing Service window.
This participant type enables you to configure an external routing service that dynamically determines the participants in the workflow. If this participant type is specified, all other participant types are ignored. It is assumed that the external routing service provides a list of participant types (single approver, list of approvers, group vote, and so on) at run time to determine the routing of the task.
Figure 15-18 Add Participant Type — External Routing Service
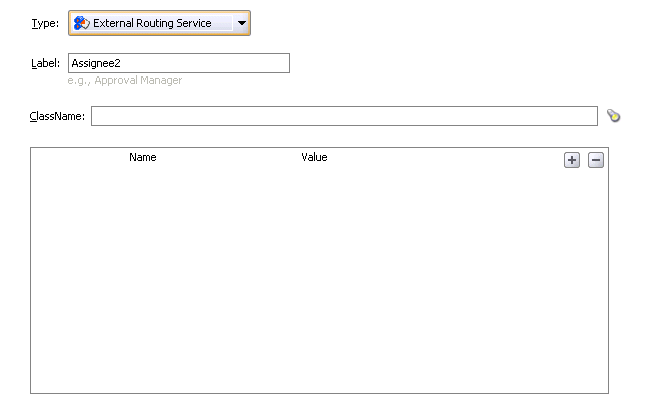
Enter a recognizable label for this participant in the Label field. This label must be unique within this workflow (for example, Approval Manager, Primary Reviewers, and so on).
Enter the fully qualified class file name or click the flashlight icon to select the name (for example, the org.mycompany.tasks.RoutingService class name). This class must implement the oracle.bpel.services.workflow.task.IAssignmentService interface.
Click the + sign to add name and pair value parameters that can be passed to the external service.
See Also:
"Dynamically Assigning Task Participants with the Assignment Service" for details about using this interfaceAfter you configure a participant type and are returned to the Human Task editor, the Allow all participants to invite other participants check box is enabled, as shown in Figure 15-19.
Figure 15-19 Human Task Editor — Assignment and Routing Policy Section

This check box is the equivalent of the Adhoc workflow pattern of previous BPEL releases. This applies when there is at least one participant. In this case, each user selects users or groups as the next assignee when approving the task.
If you want this task assignee to invite other participants into the workflow before routing it to the next assignee in this workflow, select the Allow all participants to invite other participants check box.
After you configure a participant type and are returned to the Human Task editor, the Enable abrupt completion condition check box is enabled, as shown in Figure 15-19.
If you want to specify conditions under which to complete the task early, regardless of the other participants in the workflow, select the Enable abrupt completion condition check box.
The Abrupt Completion Details window appears.
For example, assume an expense report goes to the manager, and then the director. If the first participant (manager) rejects it, you can end the workflow without sending it to the next participant (director).
There are two methods for specifying the abrupt completion of a task:
Outcomes
XPath expression routing condition
If outcomes are specified, any time the selected task outcome occurs, the task completes. If both outcome and routing condition are specified, the workflow service performs a logical OR on the two.
Select appropriate outcomes and click the > button. To select all, click the >> button.
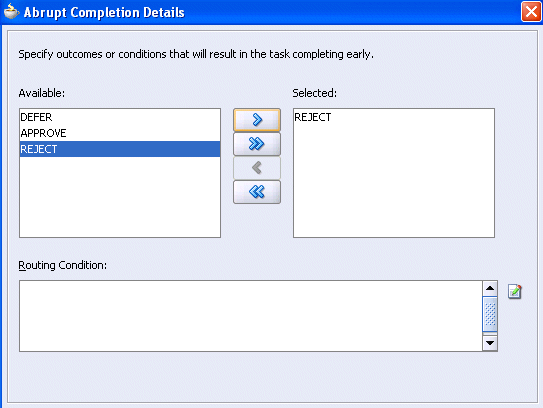
Click the icon to the right of the Routing Condition field to display the Expression Builder window for dynamically creating a condition under which to complete this task early. For example, if a user submits a business trip expense report that is below a specific amount, no approval is required by their manager.
Click OK to return to the Human Task editor.
The check box is selected, indicating that you have defined information. You can click the icon to the right of the Enable abrupt completion condition check box to edit this information.
Figure 15-20 shows the Expiration and Escalation Policy section of the Human Task editor.
You can specify expiration duration of a task in this global policy section (also known as the routing slip level). If expiration duration is specified at the routing slip level instead of at the participant type level, then this duration is the expiration duration of the task across all the participants. However, if you specify expiration duration at the participant type level (through the Limit allocated duration to field), then those settings take precedence over settings specified in the Expiration and Escalation Policy section (routing slip level).
Figure 15-20 Human Task Editor — Expiration and Escalation Policy Section

This section provides an overview of how specifying the expiration duration at this level makes this setting the expiration duration of the task across all the participants.
For example, participant LoanAgentGroup and participant Supervisor have 3 days to act on the task between them, as shown in Figure 15-21:
If there is no expiration specified at either the participant level or this routing slip level, then that task has no expiration duration.
If expiration duration is specified at any of the participant's level, then for that participant the participant expiration duration is used. However, the global expiration duration is still used for the participants that do not have participant level expiration duration. The global expiration duration is always decremented by the time elapsed in the task.
The policy to interpret the participant level expiration for the participants is described below:
Management Chain — Each participant in the management chain gets the same expiration duration. The duration is not for all the assignments resulting from this assignment. If the task expires at any of the assignments in the management chain, the task expires and the escalation and renewal policy is applied.
Sequential list of approvers — Each assignment in the management chain gets the same expiration duration as the one specified in the sequential list of approvers. Note that the duration is not for all the assignments resulting from this assignment. If the task expires at any of the assignments in the management chain, the task expires and the escalation and renewal policy is applied.
Group vote
In a group vote workflow, if the parallel participants are specified as a resource, a routing slip is created for each of the resources. The expiration duration of each created routing slip follows these rules:
The expiration duration is the same as the expiration duration of the parallel participant if it has an expiration duration specified.
The expiration duration that is left on the task if it was specified at the routing slip level.
No expiration duration, otherwise.
If parallel participants are specified as routing slips, then the expiration duration for the parallel participants are determined by the routing slip.
Note:
When the parent task expires in a parallel task, the subtasks are withdrawn if those tasks have not expired or completed.In the following routing slip sample, participant Loan Agent Group has an expiration duration of 1 day and participant Loan Agent Supervisor does not have any expiration duration on the task, even though an expiration duration is specified at the routing slip level. In this example, the routing slip is treated just as if there were no expiration duration specified at the routing slip level.
<routingSlip xmlns="http://xmlns.oracle.com/pcbpel/workflow/routingslip">
  <expirationDuration>PT10D </expirationDuration>

  <participants>

    <participant name="Loan Agent 1" expirationDuration="PT2D">
      <resource isGroup="true" type="STATIC">jcooper</resource>
    </participant>
    <participant name="Loan Agent 2">
      <resource isGroup="true" type="STATIC">jstein</resource>
    </participant>

    <managementChain name="Loan Approval Chain"

                     expirationDuration="PT2D">
      <resource isGroup="true" type="STATIC">wfaulk</resource>
      <levels type="STATIC">1</levels>
      <title type="STATIC">Vice President</title>
    </managementChain>

    <participant name="Reviewer">
      <resource isGroup="true" type="STATIC">sfitzger</resource>
    </participant>
  </participants>

</routingSlip>
Table 15-8 demonstrates the expiration policy. Note that the management chain in the above example evaluates to two users — wfaulk and cdickens (manager of wfaulk).
Table 15-8 Expiration Policy
| Participant | Expiration | Actual Time Taken to Approve |
|---|---|---|
Loan Agent 1 – jcooper |
2 days (participant level) |
One day |
Loan Agent 2 – jstein |
9 days (10 – 1 days) (global level) |
One day |
Loan Approval Chain – wfaulk (first user in chain) |
2 days (participant level) |
One day |
Loan Approval Chain – cdickens (second user in chain) |
2 days (participant level) |
One day |
Reviewer - sfitzger |
6 days (10 – 4 days) (global level) |
Select an escalation and expiration policy. You can enter a fixed time or a dynamic time by clicking the icon to the right of the By Expression field to display the Expression Builder window.
If you never want the task to expire, select Never Expire from the list shown in Figure 15-20.
If you want the task to expire, select Expire after from the list shown in Figure 15-20.
Specify the maximum time period for the task to remain open.
When the task expires, either the escalation policy or the renewal policy at the routing slip level is applied. If neither is specified, the task expires. The expiration policy at the routing slip level is common to all the participants.
The expiration policy for parallel participants is interpreted as follows.
If parallel participants are specified as resources in parallel elements, there is no expiration policy for each of those participants.
If parallel participants are specified as routing slips, then the expiration policy for the routing slip applies to the parallel participants.
Figure 15-22 indicates that the task expires in 3 days.
If you want to extend the expiration period when the user does not respond within the allotted time, select Renew after from the list shown in Figure 15-20.
Specify the maximum number of times to continue renewing this task.
The renewal policy specifies the number of times the task can be renewed on expiration and the renewal duration. In Figure 15-23, when the task expires, it is renewed at most 3 times. It does not matter if the task expired at the LoanAgentGroup participant or the Supervisor participant.
If you want to escalate the task (for example, to the user's manager) if the user does not respond within the allotted time, select Escalate after from the list shown in Figure 15-20.
Specify the following additional values:
Maximum Escalation Levels
Number of management levels to which to escalate the task
Highest Approver Title
The title of the highest approver (for example, self, manager, director, or CEO).
The escalation policy specifies the number of times the task can be escalated on expiration and the renewal duration. In Figure 15-24, when the task expires, it is escalated at most 3 times. It does not matter if the task expired at the LoanAgentGroup participant or the Supervisor participant.
Figure 15-25 shows the Notification Settings section of the Human Task editor (when fully expanded).
Notifications indicate when a user is assigned a task or informed that the status of the task has changed. Notifications can be sent through e-mail, voice message, fax, pager, or SMS. Notifications are sent to different types of participants for different actions. Notifications are configured by default with default messages. For example, a notification message is sent to indicate that a task has completed and closed. You can create your own or modify existing configurations.
Figure 15-25 Human Task Editor — Notification Settings Section
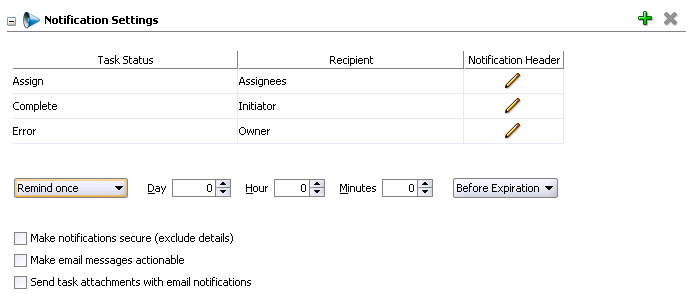
Click the + sign to expand the Notification Settings section (displays as shown in Figure 15-25).
Instructions for configuring the following subsections of the Notification Settings section are listed in Table 15-9.
Table 15-9 Human Task Editor — Notification Settings Section
| For This Subsection... | See... |
|---|---|
| Task Status
Recipient |
"Notifying Recipients of Changes to Task Status" |
| Notification Header | "Editing the Notification Message" |
| Reminders | "Setting Up Reminders" |
| Make notifications secure (exclude details)
Make e-mail messages actionable Send task attachments with email notifications |
"Securing Notifications, Making Messages Actionable, and Sending Attachments" |
See Also:
"Notifications from Workflow Services"Three default status types display in the Task Status column: Assign, Complete, and Error. You can select other status types for which to receive notification messages.
Click a type in the Task Status column to display the complete list of task types:
Assign—when the task is assigned to users or a group. This action captures the following actions:
Task is assigned to a user
Task is assigned to a new user in a sequential list of approvers workflow
Task is renewed
Task is delegated
Task is reassigned
Task is escalated
Information for a task is submitted
Complete
Error
Expire
Request Info
Update Outcome
Suspend
Withdraw
Select a task status type.
Notifications can be sent to users involved in the task in various capacities. This includes when the task is assigned to a group, each user in the group is sent a notification if there is no notification endpoint available for the group.
Click an entry in the Recipient column to display a list of possible recipients for the notification message.
Assignees—the users or groups to whom the task is currently assigned
Initiator—the user who created the task
Approvers—the users who have approved the task so far. This applies in a sequential list of approvers participant type where multiple users have approved the task and a notification must be sent to all of them.
Owner—the task owner
See Also:
"Configuring the Notification Channel"A default notification message is available for delivery to the selected recipient. If you want, you can modify the default message text.
Click the icon in the Notification Header column to modify the default notification message.
The Edit Notification Message window appears.
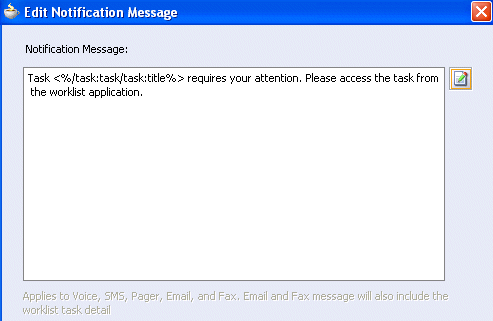
This message applies to all the supported notification channels: e-mail, voice, fax, pager, and SMS. E-mail and fax messages can also include the worklist task detail defined in this message. The channel by which the message is delivered is based upon the notification preferences you specify.
Modify the message wording as necessary.
Click OK to return to the Human Task editor.
See Also:
"Notifications from Workflow Services" for notification preference detailsYou can send task reminders, which can be based on the time the task was assigned to a user or the expiration time of a task. The number of reminders and the interval between the reminders can also be configured.
Select the number of reminders to send from the Remind list.
If you selected to remind the assignee one, two, or three times, select the interval between reminders, and whether to send the reminder before or after the assignment.
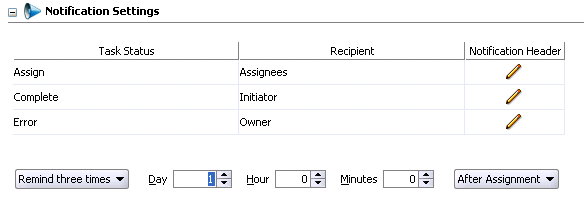
See Also:
"Sending Reminders"You can perform additional notification tasks in this section.
Select the corresponding check box for functionality you want to use.
| Field | Value |
|---|---|
| Make notifications secure (exclude details) | Select to make the notification message secure. If selected, a default notification message is used. There are no HTML worklist task details, attachments, or actionable links in the e-mail. Only the task number is in the message.
See Also: "Sending Secure Notifications" |
| Make e-mail messages actionable | Select to make e-mail notifications actionable. This enables you to perform task actions through e-mail.
See Also: "Sending Actionable E-mails" for additional configuration details |
| Send task attachments with e-mail notifications | Select to send task attachments with the notification message. |
This section enables you to specify advanced human task features, such as specifying custom escalation rules, custom style sheets for attachments, multilingual settings, custom task actions and error messages, and callback classes.
Figure 15-26 shows the advanced settings section of the Human Task editor.
Figure 15-26 Human Task Editor — Advanced Settings Section
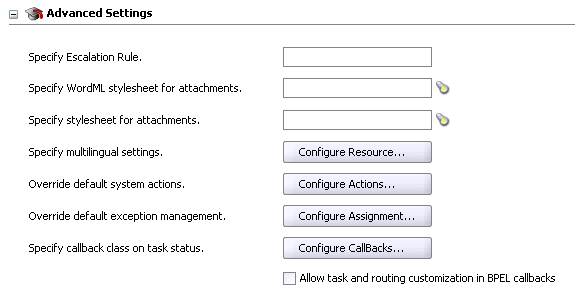
Table 15-10 describes the sections available.
Table 15-10 Advanced Settings Sections
| Section | See... |
|---|---|
| Specify escalation rule | "Specifying Escalation Rules" |
| Specify WordML Stylesheet for attachments | "Specifying WordML Style Sheets for Attachments" |
| Specify stylesheet for attachments | "Specifying Style Sheets for Attachments" |
| Specify multilingual settings | "Specifying Multilingual Settings" |
| Override default system actions | "Overriding Default System Actions" |
| Override default exception management | "Overriding Default Exception Management" |
| Specify callback class on task status | "Specifying Callback Classes on Task Status" |
| Allow task and routing customization in BPEL callbacks | "Allowing Task and Routing Customization in BPEL Callbacks" |
This option allows a custom escalation rule to be plugged in for a particular workflow. For example, to assign the task to a current user's department manager on task expiration, you can write a custom task escalation function, register it with the workflow service, and use that function in task definitions.
The default escalation rule is to assign a task to the manager of the current user. To add a new escalation rule, follow the steps below.
Implement interface oracle.bpel.services.workflow.assignment.dynamic.IDynamicTaskEscalationFunction. This implementation has to be available in the classpath for the server.
Change the file SOA_Oracle_Home\bpel\system\services\config\wf-dynamic-assign-cfg.xml to add a new function:
<dynamicAssignmentFunctions>

  <function name="MANAGERS_MANAGER"
 classpath="oracle.bpel.services.workflow.assignment.dynamic.patterns.
 TaskEscalationManagersManager">
  </function>

</dynamicAssignmentFunctions>
Enter the function name as defined in the wf-dynamic-assign-cfg.xml file for the escalation rule in the Specify Escalation Rule field.
See Also:
"Custom Escalation Function"This option allows dynamic creation of Microsoft Word documents for the purpose of sending them as e-mail attachments using a WordML XSLT stylesheet. The XSLT stylesheet is applied on the task document.
Click the flashlight icon to select a WordML style sheet as an attachment.
See Also:
Oracle Application Server Developer's Guide for Microsoft Office Interoperability for specific detailsThis option allows creation of e-mail attachments using an XSLT stylesheet. The XSLT stylesheet is applied on the task document.
Click the flashlight icon to select a stylesheet as an attachment.
You can specify resource bundles for displaying task details in different languages in the Oracle BPEL Worklist Application. Resource bundles are supported for the following task details.
Displaying the value for task outcomes in plain text or with the message(key) format
Displaying the XML element and attributes names in the payload display of the Oracle BPEL Worklist Application. The key name in the resource bundle must be the same as the name of the XML element and attributes for internationalization of XML element names in the Oracle BPEL Worklist Application.
Making e-mail notification messages available in different languages. At run time, specify the XPath extension function hwf:getTaskResourceBundleString(taskId, key, locale?) to obtain the internationalized string from the specified resource bundle. The locale of the notification recipient can be retrieved with the function hwf:getNotificationProperty(propertyName).
Click Configure Resource.
The Resource Details window appears.
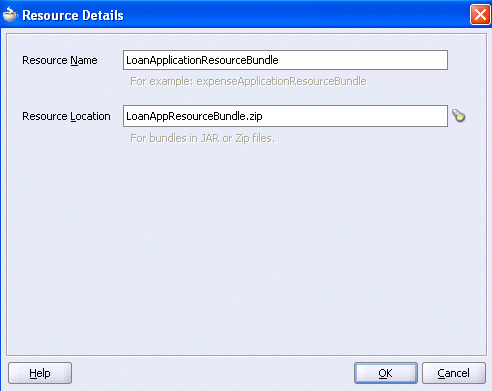
Enter the name of the resource used in the resource bundle.
Click the flashlight icon to select the JAR or ZIP resource bundle file to use. The resource bundle can be part of your BPEL suitcase.
Click OK to return to the Human Task editor.
The actions performed from the Oracle BPEL Worklist Application are common to all business processes. However, you can restrict some actions in a particular business process.
For example, assume that in a loan approval process, the business requirement is to never suspend a loan application. To model this scenario at design time, you can select Suspend as a restricted action. When an action is selected as restricted, the Oracle BPEL Worklist Application does not display the action for this task.
By default, these actions are available on all tasks based on the user's privileges. The task owner or bpeladmin administrator can always perform any of these actions on processes they own.
Click Configure Actions.
Select the system actions allowed on a task. By default, all are selected and available (unrestricted).
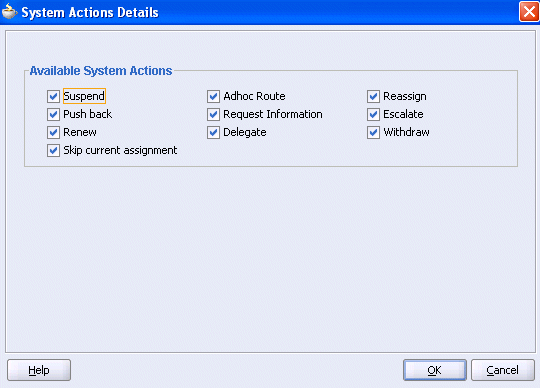
The following system actions can be restricted by unselecting them:
Suspend — Enables task owners (or users with the BPMWorkflowSuspend privilege) to put a workflow temporarily on hold. Task expiration and escalation do not apply until the workflow is resumed. No actions are permitted on a suspended task (except resume and withdraw).
Push back — Sends the task one level back in the workflow. For example, assume the task was routed to the LoanAgentGroup and then to jstein. If jstein now pushes the task back, it goes back to the LoanAgentGroup.
Renew — If a task is about to expire, a task assignee can renew the task and request more time to perform the task. This operation is not allowed if the process designer has restricted task renewal on the workflow.
Skip current assignment — Skips the current assignment and moves to the next assignment or picks the outcome as set by the previous approver if there are no more assignees.
Adhoc Route — Enables a user to enter an outcome and then route the task in an adhoc fashion to the next user who must review the task.
Request Information — Any workflow participant can request information from the task initiator or any of the prior approvers of the task. When the requested information is submitted, the task is assigned to the user who requested the information.
Delegate — Any workflow participant can delegate the task to another user. In this case, the other user is acting on behalf of the current assignee. When the task is delegated, it resides on both users' worklists until the original assignee or the delegated person acts on it.
Reassign — Enables the current assignee of the task to transfer it to another user or group. In this case, the task is moved from the worklist of the current assignee to the new assignee.
Escalate — Escalates a task to their manager for further action.
Withdraw — Enables the task initiator to withdraw any pending task if they no longer want to send it through the workflow. A task owner can also withdraw a task on behalf of the initiator. When a task is withdrawn, the business process is called back with the state attribute of the task set to Withdrawn.
Click OK to return to the Human Task editor.
Tasks can error due to incorrect assignments. Incorrect assignments can occur for any of the following reasons:
Invalid assignees — The task assignee user or group is not a valid user in the system.
Invalid dynamic assignment — When assignees are specified to be dynamic, the dynamic XPath expression is not evaluated.
In the above cases, the task is marked as errored. By default, the life cycle of the task is completed with that action.During modeling of workflow tasks, you can specify error assignees for the workflow. If error assignees are specified, they are evaluated and the task is assigned to them. The error assignee can perform one of the following actions:
Adhoc route — route the task to the actual users assigned to the task. Adhoc route allows the task to be routed to users in sequence, parallel, and so on.
Reassign — reassign the task to the actual users assigned to this task
Error task — indicate that this task cannot be rectified.
If there are any errors in evaluating the error assignees, the task is marked as errored.
This window enables you to specify the users or groups to whom the task is assigned if an error in assignment has occurred.
Click Configure Assignment.
Select the error assignees.
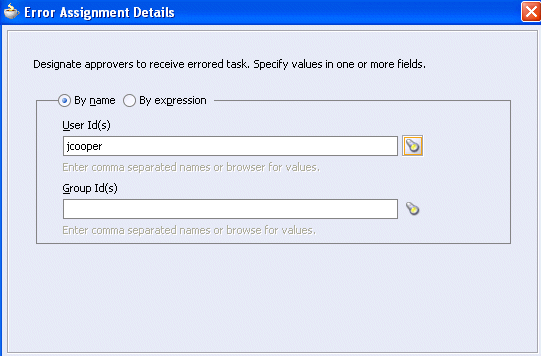
You can register callbacks for the workflow service to call during the life cycle of a task. The callback class has to implement the interface oracle.bpel.services.workflow.task.IRoutingSlipCallback. Make the callback class available in the classpath of the server.
Click Configure Callbacks.
Click the + sign to add a callback to the table. A callback named OnAssigned is automatically added to the Callback column.
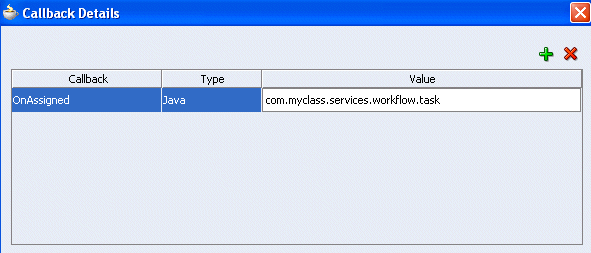
Click OnAssigned to display a list of additional callback values to select for this column.
The following callbacks are available:
onCompleted — This callback is invoked when the task is completed, expired, withdrawn, or errored.
onAssigned — This callback is invoked when the task is assigned to a new set of assignees due to the following actions:
outcome update
skip current assignment
override routing slip
onUpdated — This callback is invoked for any other update to the task that does not fall in the onTaskComplete or onTaskAssigned callback. This includes updates on a task due to request for information, submit information, escalation, reassign, and so on.
onSubtaskUpdated — This callback is invoked for any update to a subtask.
Click Java in the Type column to display a list of additional values for this column.
Click the empty field in the Value column to enter a value. The value is the complete class name of the Java class that implements oracle.bpel.services.workflow.task.IRoutingSlipCallback.
Click OK.
The Allow task and routing customization in BPEL callbacks check box must be selected if you select the check box of the same name on the Human Task - Advanced tab shown in Figure 15-28. Selecting both check boxes updates the metadata for callbacks.
See Also:
"Allowing Task and Routing Customizations in BPEL Callbacks" for details on using callbacksYou can save your human task changes at any time. The task can be re-edited at a later time by clicking the metadata task configuration .task file in the Application Navigator.
Select Save from the File main menu or click the X sign to close the .task metadata task configuration file. 
Description of the illustration ht_exit.gif
If you click the X sign, select Yes when prompted to save your changes.
You must associate the .task file that consists of the human task settings with a BPEL process. When association is complete, a Task Service partner link is created. The Task Service exposes the operations required to act on a task.
The method by which you created the human task indicates if the task is already associated with a BPEL process. Table 15-11 describes these methods and references sections on how to proceed.
Note:
Note that regardless of whether you have already associated the human task with a BPEL process, you must still define key human task activity properties, including the task title, task initiator, task priority, and task parameter variables. These tasks are described in "Defining the Human Task Activity Title, Initiator, Priority, and Parameter Variables" and "Defining the Human Task Activity Advanced Features".Table 15-11 Human Task Association with the BPEL Process
| Human Task Creation Method | Then... | See... |
|---|---|---|
|
You must associate the human task with your BPEL process. | "Associating a Human Worklist Task with a BPEL Process" |
|
The human task is already associated with the BPEL process | "Opening a Human Task Activity Already Associated with a BPEL Process" |
See Also:
"Task 1: Creating the Human Task Definition with the Human Task Editor" for instructions on creating a human taskSelect the BPEL process with which to associate the .task file of the human task in the Application Navigator.
Select Process Activities from the Component Palette.
Drag and drop a new Human Task activity into your BPEL process.
The Add a Human Task window appears.
Note:
When you first drag and drop this activity into Oracle JDeveloper, the window is named Add a Human Task. After you finish specifying details on this window and click OK, the name of this window changes to simply Human Task.Click the first icon to the right of the Task Definition field.
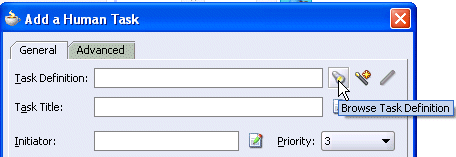
The Choose Task Definition File appears.
Select the .task file and click Open. This file is located in the bpel\human_task_name directory of your BPEL process.
The .task file is added to the Task Definition field.
See the following sections to configure the human task activity:
Double-click the previously created Human Task activity in your BPEL process.
The Human Task window appears.
Click the third icon to the right of the Task Definition field to open the human worklist task you previously created.

See the following sections to configure the human task activity:
Figure 15-27 shows the General tab.
The General tab of the Human Task activity enables you to perform the tasks shown in Table 15-12:
Table 15-12 Human Task - General Tab
| For this Field... | See... |
|---|---|
| Task Title | "Specifying the Task Title" |
| Initiator
Priority |
"Specifying the Task Initiator and Task Priority" |
| Task Parameters | "Specifying Task Parameters" |
Enter the task title in the Task Title field through one of the following methods. This is a mandatory field. Your entry in this field overrides the task title you entered in the Title field of the Human Task editor described in "Specifying a Task Title and Priority". The title displays the task in the Oracle BPEL Worklist Application during run time.
Enter the title manually.
Click the icon to the right of the field to display the Expression Builder window to dynamically create the title.
You can also mix static text and dynamic expressions in the same title. To include dynamic text, place your cursor at the appropriate point in the text and click the icon on the right to invoke the Expression Builder window.
See Also:
"Assigning Input and Output Parameters for the Human Task" for an example of specifying the task title nameEnter the initiator (for example, jcooper) or click the icon to the right of the Initiator field to display the Expression Builder window for dynamically specifying an initiator. This field is optional.
The initiator is the user who initiates a task. The initiator can view their created tasks from the Oracle BPEL Worklist Application and perform specific tasks defined in the System Action Details window, such as withdrawing or suspending a task. If not specified, the initiator defaults to the task owner specified on the Advanced tab of the Human Task window. The initiator defaults to bpeladmin if a task owner is also not specified.
Select a priority value between 1 (the highest) and 5 from the Priority list. This field is provided for user reference and does not make this task a higher priority during run time. The priority can be used to sort tasks in the Oracle BPEL Worklist Application. This priority value overrides the priority value you select in the Priority list of the Human Task editor.
See Also:
"Specifying a Task Title and Priority" for instructions on specifying the priority in the Human Task editorThe task parameter table displays a list of task parameters after you complete the Task Title and Initiator fields.
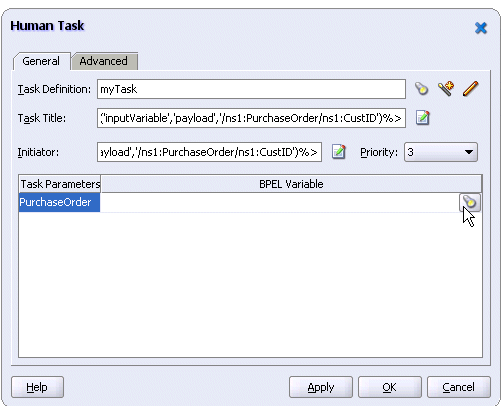
Click the flashlight in the BPEL Variable column to map the task parameter to the BPEL variable. You must map only the task parameters that carry input data. For output data that is filled in from the worklist, you do not need to map the corresponding variables.
The Task Parameters window appears.
Expand the Variables navigation tree and select the appropriate task variable.
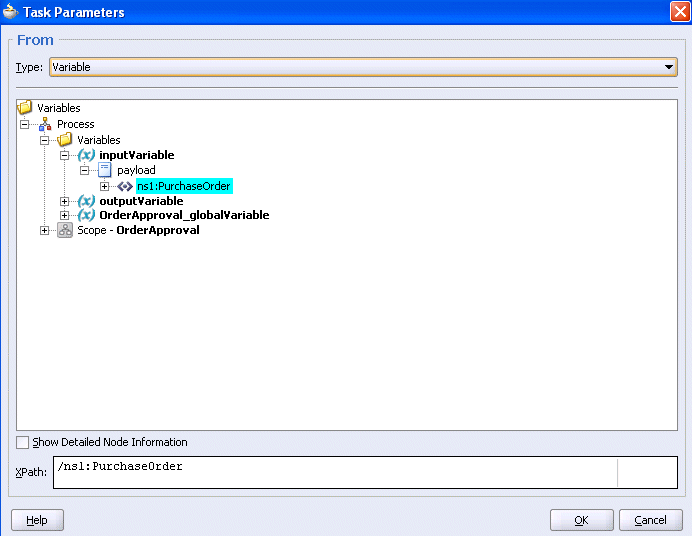
Click OK.
The Human Task window appears as follows.
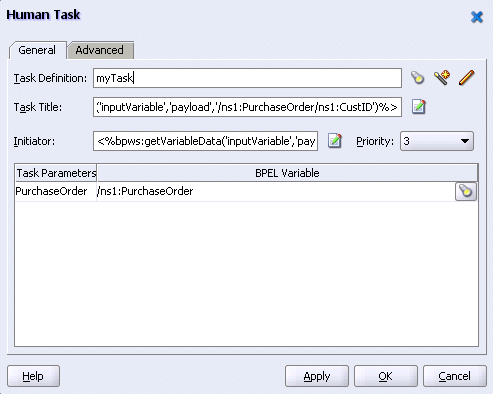
Click Apply.
If you want to define advanced features for the human task activity, click the Advanced tab and go to section "Defining the Human Task Activity Advanced Features". Otherwise, click OK to close the Human Task window.
Figure 15-28 shows the Advanced tab.
The Advanced tab of the Human Task activity enables you to perform the tasks shown in Table 15-13:
Table 15-13 Human Task - Advanced Tab
| For this Field... | See... |
|---|---|
| Scope Name
Global Task Variable Name |
"Specifying a Scope Name and a Global Task Variable Name" |
| Owner | "Specifying a Task Owner" |
| Identification Key | "Specifying an Identification Key" |
| Include task history from | "Including the Task History of Other Human Tasks" |
| Allow task and routing customization in BPEL callbacks | "Allowing Task and Routing Customizations in BPEL Callbacks" |
You are automatically provided with default scope and global task variable names during human task activity creation. However, you can specify custom names that are used to name the scope and global variable during human task activity creation.
Enter the name for the BPEL scope to be generated in the Scope Name field.
This BPEL scope encapsulates the entire interaction with the workflow service and BPEL variable manipulation.
Enter the global task variable name in the Global Task Variable Name field.
This is the name of the BPEL task variable used for the workflow interaction.
Enter the task owner name in the Owner field or click the icon to the right to use the Expression Builder to dynamically specify the owner of this task.
The task owner can view tasks belonging to business processes they own and perform operations on behalf of any of the task assignees. Additionally, the owner can also reassign, withdraw, or escalate tasks.
If you do not specify a task initiator on the General tab of the Human Task window, it defaults to the owner specified here. If an owner is not specified, it defaults to the bpeladmin administrator.
Enter an optional identification key value in the Identification Key field.
The identification key can be used as a user-defined ID for the task. For example, if the task is meant for approving a purchase order, the purchase order ID can be set as the identification key of the task. Tasks can be searched from the Oracle BPEL Worklist Application using the identification key. This attribute has no default value.
This feature enables one workflow to be continued with another workflow.
Select the Include task history from check box to extend a previous workflow task in the BPEL process. Selecting this check box includes the task history, comments, and attachments from the previous task. This provides you with a complete end-to-end audit trail.
When a workflow task is continued with another workflow, the following information is carried over to the new workflow:
Task payload and the changes made to the payload in the previous workflow
Task history
Comments added to the task in the previous workflow
Attachments added to the task in the previous workflow
In the Include task history from list, all existing workflows are listed. Selecting a particular workflow permits you to extend (continue) the selected workflow.
For example, a hiring process is used to hire new employees. Each interviewer votes to hire or not hire a candidate. If 75% of the votes are to hire, then the candidate is hired; otherwise, the candidate is rejected. If the candidate is to be hired, an entry in the HR database is created and the human resources contact completes the hiring process. The HR contact also needs to see the interviewers and the comments they made about the candidate. This process can be modeled using a group vote for the hiring. If the candidate is hired, a database adapter is used to create the entry in the HR database. After this, a simple workflow can include the task history from the group vote so that the hiring request, history, and interviewer comments are carried over. This simple workflow is assigned to the HR contact.
Select the Allow task and routing customizations in BPEL callbacks check box to notify the BPEL process using OnMessage callbacks every time a task is routed to a different user or when the task status changes. You must also select the check box of the same name in the Advanced Settings section of the Human Task editor shown in Figure 15-26 in order to update the metadata for callbacks.
In these callbacks, you can call the Task Service to change the routing or update the current assignees. This option impacts the BPEL code generated to interact with the Task Service.
If this option is not selected, the client process gets notified only when the task completes or when it expires or errors out.
Click OK to close the Human Task window.
Go to the Human Task editor for this human task (the .task file).
Expand the Advanced Settings section at the bottom of the editor.
Click Allow task and routing customization in BPEL callbacks.
This check box must be selected to use callbacks. This enables you to update the metadata.
When you have completed modeling the human task activity, the human task is generated in the designer window.
Figure 15-29 shows how a workflow interaction is modeled in Oracle BPEL Process Manager. Figure 15-29 also illustrates the interaction when no BPEL callbacks are modeled. In this case, once a task is complete, the BPEL process is called back with the completed task. No intermediary events are propagated to the BPEL process instance. It is recommended that any user customizations be done in the first assign, AssignTaskAttributes, and that AssignSystemTaskAttributes not be changed.
Figure 15-30 shows a workflow interaction in Oracle JDeveloper.
Figure 15-30 Workflow Interaction Modeling in Oracle JDeveloper
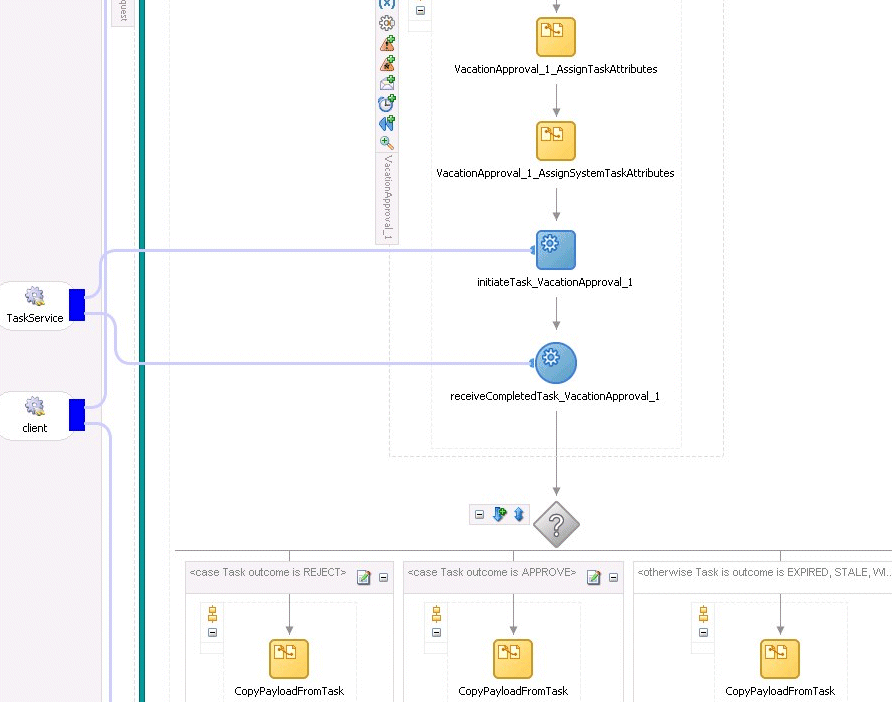
If intermediary events need to be propagated to the BPEL process instance, select the Allow task and routing customization in BPEL callbacks check box in both the Advanced tab of the Human Task window and the Advanced Settings section of the Human Task editor. When these options are selected, the workflow service invokes callbacks in the BPEL instance during each update of the task. The callbacks are listed in the TaskService.wsdl file and described below:
onTaskCompleted — This callback is invoked when the task is completed, expired, withdrawn, or errored.
onTaskAssigned — This callback is invoked when the task is assigned to a new set of assignees due to the following actions:
Outcome update
Skip current assignment
Override routing slip
onTaskUpdated — This callback is invoked for any other update to the task that does not fall in the onTaskComplete or onTaskAssigned callback. This includes updates on tasks due to request for information, submit information, escalation, reassign, and so on.
onSubTaskUpdated — This callback is invoked for any update to a subtask.
Figure 15-31 shows how a workflow interaction with callbacks is modeled in Oracle BPEL Process Manager. Once this task is initiated, a while loop is used to receive messages until the task is complete. The while loop contains a pick with four onMessage branches — one for each of the above-mentioned callback operations. The workflow interaction works fine even if nothing is changed in the onMessage branches, meaning that customizations in the onMessage branches are not required.
In this scenario, a workflow context is captured in the BPEL instance. This context can be used for all interaction with the workflow services. For example, if you want to reassign a task if it is assigned to a group, then you need the workflow context for the reassignTask operation on the Task Service.
It is recommended that any user customizations be done in the first assign, AssignTaskAttributes, and that AssignSystemTaskAttributes not be changed.
Figure 15-31 Workflow Interaction Modeling (with Callbacks)
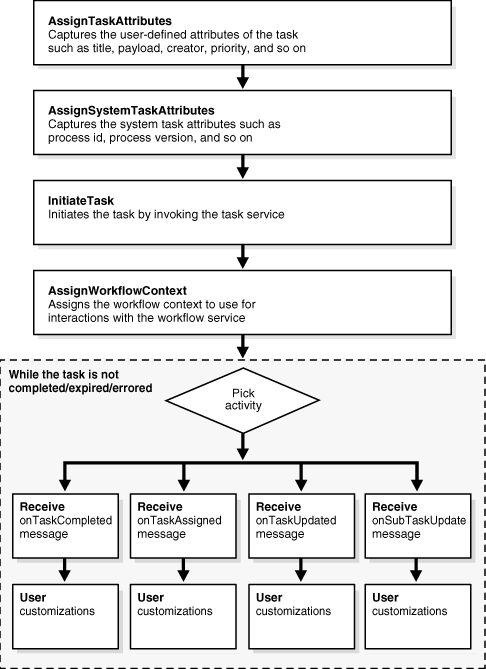
Figure 15-32 shows a workflow interaction in Oracle JDeveloper.
Figure 15-32 Workflow Interaction Modeling (with Callbacks) in Oracle JDeveloper
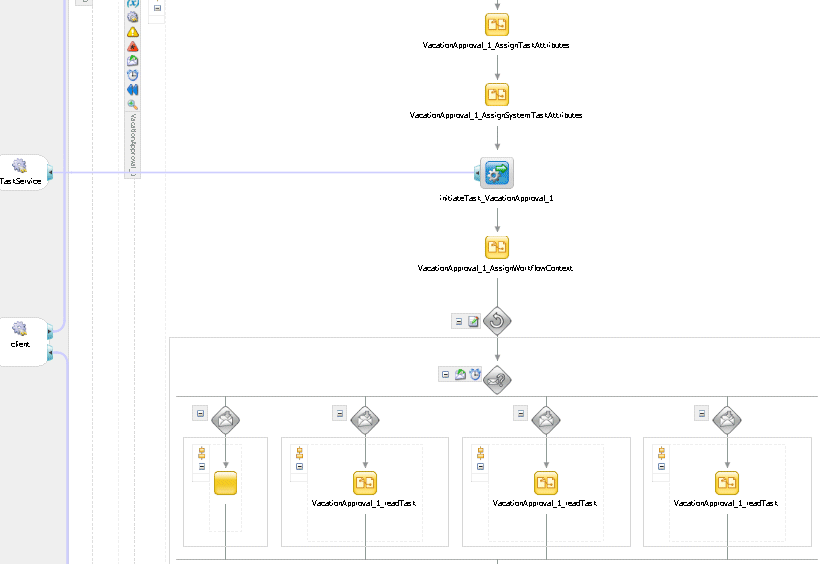
When the task history is included in a workflow, the generated BPEL process described in the previous two sections is similar, with the following differences:
The BPEL variable from the workflow whose task history is to be included is reused and no new BPEL variable is created.
The first invoke activity invokes the reinitiate operation instead of the initiate operation.
In many cases, the outcome of a task determines the flow of the business process. To facilitate modeling of the business logic, when a user task is generated, a BPEL switch activity is also generated with prebuilt BPEL case activities. By default, one case branch is created for each outcome selected during creation of the task. An otherwise branch is also generated in the switch to represent cases when the task is withdrawn, expired, or errored.
The task carries a payload in it. If the payload is set from a business process variable, then an assign activity with the name copyPayloadFromTask is created in each of the case and otherwise branches to copy the payload from the task back to its source. If the payload is expressed as other XPath expressions (such as ora:getNodes(...)), then this assign is not created because of the lack of a process variable to copy the payload back. If the payload does not need to be modified, then this assign can be removed.
By default, the switch activity contains case statements for the outcomes only. The other task conclusions are captured in the otherwise branch. These conclusions are as follows:
The task is withdrawn
The task is errored
The task is expired
If business logic must be added for each of these other conclusions, then case statements can be added for each of the preceding conditions. The case statements can be created as shown in the following BPEL segment. The XPath conditions for the other conclusions in the case activities for each of the preceding cases are shown in bold.
<switch name="taskSwitch">
  <case condition="bpws:getVariableData('SequentialWorkflowVar1',
'/task:task/task:state') = 'COMPLETED' and
bpws:getVariableData('SequentialWorkflowVar1', '/task:task/task:conclusion') = 'ACCEPT'">
    <bpelx:annotation>
      <bpelx:pattern>Task outcome is ACCEPT
      </bpelx:pattern>
    </bpelx:annotation>
      ...
  </case>
  <case condition=
"bpws:getVariableData('SequentialWorkflowVar1', '/task:task/task:state') = 'WITHDRAWN'">
    <bpelx:annotation>
      <bpelx:pattern>Task is withdrawn
      </bpelx:pattern>
    </bpelx:annotation>
     ...
  </case>
  <case condition=
"bpws:getVariableData('SequentialWorkflowVar1', '/task:task/task:state') = 'EXPIRED'">
    <bpelx:annotation>
      <bpelx:pattern>Task is expired
      </bpelx:pattern>
    </bpelx:annotation>
     ...
  </case>
  <case condition=
"bpws:getVariableData('SequentialWorkflowVar1', '/task:task/task:state') = 'ERRORED'">
    <bpelx:annotation>
      <bpelx:pattern>Task is errored
      </bpelx:pattern>
    </bpelx:annotation>
     ...
  </case>
  <otherwise>
    <bpelx:annotation>
      <bpelx:pattern>Task is EXPIRED, WITHDRAWN or ERRORED
      </bpelx:pattern>
    </bpelx:annotation>
      ...
  </otherwise>
</switch>
The task display form defines the display mechanism for the task payload in the Oracle BPEL Worklist Application. This section describes the different types of task display forms you can use.
This section contains the following topics:
The task display form for the human task can be automatically generated and then customized or developed completely from the beginning using the workflow APIs. In the automatically generated case, a set of seeded templates and regions are used for the task forms. There are two methods for generating forms associated with the task definition:
Automatically generate a simple task form — JSP-based forms that use the standard header, body, and footer template.
Custom task form — enables you to select one of the existing templates and regions to create a task form. You can also specify which task parameters to display in the form.
When task display forms are generated, a .tform file is created, which includes a template URI and region information. The .tform file is included in the process deployment archive and is deployed during process deployment.
Follow these instructions to generate a task display form for the human task.
Go to the Application Navigator in Oracle JDeveloper.
Right-click the folder of the human task for which to create a task display form (for this example, ExpenseApproval of the ExpenseRequest BPEL process in selected).
The following menu of selections appears.

See the following sections for details about generating the different types of task forms:
| Selection | See... |
|---|---|
| Auto Generate Simple Task Form | "Automatically Generating a Simple Task Display Form" |
| Custom Task Form | "Generating a Custom Task Display Form" |
A preview release of task display form support for application development framework (ADF) data controls is provided. Very minimal support is provided with this preview release. Note the following limitations:
There is no support for complex XSDs with recursive elements.
Task forms generated with ADF data controls cannot be edited.
Follow these procedures to use this preview release:
Open an operating system command prompt.
Open Oracle JDeveloper in preview mode:
JDev_Oracle_Home\jdev\bin\jdev.exe -J"-Dpreview_mode=true"
Note that Auto Generate Task Form With ADF Datacontrols now appears as a menu option when you right-click the folder of the human task, as shown in Step 2 of "Selecting a Task Display Form".
Open the SOA_Oracle_Home\j2ee\OC4J_Home\config\server.xml file.
where OC4J_Home is the name of the OC4J container for your install type:
home — for the Oracle Application Server SOA Basic install type
OC4J_SOA — if you accepted the default value for the Oracle Application Server SOA Advanced install types
Add the following line under the <shared-library name="oracle.bpel.common" version="10.1.3"> section:
<import-shared-library name="adf.oracle.domain"/>
Restart Oracle Application Server SOA Suite for the changes to take effect.
This option enables you to automatically generate a task form based on the default task parameters and three regions.
Select Auto Generate Simple Task Form from the list shown in Step 2.
The default layout is based on the following three region template:
Header region — this region has standard task attributes such as title, priority, created date, assignee, and expiration date. This information is contained in the Header1.jsp file.
Body region — this region is generated based on the task parameters. Depending on the XSD used in the task, it is either generated as a list of values or as a table (for repeating items). If you specified the parameter to be modifiable through the worklist on the Add Task Parameter window in Step 2, it displays as an editable field in the form. Otherwise, the field displays as read-only. The information for this region is contained in the payload-body.jsp file and the payload-body.xml mapping file. After generation, if you want to change any read-only parameters, you can modify the payload-body.xml file.
Footer region — this region has an area for comments, attachments, and a short history of the task routing. This information is contained in the Footer1.jsp file.
A .tform file is generated. The contents of this file are as follows:
<?xml version = '1.0' encoding = 'UTF-8'?>
<taskDisplay
 targetNamespace="http://xmlns.companyABC.com/workflow/orderTaskDisplay"
             generateInternationlizedJSP="false"
             xmlns:task="http://xmlns.oracle.com/bpel/workflow/task"
             xmlns="http://xmlns.oracle.com/bpel/workflow/taskDisplay">
   <taskDefinitionId>${domain_id}_${process_id}_${process_revision}_
Workflow_Name</taskDefinitionId>
   <applicationName>worklist</applicationName>
   <template>${http_url}/${domain_id}/${process_id}/${process_
revision}/Workflow_Name/Template_Name.jsp</template>
   <regions>
      <defaultJSP regionName="Header">
         <jspURI>Header1.jsp</jspURI>
      </defaultJSP>
      <autoGeneratedJSP regionName="Body" editable="true">
         <jspURI>payload-body.jsp</jspURI>
         <messageAttribute
 editable="false">Workflow_NameProcessRequest</messageAttribute>
      </autoGeneratedJSP>
      <defaultJSP regionName="Footer">
         <jspURI>Footer1.jsp</jspURI>
      </defaultJSP>
   </regions>
</taskDisplay>
Two files are automatically generated to display the payload for the autogenerated JSP:
A default JSP file named payload-body.jsp. This file is added to the HTML root directory of your project, which is by default the public_html directory.
A mapping XML file named payload-body.xml. This file is added to the same directory of your project as payload-body.jsp.
Note:
If you select Custom Task Form in Step 2, you can specify a unique file name for the autogenerated JSP. The mapping XML file is created based on the JSP file name. You can also select the payload elements to include in the autogenerated JSP. For example, if the JSP file is namedautogenerate-body.jsp, then the mapping XML file is named autogenerate-body.xml.
See "Generating a Custom Task Display Form" for details.
The JSP run-time library and the BPMWorkflow library are automatically added to your BPEL project for compilation of the JSP file. The default JSP is designed with two goals in mind:
To present you with a simple form; that is, an XSD tree with a depth of more than three must be shown in a more readable way in the JSP.
The default JSP must require minimum modification. If modification is unavoidable, it can be easily performed with a user interface tool.
To attain these goals, instead of presenting a tree structure that mimics the payload XSD structure, the default JSP groups the entire payload structure in sections. It groups simple types that belong to the same parents and makes them sections.
For example, assume you provide the following payload XSD:
<schema xmlns="http://www.w3.org/2001/XMLSchema"
        targetNamespace="http://www.mycompany.com/mycompany"
        xmlns:mp="http://www.mycompany.com/mycompany">

  <element name="myCompany" type="mp:myCompanyType"/>

  <complexType name="myCompanyType" >
    <sequence>
      <element name="board" type="mp:boardType" />
      <element name="CEO" type="string"/>
      <element name="department" type="mp:departmentType" maxOccurs="unbounded"/>
    </sequence>
  </complexType>

  <complexType name="boardType">
    <sequence>
      <element name="size" type="int" />
      <element name="head" type="string" />
    </sequence>
  </complexType>

  <complexType name="departmentType">
    <sequence>
      <element name="size" type="int" />
      <element name="head" type="string" />
      <element name="function" type="string" />
    </sequence>
  </complexType>

</schema>
This XSD has the structure shown in Figure 15-33.
In the default JSP, based on the structure of the leaf nodes, there are three sections: {size, head}, {CEO}, and {size, head, function}. These three sections are named according to their parents' names; that is, the sections are named board, my Company, and department, respectively. In the board section, there are two fields, size and head. Each of these fields are in an editable HTML input type.The section department is different from other sections and can have multiple occurrences (maxOccurs > 1). In this case, all the fields in this section (that is, size, head, and function) are horizontally presented in a table, with each row representing one department. This is called a table section. There is a plus (+) button for adding a row (department) and a minus (-) button for subtracting a row (department) for the department table section.Unlike a regular section, it is not necessarily true that all the fields belong to the same XSD parent in a table section. For example, suppose the head element has two elements: employeeNumber and dateOfBirth. Since these two elements have maxOccurs set to less than or equal to 1, they are shown in the same department table section. This is a desired behavior, because adding a row in the department table not only adds a size and a function field, but also adds the head information fields in the same department row. This makes it easy to move through complicated payload instances.
Nested multiple (maxOccurs > 1) elements are supported. Assume the department element has a groupMember child element whose maxOccurs is unbounded. In that case, the parent element department is presented in a table section while the child groupMember elements are presented in different child table sections. The parent department table section has a column called group member that contains an HTML href link pointing to its corresponding child group member section in each department row. Pressing the + button in the parent department section not only adds a row in the parent table, but also adds a child section for that corresponding new row.
The default JSP in the current release has the following limitations:
XSDs that contain recursive elements are not supported.
The default JSP shows all the simple types defined in the payload XSD. If multiple simple types belong to the same XSD choice block, all these simple types are shown in the default JSP. Although simple types are preserved in the JSP, XSD restrictions are not relevant.
Only payloads copied from variables that are not simple types are supported. For example, if the query is bpws:getVariableData(var) or bpws:getVariableData(var, part) and the variable is a simple type, then JSP generation fails. Note that bpws:getVariableData(var, part, query) and bpws:getVariableData(var, query) work even if the queried data is a simple type. You only need to make sure the variable itself is not a simple type.
XSI extensions are not supported
No special handling of XSD order indicators occurs (that is, choice, all, and sequence). For example, the default JSP does not check if you entered both firstname and lastname:
<xs:element name="person">
 <xs:complexType>
   <xs:all>
     <xs:element name="firstname" type="xs:string"/>
     <xs:element name="lastname" type="xs:string"/>
   </xs:all>
 </xs:complexType>
</xs:element>
The autogenerated default JSP is generic, and so may require changes to improve its look and feel. The JSP works in conjunction with the mapping file to determine which elements in the payload are displayed in the form.
The mapping file gives you control of the presentation. The mapping file is an XML file that contains a list of viewable fields. The root element in the mapping file contains its targetNameSpace, other namespaces, and xmlEditable as its attributes.
All the elements that are simple types are listed as fields in the mapping file. Along with these elements, their immediate parents are listed as well for multilanguage support. Each field has three properties defined in the mapping file. They are xpath, editable, and resource_key.
The xpath property defines the XPath of this field. It is always prefixed by /ns0:task/ns0:payload. This is the XPath to the root of the payload object. When maxOccurs is greater than 1, it is denoted by [*]. For example, /ns0:task/ns0:payload/company[*]/ceo shows that maxOccurs is greater than 1 for the company field.
Note:
Do not modify this XPath field because it is also a unique key that determines the identity of the field.The editable property defines if this field is editable. It defaults to true. If the value of this field is changed to false, the default JSP shows a disabled text field that disallows value changes.
The resource_key property is for multilanguage support. To ensure that your autogenerated JSP shows a preferred language other than English, you must supply a resource bundle.
Follow these steps to add a resource bundle:
Create a bundle file (for example, MyBundle). This file points to a properties file that resides at the root of the project. The following code shows an example of MyBundle_en-US.properties:
ACCEPT_MSG = Accept0
REJECT_MSG = Reject0
FLEX_STRING1_MSG = Flex String1
FLEX_LONG1_MSG = Flex Long1
FLEX_DATE1_MSG = Flex Date1
TASK_TITLE = i18n Task
In this case, if a field is defined in your mapping file as follows
<field>
      <xpath>/ns0:task/ns0:payload/taskTitle</xpath>
      <editable>true</editable>
      <resourceKey>TASK_TITLE</resourceKey>
   </field>
then calling
FormUtil.getElementDisplayName("/ns0:task/ns0:payload/taskTitle", ,
form, context.getLocale(), task)
in the default JSP returns the string i18n Task if your locale is set to en-US. Similarly, if your locale is set to French, the proper properties file (MyBundle_fr.properties) is picked up.
Specify the resource bundle name and location in the Resource Details window of the Human Task editor, as shown in "Specifying Multilingual Settings".
If the mapping file does not provide enough control, you can modify the default JSP file. Only modify the section after the label:
/* Modify the code below when necessary */
Most JSP modifications can be made in the JSP design view of Oracle JDeveloper.
By default, all the fields are set to text field. If you want to change a text field to a text area, you can do the following.
Select Text Area in the Component Palette, as shown in Figure 15-34.
Drop it into the position of the text field you want to replace.
Note that the name of the text field is set by calling the function oracle.bpel.services.workflow.worklist.payload.PayloadFormGenerator.constructName(String xpath), and the value of the field is set by PayloadFormGenerator.selectNodeValue(Element payload, String xpath, Map namespace). These functions must be used to construct form field names and to retrieve form field values.
Set the text area's name and value to the same name and value as the text field.
Delete the text field.
In the place you want to insert text or other HTML elements that are not in a table, add text by typing it or add an HTML element by dragging and dropping the HTML component from the Component Pallet.
If the place you want to insert HTML elements is in an HTML table, to insert text or a horizontal rule, first add a table row by clicking a row, right-clicking, and selecting Insert Row. After a row is inserted, you may need to merge all the cells in the row by selecting all the cells in the row and right-clicking to select Merge Cells. Then you can either type your text or drag and drop your HTML component.
If you want to change the layout of the table or form, highlight the section you want to modify, right-click, and select table or form.
If you want to format the text, use the toolbar's color and style buttons.
It is recommended that you modify the default JSP's look and feel only. You should preserve the functions being used in the JSP. You must not alter the hidden parameters being submitted in the HTML form, because the Update button invokes form submission to the WFTaskUpdate that expects certain values. If your change is complicated and has programming logic in it, you must switch to the source view and modify the JSP code directly.
By putting the statement <%@ page pageEncoding="UTF-8" %> in the default JSP, UTF-8 is set as the default encoding.
See Also:
TheHelpDeskServiceRequest demo in SOA_Oracle_Home\bpel\samples\demos for an example of an autogenerated JSP and how to change the payload presentationFollow these instructions if you want to customize the JSP page to display a selectable check box instead of a text box.
Note that the input for the status is generated as follows.
<input name="<%=PayloadFormGenerator.constructName("/ns0:task/ns0:payload/ns1:holds/ns
1:holdCodes[" + i3 + "]/ns1:status")%>"
 value="<%=PayloadFormGenerator.selectNodeValue(payload,
 "/ns0:task/ns0:payload/ns1:holds/ns1:holdCodes[" + i3 + "]/ns1:status",
 form.getNamespaceMap())%>" dataType="string" <%=thisDisabled%> ></input>
Substitute the entire code block shown in Step 1 with the following code block:
String checked = "";
   String status = PayloadFormGenerator.selectNodeValue(payload,
 "/ns0:task/ns0:payload/ns1:holds/ns1:holdCodes[" + i3 + "]/ns1:status",
 form.getNamespaceMap());
   if(status != null && status.equals("true"))
   {
        checked = "checked";
   }

 <input type="CHECKBOX"
 name="<%=PayloadFormGenerator.constructName
  ("/ns0:task/ns0:payload/ns1:holds/ns
1:holdCodes[" + i3 + "]/ns1:status")%>" value="<%=status%>"  <%=checked%>
 onClick="changeStatusValue(this)" ></input>
Add the following JavaScript. This is required because the value for the check box field in JavaScript is always the value defined in the input element.
function changeStatusValue(obj)
    {
      obj.value = obj.checked;
    }
For this release, task display forms are generated by using templates consisting of different regions. Oracle JDeveloper automatically includes three templates and two default JSPs:
The three templates are as follows:
Three Region JSP — Consists of the header, body and footer regions. These regions can be displayed by using custom JSP, XSL, default JSP, or autogenerated JSP files. The automatically generated JSP displays the body region.
Two Region JSP — Consists of the header and footer regions
One Region JSP — Consists of the body region
The two default JSPs are as follows:
The header JSP displays task attributes such as task number, priority, title, and so on.
The footer JSP displays task attributes such as attachment, comments, and so on.
The custom task display form enables you to select the template and rendering type for displaying task details.
Select Custom Task Form from the list shown in Step 2.
The Task Form Display window appears.
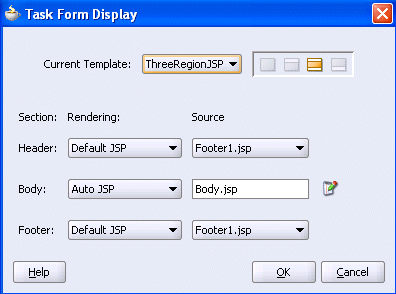
Select a template from the Current Template list. Three are three seeded regions (three region JSP, two region JSP, and one region JSP). After selecting a region, you can specify how to render it.
See the following sections for details about generating the different types of custom task display forms:
| Type | See... |
|---|---|
| Auto JSP | "Autogenerated JSP" |
| Custom JSP | "Custom JSP" |
| Default JSP | "Default JSP" |
| XSL | "XSL" |
This option enables you to automatically generate a form for the payload of the task. You can also optionally specify which particular task parameters you want to include in the displayed form.
Select Auto JSP from the Body list in the Rendering section.
An icon displays to the right of Body.jsp in the Source section.
Click the icon.
The Payload Mapping window appears.
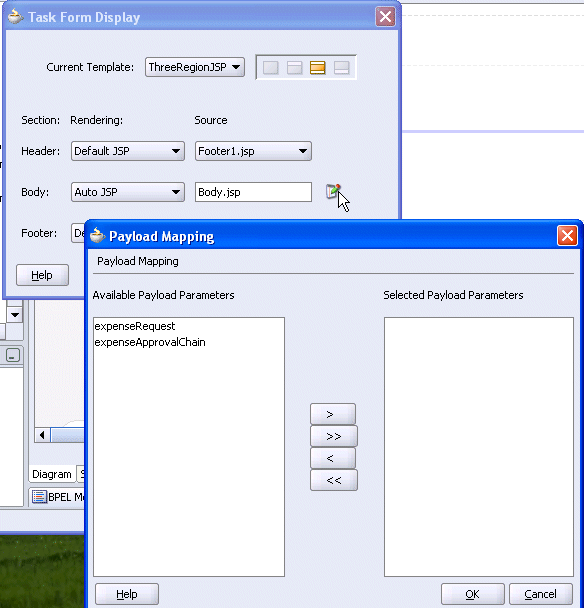
This window enables you to select message attributes.
Select message attributes to include in the autogenerated JSP.
Click OK to return to the Task Form Display window.
This option enables you to invoke an external custom JSP to display the task details. You can also specify URL parameters to pass to this JSP at run time. Three parameters are passed in by default — taskID, version, and workflowContext. Additional parameters must be explicitly specified.
Select Custom JSP from the Header list in the Rendering section.
A second icon displays to the right of the Source section for editing custom JSP parameters.
Enter the custom JSP file name in the Source field or click the first icon to select the JSP file to use. This JSP is used in the project and deployed with the other JSP files.
Click the second icon to specify run time JSP parameters.
The Payload Mapping window appears. This window enables you to add input JSP parameters.
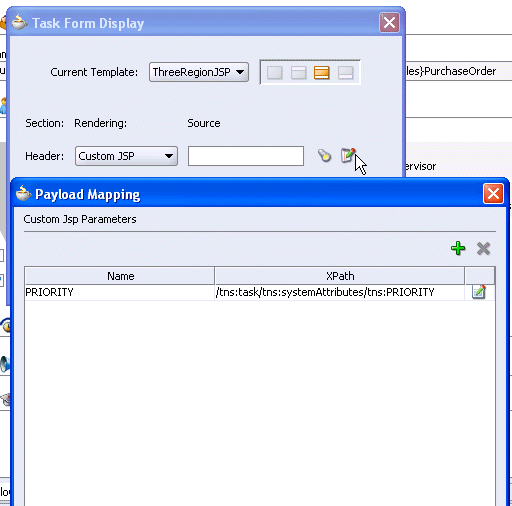
Add a parameter by clicking the + sign.
Add a name in the Name column.
Click the icon to the right of the row to display the Expression Builder window to dynamically enter a value for the XPath column.
For this example, the custom JSP is using a parameter named PRIORITY to receive the task ID from the request. Therefore, PRIORITY is specified as the name and /tns:task/tns:systemAttributes/tns:PRIORITY is specified as the XPath expression.
See Also:
"Creating Custom JSP Forms" for details about explicitly passing parametersThis option provides the default Header1.jsp and Footer1.jsp files to display the header and footer regions, respectively.
Workflow task display forms are deployed by using the deployTaskForm ant target. This target is executed when you deploy the BPEL process from Oracle JDeveloper or from the command prompt. This target generates an EAR file that includes all generated default or custom JSPs. This generated EAR file is deployed as a child of the Oracle BPEL Process Manager application.
The following directory structure is generated.
JDev_Oracle_Home\jdev\mywork\application_name\project_name\public_html\human_task_name\form
The following subdirectories and files are created:
A J2EE enterprise archive directory named ear is created. EAR deployment descriptors are generated and stored in the META-INF subdirectory.
A Web archive (WAR) directory named war is created. This directory contains the following files and subdirectories:
Style sheets and Java server page files for the header (Header1.jsp), footer (Footer1.jsp), and body (payload-body.jsp and payload-body.xml) are generated and stored in the war directory.
Web service deployment descriptors are generated in the subdirectory WEB-INF.
You can delete all form-related files by right-clicking the human task folder in the Application Navigator and selecting Delete Task Form files.
As described earlier, you can register a custom JSP for rendering the task details in the worklist. The BPEL worklist invokes any custom JSP that has been registered.
Follow these instructions to create a custom JSP form.
Get the task ID, version, and context ID from the request.
Get the workflow context object based on the context ID.
Get the task object based on the task ID and version. Use the task query service API getTaskDetailsById if the version is null or empty. Otherwise, use the getTaskVersionDetails API.
Use the task object methods to get the values you want to display in the JSP.
In the case of update support, generate the hidden HTML type for the following parameters, so that the update servlet can read these parameter values:
oracle.bpel.service.workflow.worklist.api.payload.PayloadConstants.WORKLIST_NEXT_PAGE_PARAMETER_NAME
oracle.bpel.service.workflow.worklist.api.payload.PayloadConstants.WORKLIST_LOGIN_PAGE_PARAMETER_NAME
oracle.bpel.service.workflow.worklist.api.payload.PayloadConstants.WORKLIST_ERROR_PAGE_PARAMETER_NAME
You can get the values for these parameters in the custom JSP servlet request object. Run time invokes the custom JSP by passing these parameters.
The following custom JSP code shows how to use these steps to write a custom JSP that uses the local query service and verification APIs. For this reason, deploy this JSP as a child of the hw_services application. If you do not want to deploy to the same application server, replace local APIs with remote APIs.
<%@ page contentType="text/html;charset=UTF-8"%>
  <%@ page import="java.util.*,
                   java.net.URLEncoder,
                   java.io.UnsupportedEncodingException,
                   java.text.*,
                   oracle.bpel.services.workflow.query.impl.TaskQueryService,
                   oracle.bpel.services.workflow.query.ITaskQueryService,
                   oracle.bpel.services.workflow.verification.IWorkflowContext,
                   oracle.bpel.services.workflow.verification.IVerificationService,
 oracle.bpel.services.workflow.verification.impl.VerificationService,
                   oracle.bpel.services.workflow.task.model.Task,
                   oracle.bpel.services.workflow.task.model.IdentityType,
                   oracle.bpel.services.workflow.task.model.CommentType,
                   oracle.bpel.services.workflow.task.model.AttachmentType,
                   oracle.bpel.services.workflow.task.model.IdentityType,
                   oracle.bpel.services.workflow.worklist.display.Resource,
 oracle.bpel.services.workflow.worklist.display.ResourceKeyConstants,
                   oracle.bpel.services.workflow.worklist.servlet.Constants,
                   oracle.bpel.services.workflow.worklist.api.util.WorklistUtil,
   oracle.bpel.services.workflow.worklist.api.payload.PayloadConstant;"%>
        <%
      String taskId = request.getParameter(Constants.WORKLIST_TASKID_PARAMETER_
NAME);
      String strTaskVersion = request.getParameter(Constants.WORKLIST_TASK_
VERSION_PARAMETER_NAME);
      String contextId = request.getParameter(Constants.WORKLIST_CONTEXT_
PARAMETER_NAME);

      int taskVersion = 0;
      // incase strTaskVersion is null means user wants latest version
      // from WFTask table
      // else it wants from the WFTaskHistory table
      if(strTaskVersion != null && !strTaskVersion.trim().equals(""))
      {
        try
        {
          taskVersion = Integer.parseInt(strTaskVersion);
        }
        catch(NumberFormatException exc)
        {
          //TO DO throw the exception
          taskVersion = 1;
        }
      }

      //no need to use Notm to get the task
      Task task = (Task)session.getAttribute(Constants.SESSION_CURRENT_TASK_
OBJECT);

      IVerificationService verificationService =
 VerificationService.getVerificationService();
      IWorkflowContext context = verificationService.getContext(contextId);


      if(task == null)
      {
         ITaskQueryService queryService = TaskQueryService.getInstance();
         if(taskVersion == 0)
         {
           task =  queryService.getTaskDetailsById(context, taskId);
         }
         else
         {
           task = queryService.getTaskVersionDetails(context,taskId,taskVersion);
         }
      }
      Locale locale = context.getLocale();

      // get the TaskId and use above object
      SimpleDateFormat dfshort = new SimpleDateFormat( "MM/dd/yy" );
      SimpleDateFormat dflong = new SimpleDateFormat( "MM/dd/yy hh:mm a" );

      String nextPage = request.getParameter(Constants.WORKLIST_NEXT_PAGE_
PARAMETER_NAME);
      String loginPage = request.getParameter(Constants.WORKLIST_LOGIN_PAGE_
PARAMETER_NAME);

    %>
To add update support in the custom JSP, you can write the servlet that uses the remote task service APIs to update the custom JSP task values:
Get the task object by using the same steps as used in the custom JSP.
Query the task object and set the values based on the custom JSP form.
For example, if the custom JSP form allows a user to update the priority attribute, then get the priority JSP form value and call task.setPriority(newvalue);.
Use the remote task service API to update the task.
Get the value from servlet parameter WORKLIST_NEXT_PAGE_PARAMETER_NAME, which the custom JSP page includes as a hidden parameter.
Redirect the page to the URL.
Changes made in Oracle BPEL Control to a BPEL process that includes a human task impact how tasks display in Oracle BPEL Worklist Application:
If you abort an active BPEL process instance on the Instances tab, associated tasks are marked as Stale in the Status column of the Oracle BPEL Worklist Application home page.
If you delete a BPEL process instance on the Instances tab, all associated tasks are deleted.
If you undeploy a BPEL process on the BPEL Process tab, associated tasks are marked as Stale in the Status column of the Oracle BPEL Worklist Application home page.
Notifications are sent to alert users of changes to the state of a task. Notifications can be sent through any of the following channels: e-mail, telephone voice message, fax, pager, or SMS.
This section contains the following topics:
After configuring the notification service for e-mail and other channels in Oracle JDeveloper, set the NotificationMode parameter for the notification service to either ALL or EMAIL in the SOA_Oracle_Home\bpel\system\services\config\ns_emails.xml file.
By default, this value is set to NONE, meaning that no notifications are sent. The possible values for the NotificationMode attribute are:
ALL – the e-mail, SMS, voice, fax, and pager channels are configured and notification is sent through any channel.
EMAIL – Only the e-mail channel is configured for sending notification messages.
NONE – No channel is configured for sending notification messages. This is the default setting.
The notifications for a task can be configured during the creation of a task in the Human Task editor. Notifications can be sent to different types of participants for different actions. The actions for which a task notification can be sent are as follows:
Assigned — when the task is assigned to users or a group. This action captures the following task actions — acquire, adhoc route, delegate, escalate, information for a task is submitted, push back, reassign, release, and resume.
Task is completed
Task is errored
Task is expired
Information is requested for a task
Task outcome is updated
Task is suspended
Task is withdrawn
Notifications can be sent to users involved in the task in various capacities. This includes:
Assignees – the users or groups to whom the task is currently assigned
Initiator - the user who created the task
Creator – the user who created the task
Approvers – the users who have approved the task so far
This applies to a sequential list of approvers participant type where multiple users have approved the task and a notification must be sent to all.
Owner – the owner of the task
When the task is assigned to a group, each user in the group is sent a notification if no notification endpoint is available for the group.
See Also:
"Specifying Participant Notification Preferences" to configure task notifications in the Human Task editor
Chapter 14, "Oracle BPEL Process Manager Notification Service"
Service Configuration chapter of the Oracle BPEL Process Manager Administrator's Guide for details about editing the ns_emails.xml file and (for the JAZN XML provider) users-properties.xml file
Each e-mail notification can contain the following parts:
The notification message
The HTML content from the worklist application — This is a read-only view of the worklist application on the task.
Task attachments — If the notification includes task attachments
Actionable links
Notifications through SMS, voice, fax, and pager contain only the notification message.
The notification message is an XPath expression that can contain static text and dynamic values. In creating the messages, only the task BPEL variable is available for dynamic values. This restriction is because the messages are evaluated outside the context of the BPEL process. The payload in the task variable is also strongly typed to contain the type of the payload for XPath tree browsing. The XPath extension function hwf:getNotificationProperty(propertyName) is available to get properties for a particular notification. The function evaluates to corresponding values for each notification. The propertyName can one of the following values:
recipient — The recipient of the notification.
recipientDisplay — The display name of the recipient.
taskAssignees — The task assignees.
taskAssigneesDisplay — The display names of the task assignees.
locale — The locale of the recipient.
taskId — The ID of the task for which the notification is meant.
taskNumber — The number of the task for which the notification is meant.
appLink — The HTML link to the worklist application task details page.
The following example demonstrates the use of hwf:getNotificationProperty and hwf:getTaskResourceBundle together:
concat('Dear ', hwf:getNotificationProperty('recipientDisplay'), ' Task ',
/task:task/task:systemAttributes/task:taskNumber, ' is assigned to you. ',
hwf:getTaskResourceBundleString(/task:task/task:systemAttributes/task:taskId,
'CONGRATULATIONS', hwf:getNotificationProperty('locale')))
This results in a message similar to the following:
Dear Cooper, James Task 1111 is assigned to you. Congratulations
It is possible to get internationalized messages in the notification content using one of the following methods.
If you want to use values from the resource bundle specified during the task definition, use the XPath extension function hwf:getTaskResourceBundleString(taskId, key, locale?). This function returns the internationalized string from the resource bundle specified in the task definition.
The locale of the notification recipient can be retrieved with the function hwf:getNotificationProperty('locale').
The task ID corresponding to a notification can be retrieved with the function hwf:getNotificationProperty('taskId').
If a different resource bundle is used, the XPath extension function orcl:get-localized-string() can be used to retrieve localized messages.
See Also:
"Specifying Multilingual Settings"Task actions can be performed through e-mail if the task is set up to enable actionable e-mail (the same actions can also be performed from the Oracle BPEL Worklist Application). An actionable e-mail account is the account in which task action-related e-mails are received and processed. This e-mail account name is identified by the element actionableEmailAccountName in the configuration file SOA_Oracle_Home\bpel\system\services\config\wf_config.xml.
Ensure that you select Make e-mail messages actionable in the Notification Settings section of the Human Task editor to make e-mail notifications actionable. (See Figure 15-25.) This enables you to perform task actions through e-mail.
If a notification is actionable, the e-mail contains links for each of the custom outcomes. Clicking on the links invokes the compose window of the e-mail client. You do not have to change anything in the subject or the body in this e-mail. If you change the content with the NID substrings, the e-mail is not processed.
Figure 15-35 shows an actionable e-mail sample:
If the include attachments flag is checked; only e-mail is sent. The e-mails include all the task attachments as e-mail attachments. Select Send task attachments with e-mail notifications in the Notification Settings section of the Human Task editor. (See Figure 15-25.)
In the actionable e-mail reply, the user can add attachments in the e-mail and these attachments are added as task attachments.
In the actionable e-mail reply, the user can add comments in the e-mail between Comments[[' and ']] and those contents are added as task comments. For example, Comments[[looks good]].
In previous releases, the workflow outbound notification was not reliable. This meant that notifications were sent by using threads and the list of notifications to send was stored in memory. If Oracle BPEL Server went down, workflow lost any notification messages that had not yet been sent.
With release 10.1.3, the workflow outbound notification service uses queues with the persistency service to send notifications to users.
Whenever a workflow needs to send a notification to a user, it stores the task information such as notification ID, task ID, version, and so on in the dehydration store and enqueues the notification ID to the queue. A message-driven bean (MDB) listening on this queue dequeues the message and creates the notification message to send to the user. It then uses the notification service to send this message, which uses the queue with the dehydration store.
See Also:
Chapter 14, "Oracle BPEL Process Manager Notification Service" for additional details about the reliable notification serviceIf a notification is marked as secure in the Notification Settings section of the Human Task editor, a default notification message is used. (See Figure 15-25.) The default notification message includes a link to the task in the Oracle BPEL Worklist Application. You must log in to see task details.
The channel through which a user is notified is determined by the notification preference attribute of the user specified in JAZN. The notification preference is identified by the attribute orclWorkflowNotificationPreference. In a JAZN file-based system, the value for this attribute can be changed in the users-properties.xml file located at SOA_Oracle_Home\bpel\system\services\config.
In an Oracle Internet Directory-based system, the user properties can be changed using the Oracle Delegated Administration Service. If this attribute is not set, the e-mail channel is used as the default.
See Also:
Oracle Identity Management Guide to Delegated Administration for more information on the Oracle Delegated Administration ServiceTasks can be configured to send reminders, which can be based on the time the task was assigned to a user or the expiration time of a task. The number of reminders and the interval between the reminders can also be configured. The message used for reminders is the message that is meant for ASSIGNEES when the task is marked as ASSIGNED.
You set reminders in the Notification Settings section of the Human Task editor. (See Figure 15-25.) Reminder configuration involves these parameters.
Recurrence — The recurrence specifies the number of times reminders are sent. The possible values for recurrence are EVERY, NEVER, 0, 1, 2 …, 10.
RelativeDate — The relativeDate specifies if the reminder duration is computed relative to the assigned date or to the expiration date of the task. The possible values for the relativeDate are ASSIGNED and EXPIRATION.
Duration — The duration from the relativeDate and the first reminder and each reminder since then. The data type of duration is xsd:duration, whose format is defined by ISO 8601 under the form PnYnMnDTnHnMnS. The capital letters are delimiters and can be omitted when the corresponding member is not used. Examples include PT1004199059S, PT130S, PT2M10S, P1DT2S, -P1Y, or P1Y2M3DT5H20M30.123S.
The following examples illustrate when reminders are sent.
The relativeDate is ASSIGNED, the recurrence is EVERY, and the reminder duration is PT1D. If the task is assigned at 3/24/2005 10:00 AM, then reminders are sent at 3/25/2005 10:00 AM, 3/26/2005 10:00 AM, 3/27/2005 10:00 AM, and so on until the user acts on the task.
If the relativeDate is EXPIRATION, the recurrence is 2, the reminder duration is PT1D, and the task expires at 3/26/2005 10:00 AM, then reminders are sent at 3/24/2005 10:00 AM and 3/25/2005 10:00 AM if the task was assigned before 3/24/2005 10:00 AM.
If the relativeDate is EXPIRATION, the recurrence is 2, the reminder duration is PT1D, the task expires at 3/26/2005 10:00 AM, and the task was assigned at 3/24/2005 3:00 PM, then only one reminder is sent at 3/25/2005 10:00 AM.
See Also:
"Setting Up Reminders"Table 15-14 shows the end-to-end workflow examples included with Oracle BPEL Process Manager. Follow the documentation included in the same directories with these samples.
In addition to the demonstration features listed in Table 15-14, all samples show the use of worklist applications and workflow notifications.
Table 15-14 End-to-End Examples
| Sample | Location | Description | Demonstrates |
|---|---|---|---|
| AutoLoanDemo | SOA_Oracle_Home\bpel\samples\demos |
Review and approve a loan request |
|
| DocumentReview | SOA_Oracle_Home\bpel\samples\demos |
Review and approve a document |
|
| ExpenseRequestApproval | SOA_Oracle_Home\bpel\samples\demos |
The ExpenseRequest business process is used to approve and reject an expense request from an employee |
|
| HelpDeskServiceRequest | SOA_Oracle_Home\bpel\samples\demos |
Approval of a help desk service |
|
| LoanDemoPlus | SOA_Oracle_Home\bpel\samples\demos |
Approval of a loan application |
|
| OrderApproval | SOA_Oracle_Home\bpel\samples\tutorials\127.OrderBookingTutorial |
Approve or reject a purchase order |
|
| VacationRequest | SOA_Oracle_Home\bpel\samples\demos |
Vacation request approval or denial |
|
This example describes how to create a vacation request business process. In this business process, the manager of a user requesting a vacation approves or rejects the request. The approval or rejection is a one-step process.
This example highlights the use of the following:
Modeling a single approval workflow using Oracle JDeveloper
Using the Oracle BPEL Worklist Application to view and respond to tasks
This example assumes the following:
You are familiar with basic BPEL constructs, including BPEL activities and partner links, and basic XPath functions. Familiarity with Oracle JDeveloper—the environment for creating and deploying BPEL processes—is also assumed.
You must configure the e-mail server settings for the account Default to enable e-mail notifications. The Default account is used to send e-mails. The e-mail server configuration is in
SOA_Oracle_Home\bpel\system\services\config\ns_emails.xml
The following code example from the file shows the parameters that may require configuration in bold.
<EmailAccount>
      <Name>Default</Name>
      <GeneralSettings>
         <FromName>Oracle BPM</FromName>
         <FromAddress>accountId@yourdomain.com</FromAddress>
      </GeneralSettings>
      <OutgoingServerSettings>
         <SMTPHost>yourdomain.com</SMTPHost>
         <SMTPPort>25</SMTPPort>
      </OutgoingServerSettings>
      <IncomingServerSettings>
         <Server>yourdomain.com</Server>
         <Port>110</Port>
         <Protocol>pop3</Protocol>
         <UserName>accountId</UserName>
         <Password ns0:encrypted="false"
            xmlns:ns0="http://xmlns.oracle.com/ias/pcbpel/NotificationService">
            password</Password>
         <UseSSL>false</UseSSL>
         <Folder>Inbox</Folder>
         <PollingFrequency>1</PollingFrequency>
         <PostReadOperation>
            <MarkAsRead/>
         </PostReadOperation>
      </IncomingServerSettings>
   </EmailAccount>
You must set the NotificationMode parameter to one of the following values in the ns_emails.xml file:
ALL – If you have the e-mail, SMS, voice, fax, and pager channels set up.
EMAIL – If you have only the e-mail channel set up.
For example:
<EmailAccounts xmlns="http://xmlns.oracle.com/ias/pcbpel/NotificationService"
               EmailMimeCharset=""
               NotificationMode="EMAIL">
You must change the e-mail address for the user jstein to an accessible e-mail address. If the XML-based JAZN provider is used, these properties can be changed in:
SOA_Oracle_Home\bpel\system\services\config\users-properties.xml
The following XML segment from the users-properties.xml file shows where the e-mail is configured:
<userObject>
  <name>jstein</name>
  <description>Demo User</description>
  <email>user1@dlsun4254.us.oracle.com</email>
  <title>Manager2</title>
  <firstName>John</firstName>
  <lastName>Steinbeck</lastName>
  <manager>wfaulk</manager>
  <timeZone>America/Los_Angeles</timeZone>
  <languagePreference>en-US</languagePreference>
  <notificationPreferences>Mail</notificationPreferences>
</userObject>
You must restart Oracle BPEL Process Manager after making any of the preceding changes.
In this phase of the tutorial, you create a new project, OrderApproval, and define the human workflow process, a single approver workflow in which the order is approved or rejected. The order is first assigned to the Supervisor role. After a user with the Supervisor role approves the order, it is sent to the user's manager for final approval.
This section contains these tasks:
Creating the Vacation Request Process and Importing the Schema
Validating, Compiling, and Deploying the Order Approval Process
Right-click your application in the Application Navigator and select New Project.
Select BPEL Process Project.
Create an asynchronous BPEL process with the name VacationRequest.
Click Next.
Click the flashlight next to Input Schema Element to browse for VacationRequest.xsd in
SOA_Oracle_Home\bpel\samples\demos\VacationRequest\bpel
Click Open.
The Type Chooser window appears.
Expand and select Imported Schemas > VacationRequest.xsd > VacationRequestProcessRequest.
Click OK.
Click the flashlight next to Output Schema Element.
Expand and select Imported Schemas > VacationRequest.xsd > VacationRequestProcessResponse.
Click Finish.
The schemas are now imported into the project. VacationRequest.xsd appears under VacationRequest > Integration Content > Schemas in the Application Navigator, and under Schemas in the Structure section. The BPEL process—a Receive activity (receiveInput) and an Invoke activity (callbackClient)—is displayed.
Select Save from the File main menu.
Summary:
When you define the human task, theVacationApproval.task file—the task configuration metadata file—is created.Drag and drop a Human Task activity between receiveInput and callbackClient.
Click the Create Task Definition icon (second icon).
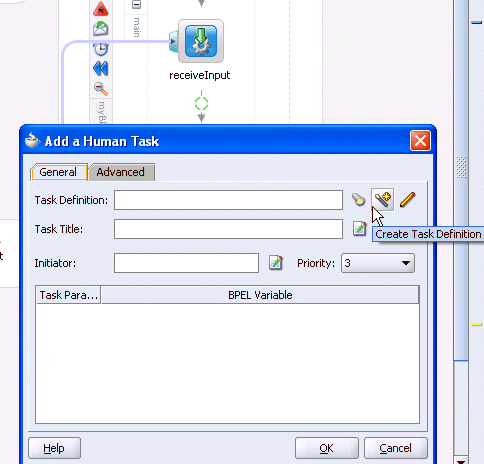
Enter VacationApproval for the human task name and click OK. (Accept the default location.)
The VacationApproval.task file is created.
The Human Task editor is displayed.
For Title, enter Vacation Approval.
Accept the default values for Priority and Outcomes.
For Parameters, click the + icon on the right side of the window.
The Add Task Parameter window is displayed.
Click Element and then the flashlight icon.
In the Type Chooser window, expand and select Project Schema Files > VacationRequest.xsd > VacationRequestProcessRequest, and click OK.
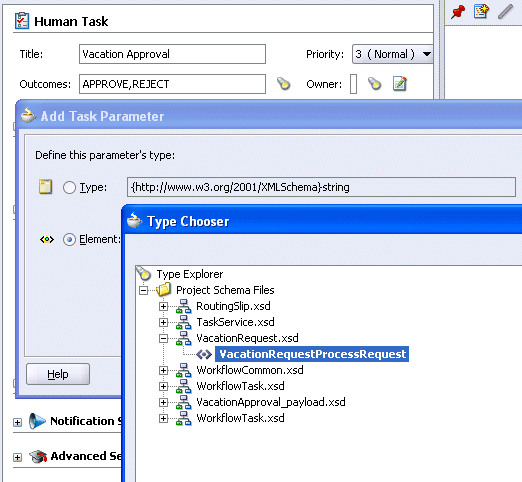
In the Add Task Parameter window, click Modifiable via worklist and click OK.
This ensures that you can modify task data using the Oracle BPEL Worklist Application.
In the Assignment and Routing Policy section, click the + icon on the right side of the window.
The Add Participant Type window is displayed.
For Type, select Single Approver.
This participant type acts alone on the task.
For Label, enter Vacation Approver.
Click By expression.
In this example, you assign the task to the manager of the vacation requester.
Click the icon to the right of the Dynamic User Xpath field to display the Expression Builder window.
Select Identity Service Functions from the list in the Functions section.
Double-click getManager.
Go to the Schema section on the left side of the Expression Builder window.
Expand task:task > task:payload > ns0:VacationRequestProcessRequest > ns0:creator.
Click Insert Into Expression.
The Expression Builder window appears as follows:
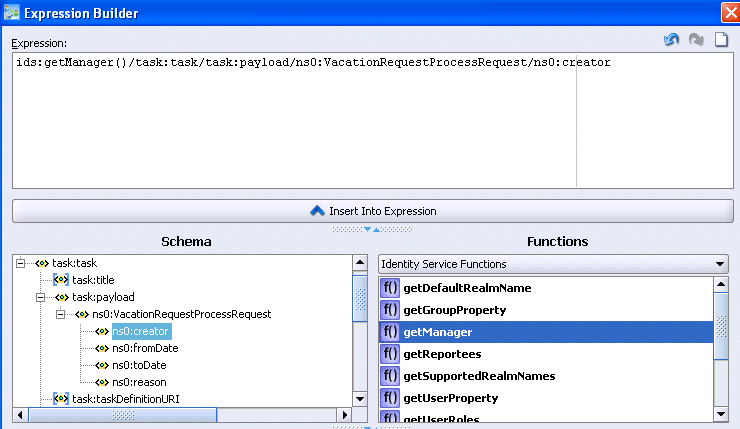
Click OK to return to the Add Participant Type window.
Click OK to return to the Human Task editor.
Click the + sign to expand the Expiration and Escalation Policy section.
Select Expire after from the drop-down list.
Click Fixed Duration and select 1 from the Day list.
Select Save from the File main menu.
Click the X next to VacationApproval.task to close the Human Task editor.
Summary:
Map the fields to the variables in the BPEL process.Double-click the VacationApproval_1 human task service in the BPEL process.
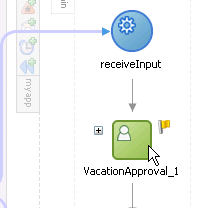
This displays the Human Task window.
In the Task Title field, enter the word for after the words Vacation Approval.
Click the icon at the right to display the Expression Builder window.
In the BPEL Variables section, expand and select inputVariable> payload > client:VacationRequestProcessRequest > client:creator.
Click Insert Into Expression.
The XPath expression appears in the Expression section.
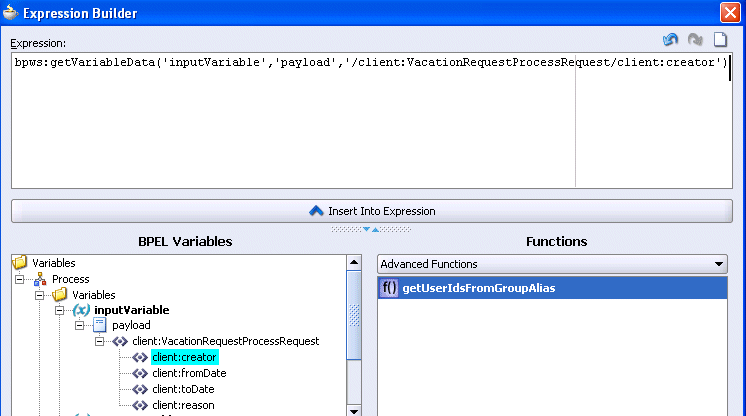
Click OK.
The XPath expression is appended to the task title.
Click the icon to the right of the Initiator field to display the Expression Builder window.
Repeat Steps 4 through 6 to insert the same XPath expression in the Initiator field.
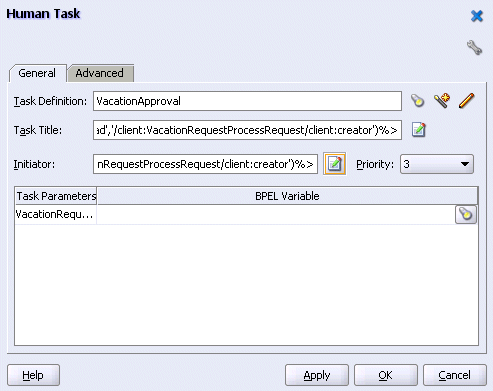
Click the flashlight icon under the BPEL Variable column.
The Task Parameters window appears.
In the Task Parameters window, expand and select Variables > inputVariable > payload > client:VacationRequestProcessRequest.
Click OK.
In the Human Task window, click OK.
Select Save from the File main menu.
Summary:
An autogenerated task form,payload-body.jsp, is created.In the Application Navigator, right-click the VacationApproval folder and select Auto Generate Simple Task Form.
This automatically generates a task form file.
Close payload-body.jsp by clicking the X sign at the top.
Summary:
The Switch activity reflects the possible outcomes, or cases, specified previously, Approve and Reject. It also has an Otherwise case to represent other outcomes, such as errored, stale, or expired. Inside each of the cases, you can add activities to complete modeling of the business process. The copyPayloadFromTask Assign activities copy the payload back to its source.Double-click VacationRequest.bpel.
Expand the taskSwitch Switch activity.
Drag and drop an Assign activity to below the copyPayloadFromTask Assign activity in the <case Task outcome is APPROVE> section of the Switch activity.
Double-click the Assign icon to display the Assign window.
Click the General tab.
Enter assignVacationApproval1 in the Name field.
Click Apply.
Click the Copy Operation tab.
Click Create and select Copy Operation.
Enter the following details:
| Field | Value |
|---|---|
| From | |
|
Expression |
|
string('Approved') |
| To | |
|
Variable |
|
Expand and select Variables > outputVariable > payload > client:VacationRequestProcessResponse > client:result
Note: The namespace number values (for example, client, ns1) can vary. Use the namespace values that automatically appear. |
Click OK to close the Create Copy Operation window and the Assign window.
Repeat Steps 3 through 11 to create an Assign activity below the copyPayloadFromTask Assign activity in the <case Task outcome is REJECT> section. Enter the same details as described above, with the following exceptions:
Name it assignVacationApproval2
Set the Expression field to string('Rejected')
Repeat Steps 3 through 11 to create an Assign Activity below the copyPayloadFromTask Assign activity in the <otherwise> section. Enter the same details as described above, with the following exceptions:
Name it assignVacationApproval3
Set the Expression field to string('Rejected')
The process looks as follows:
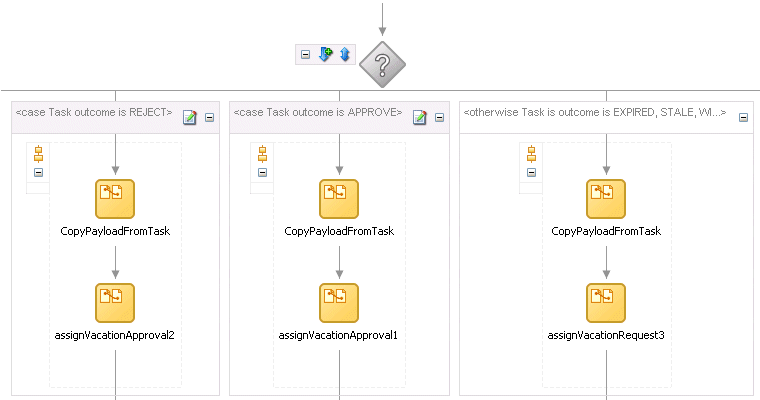
Select Save from the File main menu.
Click the - sign to close the taskSwitch Switch activity.
Go to the Application Navigator section.
Right-click VacationApproval.
Select Deploy > my_integration_server_connection > Deploy to default domain.
This compiles the BPEL process. Check for errors by clicking the buttons at the bottom of the window. If there are no errors, deployment was successful.
Log into Oracle BPEL Control by selecting Start > All Programs > Oracle - Oracle_Home > Oracle BPEL Process Manager > BPEL Control.
Enter the following details to log into Oracle BPEL Control and click Login:
| Field | Value |
|---|---|
| Username | oc4jadmin |
| Password | welcome1 |
Click VacationApproval in the Deployed BPEL Processes list.
Enter jcooper for the creator of the vacation.
Enter appropriate values for the remaining fields.
Click Post XML Message.
The BPEL Processes tab displays a message similar to the following:
Test Instance Initiated
Click the Instances tab at the top.
Click the OrderApproval instance.
A message appears indicating that the instance is active.
Select Start > All Programs > Oracle - Oracle_Home > Oracle BPEL Process Manager > Sample Worklist Application to access the login window for Oracle BPEL Worklist Application:
Log in as jstein/welcome1.
The user jstein is the manager of jcooper. This displays Oracle BPEL Worklist Application. A task waiting to be approved appears.
Select Claim in the Actions list for the task to approve.
Click Go.
The task details and payload information appear.
Review the information. For example, the following information appears if you copied and pasted in the contents of OrderBookingPO_1.xml.
Select Approve from the Task Action list and click Go.
Log out as user jcooper.
Log into Oracle BPEL Worklist Application as jstein/welcome1.
Select Approve from the Actions list and click Go.
After processing, no tasks appear in Oracle BPEL Worklist Application.
Log out.
Return to Oracle BPEL Control.
Click the Instances tab at the top.
Click the VacationApproval instance.
A message appears indicating that the instance has completed.
Click the Audit and Flow links to observe additional details about the completed OrderApproval process.
Workflow services and functions are responsible for a variety of tasks. This section describes the responsibilities of the following workflow services:
See Also:
"Workflow Services Components"Table 15-15 lists the type of SOAP, EJB, and Java support provided for the task services.
Table 15-15 EJB, SOAP, and Java Support
Table 15-16 lists the location for the SOAP WSDL file for each task service.
Table 15-16 SOAP WSDL Location for the Task Services
With the exception of the identity service, all services that use the above-mentioned APIs (SOAP, remote EJB, local EJB, and Java WSIF) require authentication to be invoked. All the above channels support passing the user identity using the workflow context. The workflow context contains either of the following:
Login and password
Token
The task query service exposes the authenticate operation that takes the login and password and returns the workflow context used for all services. Optionally, with each request, you can pass the workflow context with the login and password.
The authenticate operation also supports the concept of creating the context on behalf of a user with the admin ID and admin password. This enables you to create the context for a logged-in user to the Oracle BPEL Worklist Application if the password for that user is not available.
SOAP Web services also support Web service security. When Web service security is used, the workflow context does not need to be present in the SOAP input. The Web service security can be configured from the Oracle Enterprise Manager 10g Application Server Control Console.
Note:
Workflow service SOAP clients cannot be used when Web service security is used.See Also:
"Configuring Single Sign-on Using SAML" in the Oracle Application Server Web Services Security Guide for details about propagating the identity of a user from a Web application to the Web serviceThe workflow service EJBs also take a workflow context parameter that is used for authentication and authorization.
The authenticate API operation on the task query service can create the workflow context on behalf of a user by passing the user ID and password of an admin user in the request. An admin user is a user who has the BPMWorkflowAdmin role. This created context is as if it was created using the password on behalf of the user.
In this example, the workflow context is created for user jcooper.
ITaskQueryService taskQueryService = ….
String realm = …;
IWorkflowContext wfCtx =
    taskQueryService.authenticate('bpeladmin', 'welcome1', realm, 'jcooper');
The task service exposes operations to act on tasks. Table 15-17 describes the operations of the task service. Package oracle.bpel.services.workflow.task corresponds to the task service.
Table 15-17 Task Service Methods
| Method | Description |
|---|---|
acquireTask |
Acquire a task. |
acquireTasks |
Acquire a set of tasks. |
addAttachment |
Add an attachment to a task. |
addComment |
Add a comment to a task. |
delegateTask |
Delegate a task to a different user. Both the current assignee and the user to whom the task is delegated can view and act on the task. |
errorTask |
Cause the task to error. This operation is typically used by the error assignee. |
escalateTask |
Escalate a task. The default escalation is to the manager of the current user. This can be overridden using escalation functions. |
getApprovers |
Get the previous approvers of a task. |
getFutureParticipants |
Get the future participants of a task. The future participants are returned in the form of a routing slip that contains simple participants — (participant node and parallel nodes that contain routing slips in them). |
getUsersToRequestInfoForTask |
Get the users from whom a request for information can be requested. |
initiateTask |
Initiate a task. |
mergeAndUpdateTask |
Merge and update a task. Use this operation when a partial task should be updated. A partial task is one in which not all the task attributes are present. In this partial task, only the following task attributes are interpreted:
|
overrideRoutingSlip |
Override the routing slip of a task instance with a new routing slip. The current task assignment is nullified and the new routing slip is interpreted as its task is initiated. |
pushBackTask |
Push back a task to the previous approver or original assignees. The original assignees do not need to be the approver as they may have reassigned the task, escalated the task, and so on. The property pushbackAssignee in wf_config.xml controls whether the task is pushed back to the original assignees or the approvers. |
reassignTask |
Reassign a task. |
reinitiateTask |
Reinitiate a task. Reinitiating a task causes a previously completed task to be carried forward so that the history, comments, and attachments are carried forward in a new task. |
releaseTask |
Release a previously acquired task. |
releaseTasks |
Release a set of previously acquired tasks. |
removeAttachment |
Remove a task attachment. |
renewTask |
Renew a task to extend the time it takes to expire. |
requestInfoForTask |
Request information for a task. |
requestInfoForTaskWithReapproval |
Request information for a task with reapproval. For example, assume jcooper created a task and jstein and wfaulk approved the task in the same order. When the next approver, cdickens, requests information with reapproval from jcooper, and jcooper submits the information, jstein and wfaulk approve the task before it comes to cdickens. If cdickens requests information with reapproval from jstein, and jstein submits the information, wfaulk approves the task before it comes to cdickens. |
resumeTask |
Resume a task. Operations can only be performed by the task owners (or users with the BPMWorkflowSuspend privilege) to remove the hold on a workflow. After a workflow is resumed, actions can be performed on the task. |
resumeTasks |
Resume a set of tasks. |
routeTask |
Allow a user to route the task in an adhoc fashion to the next user(s) who must review the task. The user can specify to route the tasks in sequential, parallel, or simple assignment. Routing a task is permitted only when the workflow permits adhoc routing of the task. |
skipCurrentAssignment |
Skip the current assignment and move to the next assignment or pick the outcome as set by the previous approver if there are no more assignees. |
submitInfoForTask |
Submit information for a task. This action is typically performed after the user has made the necessary updates to the task or has added comments or attachments containing additional information. |
suspendTask |
Allows task owners (or users with the BPMWorkflowSuspend privilege) to put a workflow on hold temporarily. In this case, task expiration and escalation do not apply until the workflow is resumed. No actions are permitted on a task that has been suspended (except resume and withdraw). |
suspendTasks |
Suspend a set of tasks. |
updateOutcomeOfTasks |
Update the outcome of a set of tasks. |
updateTask |
Update the task. |
updateTaskOutcome |
Update the task outcome. |
updateTaskOutcomeAndRoute |
Update the task outcome and route the task. Routing a task allows a user to route the task in an adhoc fashion to the next user(s) who must review the task. The user can specify to route the tasks in sequential, parallel, or simple assignment. Routing a task is permitted only when the workflow permits adhoc routing of the task. |
withdrawTask |
The creator of the task can withdraw any pending task if they are no longer interested in sending it further through the workflow. A task owner can also withdraw a task on behalf of the creator. When a task is withdrawn, the business process is called back with the state attribute of the task set to Withdrawn. |
withdrawTasks |
Withdraw a set of tasks. |
See Also:
Oracle BPEL Process Manager Workflow Services API Reference located in theSOA_Oracle_Home\bpel\docs\workflow directoryThe task query service queries tasks based on a variety of search criterion such as keyword, category, status, business process, attribute values, history information of a task, and so on. Table 15-18 describes the operations of the task query service, including how to use the service over SOAP. Package oracle.bpel.services.workflow.query corresponds to the task query service.
Table 15-18 Task Query Service Methods
See Also:
Oracle BPEL Process Manager Workflow Services API Reference located in theSOA_Oracle_Home\bpel\docs\workflow directoryThis section describes the identity service component of Oracle BPEL Process Manager. The identity service is a thin Web service layer on top of the Oracle Application Server 10g security infrastructure, namely OracleAS JAAS Provider (JAZN), or any custom user repository. It enables authentication and authorization of users and the lookup of user properties, roles, group memberships, and privileges.
Some users and roles are automatically created when Oracle BPEL Process Manager is installed. Seeded users include:
guest
default
bpeladmin
oc4jadmin
The identity service predefines the following roles, which can be granted to users to perform workflow-related operations:
PUBLIC—This role is an implicit JAZN role; it does not need to be granted explicitly to any of the users. If any user can authenticate with the worklist, then they can see tasks assigned to them or groups they belong to and act on these tasks.
Note:
TheBPMPublic role can be used and explicitly granted to each user if a third-party provider does not support an implicit PUBLIC role.BPMWorkflowReassign—This role enables a user to reassign tasks to any other user in the organization. A manager can always delegate tasks to any users under him in the organization hierarchy without any Reassign privileges. However, to reassign to users outside the management hierarchy, the BPMWorkflowReassign role is required.
BPMWorkflowSuspend—This role enables users to suspend a process. If a process is suspended, then the expiration time does not apply. When the process is resumed, the expiration date is recomputed. Users cannot suspend the workflow if the process designer has designated Suspend as a restricted action, even if the user has the BPMWorkflowSuspend role.
BPMWorkflowViewHistory—In general, a user can see only the task assignment sequence as part of their worklist. This role enables a user to drill down further into the BPEL business process audit trail from the task approval sequence.
BPMWorkflowAdmin—This role enables a user to perform system actions on any workflow in the system. This role does not allow you to change the outcome of the task (such as approve or reject); it only allows you to perform actions such as delegate, escalate, and suspend. Only the task assignee or the task owner can change the outcome of the task.
BPMSystemAdmin—Both BPMWorkflowAdmin and BPMSystemAdmin have the same level of workflow privileges.
BPMDefaultDomainAdmin—This role provides a user with access to the default domain through Oracle BPEL Control.
See Also:
Oracle BPEL Process Manager Administrator's Guide for instructions on configuring the identity service and additional details about the BPMSystemAdmin and BPMDefaultDomainAdmin rolesSome of these roles are nested. The BPMWorkflowReassign, BPMWorkflowSuspend, and BPMWorkflowViewHistory roles are granted to the BPMWorkflowAdmin role. The BPMSystemAdmin role is granted to the seeded bpeladmin user.
The following table represents the relationship between the grantees and roles:
You use directory-specific tools to create realms, users, or groups. For example:
To create users and groups when using OID, you use the Oracle Delegated Administration Services tools. See Oracle Identity Management Guide to Delegated Administration for more information.
To create user and group credentials when using the XML-based JAZN provider, you use the JAZN Admintool to modify the jazn-data.xml file. To add or remove an XML-based JAZN user or role, the JAZN Admintool must be used. You can manually edit the users-properties.xml file to specify detailed user properties that JAZN does not support.
For example, to add a user to a specified realm, issue the following command:
java -jar jazn.jar -user adminUser -password adminPassword -adduser realmName newUser newUserPassword
The JAZN Admintool provides different command options. You can list all the options and their syntax with the -help option, as in:
java -jar jazn.jar -help
If you are using a third-party LDAP server or a custom user repository, you must use the specific tools available for that directory.
See Also:
Oracle Containers for J2EE Security Guide for instructions on using the JAZN AdmintoolOracle BPEL Process Manager identity service supports three types of providers: JAZN, third-party LDAP, or custom plug-in, as shown in Figure 15-36.
The identity service providers perform the following operations:
Authentication—authenticates users given their username and password
Authorization—determines roles and group memberships for a specific user. These roles are then used to control access to various work items and operations on the worklist.
Retrieve user properties—includes contact information such as first name, last name, phone, e-mail, preferred notification channel, language preference, time zone, and organization details such as manager name and reportees.
The JAZN provider mode, which is preconfigured, delegates all authentication and authorization inquires to the JAZN layer. Two JAAS providers are supplied as part of the OC4J security infrastructure: the XML-based file and LDAP-based OID.
XML-Based JAZN Provider Type — The XML-based provider type is used for lightweight storage of information in the XML files. All the user names, roles, and permissions are stored in XML files. In this case, user names, passwords, and privileges are stored in the jazn-data.xml file. In addition, Oracle BPEL Process Manager uses a user-properties.xml file that works in conjunction with this file to store detailed user properties such as name, e-mail, phone, and manager.
LDAP-Based JAZN Provider Type (Oracle Internet Directory) — The LDAP-based provider type is based on the Lightweight Directory Access Protocol (LDAP) for centralized storage of information in a directory. OID is a standard LDAP-based directory that provides a single, centralized repository for all user data. It allows sites to manage user identities, roles, authorization, and authentication credentials, as well as application-specific preferences and profiles in a single repository.
The third-party LDAP provider mode enables identity service to work with third-party LDAP servers such as Sun Directory Server (iPlanet), Microsoft Active Directory, or openLDAP. In this mode, identity service assumes that the directory is the central repository of all user data, including authentication credentials, roles, and profiles. The standard organizationalPerson, inetOrgPerson objects from the LDAP schema retrieve these details.
This mode enables you to plug in a non-LDAP-based user repository by registering a custom identity service provider. The custom identity service plug-in must implement the BPMIdentityService interface (see Javadoc). This identityservice class name must be registered in is_config.xml.
See Also:
"User and Role Properties" for more information.
Identity service configuration instructions in Oracle BPEL Process Manager Administrator's Guide
See SOA_Oracle_Home\bpel\docs\workflow\oracle\tip\pc\services\identity for Javadoc on the BPMIdentityService interface
The identity service supports the following user properties:
Display name
Given name, middle name, and last name
Description
Title
E-mail address
Telephone number
Home phone number
Mobile phone number
Fax number
Pager number
Manager ID
Owners (applies to groups and roles, but not users)
Time zone
Language preference (Java locale)
Notification preference (preferred notification channel)
The preceding properties are optional for Oracle BPEL Process Manager users. However, some features, such as task notification, are not available if the contact information is not present in the directory or in the users-properties file for the JAZN XML-based provider. Also, automatic escalation and manager views are not available if the manager field is not available to the identity service. If the user is not listed among the owners of the group, they cannot modify the rule defined for the group.
See Also:
The service configuration chapter of Oracle BPEL Process Manager Administrator's Guide for instructions on defining group ownershipThe following OID objectClasses specify user and role properties such as mail, manager, and telephoneNumber.
top
person
cn
sn
description
telephoneNumber
organizationalPerson
title
telephoneNumber
facsimileTelephoneNumber
inetOrgPerson
uid
displayName
givenName
manager
mail
homePhone
mobile
pager
preferredLanguage
orclUserV2
middleName
orclTimeZone
orclWorkflowNotificationPref
groupOfUniqueNames
description
owner
uniqueMember
orclGroup
displayName
mail
The identity service maintains a connection pool to retrieve these properties from the LDAP directory.
If you are using the XML-based JAZN provider, the same entries are represented as XML elements in the users-properties.xml file in
SOA_Oracle_Home\bpel\system\services\config
The identity service enables you to specify multiple configuration settings (to express identity contexts, supported realms, and so on) in the is_config.xml file. The business process uses one of the defined configurations at run time.
The configuration must specify the realm name to enable a business process to resolve the context at run time. For the JAZN provider, the realm name must match one of supported JAZN realm names. Otherwise, a run time exception is thrown. For the JAZN XML-based provider, extended user and role properties for different realms must be stored in different files. For the LDAP provider, the realm name can be any unique name, while the context is defined by the LDAP URL, user search base, and role search base nodes in the LDAP server tree. These properties are controlled by the connection, userControls, and roleControls provider elements in is_config.xml.
If the is_config.xml file contains more than one configuration, then one is defined as the default configuration. The default context is used by the BPEL process if no specific context information is found at run time. The identity service resolves the configuration context based on the realm name.
See Also:
The service configuration chapter of the Oracle BPEL Process Manager Administrator's Guide for configuration instructionsThe identity service supports authentication, authorization, and identity service providers. The identity service provider is the default pseudoservice provider. It must be defined for each configuration in the is_config.xml file. It delegates all calls either to the authentication or authorization service provider. By default, all three service providers share the same context setting defined in the identity provider.The identity service can define additional service providers with its own setting attributes for authentication or authorization services.If the provider service attribute is set to Authentication, the setting and the provider context are used only for all authentication calls for the configuration. If the provider service attribute is set to Authorization, the setting and provider context are used only for authorization calls.
See Also:
The multiple service providers section of the service configuration chapter of the Oracle BPEL Process Manager Administrator's Guide for an example of a configuration with two providers:The JAZN XML-based identity service provider is used for all calls, except authentication
The custom plug-in provider is used only for authentication calls
The notification service exposes operations that can be invoked from the BPEL business process to send notifications through e-mail, voice, fax, pager, or short message service (SMS) channels.
See Also:
Chapter 14, "Oracle BPEL Process Manager Notification Service"
Oracle BPEL Process Manager Administrator's Guide for instructions on configuring notification service delivery channels
Task metadata service exposes operations to retrieve metadata information related to a task. Table 15-19 describes these methods. Package oracle.bpel.services.workflow.metadata corresponds to the task metadata service.
Table 15-19 Task Metadata Service Methods
| Method | Description |
|---|---|
getOutcomes |
Get the permitted outcomes of a task. The outcomes are returned with their display values. |
getResourceBundleInfo |
Get the resource bundle information of the task. The resource bundle information contains the location and the name of the bundle. |
getRestrictedActions |
Get the actions that are restricted for a particular task. |
getTaskAttributes |
Get the task message attributes. |
getTaskAttributesForTaskDefinition |
Get the message attributes for a particular task definition. |
getTaskDefinition |
Get the task definition associated with the task. |
getTaskDefinitionById |
Get the task definition by the task definition ID. |
getTaskDefinitionOutcome |
Get the outcomes given the task definition ID. |
getTaskDisplay |
Get the task display for a task. |
getTaskDisplayRegion |
Get the task display region for a task. |
getVersionTrackedAttrs |
Get the task attributes that when changed causes a task version creation. |
listTaskMetadata |
List the task definitions in the system. |
See Also:
Oracle BPEL Process Manager Workflow Services API Reference located in theSOA_Oracle_Home\bpel\docs\workflow directoryThe user metadata service provides methods for managing metadata specific to individual users and groups. It is used for getting and setting user worklist preferences, managing user custom views, and managing workflow rules for users and groups.
For most methods in the user metadata service, the authenticated user can query and update their own user metadata. However, they cannot update metadata belonging to other users.
In the case of group metadata (for example, workflow rules for groups), only a user designated as an owner of a group (or a BPMWorkflowAdmin user) can query and update the metadata for that group. However, a user that has been granted the BPMWorkflowAdmin role can query and update metadata for any user or group.
Table 15-20 describes the methods in the user metadata service. Package oracle.bpel.services.workflow.user corresponds to the user metadata service.
Table 15-20 User Metadata Service Methods
| Method | Description |
|---|---|
setVacationInfo |
Sets a date range over which the user is unavailable for the assignment of tasks. (Dynamic assignment functions do not assign tasks to a user that is on vacation.) |
getVacationInfo |
Retrieves the date range (if any) during which a user is unavailable for the assignment of tasks. |
getRuleList |
Retrieves a list of rules for a particular user or group. |
getRuleDetail |
Gets the details for a particular workflow rule. |
createRule |
Creates a new rule. |
updateRule |
Updates an existing rule. |
deleteRule |
Deletes a rule. |
increaseRulePriority |
Increases the priority of a rule by one. Rules for a user or group are maintained in an ordered list of priority. Higher priority rules (those closer to the head of the list) are executed before rules with lower priority. This method does nothing if this rule already has the highest priority. |
decreaseRulePriority |
Decreases the priority of a rule by one. This method does nothing if this rule already has the lowest priority. |
getRuleSetInfo |
Returns information relating to the Oracle Business Rules rule set being used to store the rules for a particular user or group. This is useful if a client wants to make use of the rules SDK directly for manipulating rules, rather than using the user metadata service. |
getUserTaskViewList |
Gets a list of the user task views that the user owns. |
getGrantedTaskViewList |
Gets a list of user task views that have been granted to the user by other users. Users can use granted views for querying lists of tasks, but they cannot update the view definition. |
getStandardTaskViewList |
Gets a list of standard task views that ship with the workflow service, and are available to all users. |
getUserInboxView |
Gets a special view to store configuration information, allowing users to personalize their main inbox list of tasks. |
getUserTaskViewDetails |
Gets the details for a single view. |
createUserTaskView |
Creates a new user task view. |
updateUserTaskView |
Updates an existing user task view. |
deleteUserTaskView |
Deletes a user task view. |
updateGrantedTaskView |
Updates details of a view grant made to this user by another user. Updates are limited to hiding or unhiding the view grant (hiding a view means that the view is not listed in the main inbox page of the worklist application), and changing the name and description that the granted user sees for the view. |
getUserPreferences |
Gets a list of user preferences for the user. User preferences are simple name-value pairs of strings. User preferences are private to each user (but can still be queried and updated by BPMWorkflowAdmin). |
setUserPreferences |
Sets the user preference values for the user. Any preferences that were previously stored and are not in the new list of user preferences are deleted. |
getPublicPreferences |
Gets a list of public preferences for the user. Public preferences are similar to user preferences, except any user can query them. However, only the user that owns the preferences, or the BPMWorkflowAdmin, can update them. Public preferences are useful for storing application wide preferences (preferences can be stored under a dummy user name, such as MyAppPrefs). |
setPublicPreferences |
Sets the public preferences for the user. |
See Also:
Chapter 16, "Worklist Application" for details about the rule configuration and user preference pages
Oracle BPEL Process Manager Administrator's Guide for details on how to designate a user as a group owner
Oracle BPEL Process Manager Workflow Services API Reference located in the SOA_Oracle_Home\bpel\docs\workflow directory
The runtime config service provides methods for managing metadata used in the task service run time environment. It principally supports management of task payload flex field mappings.
The task object used by the task service contains a number of flex field attributes, which can be populated with information from the task payload. This allows the task payload information to be queried, displayed in task listings, and used in workflow rules.
The runtime config service allows administrators to create mappings between simple task payload attributes and these flex field attributes.
Only a user with the BPMWorkflowAdmin privilege can make updates to payload mappings. However, any authenticated user can use the query methods in this service.
An administrator can create attribute labels for the various flex field attributes. These attribute labels provide a meaningful label for the attribute (for example, a label Location may be created for the flex field attribute TextAttribute1). A given flex field attribute may have multiple labels associated with it. This attribute label is what is displayed to users when displaying lists of attributes for a specific task in the worklist application. The attribute labels for a specific task type can be determined by calling the getTaskAttributesForTaskDefinition method on the task metadata service.
When defining attribute labels, the following fields are automatically populated by the service. You do not need to specify values for these attributes when creating or updating attribute labels:
Id
CreatedDate
WorkflowType
Active
Valid values for the task attribute field are as follows:
TextAttribute1 through TextAttribute10
FormAttribute1 through FormAttribute5
UrlAttribute1 through UrlAttribute5
DateAttribute1 through DateAttribute5
NumberAttribute1 through NumberAttribute5
Mappings can then be created between task payload fields and the attribute labels. For example, the payload field customerLocation can be mapped to the attribute label Location. Different task types can share the same attribute label. This allows payload attributes from different task types that have the same semantic meaning to be mapped to the same attribute label.
Note:
Only payload fields that are simple XML types can be mapped.The runtime config service also provides methods for querying the dynamic assignment functions supported by the server.
Table 15-21 describes the methods in the runtime config service. Package oracle.bpel.services.workflow.runtimeconfig corresponds to the runtime config service.
Table 15-21 Runtime Config Service
| Method | Description |
|---|---|
GetWorkflowPayloadMappings |
Gets a list of all the flex field mappings for a particular workflow task definition. |
CreateAttributeLabel |
Creates a new attribute label for a particular task flex field attribute. |
updateAttributeLabel |
Updates an existing attribute label. |
DeleteAttributeLabel |
Deletes an existing attribute label. |
getAttributeLabelUsages |
Gets a list of attribute labels (either all attribute labels, or labels for a specific type of attribute) for which mapping (if any) the labels are currently used. |
createPayloadMapping |
Creates a new mapping between an attribute label and a task payload field. |
deletePayloadMapping |
Deletes an existing payload mapping. |
getUserDynamicAssignmentFunctions |
Returns a list of the dynamic assignment functions that can select a user that are implemented on this server. |
getGroupDynamicAssignmentFunctions |
Returns a list of the dynamic assignment functions that can select a group that are implemented on this server. |
See Also:
"Dynamic Assignment Functions" for additional details
Chapter 16, "Worklist Application" for details about flex field mapping
Oracle BPEL Process Manager Workflow Services API Reference located in the SOA_Oracle_Home\bpel\docs\workflow directory
Attribute labels provide a method of attaching a meaningful label to a task flex field attribute. It can be desirable to present attribute labels that are translated into the appropriate language for the locale of the user.
To achieve this, you can add entries to the WorkflowLabels.properties resource property file, and associated resource bundles in other languages. This file exists in the SOA_Oracle_Home\bpel\system\services\config\wfresource directory.
Entries for flex field attribute labels must be of the form:
FLEX_LABEL.[label name]=Label Display Name
For instance, the entry for a label named Location is:
FLEX_LABEL.Location=Location
Note that adding entries to these files for attribute labels is optional. If no entry is present in the file, the name of the attribute label as specified using the API is used instead.
This section describes how to configure the assignment service.
This section contains the following topics:
Dynamic assignment functions select a particular user or group from either a group, or from a list of users or groups.
The selection is made according to criteria specific to the particular dynamic assignment function. The three dynamic assignment functions shown in Table 15-22 are included with Oracle BPEL Process Manager:
Table 15-22 Dynamic Assignment Functions
| Function | Description |
|---|---|
ROUND_ROBIN |
Picks each user or group in turn. |
least-busy |
Picks the user or group with the least number of tasks currently assigned to it. |
most-productive |
Picks the user or group that has completed the most tasks over a certain time period (by default, the last seven days). |
These functions all check a user's vacation status. A user that is currently unavailable is not automatically assigned tasks.
These dynamic assignment functions can be called using the custom XPath functions in a BPEL process or task definition.
wfDynamicUserAssign
wfDynamicGroupAssign
These XPath functions must be called with at least two, and optionally more parameters:
The name of the dynamic assignment function being called.
The name of the group on which to execute the function (or a list of users or groups).(Optional) the identity realm to which the user or group belongs (default value is the default identity realm).
Additional optional parameters specific to the dynamic assignment function. In the case of the most-productive assignment function, this is the length of time (in days) to calculate a user's productivity. The two other functions do not use additional parameters.
In addition, workflow rules created for a group can use dynamic assignment functions to select a member of that group for reassignment of a task.
In addition to the three functions, a dynamic assignment framework is provided that allows you to implement and configure your own dynamic assignment functions.
To implement your own dynamic assignment function, write a Java class that implements one or both of the following interfaces:
oracle.bpel.services.workflow.assignment.dynamic. IDynamicUserAssignmentFunction
oracle.bpel.services.workflow.assignment.dynamic. IDynamicGroupAssignmentFunction
If your dynamic assignment function selects users, implement the first interface. If it selects groups, implement the second interface. If it allows the selection of both users and groups, implement both interfaces.
The two interfaces above both extend the interface oracle.bpel.services.workflow.assignment.dynamic.IDynamicAssignmentFunction.
Your Java class should also implement the methods in that interface.
These interfaces as shown below:
public interface IDynamicAssignmentFunction
{
  /**
   * Sets the initialization parameters required by the function (if any)
   * This function is called automatically by the DynamicAssignmentRegistry
   * on registration of a new function. Initialization parameters can be
   * specified in the xml definition of the function in the dynamic assign
   * config file
   * @param initParams Map of String parameter values keyed by String parameter
   * names
   * @throws DynamicAssignmentException if implementation of method finds invalid
   * parameters
   */
  public void setInitParams( Map initParams ) throws DynamicAssignmentException;


   /**
   * Gets the name of this Dynamic Assignment Function
   * @return String the name of the Dynamic Assignment Function
   */
   public String getFunctionName();


  /**
   * Gets a description of this Dynamic Assignment Function
   * @return  String description of function
   */
   public String getDescription();
}
public interface IDynamicGroupAssignmentFunction extends
 IDynamicAssignmentFunction
{
  /**
    * This method contains the implementation of the Assignment Function
    * Given a group name, it will return a subgroup in that group,
    * according to the assignment pattern implemented
    * @return String name of group
    * @param groupName String name of group to select group from
    * @param realm String name of Identity Service realm the group belongs
    * to. If realm is null, the default Identity Service realm will be used.
    * @param parameters String[] optional array of parameter values.
    * Use of parameter values is implementation-specific.
    */
    public String getGroupAssignment( String groupName, String realm, String[]
 parameters )
      throws DynamicAssignmentException;
  /**
    * This method contains the implementation of the Assignment Function
    * Given an arbitrary list of groups, it will return a group in that
    * list, according to the assignment pattern implemented
    * @return String name of group
    * @param groupNames List of groups to select from
    * @param realm String name of Identity Service realm the groups belong
    * to. If realm is null, the default Identity Service realm will be used.
    * @param parameters String[] optional array of parameter values.
    * Use of parameter values is implementation-specific.
    */
    public String getGroupAssignment( List groupNames, String realm, String[]
 parameters )
      throws DynamicAssignmentException;
}
public interface IDynamicUserAssignmentFunction extends IDynamicAssignmentFunction
{
  /**
    * This method contains the implementation of the Assignment Function
    * Given a group name, it will return a user in that group,
    * according to the assignment pattern implemented
    * @return String username of user
    * @param groupName String name of group to select user from
    * @param realm String name of Identity Service realm the group belongs
    * to. If realm is null, the default Identity Service realm will be used.
    * @param parameters String[] optional array of parameter values.
    * Use of parameter values is implementation-specific.
    */
    public String getUserAssignment( String groupName, String realm, String[]
 parameters )
      throws DynamicAssignmentException;
   /**
    * This method contains the implementation of the Assignment Function
    * Given an arbitrary list of users, it will return a user in that
    * list, according to the assignment pattern implemented
    * @return String username of user
    * @param usernames List of usernames to select user from
    * @param realm String name of Identity Service realm the users belong
    * to. If realm is null, the default Identity Service realm will be used.
    * @param parameters String[] optional array of parameter values.
    * Use of parameter values is implementation-specific.
    */
    public String getUserAssignment( List usernames, String realm, String[]
 parameters )
      throws DynamicAssignmentException;
}
The dynamic assignment framework also provides the utility class oracle.bpel.services.workflow.assignment.dynamic.DynamicAssignmentUtils.
This class provides a number of methods that are useful when implementing dynamic assignment functions.
These include:
/**
   * Method returns a list of users belonging to the specified group
   * that are available (i.e. not on vacation etc.)
   * @return List of String usernames of available users
   * @param  group - name of group to lookup users for
   * @throws DynamicAssignmentException if error encountered looking up
   * group, or checking users.
   */
  public static List getAvailableUsersFromGroup( String group, String realm )
    throws DynamicAssignmentException
    /**
   * Method returns a list of users from the specified list
   * that are available (i.e. not on vacation etc.)
   * @return List of String usernames of available users
   * @param usernames - List of String usernames to check
   * @param realm - realm that users belong to
   * @throws DynamicAssignmentException if error encountered looking up
   * group, or checking users.
   */
  public static List getAvailableUsersFromList( List usernames, String realm )
    throws DynamicAssignmentException
  /**
  * Method uses the specified group name to lookup the sub-groups belonging to
  * that group using the identity service.
  * @return List of String names of groups
  * @param groupName name of group to lookup
  * @param realm to lookup group in - if null, then use identity service default
  * @realm
  * @batam boolean - directsOnly: if true return only the direct sub-groups
  * of this group. If false, return all groups belonging to this group.
  * @throws DynamicAssignmentException if group could not be found
  */
  public static List getGroupsFromGroup( String groupName
                                       , String realm
                                       , boolean directsOnly )
    throws DynamicAssignmentException
  /**
  * Method uses the specified group name to lookup the users belonging to that
  * group using the identity service.
  * @return List of String usernames of user
  * @param groupName String name of group to lookup
  * @param realm to lookup group in - if null, then use identity service default
  * @realm
  * @throws DynamicAssignmentException if group could not be found
  */
  public static  List getUsersFromGroup( String groupName, String realm )
    throws DynamicAssignmentException
  /**
   *Method returns the default identity management realm for the Identity Service
   *Instance.
   */
  public static String getIDServiceDefaultRealm( ) throws
 DynamicAssignmentException

  /**
  * Method checks WF Schema to determine if the specified user is available
  * (i.e. they are not on vacation etc.).
  * @return true if user is available, false if they are on vacation
  * @param username
  * @param realm
  */
  public static boolean isUserAvailable( String username, String realm )
    throws DynamicAssignmentException
Dynamic assignment functions are configured using the wf-dynamic-assign-cfg.xml file in the SOA_Oracle_Home\bpel\system\services\config directory.
Each dynamic assignment function must have an entry in this file, in the form of a <function> tag.
The function tag must contain two attributes:
name — the name of the function.
classpath — the classpath of the class that implements the function.
In addition, the function tag can optionally contain any number of <property> tags. These tags pass initialization parameters to the dynamic assignment function. Each property tag must contain a name attribute. The value of the property is specified in the body of the tag.
The property values specified in these tags are passed as a map (indexed by the value of the name attributes) to the setInitParameters method of the dynamic assignment functions.
Two of the functions have initialization parameters. These are:
ROUND_ROBIN — The parameter MAX_MAP_SIZE specifies the maximum number of sets of users or groups for which the function can maintain ROUND_ROBIN counts. The dynamic assignment function holds a list of users and groups in memory for each group (or list of users and groups) on which it is asked to execute the ROUND_ROBIN function.
most-productive — The parameter DEAFULT_TIME_PERIOD specified the length of time (in days) over which to calculate the user's productivity. This value can be overridden when calling the most-productive dynamic assignment function. Use an XPath function by specifying an alternative value as the third parameter in the XPath function call.
The runtime config service provides methods for returning a list of available user and group dynamic assignment functions. These functions return both the name of the function, and a user-displayable label for the function. The functions support localization of the display name, so that it displays in the appropriate language for the context user. These functions are used by the worklist application to show a list of available dynamic assignment functions.
To specify display names (and appropriate translations) for your dynamic assignment functions, add entries to the resource property file WorkflowLabels.properties, and associated resource property files in other languages. This file exists in the SOA_Oracle_Home\bpel\system\services\config\wfresource directory.
Entries for dynamic assignment functions must be of the form:
DYN_ASSIGN_FN.[function name]=Function Display Name
For instance, the entry for the ROUND_ROBIN function is:
DYN_ASSIGN_FN.ROUND_ROBIN = Round Robin
Note that adding entries to these files for dynamic assignment functions is optional. If no entry is present in the file, then the name of the function (for example, ROUND_ROBIN') is used instead.
Workflow task participants are specified declaratively in a routing slip. The routing slip guides the workflow by specifying the participants and how they participate in the workflow task (for example, management chain hierarchy, sequential list of approvers, and so on).
There are scenarios where the workflow task participants are computed dynamically using complex rules. To support such dynamic assignment, an assignment service is used. The assignment service is responsible for determining the task assignees. You can also implement your own assignment service and plug in that implementation for use with a particular workflow.
This section contains the following topics:
The assignment service determines the following task assignment details in a workflow:
The assignment when the task is initiated
The assignment when the task is reinitiated
The assignment when a user updates the task outcome. When the task outcome is updated, the task can either be routed to other users or completed.
The assignees from whom information for the task can be requested
If the task supports reapproval from the Oracle BPEL Worklist Application, a user can request information for reapproval.
The users who reapprove the task if reapproval is supported.
The workflow service identifies and invokes the assignment service for a particular task to determine the task assignment.
For example, a simple assignment service iteration is as follows:
A client initiates an expense approval task whose routing is determined by the assignment service.
The assignment service determines that the task assignee is jcooper.
When jcooper approves the task, the assignment service assigns the task to jstein. The assignment service also specifies that a notification must be sent to the creator of the task, jlondon.
jstein approves the task and the assignment service indicates that there are no more users to which to assign the task.
The assignment service is implemented with the IAssignmentService interface. The workflow service passes the following information to the assignment service to determine the task assignment:
Task document — The task document that is executed by the workflow. The task document contains the payload and other task information like current state, and so on.
Map of properties — When an assignment service is specified, a list of properties can also be specified to correlate callbacks with backend services that determine the task assignees.
Task history — The task history is a list of chronologically ordered task documents to trace the history of the task. The task documents in this list contain a subset of attributes in the actual task (such as state, updatedBy, outcome, updatedDate, and so on).
Notes:
The assignment service class cannot be stateful because every time workflow services need to call the assignment service, it creates a new instance.
The getAssigneesToRequestForInformation method can be called multiple times because one of the criteria to show the request-for-information action is that there are users to request information. Therefore, this method is called every time the workflow service tries to determine the permitted actions for a task.
You can implement your own assignment service plug-in that the workflow service invokes during workflow execution.
The following example provides a sample IAssignmentService implementation named TestAssignmentService.java.
/* $Header: TestAssignmentService.java 24-may-2006.18:26:16 rarangas Exp $ */
/* Copyright (c) 2004, 2006, Oracle. All rights reserved.  */
/*
   DESCRIPTION
    Interface IAssignmentService defines the callbacks an assignment
    service will implement. The implementation of the IAssignmentService
    will be called by the workflow service
   PRIVATE CLASSES
    <list of private classes defined - with one-line descriptions>
   NOTES
    <other useful comments, qualifications, etc.>
   MODIFIED    (MM/DD/YY)
      rarangas  01/30/06 -
 */
/**
 *  @version $Header: IAssignmentService.java 29-jun-2004.21:10:35 rarangas Exp
 $
 *  @author  rarangas
 *  @since   release specific (what release of product did this appear in)
 */
package oracle.bpel.services.workflow.test.workflow;
import java.util.ArrayList;
import java.util.List;
import java.util.Map;
import oracle.bpel.services.workflow.metadata.routingslip.model.*;
import oracle.bpel.services.workflow.metadata.routingslip.model.Participants;
import oracle.bpel.services.workflow.metadata.routingslip.model.ParticipantsType.*;
import oracle.bpel.services.workflow.task.IAssignmentService;
import oracle.bpel.services.workflow.task.ITaskAssignee;
import oracle.bpel.services.workflow.task.model.Task;
public class TestAssignmentService implements
 oracle.bpel.services.workflow.task.IAssignmentService {
    static int numberOfApprovals = 0;
    static String[] users = new String[]{"jstein", "wfaulk", "cdickens"};
    public Participants onInitiation(Task task,
                                     Map propertyBag) {
        return createParticipant();
    }
    public Participants onReinitiation(Task task,
                                       Map propertyBag) {
        return null;
    }
    public Participants onOutcomeUpdated(Task task,
                                         Map propertyBag,
                                         String updatedBy,
                                         String outcome) {
        return createParticipant();
    }
    public Participants onAssignmentSkipped(Task task,
                                            Map propertyBag) {
        return null;
    }
    public List getAssigneesToRequestForInformation(Task task,
                                                    Map propertyBag) {
        List rfiUsers = new ArrayList();
        rfiUsers.add("jcooper");
        rfiUsers.add("jstein");
        rfiUsers.add("wfaulk");
        rfiUsers.add("cdickens");
        return rfiUsers;
    }
    public List getReapprovalAssignees(Task task,
                                       Map propertyBag,
                                       ITaskAssignee infoRequestedAssignee) {
        List reapprovalUsers = new ArrayList();
        reapprovalUsers.add("jstein");
        reapprovalUsers.add("wfaulk");
        reapprovalUsers.add("cdickens");
        return reapprovalUsers;
    }
    private Participants createParticipant() {
        if (numberOfApprovals > 2) {
            numberOfApprovals = 0;
            return null;
        }
        String user = users[numberOfApprovals++];

        ObjectFactory objFactory = new ObjectFactory();
        Participants participants = objFactory.createParticipants();
        Participant participant = objFactory.createParticipantsTypeParticipant();
        participant.setName("Loan Agent");
        ResourceType resource2 = objFactory.createResourceType(user);
        resource2.setIsGroup(false);
        resource2.setType("STATIC");
        participant.getResource().add(resource2);

        participants.getParticipantOrSequentialParticipantOrAdhoc().
          add(participant);
        return participants;
    }

}
You must use one of the following methods to make an assignment service implementation class and its related classes available in the class path of Oracle BPEL Process Manager:
Load your classes in the SOA_Oracle_Home\bpel\system\classes directory and unzip your JAR files in the same directory.
Change the Oracle BPEL Process Manager shared library to include your JAR files.
Note:
You cannot create different versions of the assignment service for use in different BPEL processes unless you change package names or class names.
Java classes and JAR files in the suitcase are not available in the class path and therefore cannot be used as a deployment model for the assignment service.
The steps must be repeated for each node in a cluster.
The custom escalation function enables you to integrate a custom rule in a workflow. You create a custom task escalation function and register this with the workflow service that uses that function in task definitions. The Advanced Settings section of the Human Task editor enables you to integrate the rule in a human task.
See Also:
"Specifying Escalation Rules" for detailsOracle BPEL Process Manager provides XPath extension functions for use with the workflow services and the identity service. XPath extension functions mimic XPath 2.0 standards. Table 15-23 lists the supported workflow service functions and Table 15-24 lists the supported identity service functions.
Table 15-23 Workflow Service Functions
| Function | Description | See |
|---|---|---|
hwf:clearTaskAssignees() |
Clears the task assignees in a task. | "clearTaskAssignees" |
hwf:createWordMLDocument() |
Creates a Word document by transforming the given XSLT to WordML | "createWordMLDocument" |
hwf:getNotificationProperty() |
Gets properties for a particular notification. | "Contents of Notification"
|
hwf:getNumberOfTaskApprovals() |
Gets the number of task approvals. | "getNumberOfTaskApprovals" |
hwf:getPreviousTaskApprover() |
Gets the previous task approver. | "getPreviousTaskApprover" |
hwf:getTaskAttachmentByIndex() |
Gets the task attachment by attachment index. | "getTaskAttachmentByIndex" |
hwf:getTaskAttachmentByName() |
Gets the task attachment by attachment name. | "getTaskAttachmentByName" |
hwf:getTaskAttachmentContents() |
Gets the task attachment contents by attachment name. | "getTaskAttachmentContents" |
hwf:getTaskAttachmentsCount() |
Gets the number of task attachments. | "getTaskAttachmentsCount" |
hwf:getTaskAttachmentByIndex() |
Gets the resource string for a particular task | "getTaskAttachmentByIndex" |
hwf:wfDynamicGroupAssign() |
Gets the name of an identity service group, selected according to the specified assignment pattern. | "wfDynamicGroupAssign" |
hwf:wfDynamicUserAssign() |
Gets the name of an identity service user, selected according to the specified assignment pattern. | "wfDynamicUserAssign" |
Table 15-24 Identity Service Functions
| Function | Description | See |
|---|---|---|
ids:getDefaultRealmName() |
Gets the default realm name. | "getDefaultRealmName" |
ids:getGroupProperty() |
Gets a group property. | "getGroupProperty" |
ids:getManager() |
Gets the manager of a given user. | "getManager" |
ids:getReportees() |
Gets the direct reportees of the user. | "getReportees" |
ids:getSupportedRealmNames() |
Gets the supported realm names. | "getSupportedRealmNames" |
ids:getUserProperty() |
Gets a user property. | "getUserProperty" |
ids:getUserRoles() |
Gets the user roles. | "getUserRoles" |
ids:getUsersInGroup() |
Gets the users in a group. | "getUsersInGroup" |
ids:isUserInRole() |
Verifies if a user has a given role. | "isUserInRole" |
ids:lookupGroup() |
Gets the group object. | "lookupGroup" |
ids:lookupUser() |
Gets the user object. | "lookupUser" |
Table 15-25 lists the workflow and identity service functions that are deprecated for this release.
Table 15-25 Deprecated Workflow Service and Identity Service Functions
| Workflow Function | Identity Service Functions |
|---|---|
ora:getNumberOfTaskApprovals() |
ora:getGroupProperty() |
ora:getPreviousTaskApprover() |
ora:getManager() |
ora:getTaskAttachmentByIndex() |
ora:getReportees() |
ora:getTaskAttachmentByName() |
ora:getUserRoles() |
ora:getTaskAttachmentContents() |
ora:getUsersInGroup() |
ora:getTaskAttachmentCount() |
ora:isUserInRole() |
ora:lookupGroup() |
|
ora:lookupUser() |
|
ora:getUserProperty() |
You can specify resource bundles for displaying task details in different languages in Oracle BPEL Worklist Application.
In addition, the resource property file WorkflowLabels.properties can be used for setting display names for the following:
Dynamic assignment functions
Payload mapping attribute labels
Task attributes
See Also:
"Specifying Multilingual Settings" for details about resource bundles
"Internationalization of Attribute Labels" and "Configuring Display Names for Dynamic Assignment Functions" for additional details about the resource property file WorkflowLabels.properties.
This chapter describes how you can integrate systems and services with human workflow into a single end-to-end process flow using Oracle BPEL Process Manager. The predefined workflow participant types are described, as are the components of workflow services—the task service, task routing service, identity service, worklist service, notification service, and others.