4 Extending the Functionality of the Connector
This chapter discusses the following optional procedure:
Note:
These sections describe optional procedures. Perform a procedure only if you want to address the business requirement stated at the start of the section.
-
Configuring Validation of Data During Reconciliation and Provisioning
-
Configuring the Connector for Multiple Installations of the Target System
Determining Whether an Attribute Is an Identity Management Services or Authentication Manager Attribute
Some of the sections in this chapter describe procedures to map new attributes for reconciliation and provisioning. One of the steps of these procedures is to create an entry in the lookup definition that holds the mapping between target system and Oracle Identity Manager attributes. The Decode value of these lookup definitions contains a setting that requires you to specify whether the attribute is an Identity Management Services or Authentication Manager attribute.
To determine if an attribute is an Identity Management Services or Authentication Manager attribute:
-
Log in to the RSA Security Console.
-
From the Identity list, select Users and then select Manage Existing.
-
Use the Search feature to display details of either a single user or all users.
-
For any user in the list of users displayed, click the arrow next to the user ID.
-
From the menu displayed:
-
Select View to display the list of Identity Management Services attributes.
-
Select Authentication Setting to display the list of Authentication Manager attributes.
-
Adding New User or Token Attributes for Reconciliation
Note:
-
You must ensure that new attributes you add for reconciliation contain only string-format data. Binary data must not be brought into Oracle Identity Manager natively.
-
Only single-valued attributes can be mapped for reconciliation.
-
For Oracle Identity Manager release 11.1.2.x, you must create a new UI form to see this new attribute. See Creating a New UI Form for more information.
By default, the attributes listed in Table 1-4 and Table 1-6 are mapped for reconciliation between Oracle Identity Manager and the target system. If required, you can add new attributes for reconciliation.
Summary of the procedure to add a new user or token attribute for reconciliation
-
Add the new attribute on the process form.
-
Add the attribute to the list of reconciliation fields in the resource object.
-
Create a reconciliation field mapping for the attribute in the process definition.
-
Create an entry for the field in the lookup definition that holds attribute mappings.
To add a new user or token attribute for reconciliation:
Note:
See Oracle Identity Manager Design Console Guide for detailed information about the steps of this procedure.
If you have already added an attribute for provisioning, then you need not repeat steps performed as part of that procedure.
-
Log in to the Oracle Identity Manager Design Console.
-
Add the new attribute on the process form as follows:
-
Expand Development Tools, and double-click Form Designer.
-
If you want to add a user attribute, then search for and open the UD_AMUSER process form.
If you want to add a token attribute, then search for and open the UD_AMTOKEN process form.
-
Click Create New Version, and then click Add.
-
Enter the details of the field.
For example, if you are adding the Country field, enter
UD_AMUSER_COUNTRYin the Name field and then enter other details such as Variable Type, Length, Field Label, and Field Type. -
Click the Save icon, and then click Make Version Active. The following screenshot shows the new field added to the process form:
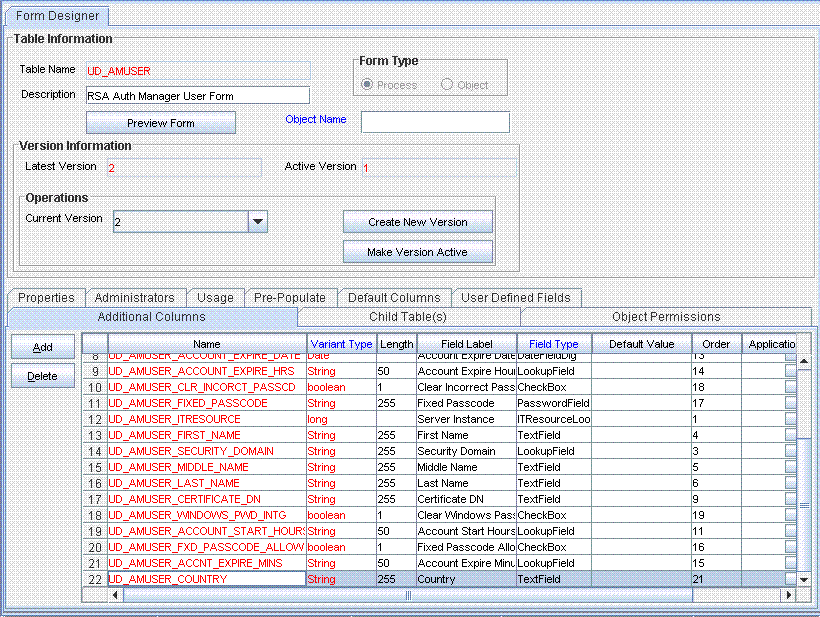
Description of the illustration process_form_field.gif
-
-
Add the new attribute to the list of reconciliation fields in the resource object as follows:
-
Expand Resource Management, and double-click Resource Objects.
-
Search for and open either the RSA Auth Manager User or the RSA Auth Manager Token resource object.
-
On the Object Reconciliation tab, click Add Field.
-
Enter the details of the field.
For example, enter
Countryin the Field Name field and select String from the Field Type list.Later in this procedure, you enter the field name as the Code value of the entry that you create in the lookup definition for reconciliation.
-
Click the Save icon. The following screenshot shows the new reconciliation field added to the resource object:
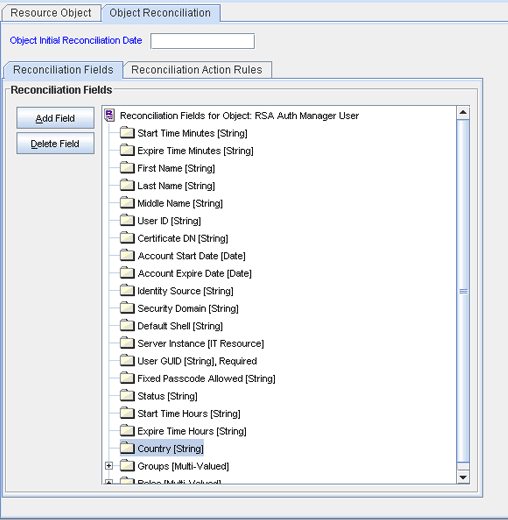
Description of the illustration recon_field.gif
-
If you are using Oracle Identity Manager release 11.1.1 or 11.1.2.x, then click Create Reconciliation Profile. This copies changes made to the resource object into the MDS.
-
-
Create a reconciliation field mapping for the new attribute in the process definition as follows:
-
Expand Process Management, and double-click Process Definition.
-
Search for and open either the RSA Auth Manager User or the RSA Auth Manager Token process definition.
-
On the Reconciliation Field Mappings tab of the RSA Auth Manager User process definition, click Add Field Map.
-
From the Field Name list, select the field that you want to map.
-
Double-click the Process Data Field field, and then select the column for the attribute. For example, select UD_AMUSER_COUNTRY.
-
Click the Save icon. The following screenshot shows the new reconciliation field mapped to a process data field in the process definition:
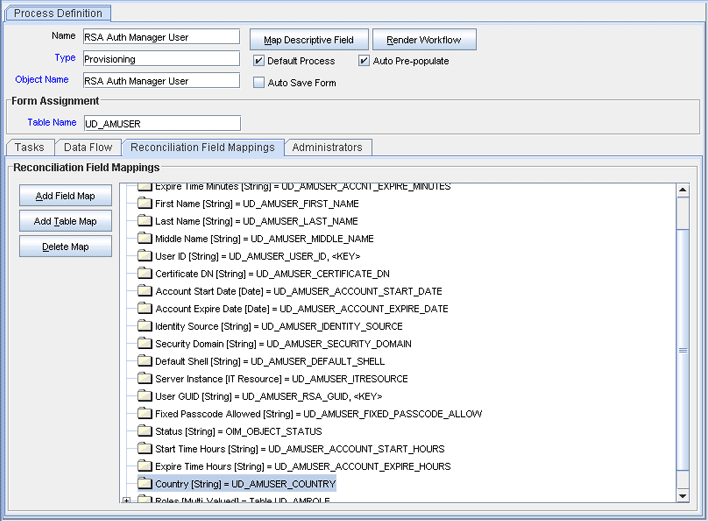
Description of the illustration process_defn_field.gif
-
-
Create an entry for the field in the lookup definition for reconciliation as follows:
-
Expand Administration.
-
Double-click Lookup Definition.
-
Search for and open either the Lookup.RSA.AuthManager.UserReconAttrMap or the Lookup.RSA.AuthManager.TokenReconAttrMap lookup definition.
-
Click Add and enter the Code Key and Decode values for the field. The Code Key value must be the name of the field in the resource object. Enter the Decode value in the following format:
METHOD_NAME;PRINCIPAL_TYPE;ATTRIBUTE_TYPE;RETURN_TYPE_OF_METHOD;RESOURCE_OBJECT_FIELD_TYPE;DTO_ATTRIBUTE_NAMESee User Attributes for Reconciliation for information about this format.
-
Click the Save icon. The following screenshot shows the entry added to the lookup definition:
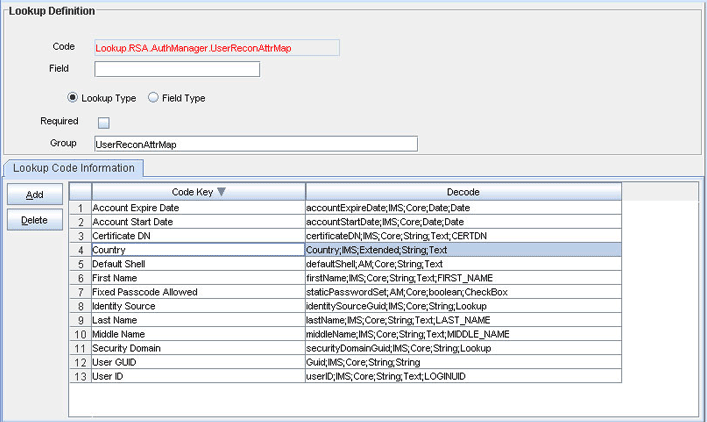
Description of the illustration field_lookup_definition.gif
-
Adding New User or Token Attributes for Provisioning
By default, the attributes listed in Table 1-9 and Table 1-11 are mapped for provisioning between Oracle Identity Manager and the target system. If required, you can map additional attributes for provisioning.
Note:
-
Only single-valued attributes can be mapped for provisioning.
-
For Oracle Identity Manager release 11.1.2.x, you must create a new UI form to see this new attribute. See Creating a New UI Form for more information.
Summary of the procedure to add a new user or token attribute for provisioning
-
Add the new attribute on the process form.
-
Create an entry for the attribute in the lookup definition that holds attribute mappings.
-
Create a task to enable update of the attribute during provisioning operations.
To add a new user or token attribute for provisioning:
Note:
See Oracle Identity Manager Design Console Guide for detailed information about the steps of this procedure.
If you have already added an attribute for reconciliation, then you need not repeat steps performed as part of that procedure.
-
Log in to the Oracle Identity Manager Design Console.
-
Add the new attribute on the process form as follows:
-
Expand Development Tools, and double-click Form Designer.
-
If you want to add a user attribute, then search for and open the UD_AMUSER process form.
If you want to add a token attribute, then search for and open the UD_AMTOKEN process form.
-
Click Create New Version, and then click Add.
-
Enter the details of the attribute.
For example, if you are adding the Country field, enter
UD_AMUSER_COUNTRYin the Name field, and then enter the rest of the details of this field. -
Click the Save icon, and then click Make Version Active. The following screenshot shows the new field added to the process form:

Description of the illustration process_form_field.gif
-
-
Create an entry for the attribute in the lookup definition for provisioning as follows:
-
Expand Administration.
-
Double-click Lookup Definition.
-
Search for and open either the Lookup.RSA.AuthManager.UserAttrMap or the Lookup.RSA.AuthManager.TokenAttrMap lookup definition.
-
Click Add and then enter the Code Key and Decode values for the attribute.
See User Attributes for Provisioning for information about the format of the value to be entered in the Decode column.
For example, enter
Countryin the Code Key column and then enterCountry;IMS;Extended;Stringin the Decode column. The following screenshot shows the entry added to the lookup definition: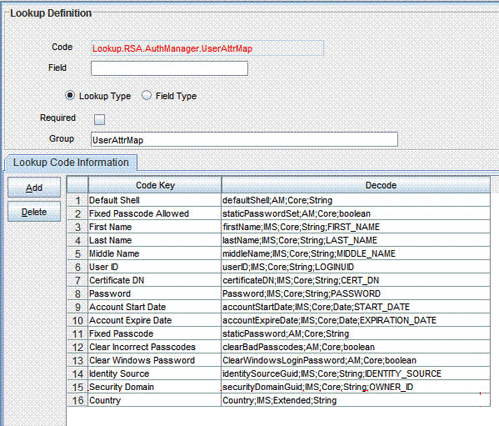
Description of the illustration lookup_entry_prov.gif
-
-
Create a task to enable update of the attribute during provisioning operations.
If you do not perform this procedure, then you will not be able to modify the value of the attribute after you set a value for it during the Create User provisioning operation.
To enable the update of the attribute during provisioning operations, add a process task for updating the attribute:
See Also:
Oracle Identity Manager Design Console Guide for detailed information about these steps
-
Expand Process Management, and double-click Process Definition.
-
Search for and open either the RSA Auth Manager User or the RSA Auth Manager Token process definition.
-
Click Add.
-
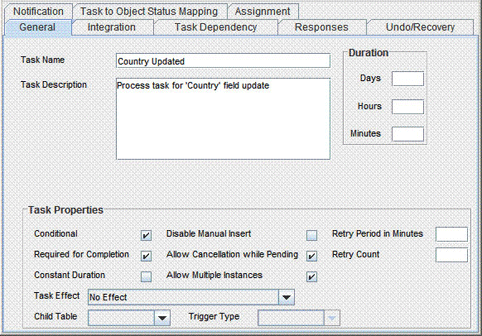
On the General tab of the Creating New Task dialog box, enter a name and description for the task and then select the following:
Conditional
Required for Completion
Allow Cancellation while Pending
Allow Multiple Instances
-
Click the Save icon. The following screenshot shows the new task added to the process definition:
Description of the illustration new_process_task.gif
-
On the Integration tab of the Creating New Task dialog box, click Add.
-
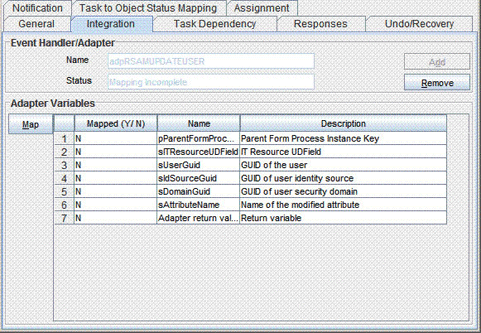
In the Handler Selection dialog box, select Adapter, click adpRSAMUPDATEUSER, and then click the Save icon.
The list of adapter variables is displayed on the Integration tab. The following screenshot shows the list of adapter variables:
Description of the illustration new_adapter.gif
-
To create the mapping for the first adapter variable:
Double-click the number of the first row.
In the Edit Data Mapping for Variable dialog box, enter the following values:
Variable Name: pParentFormProcessInstanceKey
Map To: Process Data
Qualifier: Process Instance
Click the Save icon.
-
To create mappings for the remaining adapter variables, use the data given in the following table:
Variable Number Variable Name Map To Qualifier Second
sITResourceUDField
Literal
String
For Example:
UD_AMUSER_ITRESOURCEThird
sUserGuid
Process Data
User GUID
Fourth
sIdSourceGuid
Process Data
Identity Source
Fifth
sDomainGuid
Process Data
Security Domain
Sixth
sAttributeName
Literal
String
For Example:
CountrySeventh
Adapter return value
Response Code
Not applicable
-
Click the Save icon in the Editing Task dialog box, and then close the dialog box.
-
Click the Save icon to save changes to the process definition.
-
Configuring Validation of Data During Reconciliation and Provisioning
You can configure validation of reconciled and provisioned data according to your requirements. For example, you can validate data fetched from the First Name attribute to ensure that it does not contain the at sign (@). In addition, you can validate data entered in the First Name field on the process form so that the at sign (@) is not sent to the target system during provisioning operations.
For data that fails the validation check, the following message is displayed or recorded in the log file:
Value returned for field FIELD_NAME is false.
To configure validation of data:
-
Write code that implements the required validation logic in a Java class.
This validation class must implement the oracle.iam.connectors.common.validate.Validator interface and the validate method.
See Also:
The Javadocs shipped with the connector for more information about this interface
The following sample validation class checks if the value in the First Name attribute contains the at sign (@):
public boolean validate(HashMap hmUserDetails, HashMap hmEntitlementDetails, String field) { /* * You must write code to validate attributes. Parent * data values can be fetched by using hmUserDetails.get(field) * For child data values, loop through the * ArrayList/Vector fetched by hmEntitlementDetails.get("Child Table") * Depending on the outcome of the validation operation, * the code must return true or false. */ /* * In this sample code, the value "false" is returned if the field * contains the number sign (#). Otherwise, the value "true" is * returned. */ boolean valid=true; String sFirstName=(String) hmUserDetails.get(field); for(int i=0;i<sFirstName.length();i++){ if (sFirstName.charAt(i) == '#'){ valid=false; break; } } return valid; } -
Create a JAR file to hold the Java class.
-
Copy the JAR file into the JavaTasks or ScheduleTask directory.
-
If you created the Java class for validating a user or token attribute for reconciliation, then:
-
Log in to the Design Console.
-
Search for and open one of the following lookup definitions:
-
In the Code Key column, enter the resource object field name. In the Decode column, enter the class name.
-
Save the changes to the lookup definition.
-
Search for and open the Lookup.RSA.AuthManager.Configuration lookup definition.
-
Set the value of one of the following entries to
yes:-
For a user attribute, set Use Validation For UserRecon to
yes. -
For a token attribute, set Use Validation For TokenRecon to
yes.
-
-
Save the changes to the lookup definition.
-
-
If you created the Java class for validating an attribute for provisioning, then:
-
Log in to the Design Console.
-
Search for and open one of the following lookup definitions:
-
In the Code Key column, enter the process form field name. In the Decode column, enter the class name.
-
Save the changes to the lookup definition.
-
Search for and open the Lookup.RSA.AuthManager.Configuration lookup definition.
-
Set the value of one of the following entries to
yes:-
For a user attribute, set Use Validation For UserProv to
yes. -
For a token attribute, set Use Validation For TokenProv to
yes.
-
-
Save the changes to the lookup definition.
-
Configuring Transformation of Data During Reconciliation
You can configure transformation of reconciled single-valued user data according to your requirements. For example, you can use First Name and Last Name values to create a value for the Full Name field in Oracle Identity Manager.
To configure transformation of single-valued user data fetched during reconciliation:
-
Write code that implements the required transformation logic in a Java class.
This transformation class must implement the oracle.iam.connectors.common.transform.Transformation interface and the transform method.
See Also:
The Javadocs shipped with the connector for more information about this interface
The following sample transformation class creates a value for the Full Name attribute by using values fetched from the First Name and Last Name attributes of the target system:
package oracle.iam.connectors.common.transform; import java.util.HashMap; public class TransformAttribute implements Transformation { /* Description:Abstract method for transforming the attributes param hmUserDetails<String,Object> HashMap containing parent data details param hmEntitlementDetails <String,Object> HashMap containing child data details */ public Object transform(HashMap hmUserDetails, HashMap hmEntitlementDetails,String sField) { /* * You must write code to transform the attributes. Parent data attribute values can be fetched by using hmUserDetails.get("Field Name"). *To fetch child data values, loop through the * ArrayList/Vector fetched by hmEntitlementDetails.get("Child Table") * Return the transformed attribute. */ String sFirstName= (String)hmUserDetails.get("First Name"); String sLastName= (String)hmUserDetails.get("Last Name"); String sFullName=sFirstName+"."+sLastName; return sFullName; } } -
Create a JAR file to hold the Java class.
-
Copy the JAR file into the JavaTasks or ScheduleTask directory.
-
If you created the Java class for transforming an attribute for reconciliation, then:
-
Log in to the Design Console.
-
Search for and open one of the following lookup definitions:
-
In the Code Key column, enter the resource object field name. In the Decode column, enter the class name.
-
Save the changes to the lookup definition.
-
Search for and open the Lookup.RSA.AuthManager.Configuration lookup definition.
-
Depending on whether you are applying the transformation to a user or token attribute, set either the Use Token Transform Mapping or the Use User Transform Mapping entry to
yes. -
Save the changes to the lookup definition.
-
Modifying Field Lengths on the Process Form
You might want to modify the lengths of fields (attributes) on the process form. For example, if you use the Japanese locale, then you might want to increase the lengths of process form fields to accommodate multibyte data from the target system.
If you want to modify the length of a field on the process form, then:
-
Log in to the Design Console.
-
Expand Development Tools, and double-click Form Designer.
-
Search for and open the UD_AMUSER process form.
Note:
If you want to change field lengths on the token process form, then open the UD_AMTOKEN form. The remaining steps of the procedure are the same for both process forms.
-
Click Create New Version.
-
Enter a label for the new version, click the Save icon, and then close the dialog box.
-
From the Current Version list, select the version that you create.
-
Modify the length of the required field.
-
Click the Save icon.
-
Click Make Version Active.
Guideline for Importing the Connector XML File
Note:
This section describes a guideline that you must apply if you are planning to create (or modify) and then import the connector XML file on an Oracle Identity Manager installation running on IBM WebSphere Application Server.
When you install the connector, you copy JAR files from the RSA Authentication Manager home directory to the application server home directory. You might encounter an error if you try to run the Deployment Manager or Connector Installer without first removing these JAR files from the application server home directory. Removing RSA Authentication Manager JAR Files from the IBM WebSphere Application Server Home Directory describes this issue. To avoid this issue:
-
Perform the procedure described in Removing RSA Authentication Manager JAR Files from the IBM WebSphere Application Server Home Directory.
-
Import the revised connector XML file by using the Deployment Manager. Alternatively, if you have created a deployment package using the modified connector XML file, then run the Connector Installer.
-
Perform the procedure described in Copying Target System Files to Oracle Identity Manager.
Configuring the Connector for Multiple Installations of the Target System
You might want to configure the connector for multiple installations of the target system. The following example illustrates this requirement:
The London and New York offices of Example Multinational Inc. have their own installations of the target system. The company has recently installed Oracle Identity Manager, and they want to configure Oracle Identity Manager to link all the installations of the target system.
To meet the requirement posed by such a scenario, you can create copies of connector objects, such as the IT resource and resource object.
The decision to create a copy of a connector object might be based on a requirement. For example, an IT resource can hold connection information for one target system installation. Therefore, it is mandatory to create a copy of the IT resource for each target system installation.
With some other connector objects, you do not need to create copies at all. For example, a single attribute-mapping lookup definition can be used for all installations of the target system.
All connector objects are linked. For example, a scheduled task holds the name of the IT resource. Similarly, the IT resource holds the name of the configuration lookup definition (Lookup.RSA.AuthManager.Configuration). If you create a copy of an object, then you must specify the name of the copy in associated connector objects. Table 4-1 lists associations between connector objects whose copies can be created and the other objects that reference these objects. When you create a copy of a connector object, use this information to change the associations of that object with other objects.
Note:
If you create a copy of a connector object, then you must set a unique name for it.
Table 4-1 Connector Objects and Their Associations
| Connector Object | Name | Referenced By | Comments on Creating a Copy |
|---|---|---|---|
|
IT resource |
RSA Server Instance |
RSA Auth Manager Lookup Recon (scheduled task) |
Create a copy of the IT resource. See Configuring Connection Parameters for more information. |
|
Resource objects |
RSA Auth Manager User (user resource object) RSA Auth Manager Token (token resource object) |
If you are reconciling the same set of attributes from all installations of the target system, then you need not create a copy of the resource object. In other words, create copies of the resource object only if there are differences in attributes between the various installations of the target system. See Reconciliation Scheduled Tasks for more information. |
|
|
Process definition |
RSA Auth Manager User |
NA |
Create copies of this process definition only if there are difference in attributes between the installations of the target system. |
|
Attribute Mapping Lookup Definition |
Lookup.RSA.AuthManager.UserAttrMap Lookup.RSA.AuthManager.UserChildAttrMap Lookup.RSA.AuthManager.UserReconAttrMap Lookup.RSA.AuthManager.UserReconChildAttrMap |
NA |
Create copies of this process definition only if there are difference in attributes between the installations of the target system. See the following sections for more information: |
|
Process form |
UD_AMUSER |
NA |
It is optional to create a copy of a process form. If you are provisioning different sets of attributes, then you need to create a copy of this connector object. |
|
Configuration lookup definition |
RSA Server Instance (IT resource) |
Create copies of this lookup definition only if you want to use a different set of configuration values for the various installations of the target system. See Setting Up the Configuration Lookup Definition in Oracle Identity Manager for more information. |
When you configure reconciliation:
To reconcile data from a particular target system installation, specify the name of the IT resource for that target system installation as the value of the scheduled task attribute that holds the IT resource name. For example, you enter the name of the IT resource as the value of the IT resource attribute of the RSA Auth Manager User Recon and RSA Auth Manager Token Recon scheduled tasks.
When you perform provisioning operations:
When you use the Administrative and User Console to perform provisioning, you can specify the IT resource corresponding to the target system installation to which you want to provision the user.