| Bookshelf Home | Contents | Index | PDF | |
|
Siebel Business Analytics Server Administration Guide > Security in Siebel Business Analytics > Analytics Security Manager > Working with GroupsThe Analytics Server allows you to create groups and then grant membership in them to users or other groups. You can think of a group as a set of security attributes. The Analytics Server groups are similar to groups in Windows NT and Windows 2000, and to groups or roles in database management systems (DBMS). Like Windows NT and Windows 2000, and database groups or roles, Analytics Server groups can allow access to objects. Additionally, Analytics Server groups can explicitly deny particular security attributes to its members. Groups can simplify administration of large numbers of users. You can grant or deny sets of privileges to a group and then assign membership in that group to individual users. Any subsequent modifications to that group will affect all users who belong to it. Externally defined users can be granted group membership by use of the GROUP session variable. For more information about session variables, see Using System Session Variables. This section includes the following topics:
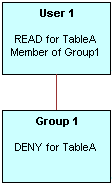
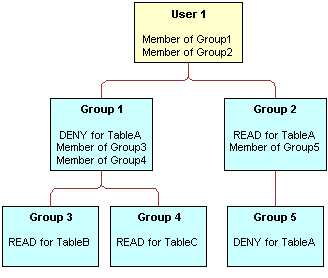
Predefined Administrators GroupThe Analytics Server has one predefined group, the Analytics Server Administrators group. Members of this group have the authority to access and modify any object in a repository. The predefined Analytics Server Administrator user ID is automatically a member of the Analytics Server Administrators group. Use caution in granting membership in the Administrators group to users or other groups. Membership in the Administrators group supersedes all privileges granted to a user, either through groups or explicitly through the user privileges. Any user who is a member of the Administrators group has all of the privileges of the Administrator user. Defined GroupsYou can create an unlimited number of groups in an analytics repository. Each group can contain explicitly granted privileges or privileges granted implicitly using membership in another group. For more information about setting up a group, see Adding a New Group. For example, you can create one group that denies access to the repository on Mondays and Wednesdays (Group1), another group that denies access on Saturdays and Sundays (Group2), and another that denies access on Tuesdays, Thursdays, and Fridays (Group3). Users who are members of Group2 can access the system only during weekdays, users who are members of Group1 and Group3 can access the system only on weekends, and so on. Group InheritanceUsers can have explicitly granted privileges. They can also have privileges granted through membership in groups, that in turn can have privileges granted through membership in other groups, and so on. Privileges granted explicitly to a user have precedence over privileges granted through groups, and privileges granted explicitly to the group take precedence over any privileges granted through other groups. If there are multiple groups acting on a user or group at the same level with conflicting security attributes, the user or group is granted the least restrictive security attribute. Any explicit permissions acting on a user take precedence over any privileges on the same objects granted to that user through groups. Example 1Suppose you have a user (User1) who is explicitly granted permission to read a given table (TableA). Suppose also that User1 is a member of Group1, that explicitly denies access to TableA. The resultant privilege for User1 is to read TableA, as shown in Figure 27. Because privileges granted directly to the user take precedence over those granted through groups, User1 has the privilege to read TableA. Example 2Consider the situation shown in Figure 28. These are the resulting privileges:
Adding a New GroupThe following procedure explains how to add a new group to a repository. To add a new group to a repository
Viewing Member HierarchiesUse the following procedures to view member hierarchies. To view member hierarchies in the Security Manager
To view member hierarchies in the Query Repository dialog box
|
| |
| Siebel Business Analytics Server Administration Guide |