| Oracle® Retail Merchandising System Oracle Retail Merchandising System User Guide 15.0 E65443-01 |
|

 Previous |
 Next |
| Oracle® Retail Merchandising System Oracle Retail Merchandising System User Guide 15.0 E65443-01 |
|
Previous |
Next |
This chapter describes support for the Franchise business model wherein a business partner (franchisee) leverages on the retailer's brand (or products) in return for margin or fee. Franchise Stores can be defined in RMS and managed by grouping them based on franchise customer. The store creation process allows setup of both stockholding franchise stores, whose inventory is managed by RMS and non-stockholding franchise stores, for which inventory is not managed post sale to the franchise store. Specific pricing structures, credit checks, and deal pass-through options that are required for franchise business transactions can also be managed. Requests for stock from franchise stores are accepted through Franchise Orders and can be fulfilled through stores, warehouses or vendors linked to the retailer. Returns from Franchise stores are similarly managed through the Franchise Returns process. Screen details and specific navigation to achieve these functions is elaborated in this following sections of this chapter.
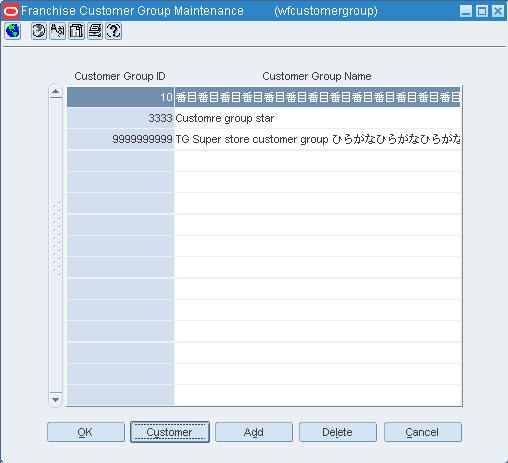
This window allows you to maintain franchise customer groups.
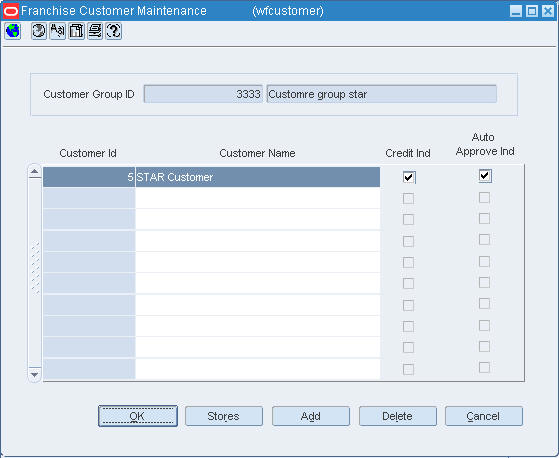
This window is for maintaining franchise customers.
Navigate: From the main menu, select Franchise > Customer Group > View. The Franchise Customer Group Maintenance window opens.
To view the Franchise Customer Group Maintenance:
Select a Customer Group Name.
Click Customer. The Franchise Customer Maintenance window opens.
Select a Customer Name.
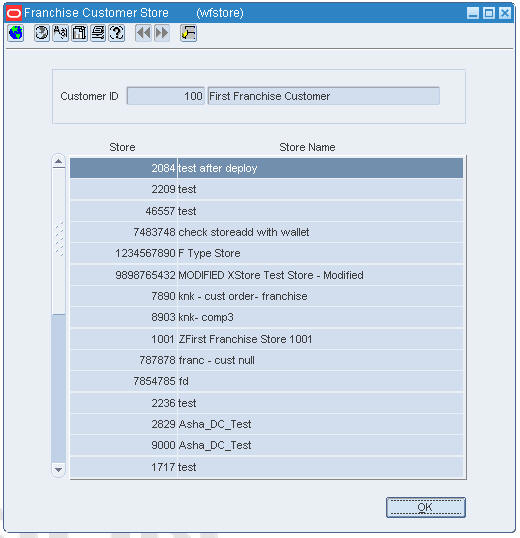
Click Stores. The Franchise Customer Store window opens.
Click OK to close the window.
Navigate: From the main menu, select Franchise > Customer Group > Edit. The Franchise Customer Group Maintenance window opens.
Select a Customer Group Name.
Click Customer. The Franchise Customer Maintenance window opens.
Click Add. The Customer ID is automatically generated.
Enter the Customer Name.
Depending on the customer, click Credit Ind and Auto Approve Ind.
Click Add to add more customer information.
Click Delete to delete the customer from the list.
Click OK to save your changes and close the window.
This window allows you to view franchise stores associated to a franchise customer.
For information on Cost Template Buildup, see "Searching for a Cost Buildup Template [costtmfnd]" in "System Administration" chapter.
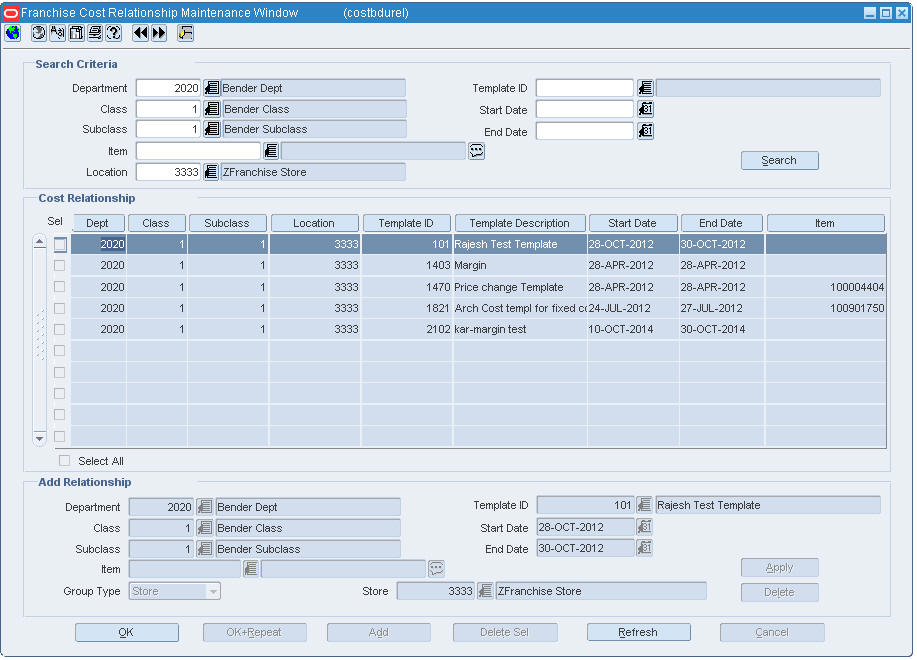
The Cost Relationship Maintenance window allows you to view the franchise cost relationships between departments. Enter the search criteria in order to search for and view the cost relationship by item.
To display the relationship, select the appropriate option from the Franchise Cost Relationship Maintenance menu.
Navigate: From the main menu, select Franchise > Franchise Cost Relationship Maintenance > Edit. The Franchise Cost Relationship Maintenance window opens.
Enter Department or select from the list.
Enter Class or select from the list.
Enter Subclass or select from the list.
Enter Template ID or select from the list.
Enter Start Date and End Date using the Calendar button.
Click Search. Information matching your search criteria populates the Cost Relationship area.
|
Note: You can either enter all the details or limit to any of the enabled search option. |
Enter Department or select from the list.
Enter Class or select from the list.
Enter Subclass or select from the list.
Enter Template ID or select from the list.
Enter Start Date and End Date using the Calendar button.
Click Search. Information matching your search criteria populates the Cost Relationship area.
Select the cost relationship in the table.
Enter the appropriate relationship information in the Add Relationship area.
Click Apply.
Click OK to save your changes and close the window.
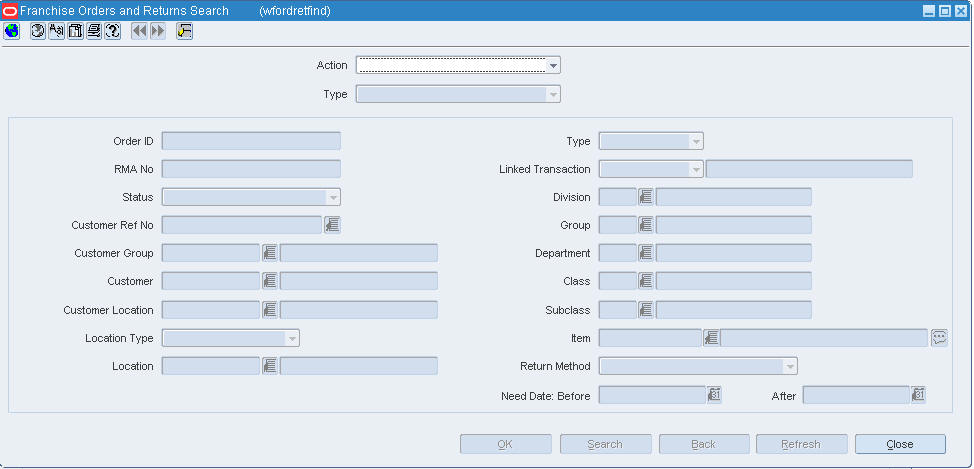
The Franchise Orders and Returns Search window allows you to search for a franchise order or return.
The default view for the search window opens when you open the window for the first time.
Navigate: From the main menu, select Franchise> Franchise Orders and Returns. The Franchise Orders and Returns Search window opens.
In the Action field, select Edit/View.
Select the Type from the following list:
Franchise Order
Franchise Return
Enter the applicable information to narrow your search.
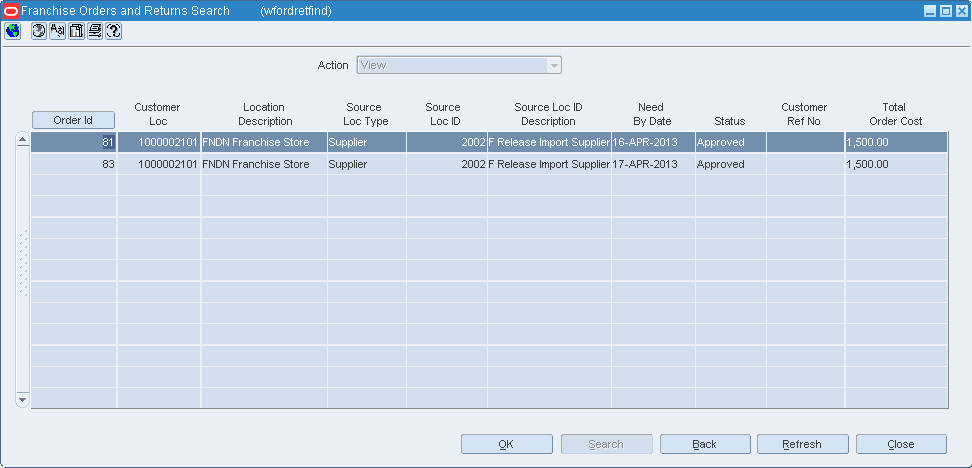
Click Search. The Franchise Orders and Returns Search window opens.
Select an order and click OK.
Depending on the search criteria, either the Franchise Order window opens or the Franchise Returns window opens.
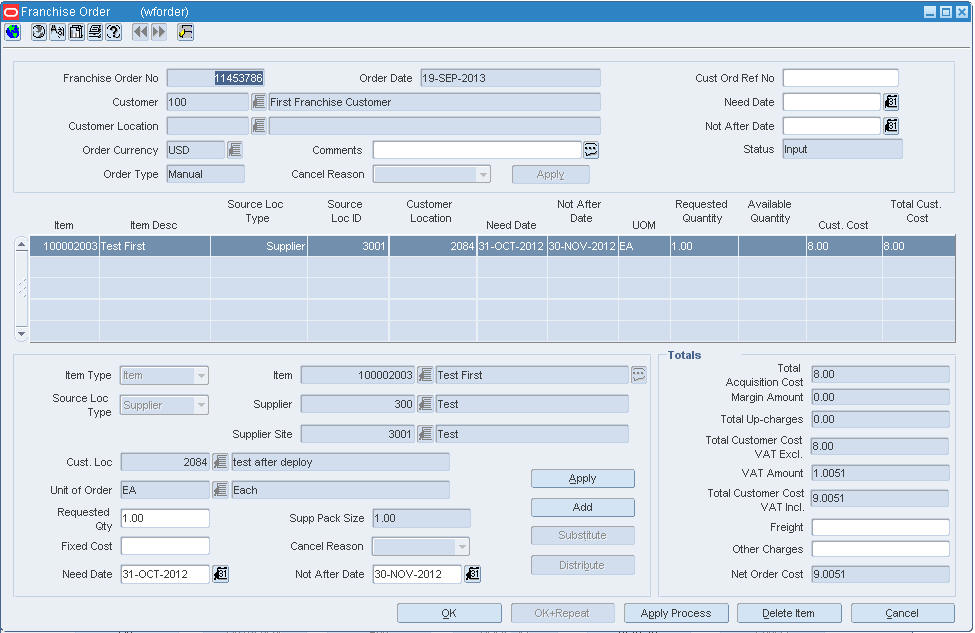
This window allows you to take orders from franchise customers and fulfill those orders from store or warehouse inventory or by orders from suppliers.
Navigate: From the main menu, select Franchise > Franchise Orders and Returns. The Franchise Order and Returns Search window opens. Select a franchise order in New mode. The Franchise Order window opens.
The following details in the Franchise Order window are displayed by default:
Franchise Order No
Order Date
Status
Order Type
Enter the Customer or select from the list.
Enter the Customer Location or select from the list.
The Order Currency is displayed automatically when you select the Customer Location.
Enter the Cust Ord Ref No.
Enter the Need Date using the Calendar button.
Enter Not After Date using the Calendar button.
Click on the grid or click Add button, the Item area becomes active.
Enter the item details.
Enter the Source Loc Type and Source Loc ID.
You can override the customer cost by providing a fixed cost.
Enter other details as required.
Click Apply.
Click Add button, if there are more items to be added.
Enter other details as required.
Click Apply.
Enter the Freight cost and Other Charges if applicable.
From the Options menu, select Approve to approve the Franchise Order.
A confirmation message appears to select either Yes or No.
Click Yes to approve the Franchise Order.
The status changes to Approved.
Click OK to save changes and return to the Franchise Orders and Returns Search window or click Cancel to return to the Franchise Orders and Returns Search window without saving changes.
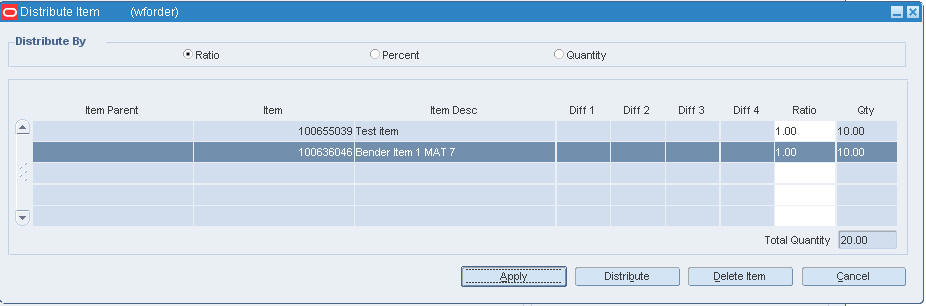
The Distribute Items in a Franchise Order window allows you to distribute parent item, item list, and buyer pack (Orderable as Eaches) item to its transaction level items and component items in an order.
Select Item parent or Item list as item type in Franchise Order window and enter the necessary details.
Click Distribute. The Distribute Item window opens.
The Item ID, description and the Source ID and description appears.
Review the quantities and edit if required based on Ratio, Percent, or Quantity.
Click Apply. The Distribute Item window closes.
Click OK to save your changes and close the window.
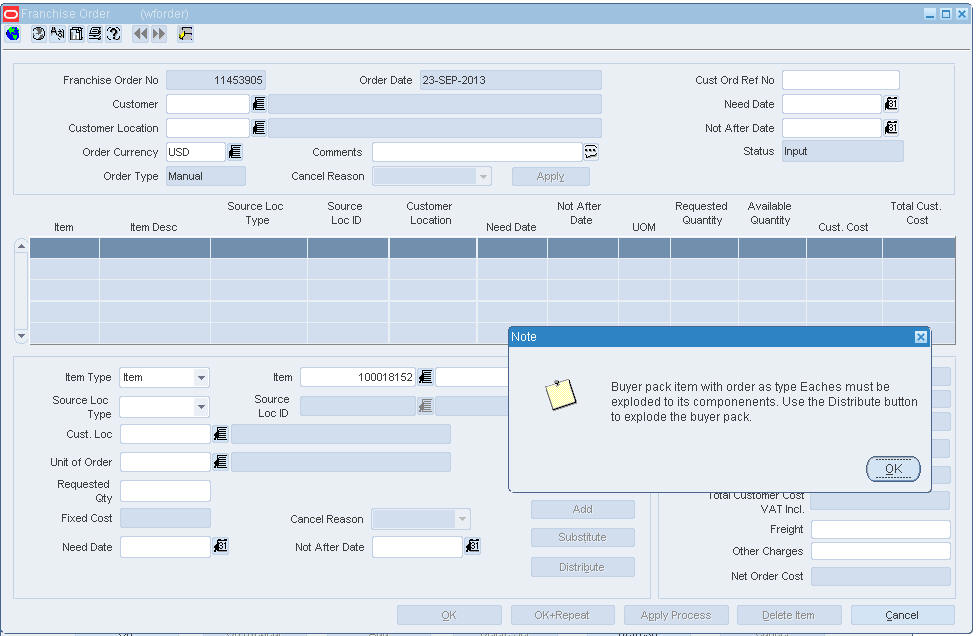
The Franchise Order window allows you to distribute buyer pack items to its component items in an order.
Select item type as item and enter a complex buyer pack orderable as eaches.
You are notified that the item entered has to be distributed.
Click OK.
Enter other appropriate details.
Review and edit the quantity if required in the Qty field.
Click Apply.
Click the Distribute button.
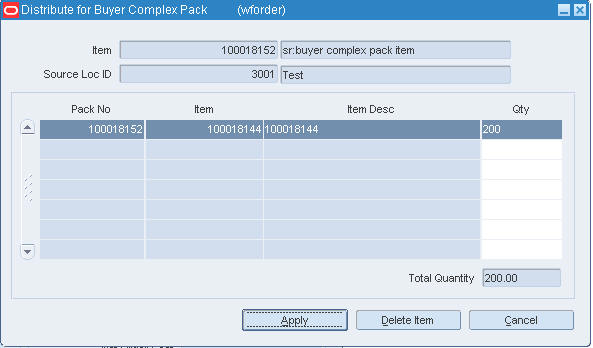
The Buyer pack screen with its component items are displayed.
Click Apply. The Distribute for Buyer Complex Pack window closes.
Click OK to save your changes and close the window.
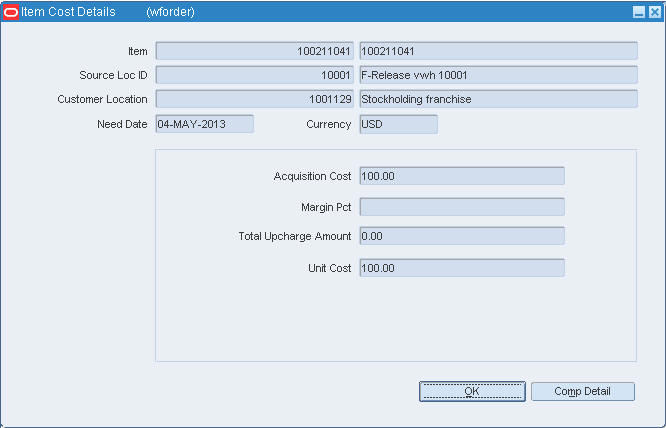
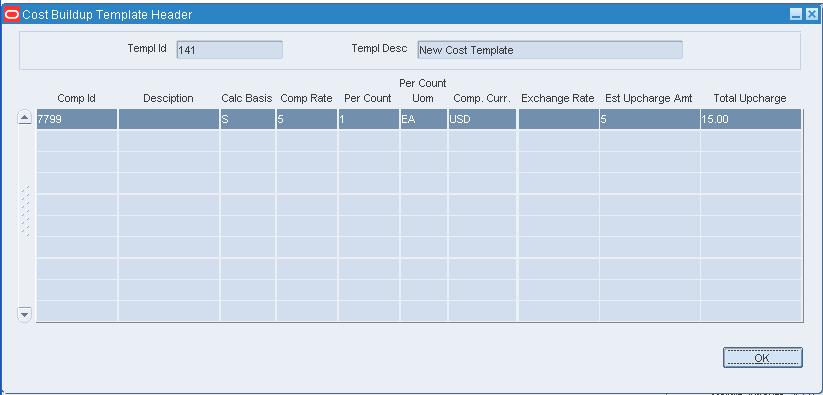
This window allows you to view the cost buildup information for an item on the franchise order, if needed.
Navigate: From the main menu, select Franchise > Franchise Orders and Returns.
Choose Item Cost Details from the Options menu. The Item Cost Details window opens.
Click OK to save the changes and close the window or click the Comp Detail button. The Cost Buildup Template Header window opens.
Click OK to close the window.
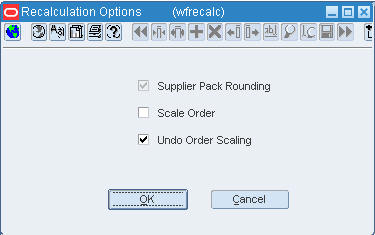
This window allows you for scaling or to undo scaling of the supplier sourced franchise orders.
This window is only available if the selected order line item is sourced from a supplier.
To change the scaling or to undo the scaling of the franchise order.
In the Franchise Order window for any supplier sourced item, click Apply Process.
The Recalculation Options window appears.
Select Scale Order to scale the order.
Select Undo Order Scaling to revert any scaling done for this order.
|
Note: You are notified that rounding is automatically done and Supplier Pack Rounding check box is checked for non Manual franchise order, if there are any vendor sourced items which are not rounded to supplier pack size. You should review the quantities before approval. |
Click OK to save changes and close the window.
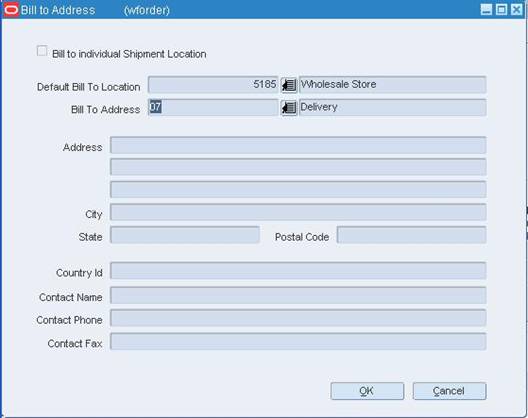
This window provides you the ability to specify a Bill to Address for the franchise order.
Navigate: From the main menu, select Franchise > Franchise Orders and Returns. The Franchise Order and Returns Search window opens. Select a franchise order in New mode. The Franchise Order window opens.
From the Options menu, select Bill to Address. The Bill to Address window opens.
Enter the appropriate information.
Click Apply.
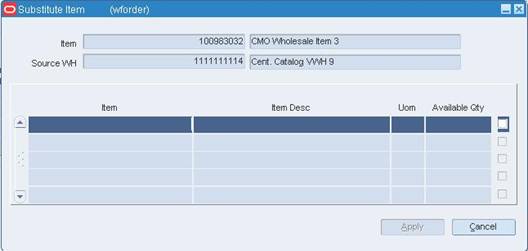
Use this procedure to substitute an item on a Franchise order:
In the Item field, enter the item number of the item to be substituted, or click the LOV button and select the item.
Enter appropriate information in the item area.
Click Substitute. The Substitute Item window opens.
Select the item to substitute.
Click Apply. The Substitute Item window closes.
Click OK to save your changes and close the window.
Navigate: From the main menu, select Franchise > Franchise Orders and Returns. The Franchise Order and Returns Search window opens. Select a franchise order in Edit mode. The Franchise Order window opens.
Enter the information to be changed.
Click Apply.
Click OK to save your changes and close the window.
|
Note: You can add new item lines to a franchise order in Input status. Substitution and Distribution options are allowed in Edit mode when you add a new item to an order. However, these options are not available for existing items on an order.For existing items on an order, you can modify the Fixed Cost, Requested Quantity, Need Date, Not after date when the order is in Input status. In Approved status, you can modify the Requested Quantity and Fixed Cost. You can modify the Requested Quantity in In Progress status. |
Select an order in Input status and click Delete Item. This button is only enabled for orders in Input status.
When prompted to delete the record, click Yes.
Click OK to save your changes and close the window.
Select an order in Approved, In-Progress, or Pending Credit Approval status and click Cancel from the menu. This button is only enabled for orders in Approved, In-Progress, or Pending Credit Approval status.
When prompted to Cancel the order, click Yes.
Click OK to save your changes and close the window.
|
Note: For franchise orders in Approved status the entire ordered quantity is canceled. For orders in In Progress status only the outstanding quantity is cancelled. |
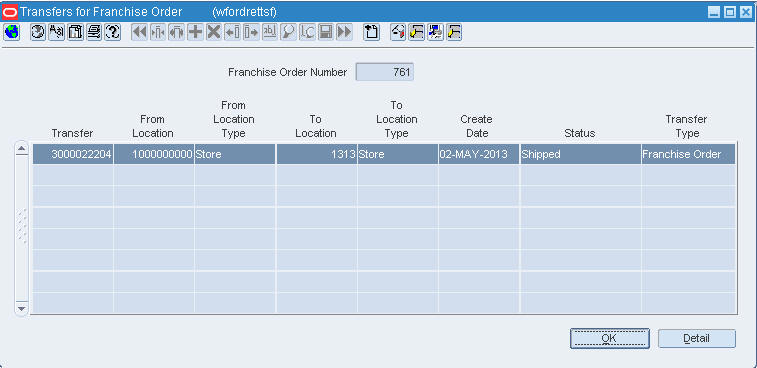
This window allows you to view transfers associated with the Franchise Orders/Franchise Returns.
To view transfers associated with the franchise order/returns.
In the Franchise Order or Franchise Returns window, select Options > View Transfers.
The Transfer for Franchise Order window appears with the details of transfers associated with franchise order or franchise returns.
Click the Details button to view details of the Transfers.
Click OK to close the window.
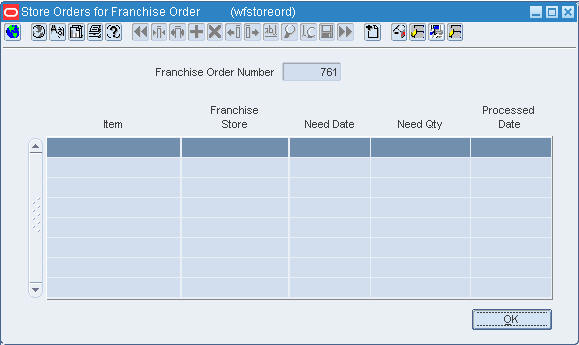
This window allows you to view store orders associated with the franchise order.
To view the transfers associated with the franchise orders.
In the Franchise Order window, select Options > View Store Order.
The Store Orders for Franchise Orders window appears with the details of store orders for the franchise order.
Click OK to close the window.
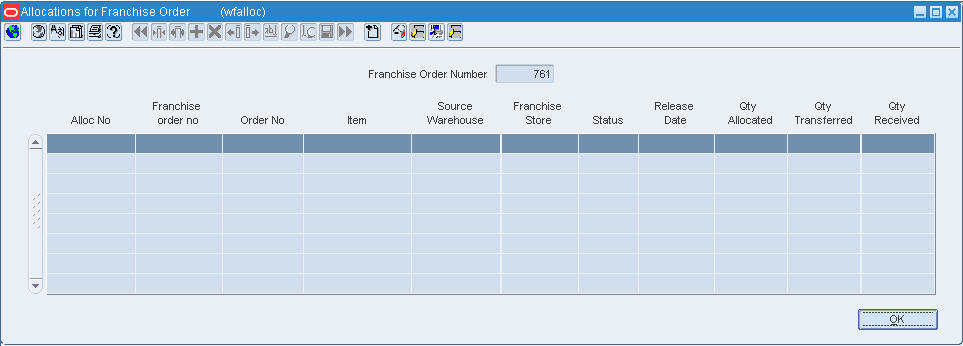
This window allows you to view allocations associated with the franchise order.
To view the allocations associated with the franchise order.
In the Franchise Order window, select Options > View Allocation.
The Allocations for Franchise Order window appears with the allocation details for the franchise order.
Click OK to close the window.
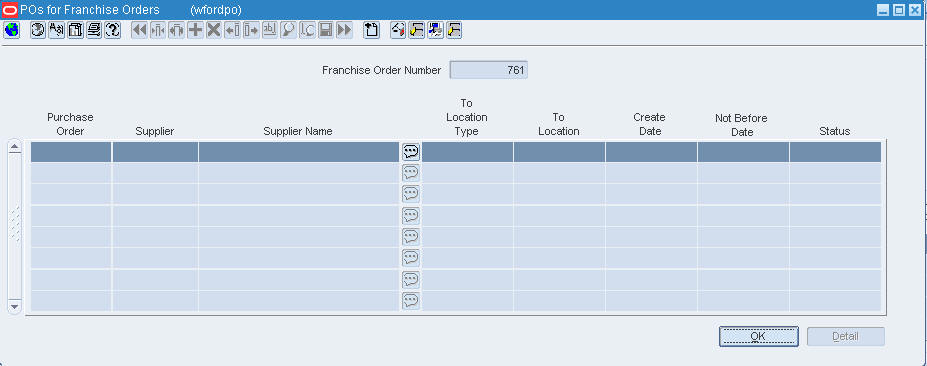
This window allows you to view purchase orders associated with the franchise orders.
To view purchase orders associated with the franchise orders.
In the Franchise Order window, select Options > View Purchase Orders.
The POs for Purchase Order window appears with the purchase order details of the franchise order.
Click the Details button to view details of the purchase order
Click OK to close the window.
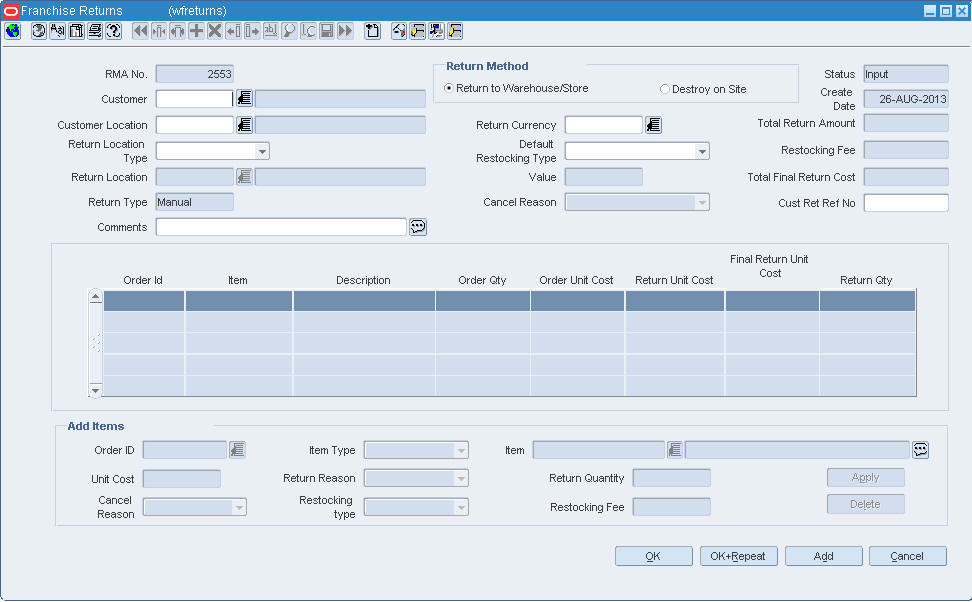
The Franchise Returns window allows you to create and modify franchise return orders.
This window allows you to return items from franchise customers.
Navigate: From the main menu, select Franchise > Franchise Orders and Returns. The Franchise Order and Returns Search window opens. Select a franchise return in New mode. The Franchise Returns window opens.
The RMA No., status, return type, create date are generated automatically.
Enter the Customer or select from the list.
Enter the Customer Location or select from the list.
Enter the Return Location Type and Return Location.
Select a Return Method.
You can choose to change the return currency.
Select the Default Restocking Type from the list.
Enter the Restocking Value.
Enter Cust Ret Ref No.
Click Add.
Enter the Order ID or select from the list.
Select the Item Type.
Select the Return Reason.
Enter the Item ID or select from the list.
Enter the Return Quantity.
You can edit Unit Cost, if required.
Click Apply.
You can add more items to the returns by clicking Add button.
Click OK.
Navigate: From the main menu, select Franchise > Franchise Orders and Returns. The Franchise Orders and Returns Search window opens.
To edit franchise returns, perform the following steps:
In the Action field, select Edit mode.
In the Type field, select Franchise Return.
Click Search.
The Franchise Returns window opens.
|
Note: You can modify item addition, deletion, quantity, and return cost in Input status. You can change the return quantity and cost in Approved status. In In Progress status, you can modify only quantity. |
Enter the information to be changed.
Click Apply.
Click OK to save your changes and close the window.
Enter the information to be changed.
Select an order and click Delete.
When prompted to delete the record, click Yes.
Click OK to save your changes and close the window.