| Oracle® Retail Store Inventory Management User Guide Release 15.0 E64567-01 |
|

 Previous |
 Next |
Transfers are movements of goods from one location to another location within the company, including store, warehouse, or an external finisher. With the Transfer functions, you can request a transfer create, cancel and approve transfers. Additionally, you can create shipments and containers within the shipment. Each container may have one or more transfers. A transfer may also be applied to several different containers or shipments. For store to store transfer shipments, SIM verifies the receiving store is approved to receive the selected items, and the sending store has the necessary stock on hand to perform the transfer.
You can dispatch a transfer immediately or save it to be dispatched later. At the time the transfer is dispatched, SIM decrements the stock on hand of the sending store and increments the in-transit inventory of the receiving store.
You can also prepare and print a bill of lading (transport document) to accompany a transfer.
A transfer document, once in approved state, can be used to fill a container within a shipment and subsequently received. Once an approved document is attached to a shipment and ready to be shipped or received, it is updated with the shipped and received quantities.
This chapter covers the following buttons on the Main Menu:
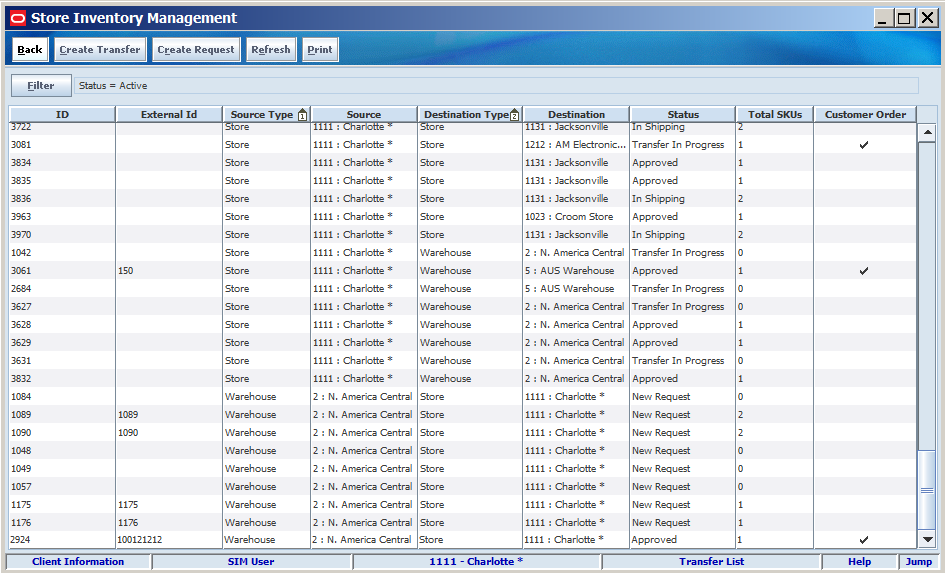
Transfer List Window
Navigate: Main Menu > Shipping/Receiving > Transfer. The Transfer List window opens.
The Transfer List window displays list of transfers for the location into which the user is logged in. The following information is displayed:
| Column | Description |
|---|---|
| ID | SIM identifier for the transfer |
| External ID | Identifier supplied by an external system |
| Source Type | Type of location transferring the goods |
| Source | ID and name of the sending location |
| Destination Type | Type of location receiving the goods |
| Destination | ID and name of the receiving location |
| Status | Current status of the transfer or request:
|
| Total SKUs | Total number of unique items for the transfer |
| Customer Order | Indicates if the transfer contains any customer orders or not |
From the Transfer List window, you can do the following:
From the Transfer List window, click Back to return to the Shipping/Receiving menu.
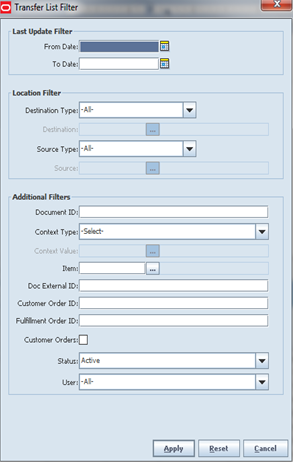
You can filter the list of transfers to limit the transfers listed. If the list is currently filtered, the filtering is shown next to the Filter button.

To filter the list of transfers or to change the current filtering, follow these steps:
In the Transfer List window, click Filter. The Transfer List Filter window opens.
Enter or select search values as needed to specify the transfers that you want to list. All values are optional. If you leave a field blank or select All, all values are included in the search.
Date Filters – Enter or select From Date and To Date values to limit the date range. The date is the creation date if in Pending status, the dispatch date if in Dispatched status, or the close date if in Received or Canceled status.
Location Filter – Select a destination or source. If a value other than All is selected for the type, enter the destination and source location to select all transfers to or from that location.
Document ID – Enter the document ID to limit the search to a specific transfer document.
Context Type – If the document is related to a promotion or repair, select the context type to limit the results returned. For example, select ”Promotion” to limit results to promotions.
Context Value – If the transfer is related to a promotion, enter a promotion ID or click the Ellipsis button to look up a promotion. See ”Look Up a Promotion” for more information.
Item – Enter the Item ID or click the Ellipsis button to look up an item.
In the Item Lookup window, locate and select the item you want. Click Apply to return to the Transfer List Filter window. See ”Item Lookup” in Chapter 20 for more information.
Doc External ID – Enter a document ID for a transfer created by a system outside of SIM.
Customer Order ID – Enter the customer order number to search for a specific customer order.
Fulfillment Order ID– Enter the fulfillment order number to search for documents with a specific fulfillment order.
Customer Orders – Select this check box if you want to search for customer orders only.
Status – Select a status from the drop-down list. The default is Active. The Active status selects documents in Approved, In Shipping, New Request, Requested, Request in Progress, and Transfer in Progress.
User – Select a user to find all documents created by a specific user.
Click Apply. You return to the Transfer List window, where your filter has been applied.
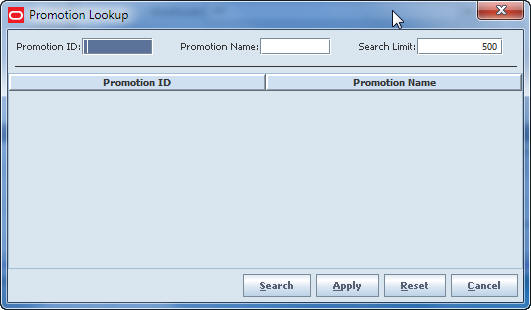
You can look up a promotion when you are filtering the list.
In the Context Type field, select Promotion. If you click the Ellipsis button on the Context Value field, the Promotion Lookup window opens.
To look up a promotion ID for a transfer:
Enter any of the following optional values to limit promotion search results:
Promotion ID – If you want to limit the search to a particular promotion ID, enter that identifier.
Promotion Name – If you want to search on the promotion name, enter a string of characters found in the promotion name.
Search Limit – If you want to change the maximum number of promotions returned from the search, enter an integer value. The default value is 500.
Select the promotion you want to use for the transfer.
Click Apply to return to the Transfer List window.
Request a transfer when you want to receive items from another location.
|
Note: To edit a transfer request that is in New Request status (started but not yet requested), select the transfer request in the Transfer List window and begin with Step 5. |
Navigate: Main Menu > Shipping/Receiving > Transfer. The Transfer List window opens.
To create a transfer request, follow these steps:
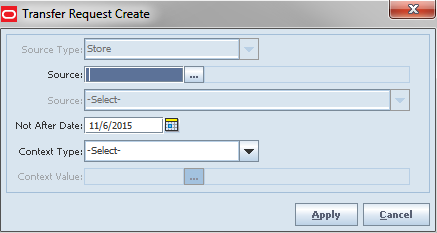
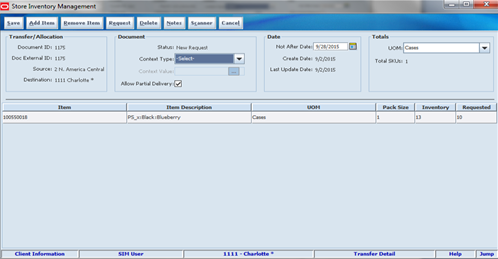
Click Create Request. The Transfer Request window opens.
Select the transferring store in the Source field or select a buddy store from the drop-down list below.
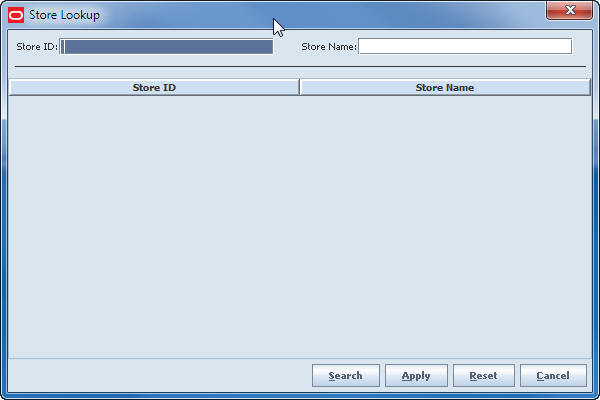
To select another store, click the Ellipsis button to look up a location that is not on the drop-down list. The Store Lookup window opens.
To look up and select a location, follow these steps:
Complete one of the fields on the lookup screen to limit the search results:
Store ID – Enter a complete store number.
Store Name – Enter a complete or partial store name.
Click Search. The search results are displayed in the list.
Select the location that you want to use.
Click Apply. You return to the Transfer Request window.
Enter or select the values for the remaining fields:
Source Type – This field is set to Store and cannot be changed. A Request can only be used for a store to store transfer.
Not After Date – Enter or select the date after which the items no longer should be shipped from the source location.
Context Type – If the transfer is related to a promotion or repair, select the context type to identify transfers belonging to special situation. For example, select ”Promotion” to identify the items on a transfer that are for a specific promotion
Context Value – If the transfer is related to a promotion, enter a promotion ID or click the Ellipsis button to look up a promotion. See ”Look Up a Promotion” for more information.
Click Apply. The Transfer Detail window opens.
Select Allow Partial Delivery, if applicable. This is populated based on the customer order. If the box is not check, then when accepting a transfer request, the user must accept the full amount being requested.
For each item you want to manually add to the transfer request, follow these steps:
Click Add Item.
In the Item field, enter the item number or click the Ellipsis button to look up the item.
In the Item Lookup window, locate and select the item you want. Click Apply to return to the Transfer Request window. See ”Item Lookup” in Chapter 20 for more information, or click Scanner to scan the item. See ”Scan an Item (Scanner Button)” in Chapter 2 for more information.
For each item on the transfer, complete these fields:
UOM – From the drop-down list, select the unit of measure.
Requested – Enter the number of units requested.
To remove items from the transfer request, follow these steps:
Select the items you want to delete.
Click Remove Item. You receive the following prompt: ”The selected line item(s) will be deleted. Do you want to continue?”
Click Yes.
To enter any additional information that you want to include with the transfer, click Notes. The Transfer Notes window opens. For each note, enter your information and click Save. When you have finishing entering notes, click Apply.
Save or complete the request:
To save the request so you can change it later, click Save. The request is saved with a status of New Request.
To complete the request, click Request. The transfer is saved with a status of Requested and waiting for the source location to approve the transfer.
You are returned to the Transfer List window.
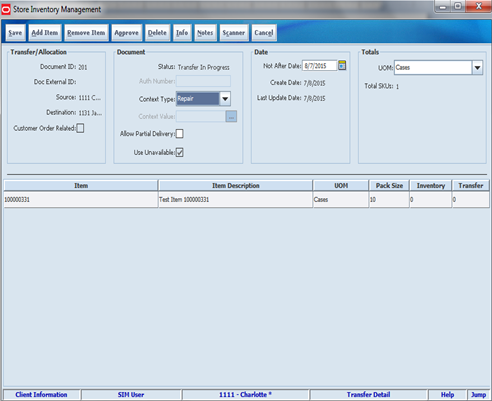
Create a transfer when you want to send items to another location. You can create a new transfer without first receiving a transfer request. You can also view and edit a transfer or transfer request, modify the transfer as needed, and approve the transfer.
|
Note: To edit a transfer that is Transfer In Progress status (not yet approved), select the transfer in the Transfer List window and begin with Step 10. |
Navigate: Main Menu > Shipping/Receiving > Transfer. The Transfer List window opens.
To create a transfer, follow these steps
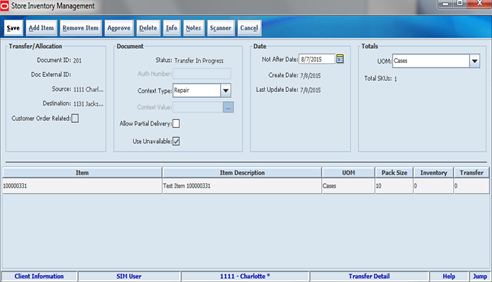
Click Create Transfer. The Transfer Create window opens.
Select the destination type from the drop-down list.
Enter the destination in the Destination field or select a buddy store from the drop-down list. The buddy store is only available when the destination type is store.
To look up a location, click the Ellipsis button. The window to look up the destination opens. For example, the Store Lookup window opens.
To look up a location, follow these steps:
Complete one of the fields to limit the search results:
For a store destination:
Store ID – Enter a complete store number.
Store Name – Enter a complete or partial store name.
For a finisher destination:
Finisher ID – Enter a complete finisher number.
Finisher Name – Enter a complete or partial finisher name.
For a warehouse destination:
Warehouse ID – Enter a complete warehouse number.
Warehouse Name – Enter a complete or partial warehouse name.
Click Search. The results of your search are listed.
Select the location you want.
Click Apply. You return to the Transfer Create window, with the selected location displayed.
Not After Date – Enter or select the date after which the transfer cannot be dispatched.
In the Context Type field, select either Promotion or Repair.
(Promotion only) In the Context Value field, enter the promotion ID, or click the Ellipsis button to look up the promotion ID. See ”Look Up a Promotion”for more information.
If Finisher or Warehouse was selected for the Destination Type, enter the authorization number.
Select Use Unavailable, if applicable. If the box is checked, unavailable inventory can be used for the transfer. If unavailable is used, all items added to the transfer will be from unavailable inventory.
Select Allow Partial Delivery, if applicable. This is populated based on the customer order. If the box is not checked, then when accepting a transfer, the user must accept the full amount being requested.
Click Apply. The Transfer Detail window opens.
For each item you want to manually add to the transfer request, follow these steps:
Click Add Item.
In the Item field, enter the item number or click the Ellipsis button to look up the item.
In the Item Lookup window, locate and select the item you want. Click Apply to return to the Transfer Request window. See ”Item Lookup” in Chapter 20 for more information, or click Scanner to scan the item. See ”Scan an Item (Scanner Button)” in Chapter 2 for more information.
For each item on the transfer, complete these fields:
UOM – From the drop-down list, select the unit of measure.
Transfer – Enter the number of units to send.
To remove items from the transfer, follow these steps:
Select the items you want to delete.
Click Remove Item. You receive the following prompt: ”The selected line item(s) will be deleted. Do you want to continue?”
Click Yes.
To enter any additional information that you want to include with the transfer, click Notes. The Transfer Notes window opens. For each note, enter your information and click Save. When you have finishing entering notes, click Apply.
Save or approve the transfer:
To save the transfer without approving it, click Save. The transfer is saved with a status of Transfer In Progress. To edit the transfer later, select the transfer in the Transfer List window.
To approve the transfer, click Approve. You receive a prompt to verify that you want to approve the transfer. Click Yes. The status changes to Approved.
You are returned to the Transfer List window.
Navigate: Main Menu > Shipping/Receiving > Transfer. The Transfer List window opens.
Select the transfer or transfer request you want to edit. The Transfer Detail window opens. You can make the following updates:
To add and remove items:
To add items to the transfer, follow these steps:
Click Add Item. An item entry is added.
In the Item field, enter the item number, or click the Ellipsis button to look up the item.
In the Item Lookup window, locate and select the item you want. Click Apply to return to the Transfer Detail window. See ”Item Lookup”in Chapter 20 for more information. Or click Scanner to scan the item. See ”Scan an Item (Scanner Button)” in Chapter 2 for more information.
Update fields as needed:
UOM – From the drop-down list, select the unit of measure.
Pack Size – Enter the pack size.
Transfer – Enter the quantity to transfer.
To add another item, click Add Item.
To remove items from the transfer, follow these steps:
Select the items you want to remove.
Click Remove Item. You receive the following prompt: ”The selected line item(s) will be deleted. Do you want to continue?”
Click Yes.
To set the Not After Date and authorization number:
Click Not after date, date column, and select date. This date is used to prevent shipping items once this date is reached. Additionally, transfers will be marked as closed.
Enter the authorization number. It should be done at the time of creation of transfer.
Click Save.
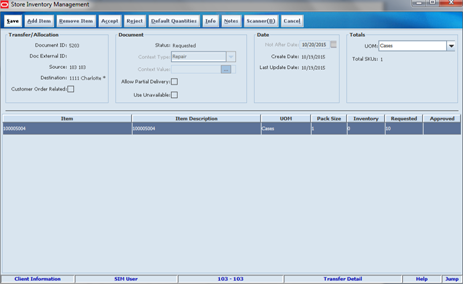
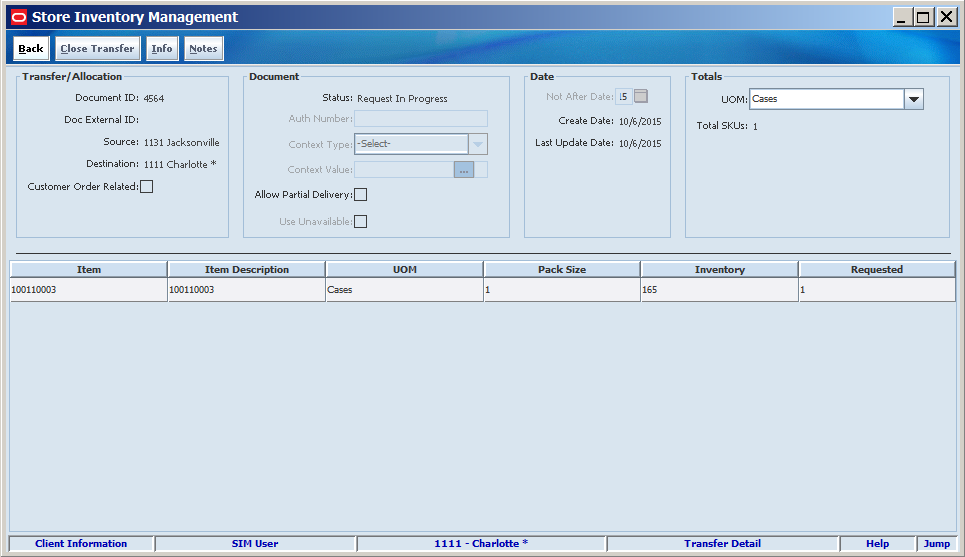
You can approve or reject a request to transfer items from your store to another location. Transfer requests that you can accept or reject are in Requested status.
Navigate: Main Menu > Shipping/Receiving > Transfer. The Transfer List window opens.
If you want to limit the Transfer List to show only requested transfers, filter the list. See ”Filter the Transfer List."
Select a transfer with a status of Requested. The Transfer Detail window opens.
Accept or reject the transfer request. See the following topics:
|
Note: Click Save at any point if you want to save your changes and return to the Transfer List window. Click Cancel at any point to return without saving any changes. |
If you want to accept the entire transfer request without changes and ship all requested line items, follow these steps:
Click Default Quantities. The Accepted field for each item is completed with the same quantity as the Requested field. (If you prefer, you can instead enter values manually in the Accepted field for every item on the transfer request.)
|
Note: If all Accepted fields on the transfer request are blank or zero when you click Accept, you will be asked whether you want to reject the entire transfer request. |
Click Accept. You receive the following prompt: ”Are you sure you want to accept the selected transfer now?”
Click Yes. You return to the Transfer List window.
If you want to accept the transfer request but you need to make some changes to the line items requested, follow these steps:
If you want to complete the Accepted field for all items with the requested quantities, click Default Quantities; otherwise enter all Accepted quantities manually.
|
Note: A blank or zero value in the Accepted field for any item means that you are rejecting the transfer request for that item. |
For each item that you need to change, update these fields as needed:
UOM – From the drop-down list, select the unit of measure.
Accepted – Enter the number of items to be sent to the requesting location. To reject an individual item on the transfer, enter an Accepted quantity of 0.
Click Accept. You receive the following prompt: ”Are you sure you want to accept the selected transfer now?”
Click Yes. You return to the Transfer List window.
If you need to reject the entire transfer request and all line items requested, follow these steps:
Click Reject. You receive the following prompt: ”Are you sure you want to reject the transfer request?”
Click Yes. You return to the Transfer List window.
To approve the transfer, click Approve in the Transfer Detail window. You receive a prompt to verify that you want to approve the transfer. Click Yes. The status changes to Approved.
You can delete the following:
Transfers created at your locations with a status of Transfer In Progress (created but not approved). The status of a deleted transfer is set to Cancelled Transfer.
Requests created at your location are in New Request status. The status of a deleted transfer request is set to Cancelled Request.
Navigate: Main Menu > Shipping/Receiving > Transfer. The Transfer List window opens.
To delete transfers or transfer requests:
If you want to filter the transfer list, see "Filter the Transfer List."
Select the transfer that you want to delete. The Transfer Detail window opens.
Click Delete. A message is displayed: ”Are you sure you want to delete the selected transfer?”
Click Yes. You are returned to the Transfer List screen.
There are various situations where a transfer document may need to be closed. Many times a transfer has been partially shipped and in order to prevent further shipments of item, the document must be closed. This may be due to a shortage of an item during a promotion period and once over, the product is no longer needed. Closing a transfer can happen in a variety of ways:
Store shipping transfers:
Manual closure - The user manually closes the transfer on the source side only. The user is only allowed to do this if there are no items on an open shipment. The Not after date is not mandatory and hence manual closure should be used to close such documents which do not have a not after date.
Batch closure - A nightly Batch closes the transfer, when the not after date has passed, and no open shipments exist.
Automatic Closure - When all the item quantities have been shipped, the transfer document is auto-closed.
RMS sends a closure message. The Not after date is not used for this.
Warehouse or external finisher to store shipments:
RMS closure - RMS can cancel the pending items on the transfer and close the transfer regardless of open receipts from the warehouse or finisher.
Auto-close: All items have been shipped to the store.
Allocations follows the same pattern as transfers.
Following are additional rules for closing a transfer:
For store outbound shipments: If a shipment exists that is in progress but not yet shipped, the user has to cancel the shipment or remove the items for that specific transfer before the transfer can be closed. This can prevent any transfer from closing, regardless of auto or manual closure.
In all cases, it is possible to receive against a closed transfer, or even allow an ASN to be processed against a closed transfer.
For store to store, finisher, or warehouse, if the transfer is manually or automatically closed and there are items still left on the transfer, those items reservation are removed and moved back to available or unavailable inventory.
For a transfer in a requested state, RMS can cancel the transfer request until approval.
Navigate: Main Menu > Shipping/Receiving > Transfer. The Transfer List window opens.
To close a transfer:
If you want to filter the transfer list, see "Filter the Transfer List."
Select the transfer that you want to close. The Transfer Detail window opens.
Click Close Transfer. A message is displayed: ”Are you sure you want to close the selected transfer?”
Click Yes. You are returned to the Transfer List screen.
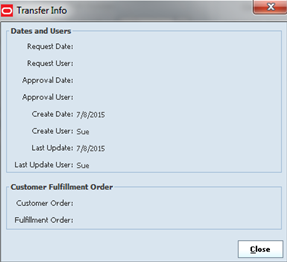
You can view information on the transfer document and details on the transfer.
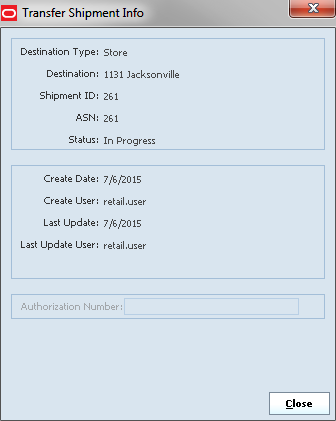
To view more details on the transfer, click Info. The Transfer Info window opens. Click Close to return to the previous window.
The following information is shown in the Dates and Users section:
Request Date – The date on which the transfer document was requested.
Request User – The user who requested the transfer document.
Approval Date – The date on which the transfer document was approved.
Approval User – The user who approved the transfer document.
Create Date – The date on which the transfer document was created.
Create User – The user who created the transfer document.
Last Update – The date on which the transfer document was last updated.
Last Update User – The user who last updated the transfer document.
The following information is shown in the Customer Fulfillment Order section:
Customer Order – Customer order number provided by Order Management System (OMS).
Fulfillment Order – Fulfillment order number provided by OMS.
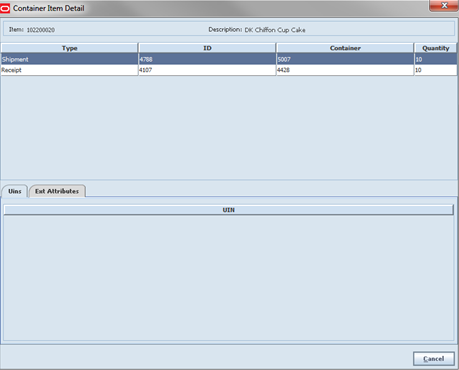
Once an item on a transfer has been shipped, you can view the shipment details for the item and if the item was part of a store to store transaction, when the item is received, you can view the receipt details. In addition, if there are any extended attributes or if the item has UINs (Unique Identification Numbers), the details can be viewed. An item on a transfer may be split between multiple containers for a shipment as well as split between multiple shipments. of an item for transfers The transfer can only be in the following statuses:
Completed
In Shipping (only once the item is shipped)
Navigate: Main Menu > Shipping/Receiving > Transfers. The Transfer List window opens.
To view a transfer or transfer request with one of these statuses, follow these steps:
If you want to filter the transfer list, see "Filter the Transfer List." Since the list defaults to active transfers, select Completed status.
Select the transfer that you want to view. The Transfer Detail window opens.
Select the item you want to view and click Item Details. The Container Item Detail window opens.
The following information is shown:
Item – The ID of the item.
Description – The description of the item.
Shipment ID – ID of the shipment that contains the containers and items.
Type – The type which is either Shipment or Receipt.
ID – Shipment ID or Receipt ID.
Container – List of container IDs which held this item.
Quantity – The quantity of the item in the container.
The following tabs are available:
Uins – The UINs if the store is UIN enabled and the item has a UIN associated to it. This field gets populated by the scanned and shipped UINs from the Transfer shipment.
Ext Attributes – The extended attributes are shown if the store and items are configured for it and if they were captured by the user during shipping or receiving.
Click Close to return to the Transfer Detail window.
Navigate: Main Menu > Shipping/Receiving > Transfers. The Transfer List window opens.
If you want to filter the transfer list, see ”Filter the Transfer List."
Select the transfer that you want to print.
Click Print. The Report Selection window opens.
Select the Transfer format and the printer.
Click OK.
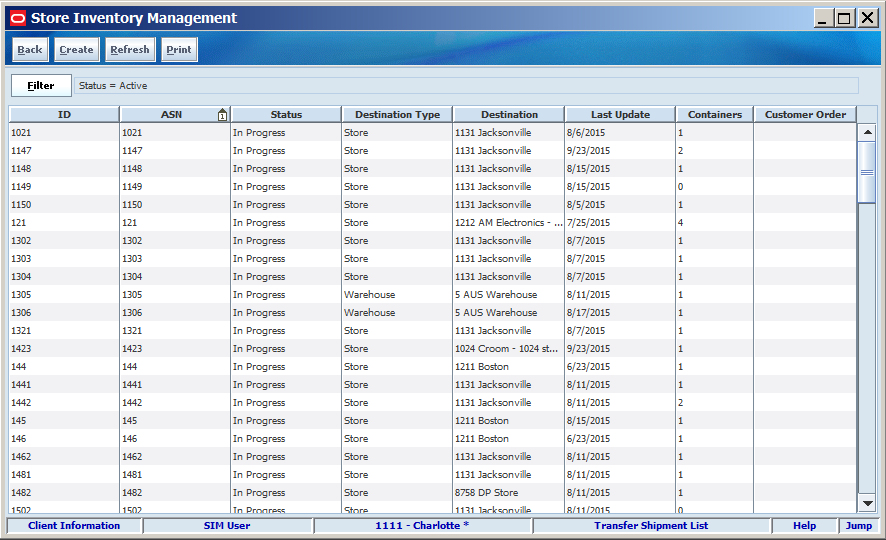
Transfer Shipment List Window
Navigate: Main Menu > Shipping/Receiving > Transfer Shipment. The Transfer Shipment List window opens.
The Transfer Shipment List window displays the following information about existing shipments:
| Column | Description |
|---|---|
| ID | SIM identifier for the shipment |
| ASN | Advanced Shipment Notice number |
| Status | Current status of the shipment:
|
| Destination Type | Type of location to receive the shipment (Store, Warehouse, Finisher) |
| Destination | ID and name of the receiving location |
| Last Update | Last date the shipment was updated |
| Containers | Total number of containers for the shipment |
| Customer Order | Identifies if customer orders are in the shipment |
From the Transfer Shipment List window, you can do the following:
From the Transfer Shipment List window, click Back to return to the Shipping/Receiving menu.
Whenever a list window is displayed, you can filter the list of transfers to limit the transfers listed. If the list is currently filtered, the filtering is shown next to the Filter button.
To filter the list of transfer shipments or to change the current filtering, follow these steps:
In the Transfer Shipment List window, click Filter. The Transfer Shipment List Filter window opens.
Enter or select search values as needed to specify the shipments that you want to list. All values are optional. If you leave a field blank or select All, every value is included in the search.
Date Filters – Enter or select From Date and To Date values to limit the date range. The date is the last date the shipment was updated.
To Location Filter – Select a destination type. If a value other than All is selected for the type, the destination location is available to select all shipments to that location.
Document ID – Enter the document identifying number to limit the search to a particular transfer or allocation.
ASN – Enter an ASN once it has been created for a shipment.
Customer Order ID – Enter the customer order number to search for a specific customer order. When specified, the system looks through the documents within the shipments for the customer order ID and returns a list of shipments with the identified customer order.
Fulfillment Order ID– Enter the fulfillment order number to search for a specific fulfillment order for the selected customer order. This further limits the shipments by fulfillment order ID.
Customer Orders – Select this check box if you want to search for shipments with customer orders.
Status – Select a status from the drop-down list. The default is Active. Active status selects transfer shipments in New, In Progress, and Submitted status.
Context Type – Select the context type to find any shipments with documents related to a promotion or repair. Select the context type to limit the results returned. For example, select ”Promotion” to limit results to promotions.
Context Value – If the transfer is related to a promotion, enter a promotion ID or click the Ellipsis button to look up a promotion. See ”Look Up a Promotion” for more information.
Click Apply. You return to the Transfer Shipment List window, where your filter has been applied.
Navigate: Main Menu > Shipping/Receiving > Transfer Shipment. The Transfer Shipment List window opens.
To create a transfer shipment, follow these steps:
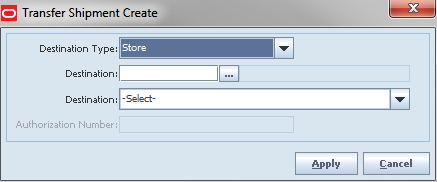
Click Create. The Transfer Shipment Create window opens.
Select the destination type from the drop-down list.
Enter the destination in the Destination field.
To look up a location, click the Ellipsis button. The window to look up the destination opens. For example, the Store Lookup window opens.
To look up a location, follow these steps:
Complete one of the fields to limit the search results:
For a store destination:
Store ID – Enter a complete store number.
Store Name – Enter a complete or partial store name.
For a finisher destination:
Finisher ID – Enter a complete finisher number.
Finisher Name – Enter a complete or partial finisher name.
For a warehouse destination:
Warehouse ID – Enter a complete warehouse number.
Warehouse Name – Enter a complete or partial warehouse name.
Click Search. The results of your search are listed.
Select the location you want.
Click Apply. You return to the Transfer Shipment Create window, with the selected location displayed.
If Finisher or Warehouse was selected for the Destination Type, enter the authorization number.
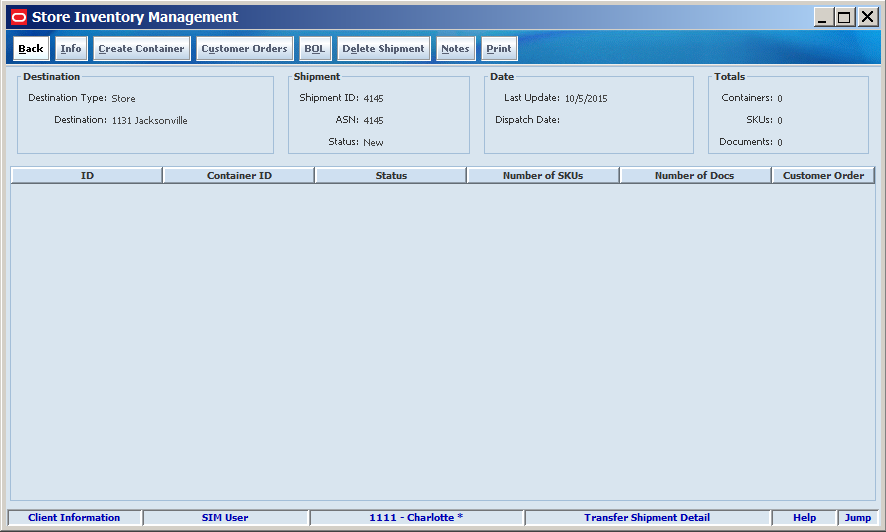
Click Apply. The Transfer Shipment Detail window opens.
To create a container, see "Create or Edit a Container".
To view more details on the shipment, click Info. The Transfer Shipment Info window opens. Click Close to return to the previous window.
To enter any additional information that you want to include with the transfer, click Notes. The Shipment Notes window opens. For each note, enter your information and click Save. When you have finishing entering notes, click Apply.
You are returned to the Transfer Shipment List window.
Navigate: Main Menu > Shipping/Receiving > Transfer Shipment. The Transfer Shipment List window opens.
Select the shipment you want to edit. The Transfer Shipment Detail window opens. You can make the following updates:
To add a container:
Click Create Container. The Transfer Shipment Container Detail window opens.
To add items into the container from one or more transfer documents, see "Select Transfer Documents for the Container".
To add loose items into the container, see "Add Items without a Transfer."
For additional steps when working within a container, see "Create or Edit a Container."
The authorization number is only available when shipping to a warehouse or finisher.
To add an authorization number, follow these steps:
Click Info. The Transfer Shipment Info window opens.
Enter the authorization number. Click Save.
In the Transfer Shipment Detail window, a check in the Customer Order column indicates if a shipment includes customer orders. The customer order information related to the shipment can be viewed.
To view the customer order information, follow these steps:
Select a container and click Customer Orders. The Customer Order Information window opens.
The following information is displayed:
Customer Order – ID assigned to this delivery.
Fulfillment Order – Fulfillment ID provided by the order management system.
ID – Container ID assigned by the system.
Container ID – Shipping container number which represents the number on the barcode for the container within the shipment.
Status – Current status of the order.
Total SKUs – Total number of line items for the fulfillment order within the container.
Comments – Comments, if available.
When you are done viewing the information, click Back.
Navigate: Main Menu > Shipping/Receiving > Transfer Shipment. The Transfer Shipment List window opens.
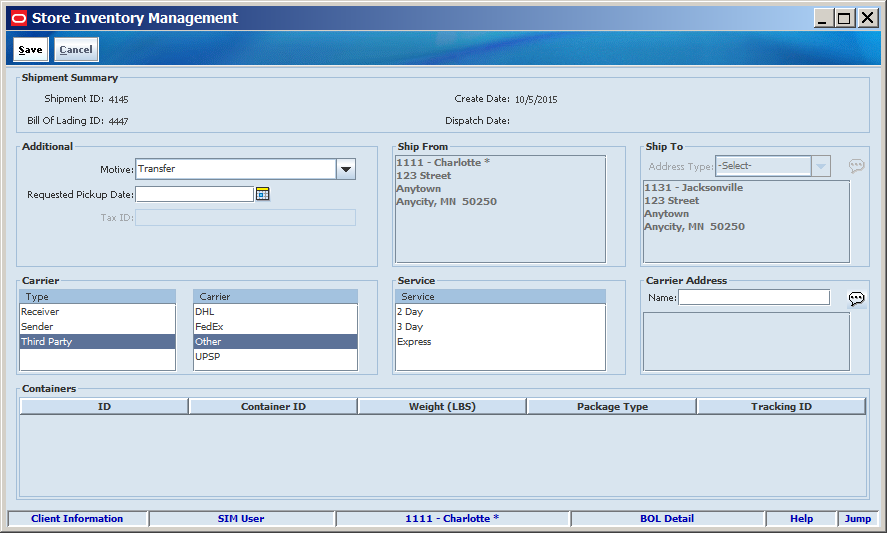
To update bill of lading (BOL) information:
Click BOL. The BOL Detail window opens.
Update the following fields as needed:
Motive – The default value is Transfer. If needed, select a different value.
Alternate Destination Address – If the transfer is to be shipped to an address other than the address displayed (under Ship To), enter the full shipping address.
Requested Pickup Date – Enter or select the date when the shipment will be picked up.
Type – Select the type of carrier to use, Sender, Receiver or Third Party. The default value depends on the setting for each destination type.
Carrier – The provider that will handle the shipment. If Third-party is selected, select the provider. If Other is selected, enter the name and address. All containers for a shipment are required to be with the same carrier, but each container will have a separate tracking id to identify each package.
Service – If third-party provider is selected, choose the service method for the shipment.
Container – If any containers have been added to the shipment, the following container information will display. Canceled containers will not display. For further details on how to add container information, see "Create or Edit a Container."
ID – System ID field.
Container ID – Container identifier that is printed on the container label.
Weight – This represents the weight of the container and is specified when the container is created or edited.
Package Type – This represents the size of the package and is specified when the container is created or edited.
Tracking ID – This may be manually entered by the user or may be returned from a manifesting system when the carrier is contacted through a web service call.
Click Save.
For any transfer, you can print a bill of lading (transport document) that accompanies the merchandise when it is shipped. You can print the bill of lading at any time; however, if the transfer is not yet shipped or if it is cancelled, the bill of lading is marked DRAFT or CANCELLED.
|
Note: Bill of lading information must be entered or updated when transfers are created or updated. Some information for the bill of lading (such as address) is filled in automatically, but other information must be entered manually. |
To print a bill of lading, follow these steps:
If you want to filter the transfer shipment list, see ”Filter the Transfer Shipment List."
Select the transfer for which you want to print a bill of lading.
Click Print.
Select the Bill of Lading format and the printer.
Click Apply.
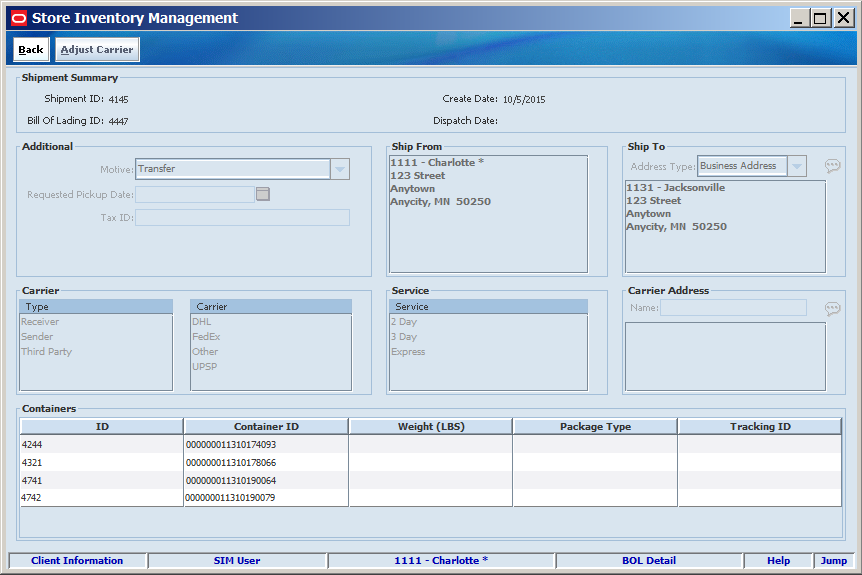
The Adjust Carrier button is displayed on the BOL Detail screen to enable the user to change the carrier. If the user decides to change the carrier, SIM prompts the user to confirm the action.
All containers must ship with the same carrier. A manifesting web service call is made, when the user confirms a container within a shipment. When the first container is confirmed, the BOL Detail screen is locked down and can no longer change details. However, if there is a valid reason to change the carrier, all containers will need to be reopened and reconfirmed. When the Adjust Carrier button is pressed, all containers on the shipment will move back to In Progress and each will need to go through the confirm process again to use the new carrier.
Navigate: Main Menu > Shipping/Receiving > Transfer Shipment. The Transfer Shipment List window opens.
To adjust the carrier, follow these steps:
Select the shipment for which you want to change the carrier. The Shipment Detail window opens.
Click BOL to open the BOL Detail window.
Click Adjust Carrier. You are asked to confirm that you want to change the carrier. Click Yes. The carrier fields are opened for editing.
All containers move back to an In Progress state and are required to be reprocessed.
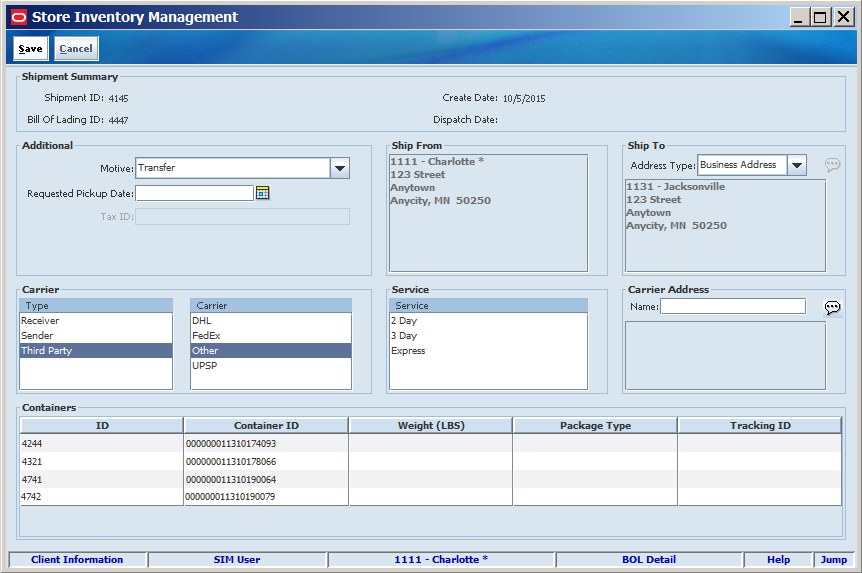
Update the following fields as needed:
Motive – The default value is Transfer. If needed, select a different value.
Carrier – The provider that will handle the shipment. If Third-party is selected, select the provider. If Other is selected, enter the name and address.
Alternate Destination Address – If the transfer is to be shipped to an address other than the address displayed (under Ship To), enter the full shipping address.
Requested Pickup Date – Enter or select the date when you want the transfer picked up.
Service – If third-party provider is selected, choose the service method for the shipment.
Carrier – The provider that will handle the shipment. If Third-party is selected, select the provider. If Other is selected, enter the name and address.
Click Save. You are returned to the Transfer Shipment Detail window.
After you create a shipment, it must be dispatched before the actual transfer of goods will occur.
You can dispatch a shipment once all containers have been completed for the shipment.
For outbound transfers with In Progress status, you can also use the following procedure to dispatch transfers without viewing or editing them.
|
Note: You can dispatch a transfer only if its status is In Progress and it is outbound. |
Navigate: Main Menu > Shipping/Receiving > Transfer Shipment. The Transfer Shipment List window opens.
If you want to limit the transfer list to show only the outbound transfers that you can dispatch, filter the list. See ”Filter the Transfer Shipment List.”
For each transfer you want to dispatch:
Select the outgoing transfer with In Progress status that you want to dispatch. The Transfer Shipment Detail window opens.
Click Dispatch. You receive a prompt to verify that you want to dispatch the transfers now.
Click Yes to dispatch the selected shipments. You are returned to the Transfer Shipment List window.
Save or dispatch the shipment:
To save the shipment without dispatching it, click Save. The shipment is saved with a status of In Progress. To edit the shipment later, select the shipment in the Transfer Shipment List window.
To dispatch the shipment, click Dispatch. You receive a prompt to verify that you want to dispatch the transfer now. Click Yes.
|
Note: Submit will be available if system is configured as such. If it is configured to submit, you will only have a submit or a dispatch. You cannot have both at the same time. It will require that you submit in order to dispatch. Once you have a submit, you will be able to dispatch. |
The Delete Shipment option allows the user to delete an entire shipment. The status of both the shipment and all containers for the shipment is changed to Canceled.
Navigate: Main Menu > Shipping/Receiving > Transfer Shipment. The Transfer Shipment List window opens.
If you want to limit the transfer list to show only the outbound transfers that you can dispatch, filter the list. See ”Filter the Transfer Shipment List.”
Select the shipment you want to delete. The Transfer Shipment Detail window opens.
Click Delete Shipment. You are prompted to confirm the deletion.
Click Yes. The status of the shipment is changed to Canceled. You are returned to the Transfer Shipment List window.
|
Note: To edit a container, double-click the container in the Transfer Shipment Detail window and begin with Step 2. |
Navigate: Main Menu > Shipping/Receiving > Transfer Shipment. The Transfer Shipment List window opens.
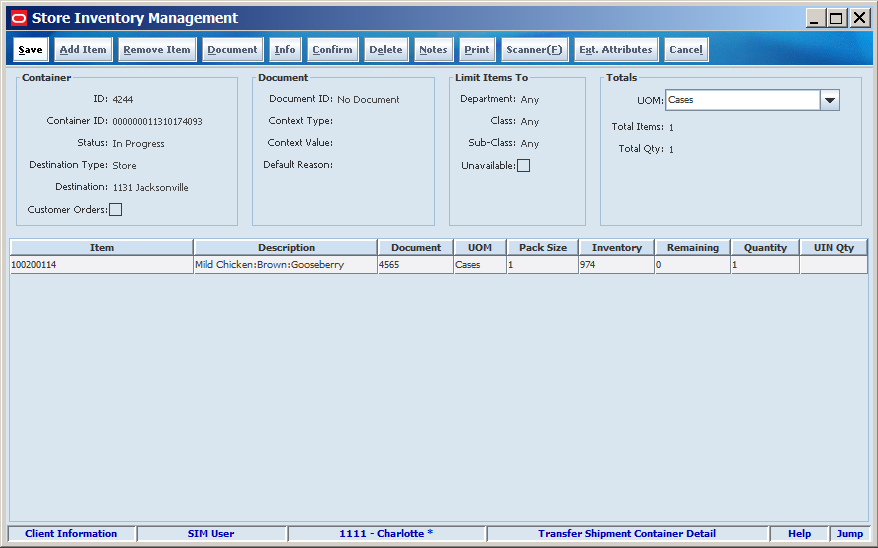
To create a container, follow these steps:
To create a container, click Create Container. The Transfer Shipment Container Detail window opens.
To select the transfer documents for the container, see "Select Transfer Documents for the Container."
For each item you want to manually add to the transfer shipment, follow these steps:
Click Add Item. A row for the item is added.
In the Item field, enter the item number or click the Ellipsis button to look up the item.
In the Item Lookup window, locate and select the item you want. Click Apply to return to the Transfer Shipment Container Detail window. See ”Item Lookup” in Chapter 20 for more information, or click Scanner to scan the item. See ”Scan an Item (Scanner Button)” in Chapter 2 for more information.
For each item on the container, complete these fields:
UOM – From the drop-down list, select the unit of measure.
Requested – Enter the number of units requested.
To remove items from the transfer shipment, see "Remove Items".
To add extended attributes, see "Enter Item Extended Attributes".
To add the container, click Save. You are returned to the Transfer Shipment Detail window.
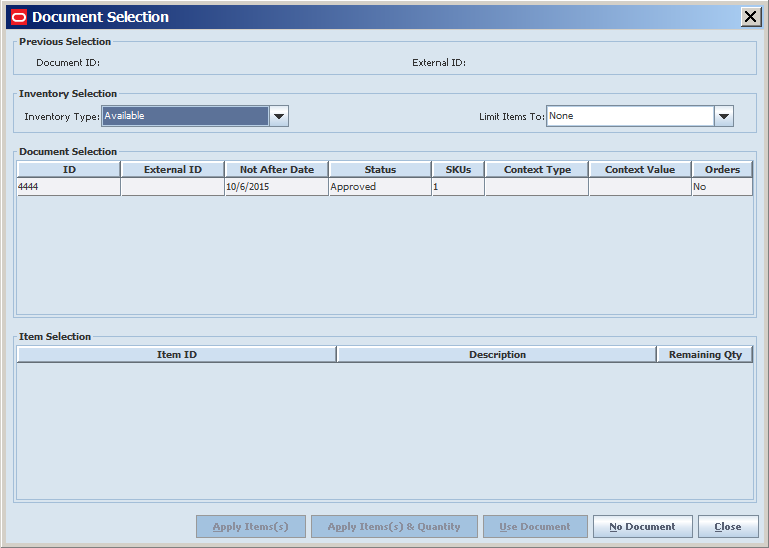
To select the transfer or allocation document to add to the container:
From the Transfer Shipment Container Detail window, click Document. The Document Selection window opens.
Select the Inventory Type:
Available - The selected document was created with the intent to ship items from currently available inventory.
Unavailable - The selected document was created with the intent to ship items from unavailable inventory. For example: product taken from shelf for a recall.
Select the Default Reason:
This drop down is only be made available when the transfer document include items from unavailable inventory.
The reason selected is used for each item when added into the container.
Select the Limit Items To:
You may set up a container to hold only items from a particular department, class, or subclass.
Select the merchandise hierarchy level you would like to limit items to.
Select None if all items are eligible to be placed in a container regardless of the merchandise hierarchy.
Select the Transfer or Allocation Document to add to the container.
Select one or more items to add to the container.
Update the document selection:
Click Apply Item(s) to add one or more selected items to the container without the corresponding quantity.
Click Apply Item(s) & Quantity to add one or more selected items and quantities to the container.
Click User Document to select a transfer document. When adding items to the container, the items will be validated against the transfer document.
Click No Document to clear the document selection. You are returned to the Transfer Shipment Detail window.
Click Close to return to the Transfer Shipment Detail window.
To select limit a container by merchandise hierarchy, follow these steps:
From the Transfer Shipment Container Detail window, click Document. The Document Selection window opens.
Select the part of the hierarchy from the Limit Items To drop-down list.
Click Close. You are returned to the Transfer Shipment Container Detail window.
To select unavailable inventory, follow these steps:
From the Transfer Shipment Container Detail window, click Document. The Document Selection window opens.
Select Unavailable in the Inventory Type drop-down list.
Click Close. You are returned to the Transfer Shipment Container Detail window.
For each item you want to manually add to the transfer shipment, follow these steps:
In the Transfer Shipment Container Detail window, click Add Item. A row for the item is added.
In the Item field, enter the item number or click the Ellipsis button to look up the item.
In the Item Lookup window, locate and select the item you want. Click Apply to return to the Transfer Shipment Container Detail window. See ”Item Lookup” in Chapter 20 for more information, or click Scanner to scan the item. See ”Scan an Item (Scanner Button)” in Chapter 2 for more information.
For each item in the shipment, complete these fields:
UOM – From the drop-down list, select the unit of measure.
Requested – Enter the number of units requested.
To remove items from the transfer shipment, follow these steps:
Select the items you want to delete in the Transfer Shipment Container Detail window.
Click Remove Item. You receive the following prompt: ”The selected line item(s) will be deleted. Do you want to continue?”
Click Yes. The items are removed from the container.
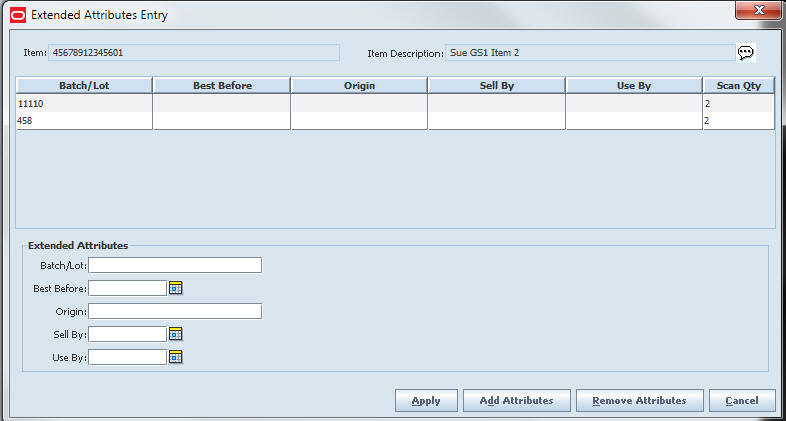
To add extended attributes:
To update the Extended Attributes, select an item row and click Ext. Attributes. The Extended Attributes window opens. This window captures additional information about an item.
|
Note: The Extended Attributes Entry window view may vary, depending upon customer chosen attributes. |
Enter/select the field options.
Click Add Attributes to add the additional attributes to the item.
Click Apply to save the changes and return to the previous window.
If unique identification numbers (UIN) are required for the items in a transfer shipment, the UINs must be scanned or entered manually when the transfer shipment is created. To enter UINs, see "Updating UINs."
Navigate: Main Menu > Shipping/Receiving > Transfer Shipment. The Transfer Shipment List window opens.
To create a container label, see the following sections:
Select the shipment for which you want to enter the container label information. The Transfer Shipment Detail window opens.
Select the container. The Transfer Shipment Container Detail window opens.
Click Info. The Container Info window opens.
Select the label from the Container Label drop-down list.
Click Apply. You are returned to the Transfer Shipment Container Detail window.
To print a container label, follow these steps:
Select the shipment for which you want to enter the container label information. The Transfer Shipment Detail window opens.
Select the container. The Transfer Shipment Container Detail window opens.
Click Info. The Container Info window opens.
Select the label from the Container Label drop-down list.
Click Print Label. You are returned to the Transfer Shipment Container Detail window.
Confirming is done when the work on a container is completed. A container can only be confirmed when the status is In Progress. When the container is confirmed, any items with zero quantity are removed and the corresponding transfer documents are updated.
Navigate: Main Menu > Shipping/Receiving > Transfer Shipment. The Transfer Shipment List window opens.
To confirm a container, follow these steps:
Select the shipment. The Transfer Shipment Detail window opens.
Select the container. The Transfer Shipment Container Detail window opens.
Click Confirm. The status is changed to Complete. If manifesting is used, the web service call is made at this time and the Tracking ID is updated into the container info screen.
Click Save. You are returned to the Transfer Shipment List window.
A container in Completed status can be reopened.
Navigate: Main Menu > Shipping/Receiving > Transfer Shipment. The Transfer Shipment List window opens.
To adjust a completed container, follow these steps:
Select the shipment. The Transfer Shipment Detail window opens.
Select the container. The Transfer Shipment Container Detail window opens.
Click Adjust. You are prompted to confirm that you want to reopen the container.
Click Yes. The status changes to In Progress.
Click Save. You are returned to the Transfer Shipment List window.
Navigate: Main Menu > Shipping/Receiving > Transfer Shipment. The Transfer Shipment List window opens.
To delete a container, follow these steps:
Select the shipment. The Transfer Shipment Detail window opens.
Select the container. The Transfer Shipment Container Detail window opens.
Click Delete. You are prompted to confirm the delete.
Click Yes. The status changes to Canceled.
Click Save. You are returned to the Transfer Shipment List window.
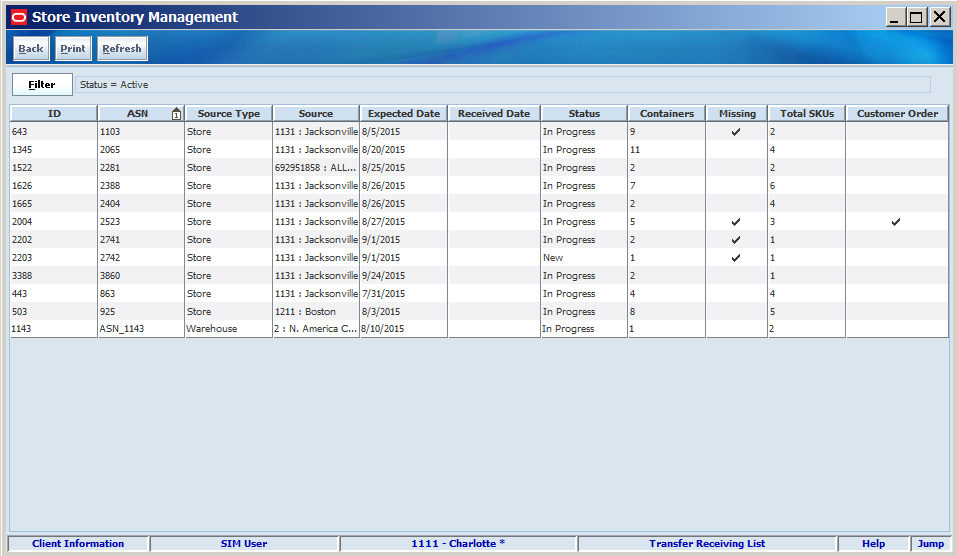
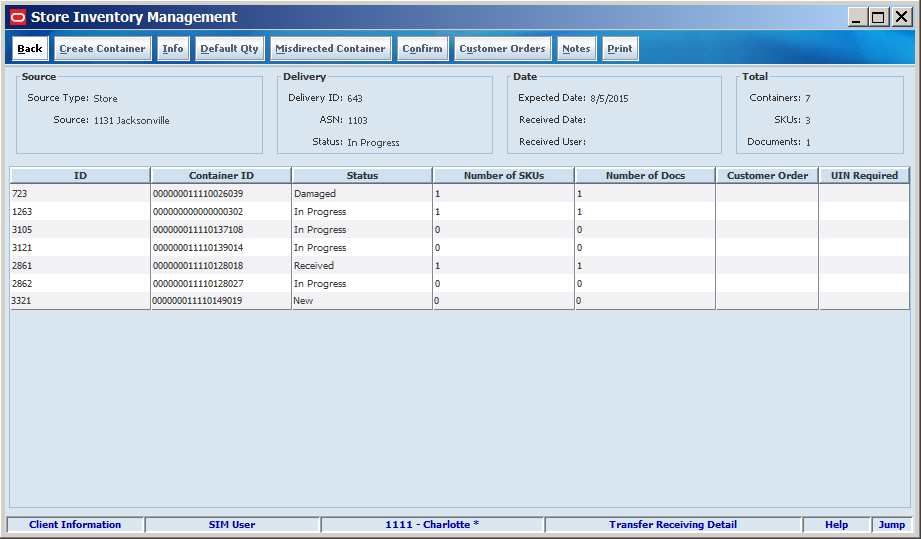
Transfer Receiving List
Navigate: Main Menu > Shipping/Receiving > Transfer Receiving. The Transfer Receiving List window opens.
The Transfer Receiving List window displays the following information about received transfers:
| Column | Description |
|---|---|
| ID | SIM identifier for the delivery |
| ASN | Advanced Shipment Notice number |
| Source Type | Type of location sending the goods |
| Source | ID and name of the sending location |
| Expected Date | Expected date of the delivery |
| Received Date | Date the delivery was received |
| Status | Current status of the delivery:
|
| Containers | Total number of containers for the delivery |
| Missing | Indicates whether or not there are one or more missing containers |
| Total SKUs | The sum of unique items for all containers |
| Customer Order | Indicates if any items are part of a customer order or not |
From the Transfer Receiving List window, you can do the following:
From the Transfer Receiving List window, click Back to return to the Shipping/Receiving menu.
Whenever a list window is displayed, you can filter the list of transfers to limit the transfers listed. If the list is currently filtered, the filtering is shown next to the Filter button.
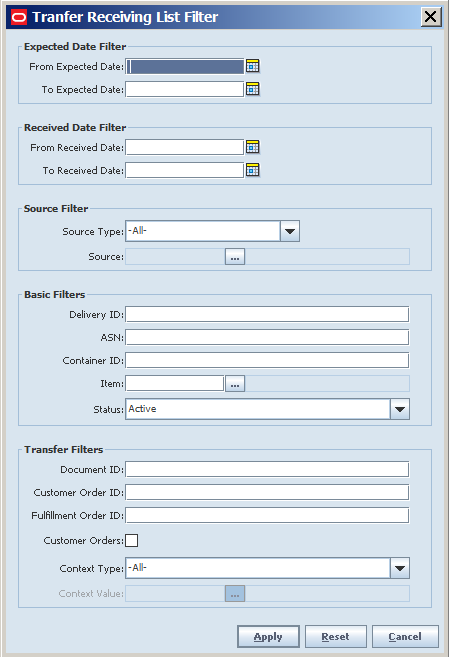
To filter the list of transfers or to change the current filtering, follow these steps:
In the Transfer Receiving List window, click Filter. The Transfer Receiving List Filter window opens.
Enter or select search values as needed to specify the deliveries you want to list. All values are optional. If you leave a field blank or select All, every value is included in the search.
Expected Date Filters – Enter or select From Date and To Date values to limit the date range of the expected arrival date.
Received Date Filters – Enter or select From Date and To Date values to limit the date range of the received date.
Source Filter – Select a source type. If a value other than All is selected for the type, enter the source location to select all transfers from that location. The type may include warehouse, store, or finisher.
ASN – Enter the ASN for the delivery.
Container ID – Enter a container identifier for a delivery.
Item – Enter the Item ID or click the Ellipsis button to look up an item.
In the Item Lookup window, locate and select the item you want. Click Apply to return to the Transfer Receiving List Filter window. See ”Item Lookup” in Chapter 20 for more information.
Status – Select a status from the drop-down list. The default is Active. Active status selects deliveries in New and In Progress status.
Document ID – Enter the document identifying number to limit the search for deliveries with the items from the selected document.
Customer Order ID – Enter the customer order number to search for a specific customer order.
Fulfillment Order ID– Enter the fulfillment order number to search for a specific fulfillment order.
Customer Orders – Select this check box if you want to search for customer orders on deliveries only.
Context Type – If related to a promotion or repair, select the context type to limit the results returned. For example, select ”Promotion” to limit the delivery results with promotions.
Context Value – If the transfer is related to a promotion, enter a promotion ID or click the Ellipsis button to look up a promotion. See ”Look Up a Promotion” for more information.
Click Apply. You return to the Transfer Receiving List window, where your filter has been applied.
You can look up a promotion when you are filtering the list.
In the Context Type field, select Promotion. If you click the Ellipsis button on the Context Value field, the Promotion Lookup window opens.
To look up a promotion ID for a transfer:
Enter any of the following optional values to limit promotion search results:
Promotion ID – If you want to limit the search to a particular promotion ID, enter that identifier.
Promotion Name – If you want to search on the promotion name, enter a string of characters found in the promotion name.
Search Limit – If you want to change the maximum number of promotions returned from the search, enter an integer value. The default value is 500.
Select the promotion you want to use for the transfer.
Click Apply to return to the Transfer Receiving List window.
You can look up a specific customer order when you are filtering the list.
To look up a customer order, follow these steps:
In the Transfer Filters section, enter the Customer Order ID provided by the order management system.
Click Apply to return to the Transfer Receiving List window.
Navigate: Main Menu > Shipping/Receiving > Transfer Receiving. The Transfer Receiving List window opens.
To receive a delivery, follow these steps:
If you want to limit the Transfer Receiving List to show only the inbound transfers that you can receive, filter the list. See ”Filter the Transfer Receiving List."
Select the delivery you want to receive. The Transfer Receiving Detail window opens.
To receive all items in all containers within the delivery, click Default Qty.
To add or remove items from the receipt, see "Create or Edit a Container."
A container that ends up at the wrong location, but is received in that location, is considered to be a misdirected container. To receive a misdirected container, see "Receive Unexpected Containers."
To complete the transfer receipt, see "Confirm a Transfer Receipt".
You are returned to the Transfer Receiving List window.
The user can receive all the items in the delivery by defaulting the expected quantity to the received quantity. To receive all items for all containers, click Default Qty in the Transfer Receiving Detail window.
The carrier details can be edited until the receipt is closed.
To identify the carrier, follow these steps:
In the Transfer Receiving Detail window, click Info. The Transfer Receiving Info window opens.
Complete the carrier information:
Carrier Entity – Enter the name of the carrier.
Carrier Type – Select the type of carrier from the drop-down list.
Carrier Code – If the Carrier Type is Third Party, enter the Standard Carrier Alpha Code (4 letter code).
License Plate – Enter the license plate of the carrier's truck.
From Address – Enter the address from where the delivery came.
Freight ID – Enter the freight code.
Click Save. You are returned to the Transfer Receiving Detail window.
A container that ends up a the wrong location, but is received in that location, is considered to be a misdirected container. The user can receive a container that was not intended for the user's destination, but the business requires them to receive it.
The unexpected container can be handled in two ways:
To create a container on the fly, click Create Container. A new container is created. The Transfer Receiving Container Detail window opens. For information on setting up the container, see "Edit a Container."
To copy a misdirected container, follow these steps:
Click Misdirected Container. The Misdirected Container window opens.
Enter the Container ID to be copied.
Click the Container to view the items within the container. In some cases, there may be more than one container with the same container ID. You can view the contents to correctly identify the container to copy.
Click Apply. The contents are copied to the new container within the delivery you are currently working in. You are returned to the Transfer Receiving Detail window, where you can now receive the container in the same manner.
In the Transfer Receiving Detail window, a yes, no or mix check value displays in the Customer Order column. This indicates if a shipment includes customer orders. The value of yes means all items in the container are for a customer order. If the value is mix, there are some items in the container for a customer order and some items that do not belong to a customer order and may need the container set aside for additional processing to separate the items. The customer order information related to the shipment can be viewed.
To view the customer order information, follow these steps:
Select a container and click Customer Orders. The Customer Order Information window opens.
The following information is displayed:
Customer Order ID – ID assigned to this delivery.
Fulfillment ID – Fulfillment ID provided by the order management system.
ID – Container ID assigned by the system.
Container ID – Shipping container number which represents the barcode number for the container within the shipment.
Status – Current status of the order.
Total SKUs – Total number of line items for the fulfillment order within the container.
Comments – Comments, if available.
When you are done viewing the information, click Close.
To complete the transfer receipt, the receipt is confirmed. Any container not identified as Received is marked as Missing.
Navigate: Main Menu > Shipping/Receiving > Transfer Receiving. The Transfer Receiving List window opens.
To confirm a transfer receipt, follow these steps:
Select the receipt. The Transfer Receiving Detail window opens.
To confirm any containers in the transfer, see "Confirm a Container".
Click Confirm. You are prompted to confirm.
Click Yes. The status is changed to Received.
Click Back. You are returned to the Transfer Receiving List window.
You are unable to delete a transfer receipt. A transfer document may be associated with multiple shipments and deliveries. Since the receipt is associated with transfers, deleting the transfer receipt is handled with purging of the transfer document and transfer shipment batch program. The purge parameter determines how long closed documents, shipments and receipts remain in the system.
To print a transfer receipt, follow these steps:
Select the transfer receipt you want to print.
Click Print. The Report Selection window opens.
Select the report type and printer.
Click Apply. The report prints. You are returned to the Transfer Receiving List window.
Navigate: Main Menu > Shipping/Receiving > Transfer Receiving. The Transfer Receiving List window opens.
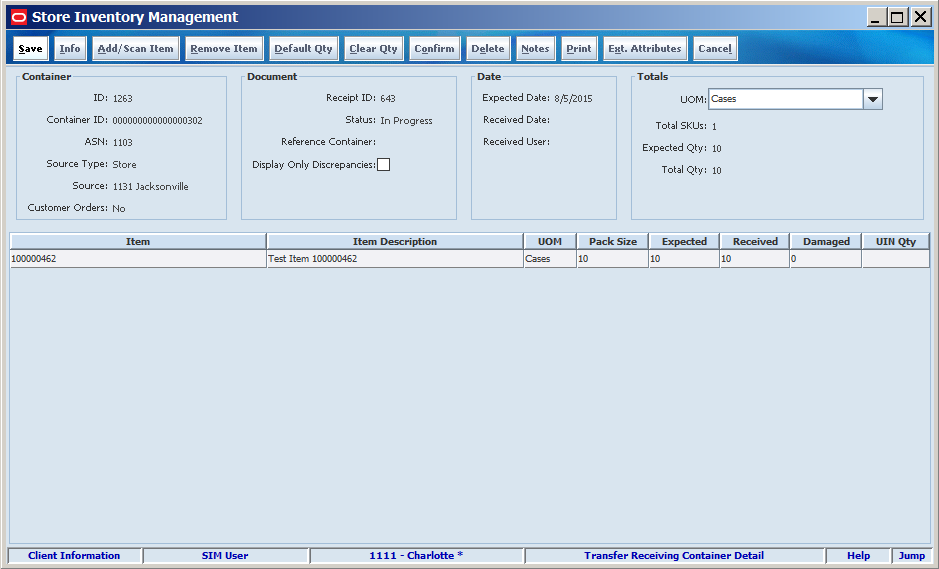
To edit a container, follow these steps:
Select the receipt with the container you want to edit. The Transfer Receiving Detail window opens.
Select the container. The Transfer Receiving Container Detail window opens.
For information on making changes, see the following sections:
Click Save. You are returned to the Transfer Receiving Detail window.
To add an item to the transfer, follow these steps:
Select the container. The Transfer Receiving Container window opens.
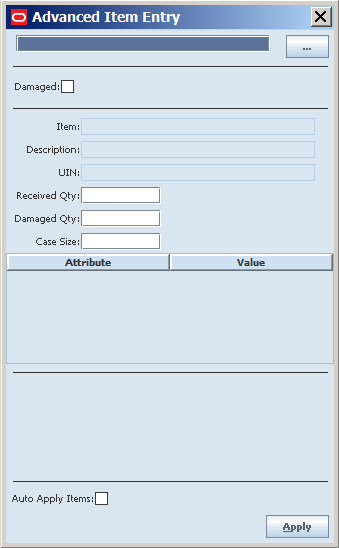
Click Add/Scan Item. The Advanced Item Entry window opens.
In the Item field, enter the item number or click the Ellipsis button to look up the item.
In the Item Lookup window, locate and select the item you want. Click Apply to return to the Transfer Request window. See ”Item Lookup” in Chapter 20 for more information, or scan the item. See ”Scan an Item (Scanner Button)” in Chapter 2 for more information.
Enter the received and/or damaged quantity to receive along with the case size.
Click Apply. The item is added to the container.
You can default all the received quantities with the expected quantity for each item in the delivery. To default all the item quantities:
Click Default Qty. You are prompted to confirm the change.
Click Yes. The received quantity column is updated.
You can revert all items in the container by replacing the received and damaged fields with a zero. To clear all the quantities:
Click Clear Qty. You are prompted to confirm the change.
Click Yes. The received and damage quantity columns are set to zero.
To remove an item from the transfer, follow these steps:
Select the container. The Transfer Receiving Container Detail window opens.
Select the item to be removed.
Click Remove Item. You are prompted to confirm the removal.
Click Yes. The item is removed.
You can print a discrepant item report to identify items with a discrepancy and also easily identify and correct discrepant items on the screen, (received plus damaged does not equal expected). To correct a discrepant item, follow these steps:
Select the container. The Transfer Receiving Container Detail window opens.
2. Click in the Display Only Discrepancies in the Document section of the window.
Click Display Only Discrepancies in the Document section of the window.
The display refreshes and only items with a discrepancy are displayed allowing you to review and update these items easily.
Click Save. You are returned to the Transfer Receiving Detail window.
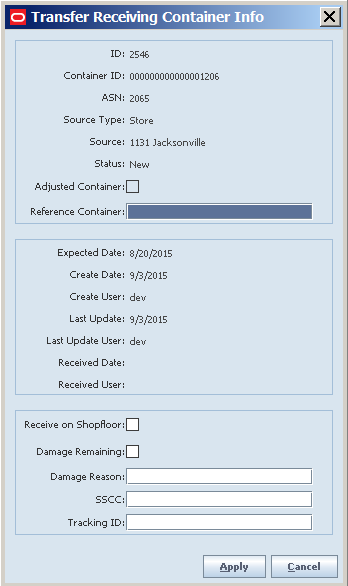
This field holds an external reference container number, for example, the container number assigned to another store but received in the current store. If the container was not found when searching for a misdirected container, you can add an empty container and record the original container ID from the container label.
To record the container reference number, follow these steps:
Select the newly created container. The Transfer Receiving Container window opens.
Click Info. The Transfer Receiving Container Info window opens.
Enter the reference number into the Reference Container field.
Click Apply. You are returned to the Transfer Receiving Container window.
To move inventory to the shop floor, follow these steps:
Select the container. The Transfer Receiving Container window opens.
Click Info. The Transfer Receiving Container Info window opens.
Check the Receive on Shopfloor box.
Click Apply. You are returned to the Transfer Receiving Container window.
To enter tracking ID and SSCC barcode, follow these steps:
Select the container. The Transfer Receiving Container window opens.
Click Info. The Transfer Receiving Container Info window opens.
Enter the values into the Tracking ID and SSCC fields.
Click Apply. You are returned to the Transfer Receiving Container window.
To add extended attributes:
Select an item row and click Ext. Attributes. The Extended Attributes window opens. This window captures additional information about an item.
|
Note: The Extended Attributes Entry window view may vary, depending upon customer chosen attributes. |
Enter/select the field options.
Click Add Attributes to add the additional attributes to the item.
Click Apply to save the changes and return to the previous window.
If unique identification numbers (UIN) are required for the items in a transfer, the UINs must be scanned or entered manually when the transfer is received. To enter UINs, see "Updating UINs".
Navigate: Main Menu > Shipping/Receiving > Transfer Receiving. The Transfer Receiving List window opens.
To enter the damage quantity, follow these steps:
Select the receipt. The Transfer Receiving Detail window opens.
Select the container. The Transfer Receiving Container Detail window opens.
Select the item.
Enter the damage quantity in the Damaged column.
Click Save. You are returned to the Transfer Receiving List window.
To enter the remaining quantity as damaged, follow these steps:
Select the container. The Transfer Receiving Container Detail window opens.
Click Info. The Transfer Receiving Container Info window opens.
Click the Damage Remaining checkbox.
Click Apply. You are returned to the Transfer Receiving Container Detail window.
To enter a damage reason code, follow these steps:
Select the receipt. The Transfer Receiving Detail window opens.
Select the container. The Transfer Receiving Container Detail window opens.
Click Info. The Transfer Receiving Container Info window opens.
Select the reason for the damage.
Click Apply. You are returned to the Transfer Receiving Container Detail window.
Navigate: Main Menu > Shipping/Receiving > Transfer Receiving. The Transfer Receiving List window opens.
To confirm a container, follow these steps:
Select the receipt. The Transfer Receiving Detail window opens.
Select the container. The Transfer Receiving Container Detail window opens.
Click Confirm. You are prompted to confirm.
Click Yes. The status is changed to Received.
Click Save. You are returned to the Transfer Receiving List window.
A container in Received status can be reopened.
Navigate: Main Menu > Shipping/Receiving > Transfer Shipment. The Transfer Receiving List window opens.
To adjust a received container, follow these steps:
Select the receipt. The Transfer Receiving Detail window opens.
Select the container. The Transfer Receiving Container Detail window opens.
Click Adjust. You are prompted to confirm that you want to reopen the container.
Click Yes. The status changes to In Progress.
Click Save. You are returned to the Transfer Receiving List window.
Navigate: Main Menu > Shipping/Receiving > Transfer Receiving. The Transfer Receiving List window opens.
To delete a container, follow these steps:
Select the receipt. The Transfer Receiving Detail window opens.
Select the container. The Transfer Receiving Container Detail window opens.
Click Delete. You are prompted to confirm the delete.
Click Yes. The status changes to Canceled.
Click Save. You are returned to the Transfer Receiving List window.
To print a Discrepant Item report, follow these steps:
Select the transfer receipt you want to print.
Click Print. The Report Selection window opens.
Select the report type and printer.
Click Apply. The report prints. You are returned to the Transfer Receiving List window.