| Oracle® Retail Store Inventory Management User Guide Release 15.0 E64567-01 |
|

 Previous |
 Next |
The Lookups functions provide a variety of ways to look up detailed information about items, suppliers, and containers. From each lookup window, you can select options to view additional related details, without performing a separate search.
For example, when you look up an item, you can also look up related items.
You can also perform lookups while you are performing some other SIM tasks. For example, you can look up an item while you are preparing an item request, or you can look up a supplier while you are preparing a store order.
The Lookups functions are as follows:
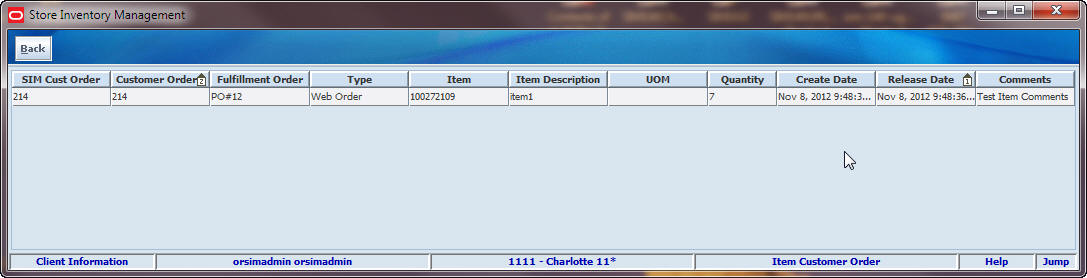
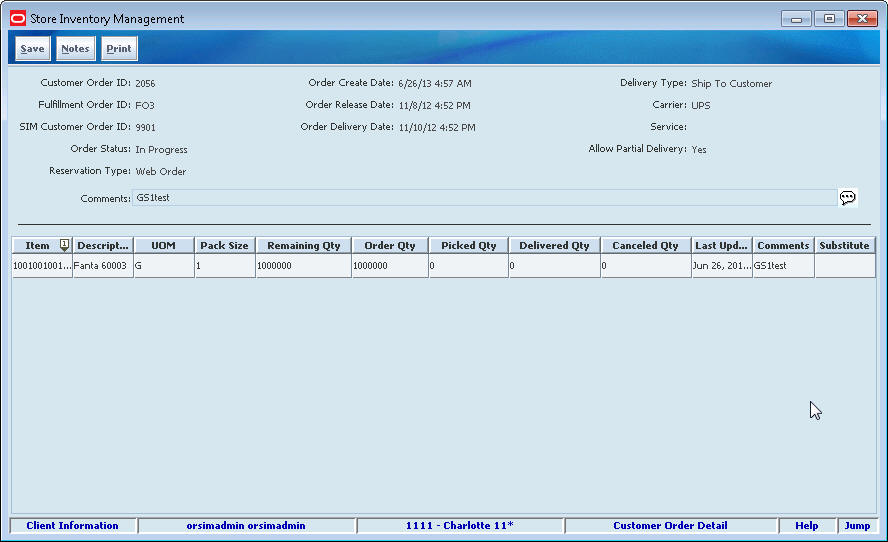
To view customer orders for the item, follow these steps:
Click Customer Order. The Item Customer Order window opens.
To view details about an order, double-click on the order. The Customer Order Detail window opens.
Click Save to return to the Customer Order List window.
Click Back to return to the Item Detail window.
You can look up all details about any inventory item, either as an inquiry or as part of another SIM task.
|
Notes: You can use the quick jump feature (Jump) while you are performing a task to look up an item. See ”Jump to Another Functional Area Using Quick Jump in Chapter 2. |
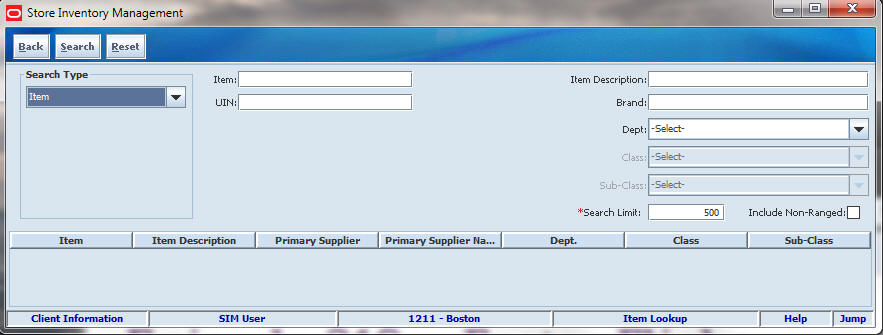
Navigate: Main Menu > Lookups > Item Lookup. The Item Lookup window opens.
To find items and view detailed information, follow these steps:
Under Search Type, select how to look up items:
Inventory – Search for items by inventory status.
Item – Search for items by item ID, vendor product number (VPN), or unique identification numbers (UIN).
Style – Search for items by the style. This can be done by entering the parent item ID.
Supplier – Search for items by the supplier of the items.
Warehouse – Search for items in a particular warehouse.
Finisher – Search for items by the finisher of the items.
UDA – Search for items by user-defined attributes.
Enter or select values for the pertinent search fields. The search fields displayed depend on your selection for Search Type (see the preceding step). Values for these fields are optional.
Lookup by Item
Item – Enter the unique number that identifies the item.
UIN – Enter the unique identification number (UIN) that identifies the item.
Lookup by Supplier
Supplier – Enter the identifier of the supplier of the items.
Primary Supplier – Select this check box if you want to search for items for which the selected supplier is the primary supplier.
Lookup by Warehouse
Warehouse – Select the warehouse from the drop-down list.
Lookup by Finisher
Finisher – Enter the finisher ID or look up the finisher.
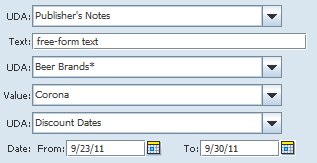
Lookup by UDA
UDA – Specify values for up to three user-defined attributes of the items you want to find. You can specify up to one each of the three types of attributes than can exist for an item:
Text – UDA values can be any free-form text.
Value – UDA values can be specific values from a list.
Date – UDA values are dates.
The following figure illustrates the three types of attributes and their values.
You can further limit the search by specifying values for the following fields. Values for these fields are optional.
Item Description – Enter a brief explanation of the item.
Brand – Enter the brand name (string, case insensitive) to find items pertaining to a particular brand.
Dept – Select a department from the drop-down list.
Class – Select a class from the drop-down list.
Sub-Class – Select a subclass from the drop-down list.
In the Search Limit field, enter the maximum number of results that you want returned. You can enter an integer from 1 to 999; the default is 500.
To search for all items including those that do not have a location association with your location, select the Include Non-Ranged check box.
Click Search. The results that match your search criteria are listed.
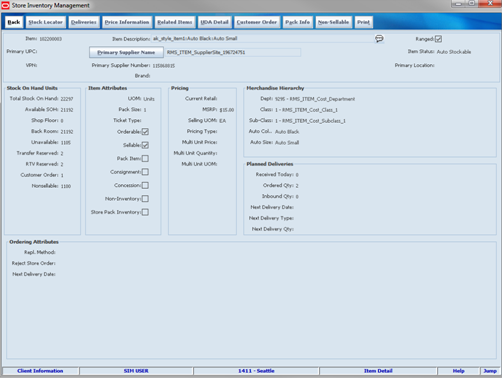
Double-click the item you want. Details for the item are displayed in the Item Detail window.
From the Item Detail window, you can view other details about an item, as described in the following topics:
To search for another item, click Reset. The search criteria fields are cleared so that you can enter new search criteria.
Click Back to return to the Lookups menu.
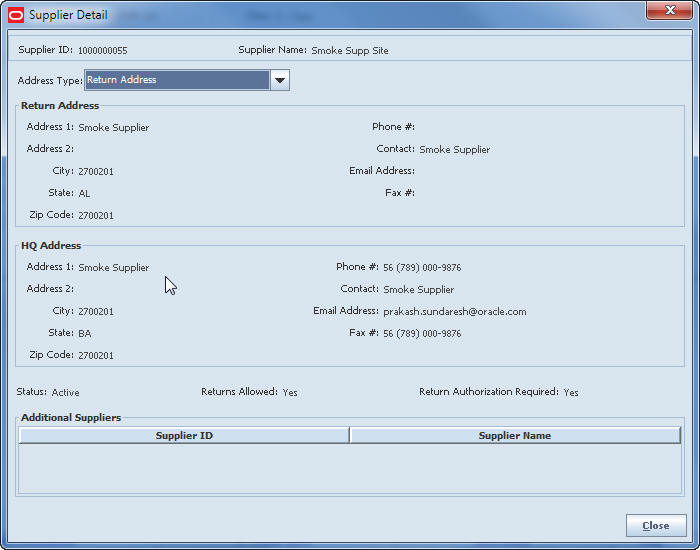
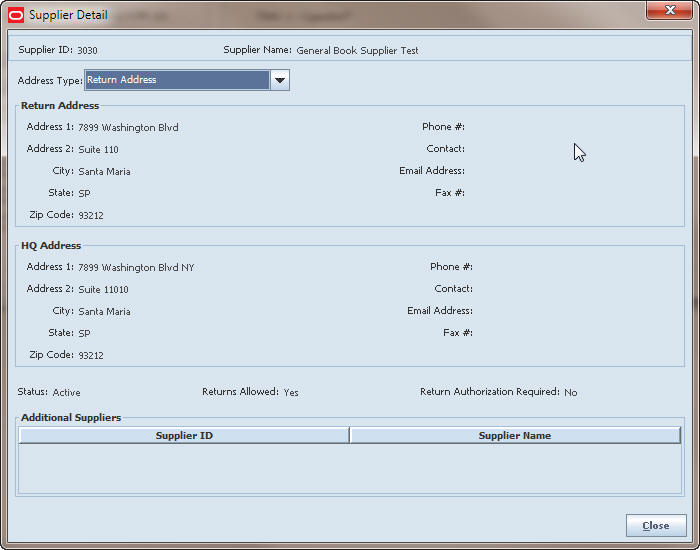
To view details about the primary supplier for the item, follow these steps:
Click Primary Supplier Name. The Supplier Detail window opens.
If there are additional suppliers for the item, they are listed at the bottom of the window.
Click Close to return to the Item Detail window.
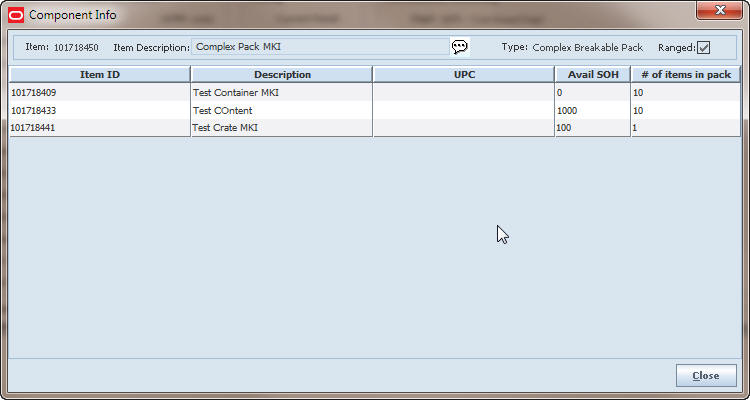
To view information about the component items for the current pack item, follow these steps:
Click Component Info. The Component Info window opens.
Click Close to return to the Item Detail window.
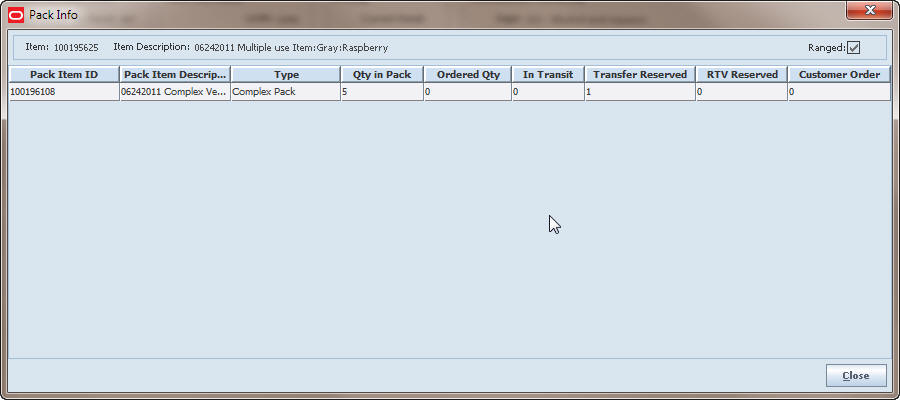
To view inventory information about the pack items associated with the current component item, follow these steps:
Click Pack Info. The Pack Info window opens.
Click Close to return to the Item Detail window.
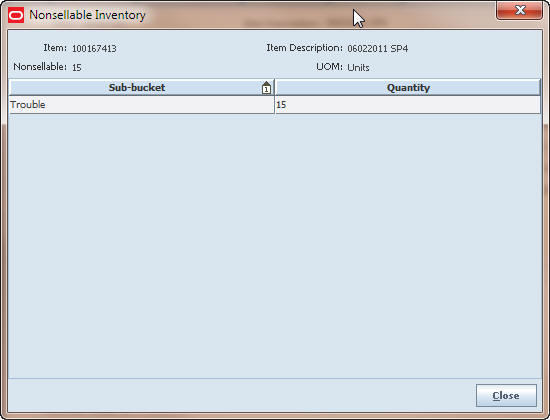
To view the inventory that is non-sellable, follow these steps:
Click Non-Sellable. The Nonsellable Inventory window opens.
Click Close to return to the Item Detail window.
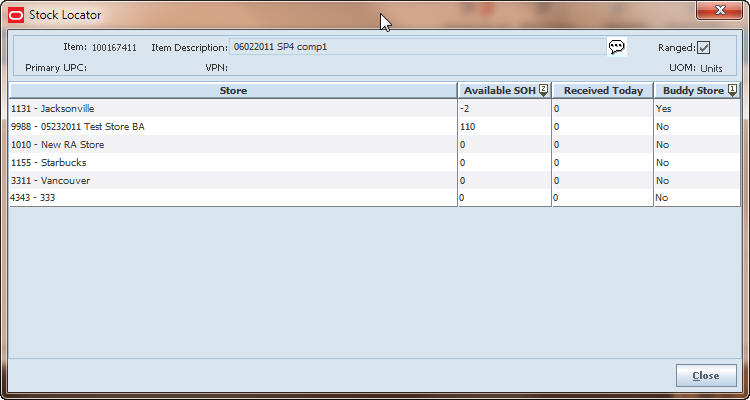
To view inventory available in other stores set up as buddy stores, follow these steps:
Click Stock Locator. The Stock Locator window opens.
Click Close to return to the Item Detail window.
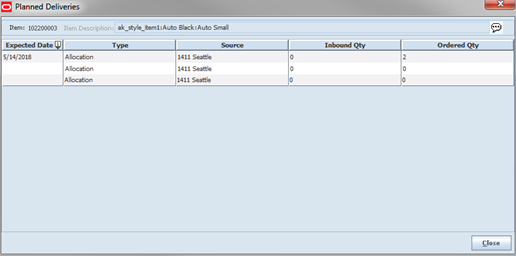
To view details about the incoming deliveries for the item, follow these steps:
Click Deliveries. The Planned Deliveries window opens.
The Allocation, Transfer, or Purchase Order displays the inbound quantity not yet received and the remaining quantity that remains to be shipped.
Click Close to return to the Item Detail window.
To view current pricing information for this item, follow these steps:
Click Price Information. The Price Information window opens.
Click Close to return to the Item Detail window.
Related items are items that are related as they have the same parent item. For example, red shirt and black shirt can be related. They can also be items that are related because they are substitutes, cross sale, or upsale items.
To view items related to this item, follow these steps:
Click Related Items. The Related Item List window opens.
Double-click the item to view the item details. The Item Detail window opens.
Click Back to return to the Item Detail window.
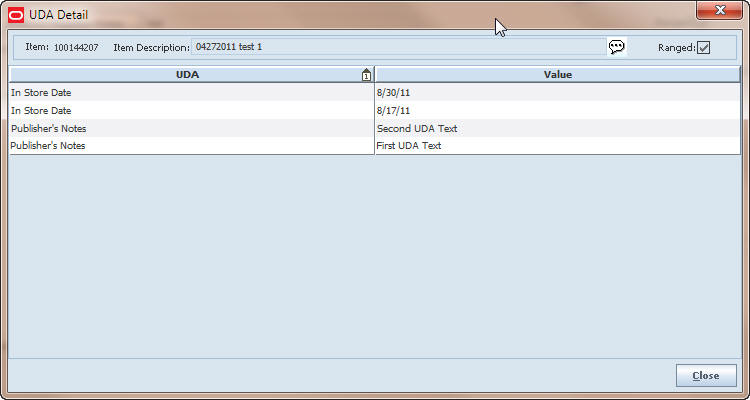
To view the values of user-defined attributes (UDA) for the item, follow these steps:
Click UDA Detail. The UDA Detail window opens.
Click Close to return to the Item Detail window.
|
Note: The UIN Detail button is available only if you use unique identification numbers, and the item requires UINs. |
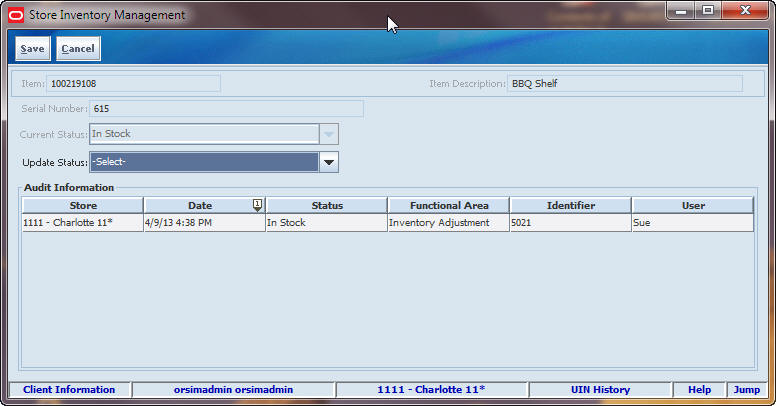
To view details about UINs for an item, follow these steps:
Click UIN Detail. The UIN Detail window opens.
From the UIN Detail window, you can optionally do the following:
Update the status of the UIN; see ”View History and Update UIN Status”
Print tickets for selected items; see ”Print Tickets”
To filter the list of UIN Detail records, follow these steps:
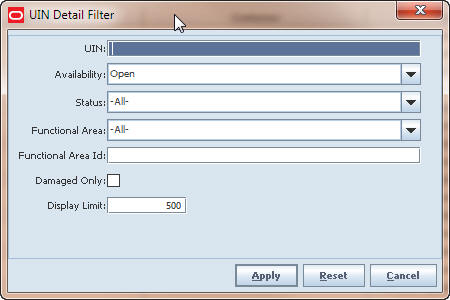
From the UIN Detail window, click Filter. The UIN Detail Filter window opens.
Enter or select search values as needed to specify the UIN records that you want to list. All values are optional. If you leave a field blank or select All, all values are included in the search.
UIN – Enter a UIN to limit the display to a specific UIN.
Availability – Select Open, Closed, or All. The default is Open.
Status – Select a status from the drop–down list. The default is All.
Functional Area – Select a functional area to filter records for a specific area.
Functional Area ID – Enter a functional ID to filter based on a specific transaction.
Damaged Only – Check the box to display UINs flagged as damaged.
Display Limit – Enter a value to limit the number of records to display. The default is 500.
Click Apply to return to the Item Detail window.
|
Note: Updating the status of a UIN does not shift inventory positions. Changing the status of a UIN should only be done when errors are flagged in the UIN Resolution window, or when errors have resulted in incorrect UINs in the inventory. |
To update the status of a UIN, follow these steps:
Select the UIN for which you want to update the status.
Click View History. The UIN History window opens.
In the Update Status field, select the status for the selected UIN.
Click Save to return to the UIN Detail window.
To print tickets for selected items, follow these steps:
Select the items for which you want to print tickets.
Click Print Ticket. You receive a message that tells you that the tickets were printed.
Click OK.
|
Note: Display of item images is an optional feature. This feature is available if stored images are available through your merchandising system, and if SIM is also configured to access and display those images. If item images are not supported on your SIM system, the Image button does not appear in the Item Detail window. |
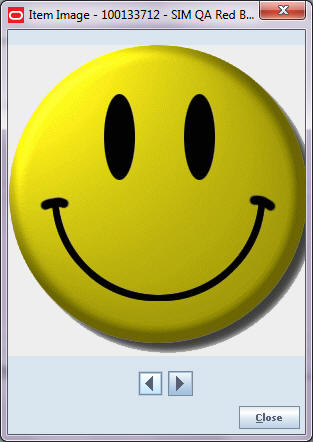
If the Image button is displayed, follow these steps to view the images that are available for the current item:
Click Image.
If at least one image is available for the item, the Item Image window opens to display the images.
If there are no images for the current item, a message informs you that there are no images.
If there is more than one image for the current item, use the arrow buttons to view all available images in the Item Image window.
Click Close to return to the Item Detail window.
The Item Detail window also provides a Print option that produces an Item Detail Report.
|
Note: SIM reports can be customized, and they may be printed or displayed on the screen, depending on how your SIM system is set up. See ”Print or View SIM Reports and Other Output”for more information. |
To print an item report, follow these steps:
Click Print. The Report Selection window opens.
In the Printer field, select the printer or other output device you want to use.
Click OK. A message informs you that the Item Detail Report was printed.
Click OK.
You can look up all details about any supplier, either as an inquiry or as part of another SIM task.
|
Note: If you are looking up a supplier while performing another SIM task, the procedures are similar:
|
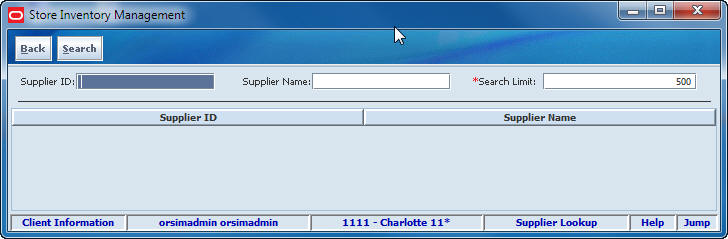
Navigate: Main Menu > Lookups > Supplier Lookup. The Supplier Lookup window opens.
To find a supplier and view details about the supplier, follow these steps:
Enter a value in one of the fields:
Supplier ID – Enter the number that identifies the supplier.
Supplier Name – Enter the name of the supplier. You can enter a full or partial supplier name.
Search Limit – Enter the maximum number of results that you want returned. You can enter an integer from 1 to 999; the default is 500.
Click Search. The results that match your search criteria are displayed.
If more than one supplier meets the search criteria, the search results are listed in the Supplier Lookup window. Double-click the supplier you want. The Supplier Detail window opens.
If only one supplier meets the search criteria, the Supplier Detail window opens.
In the Address Type field, select the supplier address information that you want to view:
Postal Address
Return Address
Order Address
Invoice Address
Remittance Address
Click Back. You return to the Supplier Lookup window.
Click Back to return to the Lookups menu.
Use this procedure to view details about containers.
Navigate: Main Menu > Lookups > Container Lookup. The Container Lookup window opens.
To find a container and view details, follow these steps:
Enter a value for either one or both of the search criteria:
In the Container ID field, enter all or part of the unique number that identifies the container.
In the Item field, enter the item ID, vpn, and so on, that applies to the containers you want to find.
In the UIN field, enter the UIN that applies to the containers that you want to find.
In the ASN field, enter the ASN number to find the containers for a specific ASN.
In the Type field, select Store, Warehouse, or Finisher, to return all containers that belong to a specific type of transaction. Both incoming and outgoing containers will display when Store is selected.
If you enter both Container ID and UIN values, only containers that satisfy both search criteria will be returned by the search.
In the Search Limit field, enter the maximum number of results that you want returned. You can enter an integer from 1 to 999; the default is 500.
Click Search. The results that match your search criteria are displayed.
To view additional information about a container, double-click on that container. The Container Detail window opens.
Click Back to return to the Container Lookup window.
Click Back to return to the Lookups menu.
You can look up all details about any external finisher, either as an inquiry or as part of another SIM task.
|
Note: If you are looking up a finisher while performing another SIM task, the procedures are similar:
|
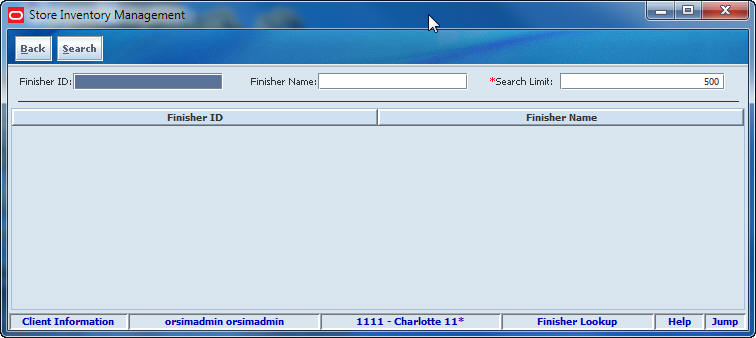
Navigate: Main Menu > Lookups > Finisher Lookup. The Finisher Lookup window opens.
To find a finisher and view details about the finisher, follow these steps:
Enter a value in one of the fields:
Finisher ID – Enter the number that identifies the finisher.
Finisher Name – Enter the name of the finisher. You can enter a full or partial supplier name.You can enter an integer from 1 to 999; the default is 500.
Search Limit – Enter the maximum number of results that you want returned. You can enter an integer from 1 to 999; the default is 500.
Click Search. The results that match your search criteria are displayed.
If more than one finisher meets the search criteria, the search results are listed in the Finisher Lookup window. Double-click the finisher you want. The Finisher Detail window opens.
If only one finisher meets the search criteria, the Finisher Detail window opens.
In the Select Address Type field, select the finisher address information that you want to view:
Postal Address
Return Address
Order Address
Invoice Address
Remittance Address
Click Back. You return to the Finisher Lookup window.
Click Back to return to the Lookups menu.
All transactions in SIM that have stock movements are displayed in Transaction History window. That may include:
Stock Counts
Transfer Receiving
DSD Receiving
Receiver Unit Adjustments (all receiving types)
Return to Vendor
ReSA - Late Sales: Transactions
Wastage
Inventory Adjustments
POS Transactions - Sales/Returns
To view details of transaction history, perform the following steps:
|
Note: Receiving Unit Adjustments will only be created if coming from an external source. Receipt Reversal and Damage Reversal will be used since the full receipt is reversed when adjusting a container from a receipt. |
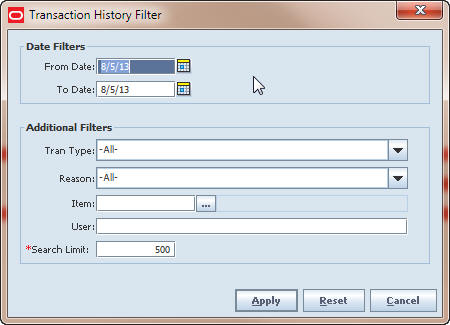
Navigate: Main Menu > Lookups > Transaction History. The Transaction History Filter window opens.
Enter or select search values to use to filter the list:
Date Filters - Select the date range by entering the dates or using the Calendar feature.
Tran Type – To filter the list to show only transaction types, select the transaction type from the drop-down list.
Reason – To filter the list by transaction reason, select a reason from the drop-down list.
Item - To filter the list to show only history for an item, enter the item ID, or click the Ellipsis button to open the Item Lookup window. In the Item Lookup window, look up and select the item you want, and then click Apply to return to the Transaction History Filter window.
User – To filter the list by a user name, enter the user name in the User field.
Search Limit – Enter the maximum number of results that you want returned. You can enter an integer from 1 to 999; the default is 500.
Click Apply. The transactions that match your search criteria are listed in the Transaction History List window.
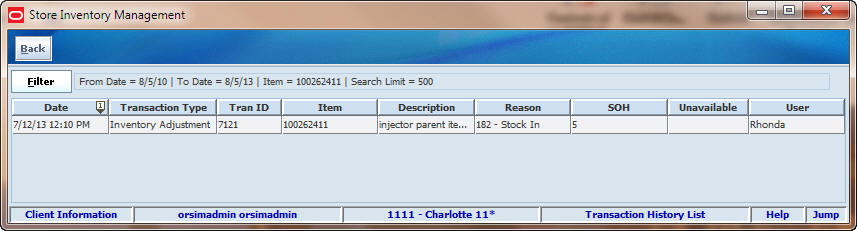
To view the details of a transaction history, follow these steps:
If the transaction history you want to view are not listed, filter the list. See ”View a Transaction History."
If a transaction history you want to view is listed, double-click the transaction. The detail window for that specific transaction will open. For example, click an RTV Transaction History. The RTV Detail window opens.
Click Back to return to the Transaction History List window.