| Oracle® Retail Store Inventory Management User Guide Release 15.0 E64567-01 |
|

 Previous |
 Next |
Inventory adjustments that you enter in SIM are supplied to the merchandising system to adjust stock levels and maintain perpetual inventory. Inventory adjustments increment or decrement inventory levels such as stock on hand and unavailable inventory.
Each inventory adjustment contains a reason code that determines the disposition of the inventory being adjusted. For example, inventory removed for repair adds to unavailable inventory and decreases the stock on hand.
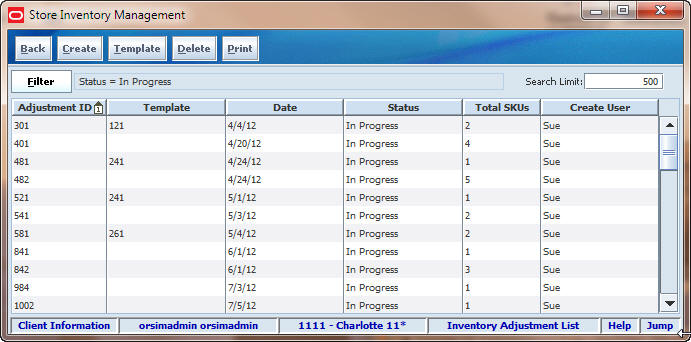
Inventory Adjustment List Window
Navigate: Main Menu > Inventory Mgmt > Inventory Adjustment. The Inventory Adjustment List window opens.
From the Inventory Adjustment List window, you can do the following:
At any time while the Inventory Adjustment List window is open, you can click Filter to change how the list is filtered.
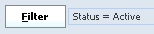
Current filtering is displayed next to the Filter button on the Inventory Adjustment List window. If no filtering is displayed, all items are currently selected and listed.
To change how the list is filtered, follow these steps:
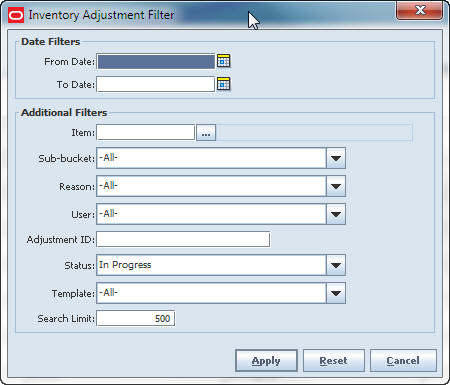
Click Filter. The Inventory Adjustment Filter window opens.
If you want to reset all filtering criteria to default values, click Reset.
Enter or select filtering criteria as needed to select just the inventory adjustments you want to list. All criteria are optional. If you leave a field blank or select All, all values will be included in your filtering selection.
Date Filters – Enter or select dates to select only those inventory adjustments between a From Date and To Date that you specify.
Item – Enter the item number or click the Ellipsis button to look up the Item ID.
In the Item Lookup window, locate and select the item you want. Click Apply to return to the Item Request Filter window. See ”Item Lookup” in Chapter 20 for more information.
Sub-bucket – Select a sub-bucket from the drop-down list.
|
Note: Will only be displayed if the system is configured for sub-buckets. |
Reason – Select a reason from the drop-down list.
User – Select a user from the drop-down list.
Adjustment Number – Enter the complete number generated by SIM for the adjustment.
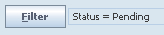
Status – Select a status from the drop-down list. The default is In Progress.
Template – Select a template from the Template List.
Search Limit – If you want to change the maximum number of inventory adjustments returned from the search, enter an integer value. You can enter an integer value from 1 to 999; the default value is 500.
Click Apply. Results that match your search criteria are displayed in the Inventory Adjustment List window.
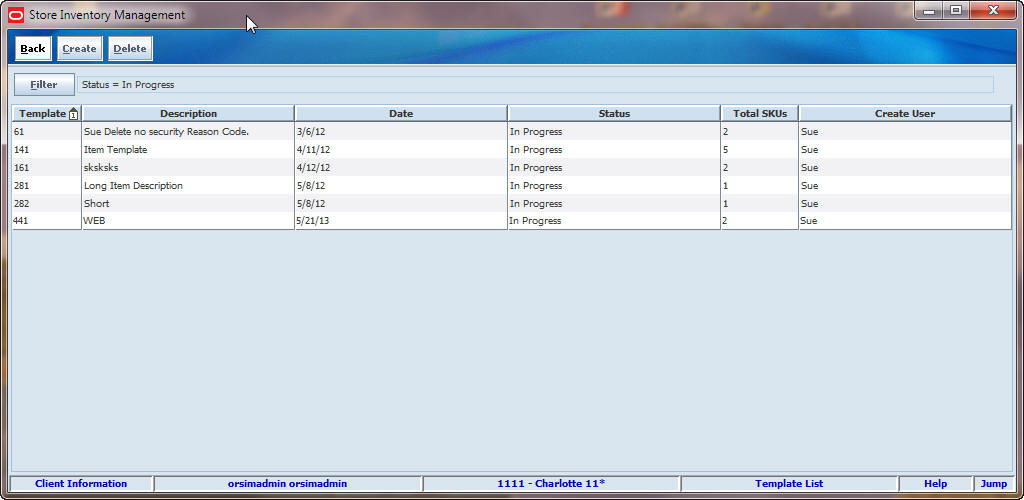
Creating a template allows you to set up a group of items, reasons, and quantities to be adjusted that will re-occur. A multiplier may also be used, to take the quantities from the template and multiply them by a user-defined value. The user can then modify what is applied, delete, and add additional items to be adjusted.
At any time while the Template List window is open, you can click Filter to change how the list is filtered.
Current filtering is displayed next to the Filter button on the Template List window. If no filtering is displayed, all items are currently selected and listed.
To change how the list is filtered, follow these steps:
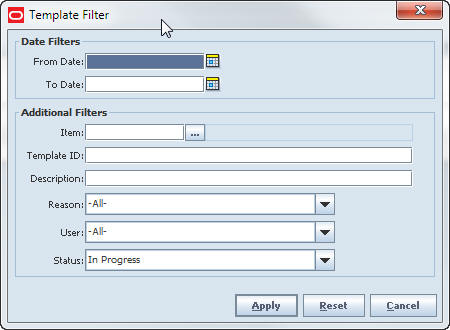
Click Filter. The Template Filter window opens.
If you want to reset all filtering criteria to default values, click Reset.
Enter or select filtering criteria as needed to select just the template items you want to list. All criteria are optional. If you leave a field blank or select All, all values will be included in your filtering selection.
Date Filters – Enter or select dates to select only those templates between a From Date and To Date that you specify.
Item – Enter the item number or click the Ellipsis button to look up the Item ID.
In the Item Lookup window, locate and select the item you want. Click Apply to return to the previous window. See ”Item Lookup” for more information.
Template ID – Enter the ID of the template.
Description – Enter the description of the template.
Reason – Select a reason from the drop–down list.
User – Select a user from the drop–down list.
Status – Select a status from the drop-down list. The default is In Progress.
Click Apply. Results that match your search criteria are displayed in the Inventory Adjustment List window.
Creating a template allows you to set up a group of items, reasons, and quantities to be adjusted that will re-occur. To create a template using an existing template, follow these steps:
Click Template. The Template List window opens.
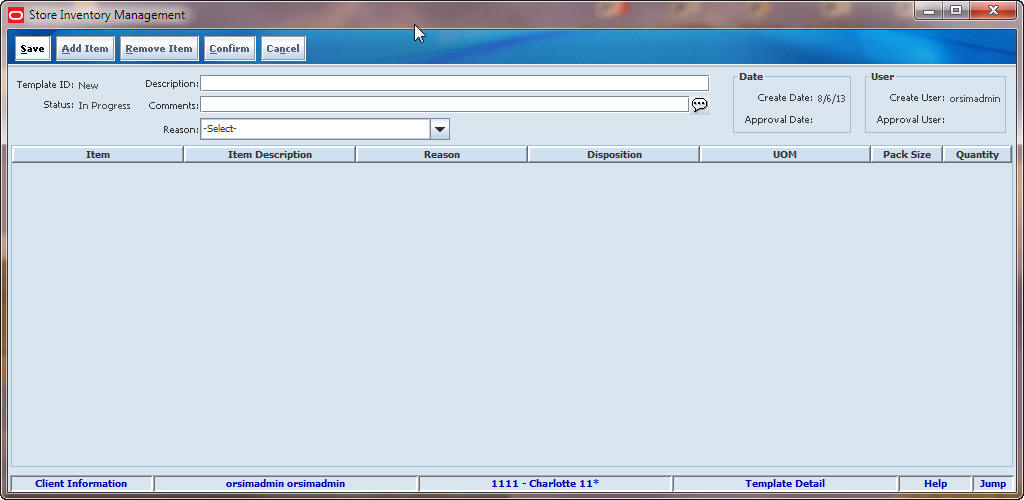
Click Create. The Template Detail window opens.
Enter or select the criteria as needed to select just the template items you want to create.
Description – Enter the description of the template.
Comments – Enter the item number or click the Ellipsis button to look up the Item ID.
In the Item Lookup window, locate and select the item you want. Click Apply to return to the Item Request Filter window. See ”Item Lookup” for more information.
Reason – In the Reason field, you can optionally select a default reason for the inventory adjustments that you enter.
If you select a default reason, it is automatically included in the Reason field for each adjustment you create. You can change the Reason field for any adjustment.
Click Add Item to include specific items to the template. Enter the item number or click the Ellipsis button to look up the Item ID.
In the Item Lookup window, locate and select the item you want. Click Apply to return to the previous window. See ”Item Lookup” for more information.
Select a Reason, if not defaulted from the header.
Enter a UOM.
Enter the Pack Size.
Enter the Quantity.
Click Save to save your changes, but not put the template into action yet. You can return to the template later, and make further changes to committing the template for use.
Click Confirm to save and start using the template.
To edit a template from the usable templates list, follow the following steps:
In the Inventory Adjustment List window, click Template. The Template List window opens.
Double-click on a specific template. The Template Detail window opens, allowing you to edit the specifics, including adding and removing an item.
Click Save to save your changes, but not put the template into action yet. You can return to the template later, and make further changes prior to committing the template for use.
Click Confirm to save the changes and start using the template.
To delete a template from the usable templates list, follow the following steps:
In the Inventory Adjustment List window, click Template. The Template List window opens.
Select the template that you want to delete from the list of templates.
Click Delete. A message is displayed: ”Are you sure you want to delete the selected templates?”
Click Yes.
Click Back to return to the Inventory Adjustment List window.
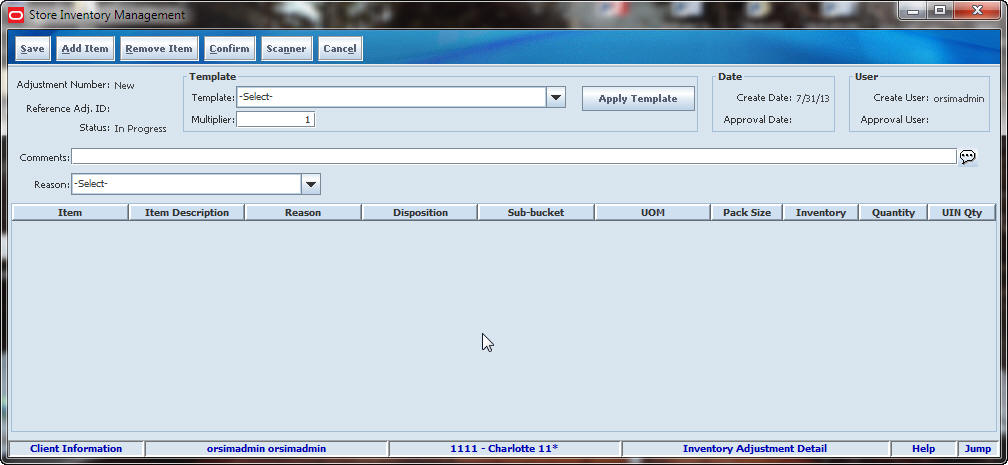
To create a new inventory adjustment, follow these steps:
Navigate: Main Menu > Inventory Mgmt > Inventory Adjustment. The Inventory Adjustment List window opens.
Click Create. The Inventory Adjustment Detail window opens with a blank line displayed.
Click Add Item to include specific items to the template. Enter the item number or click the Ellipsis button to look up the Item ID.
In the Item Lookup window, locate and select the item you want. Click Apply to return to the previous window. See ”Item Lookup” for more information. Or click Scanner to scan the item. See ”Scan an Item (Scanner Button)” in Chapter 2 for more information.
In the Template area, select a template from the drop-down list. This is an optional step to quickly enter repetitive steps.
You can copy an existing inventory adjustment transaction, taking all of the items, quantities, and reasons from the inventory adjustment and copy them to the new transaction. To copy, open a completed inventory adjustment and click Copy to create an In Progress replica.
Enter the Multiplier to be applied to the template. For example, 3 would take every quantity on the transaction and multiply it by 3, if using a template.
Click Apply Template. The fields populate accordingly, if using a template.
In the Comments field, enter any notes that are needed to describe or explain this inventory adjustments.
If you select a default reason, it is automatically included in the Reason field for each adjustment you create. You can change the Reason field for any adjustment.
From the Sub-bucket field, select a sub-bucket from the drop-down list.
|
Note: Sub-buckets are only displayed for reason codes with an inventory status to take inventory from unavailable stock. Sub-buckets will display only if the system is configured for sub-buckets. |
Enter the item number In the Item field, or click the Ellipsis button to look up the item.
In the Item Lookup window, enter search criteria as needed to find the item you want. (See ”Item Lookup” in Chapter 20 for more information about item lookup criteria.) Select the item you want and click Apply to return to the Inventory Adjustment Detail window. Or click Scanner to scan the item. See ”Scan an Item (Scanner Button)” in Chapter 2 for more information.
Select a Reason, if not defaulted from the header.
Update these fields as needed:
UOM – From the drop-down list, select the unit of measure.
Quantity – Enter the quantity to be adjusted.
|
Note: For items that require serial number type UINs, the Quantity field is disabled. See ”Enter UINs for an Inventory Adjustment." |
To add another item, click Add Item. A new blank line is displayed. Repeat Steps 2 and 3 to add the item.
|
Note: If you enter multiple items, SIM creates an inventory adjustment record for each item. |
Click Save to save your changes. You can return to the adjustment later, and make further changes prior to committing the adjustment.
Click Confirm to complete the adjustment. Stock on hand will be updated.
Click Save to return to the Inventory Adjustment List window.
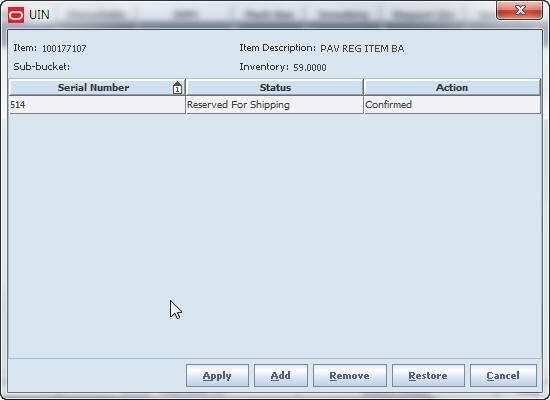
If an item requires a serial number type UIN, the Quantity field is disabled on the Inventory Adjustment Detail window.
Follow these steps to add individual item UINs to the inventory adjustment:
Double-click the UIN Qty field. The UIN window opens.
For each UIN you want to add, follow these steps:
Click Add.
In the unique identification number field, enter the valid UIN of the item.
To delete a UIN you have entered, select the UIN and click Remove.
(Optional) If you want to select a reason for the adjustment of this line item, select the reason from the drop-down list at the top of the window.
Click Apply to return to the Inventory Adjustment Detail window.
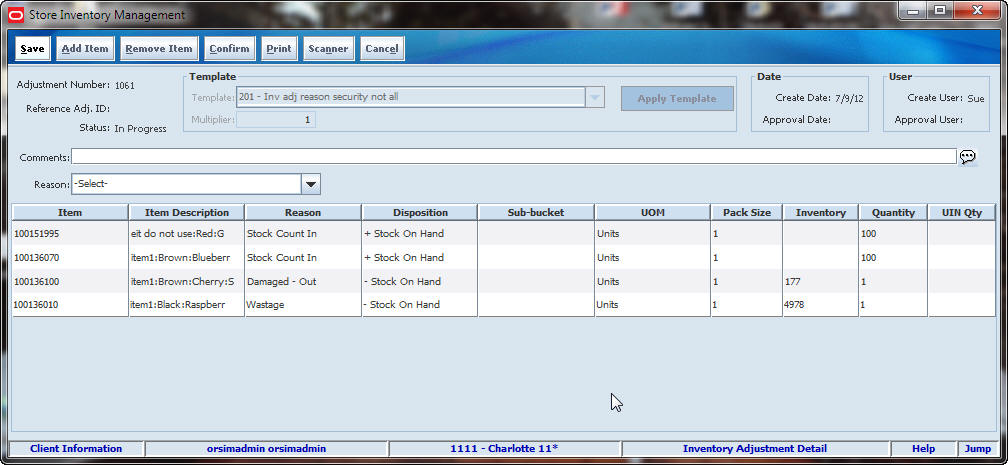
You can edit an inventory adjustment only if its status is In Progress. You can modify items, add new items, or delete items from a pending adjustment.
Navigate: Main Menu > Inventory Mgmt > Inventory Adjustment. The Inventory Adjustment List window opens.
If you want to limit which inventory adjustments are listed, filter the list. See ”Filter the Inventory Adjustment List."
Find the inventory adjustment that you want to edit. Double-click the inventory adjustment to open it in the Inventory Adjustment Detail window.
Update these fields as needed:
Comments – Enter or change any notes required to describe or explain this inventory adjustment. The comment will be added to the inventory adjustment record of the item affected by the disposition change.
Reason – Select the reason code from the drop-down list.
Disposition – From the drop-down list, select a disposition.
UOM – From the drop-down list, select the unit of measure.
Quantity – Enter the quantity to be adjusted. The quantity you enter must be less than or equal to the quantity listed.
|
Note: For items that require UINs, you cannot change the quantity or add any UINs to the adjustment. |
If you want to print an inventory adjustment report, click Print. See ”Print an Inventory Adjustment Report."
Click Save to save your changes. You can return to the adjustment later, make further changes prior to committing the adjustment.
Click Confirm to complete the adjustment and update stock on hand.
Click Save to return to the Inventory Adjustment List window.
You can print an inventory adjustment report from either the Inventory Adjustment List or Inventory Adjustment Detail window:
If you are printing the report from the Inventory Adjustment List window, first select the adjustments for which you want to print reports.
If you are printing the report from the Inventory Adjustment Detail window, the report printed is for the adjustment currently displayed.
To print the report, follow these steps:
Click Print. The Report Selection window opens.
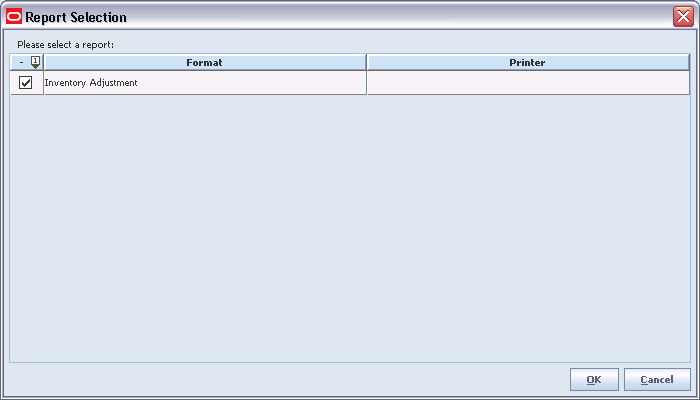
In the Printer field, double-click and select the printer or other output device for the report.
(See ”Print or View SIM Reports and Other Output” in Chapter 2 for general information about SIM report output.)
Click OK. You receive a message that the report was printed.
Click OK.