| Oracle® Retail Store Inventory Management User Guide Release 15.0 E64567-01 |
|

 Previous |
 Next |
Sequencing a store establishes an ordered list of locations in a store at which items can be stocked, and ordered lists of the items within each location. The list of locations is the macro sequence. Each list of items within a location is a micro sequence. These sequences allow you to identify all the locations of any item in the store.
Within each location, you can add and remove items or resequence the items at that location. You can add and remove items and locations as needed.You can build sequences by assigning items to locations, or by assigning locations to items.
Sequencing can improve the efficiency of store processes such as stock counts. You can use guided stock counts in which employees are guided in order through the locations and items, one after another.
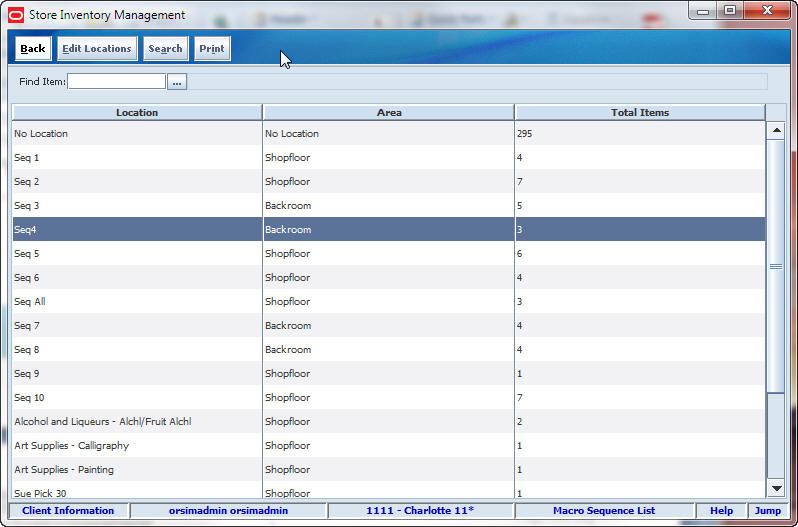
Macro Sequence List Window
Navigate: Main Menu > Inventory Mgmt > Sequencing. The Macro Sequence List window opens.
From the Macro Sequence List window, you can do the following:
From the Macro Sequence List window, click Back to return to the Inventory Management menu.
Use this procedure to add a new location in the store to the macro sequence of locations.
Navigate: Main Menu > Inventory Mgmt > Sequencing. The Macro Sequence List window opens.
To add a new location, follow these steps:
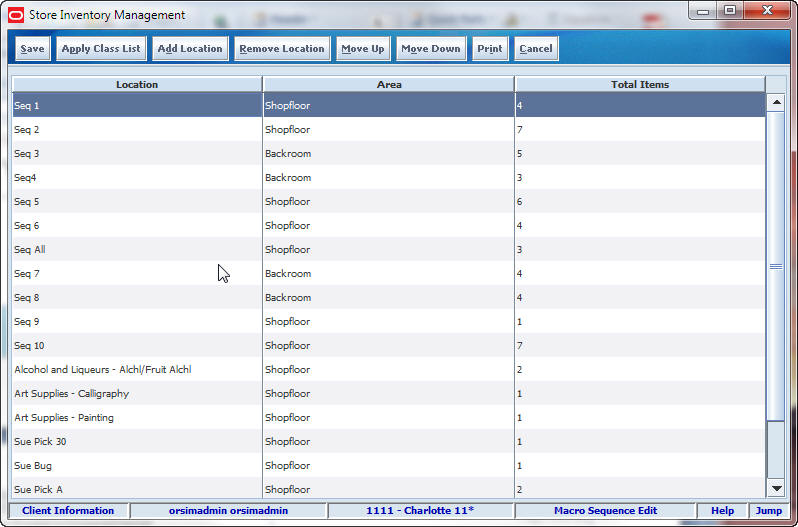
Click Edit Locations. The Macro Sequence Edit window opens.
Click Add Location. A new blank line is displayed at the bottom of the list.
Update the fields of the new line:
Location – Enter the name of the location that you want to add.
Area – Select Backroom or Shopfloor from the drop-down list.
Click Save to return to the Macro Sequence List window.
Use this procedure to change information about a location in the macro sequence.
Navigate: Main Menu > Inventory Mgmt > Sequencing. The Macro Sequence List window opens.
To edit information about a location, follow these steps:
Click Edit Locations. The Macro Sequence Edit window opens.
Select the location that you want to edit.
Perform one or more of the following actions.
Change the Area
In the Area field, select the value from the drop-down list.
Generate Locations for All Classes
If you generate locations for all classes, a new location is created for each item class, in alphabetical order, starting at the end of the existing location sequence. Every class will be a location. If a location already exists for a class, it will not be added.
Click Apply Class List. This message is displayed: ”Are you sure you want to generate locations for all classes?”
Click Yes. This message is displayed: ”Would you like to apply classes to the shopfloor or backroom?”
Click either Shopfloor or Backroom as the area to which you want to apply classes.
Change the Macro Sequence Order of a Location
Select the classes that you want to move.
Click Move Up or Move Down.
Click Save. Your changes are displayed in the Macro Sequence List window.
Use this procedure to delete locations from the macro sequence.
Navigate: Main Menu > Inventory Mgmt > Sequencing. The Macro Sequence List window opens.
To delete locations, follow these steps:
Click Edit Locations. The Macro Sequence Edit window opens.
Select the locations you want to delete.
Click Remove Location. A message is displayed: ”Are you sure you want to delete the selected locations now?”
Click Yes.
Click Save to return to the Macro Sequence List window.
Use this procedure to look up location details for an item. You can find the locations of items that have been sequenced, and you can also determine if an item has no location assigned yet.
Navigate: Main Menu > Inventory Mgmt > Sequencing. The Macro Sequence List window opens.
To look up location details for an item, follow these steps:
In the Find Item field, enter the item number for which you want to view location information, or click the Ellipsis button to look up an item.
In the Item Lookup window, locate the item you want and select it. Click Apply to return to the Macro Sequence List window. See ”Item Lookup”in Chapter 20 for more information.
Click Search. The Item Locations List window opens with location information displayed for the item.
In the Item Locations window, you can do the following:
Click Save to return to the Macro Sequence List window.
Use this procedure to add a new location for an item stocked at a particular location.
|
Note: You can also add a location for an item by first looking up an item, instead of selecting a location. See ”Look Up Location Details for an Item." |
Navigate: Main Menu > Inventory Mgmt > Sequencing. The Macro Sequence List window opens.
To add a new location for an item, follow these steps:
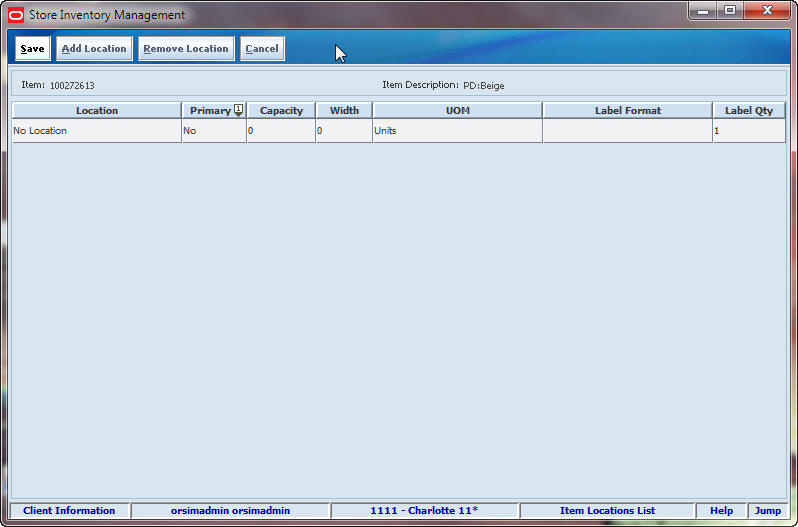
Double-click the location for which you want to view micro sequencing. The Micro Sequence List window opens.
Double-click the item for which you want to add another location. The Item Locations List window opens.
For each location you want to add, follow these steps:
Click Add Location. A new blank line is displayed at the bottom of the list.
Update the fields:
Location – Select a location from the drop-down list.
Primary – Select Yes if this is a primary location or No if this is a secondary location. You can have only one primary location for each item.
Capacity – Enter the quantity of the item that can fit on the shelf at this location.
Width – Enter the number of items that can fit horizontally across the shelf at this location.
UOM – Select Cases or Units from the drop-down list.
Label Format – Select the format of the shelf label from the drop-down list.
Label Qty – Enter the number of labels to print.
Click Save to return to the Micro Sequence List window.
Click Back to return to the Macro Sequence List window.
Use this procedure to update location information about an item in a particular location.
|
Note: You can also edit location information for an item by first looking up an item, instead of selecting a location. See ”Look Up Location Details for an Item." |
Navigate: Main Menu > Inventory Mgmt > Sequencing. The Macro Sequence List window opens.
To edit location information for an item, follow these steps:
Double-click the location for which you want to view micro sequencing. The Micro Sequence List window opens.
Double-click the item for which you want to edit location information. The Item Locations List window opens.
For each location you want to edit, update the fields as needed:
Primary – Select Yes if this is a primary location or No if this is a secondary location. You can have only one primary location for each item.
Capacity – Enter the quantity of the item that can fit on the shelf at this location.
Width – Enter the number of items that can fit horizontally across the shelf at this location.
UOM – Select Cases or Units from the drop-down list.
Label Format – Select the format of the shelf label from the drop-down list.
Label Qty – Enter the number of labels to print.
Click Save to return to the Micro Sequence List window.
Click Back to return to the Macro Sequence List window.
Use this procedure to delete one or more locations for an item at a particular location.
|
Note: You can also delete location information for an item by first looking up an item, instead of selecting a location. See ”Look Up Location Details for an Item." |
Navigate: Main Menu > Inventory Mgmt > Sequencing. The Macro Sequence List window opens.
To delete locations for an item, follow these steps:
Double-click the location for which you want to view micro sequencing. The Micro Sequence List window opens.
Double-click the item for which you want to delete locations. The Item Locations List window opens.
Select the locations you want to delete.
Click Remove Location. This message is displayed: ”Are you sure you want to delete the selected locations now?”
Click Yes.
Click Save to return to the Micro Sequence List window.
Click Back to return to the Macro Sequence List window.
Use this procedure to assign locations to items that have no locations assigned yet.
Navigate: Main Menu > Inventory Mgmt > Sequencing. The Macro Sequence List window opens.
To assign unassigned items to locations, follow these steps:
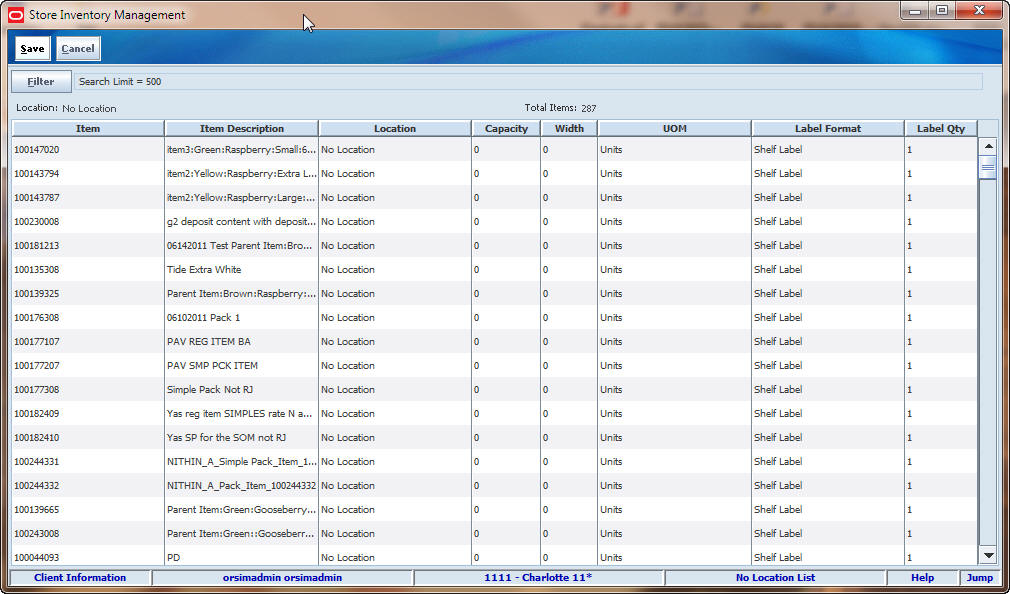
To view items that are not assigned to a location, double-click the No Location line. The No Location List window opens.
If you want to limit the items displayed in the list, click Filter. See ”Filter the No Location List” for more information.
Select an item that you want to assign to a location.
Update the fields:
Location – Select a location from the drop-down list.
Label Format – Select the kind of shelf label from the drop-down list.
Label Qty – Enter the number of labels to print.
Click Save to return to the Macro Sequence List window.
At any time while the No Location List window is open, click Filter to change how the list is filtered.
Current filtering is displayed next to the Filter button on the No Locations List window. If no filtering is displayed, all items are currently selected and listed.

To filter the items listed on the No Location List window, follow these steps:
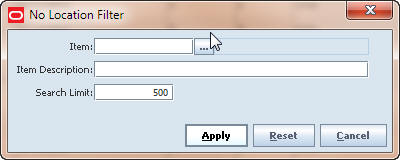
Click Filter. The No Location Filter window opens.
If you want to reset all filtering criteria to default values, click Reset.
Enter or select filtering criteria as needed to select just the items you want to list. All criteria are optional. If you leave a field blank, all values will be included in your filtering selection.
Item – Enter the item number or click the Ellipsis button to look up the item
In the Item Lookup window, locate the item you want and select it. Click Apply to return to the No Location Filter window. See ”Item Lookup” in Chapter 20 for more information.
Item Description – Enter an item description to select only the items with this description.
Enter a Search Limit value to limit the number of items displayed on the No Location List window. The default is 500.
Click Apply. The items you have specified are listed in the No Location List window.
Use this procedure to add an item to a particular location.
Navigate: Main Menu > Inventory Mgmt > Sequencing. The Macro Sequence List window opens.
To add an item to a location, follow these steps:
Double-click the location where you want to add an item. The Micro Sequence List window opens.
Click Edit Items. The Micro Sequence Edit window opens.
Click Add Item. A new blank line is displayed at the bottom of the list. Or click Scanner to scan the item. See ”Scan an Item (Scanner Button)” in Chapter 2 for more information.
Update the fields:
Item – Enter the item number or click the Ellipsis button to look up the item.
In the Item Lookup window, locate the item you want and select it. Click Apply to return to the Micro Sequence Edit window. See ”Item Lookup” in Chapter 20 for more information.
Capacity – Enter the quantity of the item that can fit on the shelf at this location.
Width – Enter the number of items that can fit horizontally across the shelf at this location.
UOM – From the drop-down list, select Units or Cases.
Label Format – Select the kind of shelf label from the drop-down list.
Label Qty – Enter the number of labels to print.
Click Save. The new item is displayed in the Micro Sequence List window.
Click Back to return to the Macro Sequence List window.
Use this procedure to edit location information about items at a particular location.
Navigate: Main Menu > Inventory Mgmt > Sequencing. The Macro Sequence List window opens.
To edit item location information, follow these steps:
Double-click the location for which you want to edit items. The Micro Sequence List window opens.
Click Edit Items.
If necessary, click Apply Item List to add all items associated with the class location.
|
Note: Items from the class are applied only if the location was created through the Apply Class List button on the Macro Sequence Edit Screen. See ”Edit a Location” for more information. |
Select the item, or click Scanner to scan the item. See ”Scan an Item (Scanner Button)” in Chapter 2 for more information.
For each item that you want to edit, change item or location information by updating these fields:
Capacity – Enter the quantity of the item that can fit on the shelf at this location.
Width – Enter the number of items that can fit horizontally across the shelf at this location.
UOM – From the drop-down list, select the unit of measure.
Label Format – Select the kind of shelf label from the drop-down list.
Label Qty – Enter the number of labels to print.
Multiple Locations – Select Yes if the item is sequenced in more than one location in the store. Select No if the item is sequenced in only one location.
To change the location of an item:
Select the item that you want to move.
Click Move Up or Move Down.
Click Save. Your changes are displayed on the Micro Sequence List window.
Click Back to return to the Macro Sequence List window.
Use this procedure to delete items from a particular location.
Navigate: Main Menu > Inventory Mgmt > Sequencing. The Macro Sequence List window opens.
To delete items, follow these steps:
Double-click the location from which you want to delete items. The Micro Sequence List window opens.
Click Remove Item. The Micro Sequence Edit window opens.
Select the items that you want to delete.
Click Delete. This message is displayed: ”Are you sure you want to delete the selected items now?”
Click Yes. The selected items are removed from the location list.
Click Save to return to the Micro Sequence List window.
Click Back to return to the Macro Sequence List window.
Use this procedure to print labels for one or more locations.
Navigate: Main Menu > Inventory Mgmt > Sequencing. The Macro Sequence List window opens.
To print labels, follow these steps:
Select one or more locations for which you want to print labels.
Click Print. This message is displayed: ”Are you sure you want to print shelf edge labels for all items in the locations selected?”
Click Yes. The labels are printed.