| Oracle® Retail Store Inventory Management User Guide Release 15.0 E64567-01 |
|

 Previous |
 Next |
You can use Shelf Replenishment to create lists in a variety of ways to efficiently replenish stock. This can be used in conjunction with sequencing to determine the shelf capacity, but is not required for all shelf replenishment types. Some lists may be configured to generate a list within day or at the end of the day to assist with determining the appropriate fill level.
There are four shelf replenishment types:
Adhoc — Replenishment need = handheld scanned units. Retail environment types include unstructured or unique shop floor format, easy to identify missing items, continuous manual inventory checking, no need to track backroom or shopfloor inventory, grocery store or mass merchant.
Capacity — Replenishment need = shopfloor capacity minus shopfloor inventory. Retail environment types include structures shop floor, static item assortment, multiple units per item on shopfloor, grocery store or mass merchant.
Display — Replenishment need = single style/diff item not scanned based on analysis of a product group. Retail environment types include unstructured or unique shop floor format, difficult to identify missing display items, display of single style/color item is very important, very large number of unique items in backroom, accessory fashion retailer.
Sales — Replenishment need = sold units. Retail environment types include unstructured or unique shop floor, dynamic or short lived item cycle, low unit count per item on shop floor, many unique items, or high-end fashion retailer.
Shelf Replenishment Window
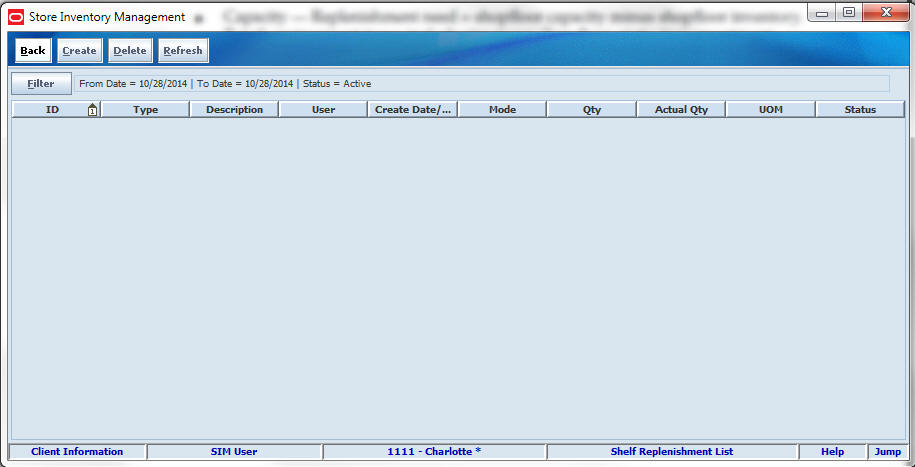
Navigate: Main Menu > Inventory Mgmt > Shelf Replenishment. The Shelf Replenishment List window opens.
From the Shelf Replenishment List window, you can do the following:
From the Shelf Replenishment List window, click Back to return to the Inventory Management menu.
At any time while the Shelf Replenishment List window is open, you can click Filter to change how the list is filtered.
Current filtering is displayed next to the Filter button. If no filtering is displayed, all pick lists are currently selected and listed.

To change how the list is filtered, follow these steps:
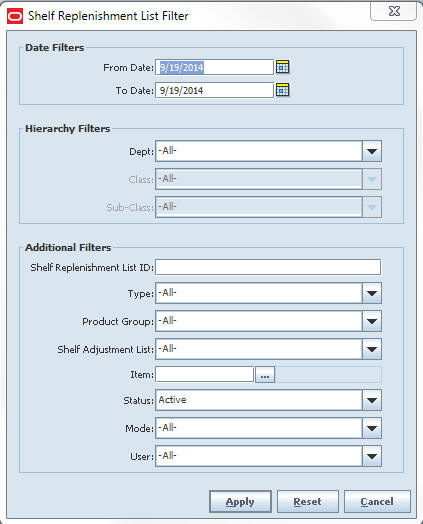
Click Filter. The Shelf Replenishment List Filter window opens.
If you want to reset all filtering criteria to default values, click Reset.
Enter or select filtering criteria as needed to select just the shelf replenishment lists you want to list. All criteria are optional. If you leave a field blank or select All, all values will be included in your filtering selection.
Date Filters – Enter or select dates to select only those shelf replenishment lists created between a From Date and To Date that you specify. The default values for the dates are the current date. If you do not want to search on the created date, clear these fields.
Hierarchy Filters – Select Department, Class, and Sub-Class to select only those items for a hierarchy that you specify.
Shelf Replenishment List ID – Enter the system-generated numeric identifier of the shelf replenishment list you want.
Product Group – Select a product group to list only the shelf replenishment lists for that product group.
Shelf Adjustment List — Select a Shelf Adjustment list from the drop-down list.
Item – Enter the item number or click the Ellipsis button to look up the Item ID.
In the Item Lookup window, locate and select the item you want. Click Apply to return to the Shelf Replenishment List Filter window. See ”Item Lookup” in Chapter 20 for more information.
Status – Select All, Active (default), Canceled, Completed, In Progress, New, Pending, or Altered from the drop-down list.
Mode – Select All (default), End of Day, or Within Day shelf replenishment.
User – Select a user from the drop-down list.
Click Apply. Results that match your search criteria are displayed in the Shelf Replenishment List window.
Use this function to create a shelf replenishment list. After you create the shelf replenishment list, SIM automatically generates the pick list based on SIM settings for shelf replenishment.
Navigate: Main Menu > Inventory Mgmt > Shelf Replenishment. The Shelf Replenishment List window opens.
To create a new shelf replenishment list, follow these steps:
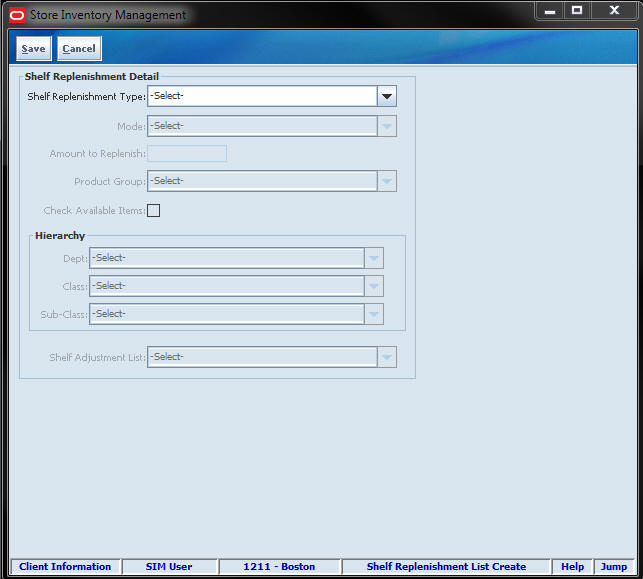
Click Create. The Shelf Replenishment List Create window opens.
Enter or select values for these fields:
Shelf Replenishment Type – From the drop-down list, select Adhoc, Capacity, Display, or Sales.
Mode – From the drop down list, select the mode for which you want to create a shelf replenishment, end of day or within day. For a within-day shelf replenishment list, SIM generates a shelf replenishment list with the number of cases that you have time to complete. For an end-of-day shelf replenishment list, SIM generates a shelf replenishment list for all items that need replenishing. This field is disabled for replenishment type of Ad Hoc or Display.
Amount to Replenish – Enter the number of cases/units to be replenished, based on the amount of labor available.
|
Note: This field is enabled only if the mode is Within Day. If the mode is End of Day, the amount is disabled. |
Product Group – From the drop-down list, select the product group for which you want to create a shelf replenishment list. This field is disabled when the Shelf Replenishment Type is Ad Hoc. When a Hierarchy Filter is selected for Replenishment Type Sales, this field is disabled.
Check Available Items – Select to check whether the items with quantity 0 or less would be considered for the list. This field is automatically checked and disabled for Display type.
Hierarchy Filters – Select Department, Class, and Sub-Class to select only those items for a hierarchy that you specify. This field is only available for Replenishment Type of Sales. If the user has selected a product group, this field is disabled.
Shelf Adjustment List – Select shelf adjustment list for Adhoc and Display list replenishment.
Click Save. A message is displayed: ”Are you sure you want to create the shelf replenishment list?”
Click Yes to create the shelf replenishment list and return to the Shelf Replenishment List window.
Shelf Replenishment List Processing
After you click Save, the replenishment calculation runs and SIM performs the following actions:
Adoc — Handheld is required to create a shelf adjustment list prior to creating the Shelf Replenishment List. Goods are moved only if more than the available quantity.
Capacity — Gross need units is the total capacity minus the shop floor quantity. The net need calculation uses the total capacity, max fill percentage and mode. The fill quantity is the net need or the total available, whichever is smaller.
Display — During high sales cycles, available stock is not displayed on the shop flooor. Handheld is required to create a display list by scanning the available goods.
Sales — Sales are reset at the end of the day and items sold from the backroom will show up on the replenishment list. New assortments must be replenished before the store opens.
Use this function to update the actual quantities replenished.
|
Note: You can edit quantities only when the shelf replenishment list status is Completed or In Progress. |
Navigate: Main Menu > Inventory Mgmt > Shelf Replenishment. The Shelf Replenishment List window opens.
To enter shelf replenishment list quantities, follow these steps:
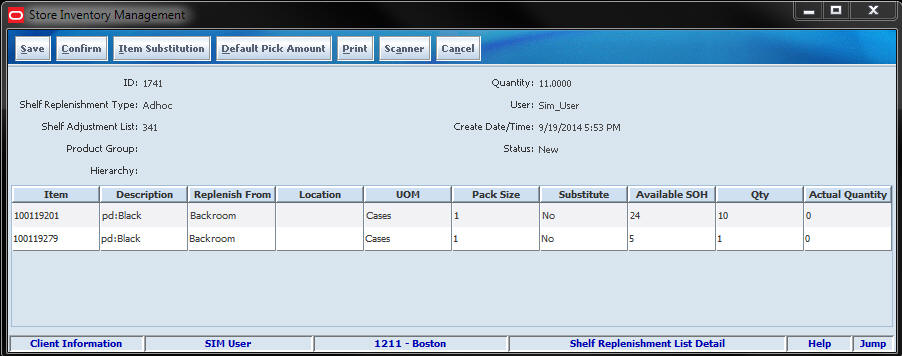
Double-click the shelf replenishment list for which you want to enter quantities. The Shelf Replenishment List Detail window opens.
Select Default Pick Amount to update the Actual Quantity field based on a suggested pick amount. This field is only defaulted if there is not a previous quantity in the field.
In the Actual Quantity field, enter the number of items that you replenished.
Click Save to return to the Shelf Replenishment List window.
Click Confirm to complete the shelf replenishment and return to the Shelf Replenishment List window.
Click Default Pick Amount to default the suggested pick amount into the Actual Quantity field if the amount is null.
If an item exists on the shelf replenishment, but no inventory can be found, if check available items is selected, an item can be substituted for a shelf replenishment.
Click Item Substitution. The Item Substitution popup window opens. All items listed fall under the same type as the item that is on the shelf replenishment.
If Item Lookup is available, search for an item to select and then click Add Item to add the item to the pick.
Enter the substitution, such as UOM or quantities.
Click Apply to add the item to the Shelf Replenishment Detail window with default the actual quantity to 1.
You can print a shelf replenishment list report to print a generated shelf replenishment list. You can use the report as a reference for the actual replenishing of items.
|
Note: When you print a pending shelf replenishment list, the system changes the status to Complete and updates inventory. |
Navigate: Main Menu > Inventory Mgmt > Shelf Replenishment. The Shelf Replenishment List window opens.
To print a shelf replenishment list report, follow these steps:
Double-click the shelf replenishment list that you want to print. The Shelf Replenishment List Detail window opens.
Click Print. A message is displayed: ”Are you sure you want to print the shelf replenishment lists?”
Click Yes. The Report Selection window opens.
In the Printer field, select the output device for the report.
Click OK. A message is displayed: ”Shelf Replenishment printed.” You are turned to the Shelf Replenishment List Detail window.
Click OK.
Click Save to return to the Shelf Replenishment List window.
|
Note: You can delete a Shelf Replenishment List only if its status is Pending. |
Navigate: Main Menu > Inventory Mgmt > Shelf Replenishment. The Shelf Replenishment List window opens.
To delete shelf replenishment lists, follow these steps:
Select the shelf replenishment lists that you want to delete.
Click Delete. A message is displayed: ”Are you sure you want to delete the selected shelf replenishment lists now?”
Click Yes. The selected shelf replenishment lists are deleted.