| Oracle® Retail Store Inventory Management User Guide Release 15.0 E64567-01 |
|

 Previous |
 Next |
Use the Ticketing functions to print shelf edge labels and item tickets for stock at the store. You can print tickets or labels for individual items as well as print groupings of item tickets within ticket batches. SIM will automatically generate tickets and labels when price changes, description changes or QR changes are made.
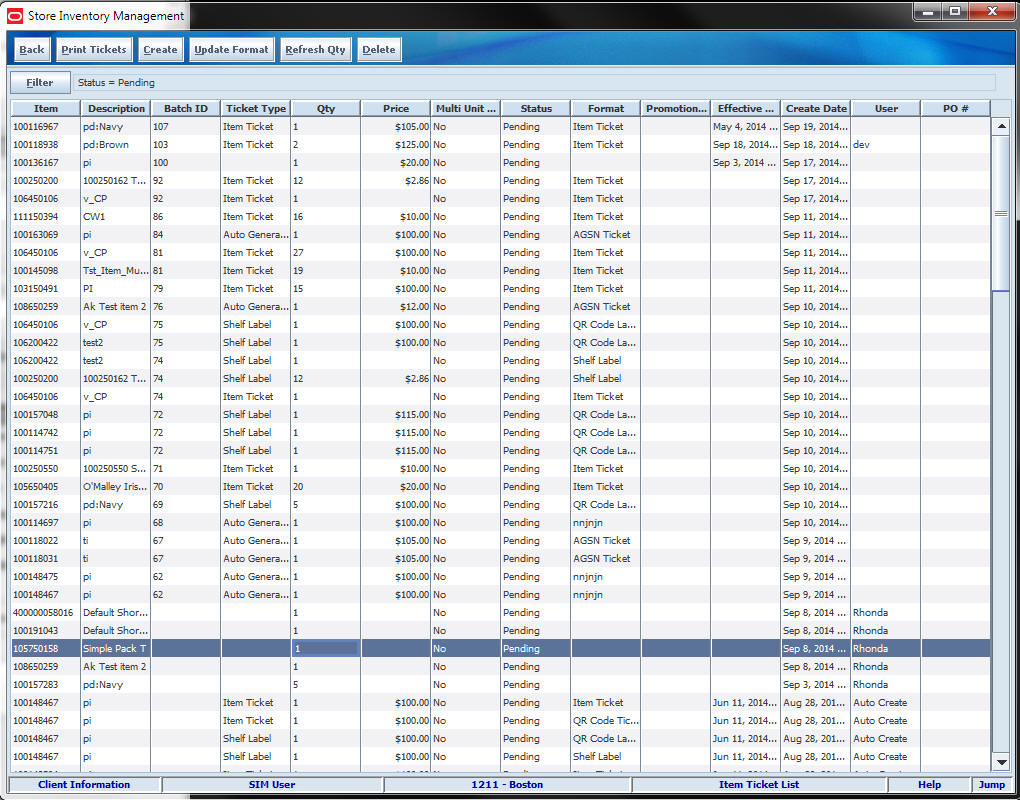
Item Ticket List Window
Navigate: Main Menu >Print > Item Ticket. The Item Ticket Filter window opens.
Enter search criteria to limit the item tickets you want displayed, and click Apply. (See ”Filter the Item Ticket List” for more information.) The Item Ticket List window opens.
From the Item Ticket List window, you can do the following:
From the Item Ticket List window, click Back to return to the Print Menu window.
The Item Ticket Filter window opens each time you click Item Ticket on the Print menu. At any time while the Item Ticket List window is open, click Filter to change how the list is filtered.
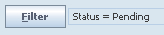
Current filtering is displayed next to the Filter button on the Item Ticket List window. If no filtering is displayed, all items are currently selected and listed.

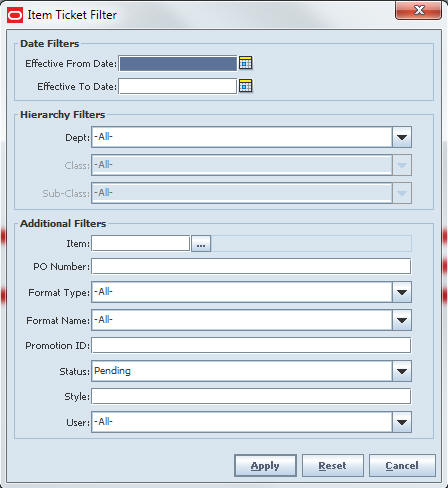
To filter the item tickets listed on the Item Ticket List window, follow these steps:
Click Filter. The Item Ticket Filter window opens.
If you want to reset all filtering criteria to default values, click Reset. By default, the Item Ticket List displays item tickets in Pending status.
Enter or select filtering criteria as needed to select just the item tickets you want to list. All criteria are optional. If you leave a field blank or select All, all values will be included in your filtering selection. The list results will be limited to the system configuration parameter. The default is set to a maximum of 500 records returned.
Date Filters – Enter or select dates to select only those tickets that have an effective date between an Effective From Date and Effective To Date that you specify.
Hierarchy Filters – Select Department, Class, and Sub-Class to select only those tickets for a hierarchy that you specify.
Item – Enter or select an item ID to select only those tickets for a particular item.
PO Number – Enter a purchase order ID to select only those tickets created from a particular purchase order.
Format Type – Select a format type to select only the tickets for a particular type, such as Auto Generate SN, Item Ticket, Shelf Label, or select All.
Format Name – Select a format name to select only the tickets for a particular format name. These names are client specific such as Regular Price Label, Everyday Low Price, QR Code Label, QA Code Ticket, or select All.
Promotion ID – Enter a promotion ID to select only the tickets created from a particular promotion ID.
Status – Enter the style (parent id) to return all transaction level children in tickets. The default value is blank.
Style - Enter the style (parent ID) to return all transaction level children in tickets. The default value is blank.
User – Select a user to return all tickets created by a specific user or select All. The default value is All.
Click Apply. The tickets you have specified are listed in the Item Ticket List window.
To print item tickets, follow these steps:
Enter search criteria to limit the item tickets you want displayed, and click Apply. (See ”Filter the Item Ticket List” for more information.) The Item Ticket List window opens.
|
Note: You can print tickets from either the Item Ticket List window, the Item Ticket Detail window, the Item Ticket Batch List window and the Item Ticket Batch Detail window:
|
Select the rows for the items for which you want to print tickets.
Click Print Tickets. The Printer Selection window opens.
Select the Printer from a drop-down list.
Click OK. A message is displayed to tell you the item tickets were printed.
|
Note: In addition to printing a label, the outgoing shipment may also need legal documentation, which may be provided by SIM or the manifesting system. |
Click OK to return to the Item Ticket List.
To create a new ticket, follow these steps:
In the Item Ticket List window, select Create. The Item Ticket Detail window opens.
|
Note: The user may also get to this screen through the Item Ticket Batch Detail window. |
To create a new ticket, see Step 2 in "Create Tickets" for the process and more information.
To update ticket information and print tickets, follow these steps:
In the Item Ticket List window, double-click the item you want to update. The Item Ticket Detail window opens.
|
Note: This window can also be accessed from the new Item Ticket Batch Detail window. |
Update the following fields as needed:
Format Name – Select the format you want to use, such as QR Code, Item Tickets Shelf Label.
Quantity – Enter the number of tickets or labels you want to print.
Override Ticket Price – Enter an override ticket price for the item.
Country of Manufacture – Select country of manufacture.
Select Auto Generate checkbox, if Format Type is Auto Generate and you want to generate serial numbers.
Select Select UIN if you want to select specific UINs to print. Do not select the Auto Generate check box if you want to select the UINs to print. This button is only available for the Format Type of Auto Generate SN. See "Select UINs" for the process and more information.
Select Ticket UDA if you want to add or remove additional information to print on a ticket. See "Additional Attributes Entry" for more information.
Click Print Tickets.
The Printer Selection window opens. Select a Printer.
Click OK. A message is displayed to tell you that the item tickets were printed.
Click OK.
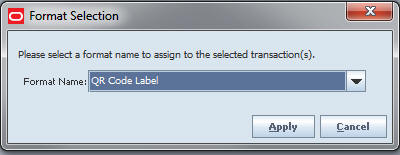
To update the format name assigned to a ticket, follow these steps:
Select one or more tickets.
Click Update Format. The Format Selection window opens.
Select a Format Name from the drop down list.
Click OK. A format is assigned for the tickets selected. You are returned to the Item Ticket List window.
To update ticket quantity based on the current stock on hand, follow these steps:
Select one or more tickets.
Click Refresh Qty.
Click Yes at the confirmation window.
To delete a ticket, follow these steps:
Select one or more tickets.
Click Delete.
Select Yes at the confirmation window. You are returned to the Item Ticket List window.
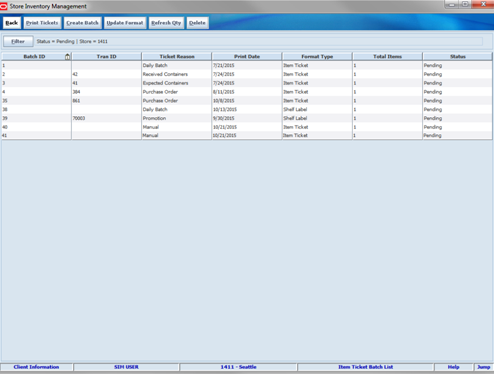
The window lists ticket batches generated in SIM by various methods.
From this window you can:
Filter the Item Ticket Batch List
Update Ticket Format
Refresh the Ticket Quantity
Navigate: Main Menu > Print > Item Ticket Batch. The Item Ticket Batch List window opens.
Fields include:
Batch ID – SIM-generated header level ticket ID
Tran ID – The ID of the transaction
Ticket Reason – Transaction type or event of the item that needs to be ticketed
Effective Date – Effective date of the event or transaction
Format Type – Type of format, such as item ticket, shelf label, or auto-generated SN
Total Items – Total number of items in the batch
Status – The state of the ticket batch
The Item Ticket Filter window opens each time you click Item Ticket on the Print menu. At any time while the Item Ticket List window is open, click Filter to change how the list is filtered.
Current filtering is displayed next to the Filter button on the Item Ticket List window. If no filtering is displayed, all items are currently selected and listed.
To filter the item tickets listed on the Item Ticket List window, follow these steps:
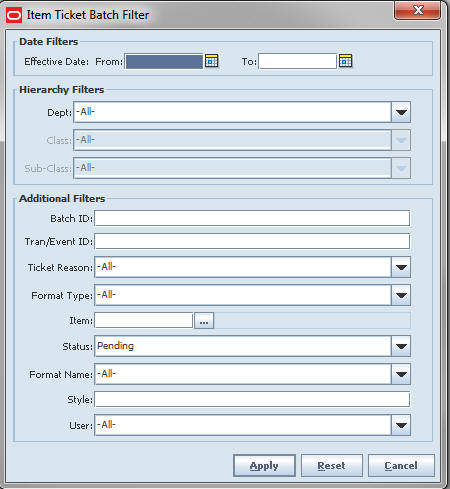
Click Filter. The Item Ticket Batch Filter window opens.
If you want to reset all filtering criteria to default values, click Reset. By default, the Item Ticket Batch List displays Ticket Batches in Pending status.
Enter or select filtering criteria as needed to select just the item tickets you want to list. All criteria are optional. If you leave a field blank or select All, all values will be included in your filtering selection.
Date Filters - Enter or select dates to select only those ticket batches that have an effective date between an Effective From Date and Effective To Date that you specify.
Hierarchy Filters - Select Department, Class, and Sub-Class to select only those ticket batches for a hierarchy that you specify.
Batch ID - Enter a Batch ID to select only a specific ticket batch.
Tran/Event ID - Enter a transaction or event id to select only those ticket batches for a particular transaction or event.
Ticket Reason - Enter or select a ticket reason to select only those ticket batches with a particular reason.
Format Type - Select a format type to select only the ticket batches for a particular type, such as Auto Generate SN, Item Ticket, Shelf Label, or select All.
Item - Enter or select an item ID to select only those ticket batches for a particular item.
Status - Select Canceled, Pending, Printed, or All. The default value is Pending.
Format Name - Select a format name to select only the ticket batches for a particular format name. These names are client specific such as Regular Price Label, Everyday Low Price, QR Code Label, QA Code Ticket, or select All.
Style - Enter the style (parent id) to return all transaction level children in ticket batches. The default value is blank.
User - Select a user to return all ticket batches created by a specific user or select All. The default value is All.
Click Apply. The ticket batches you have specified are listed in the Item Ticket Batch List window.
To print tickets, follow these steps:
Select one or more ticket batches.
Click Print Tickets. The Printer Selection window opens.
Select a Printer from the drop down list.
Click Apply. The tickets print and the window closes to return to the Item Ticket Batch List window.
To create a new ticket batch, follow these steps:
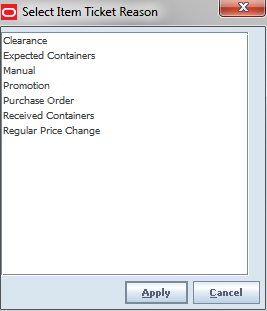
Click Create Batch. The Select Item Ticket Reason window opens.
Select a reason and click Apply. The Add Transaction window opens.
|
Note: If Manual is selected as a reason, the Item Ticket Batch Detail window opens. |
|
Note: The Add Transaction window may vary slightly, depending on the Item Ticket Reason selected. |
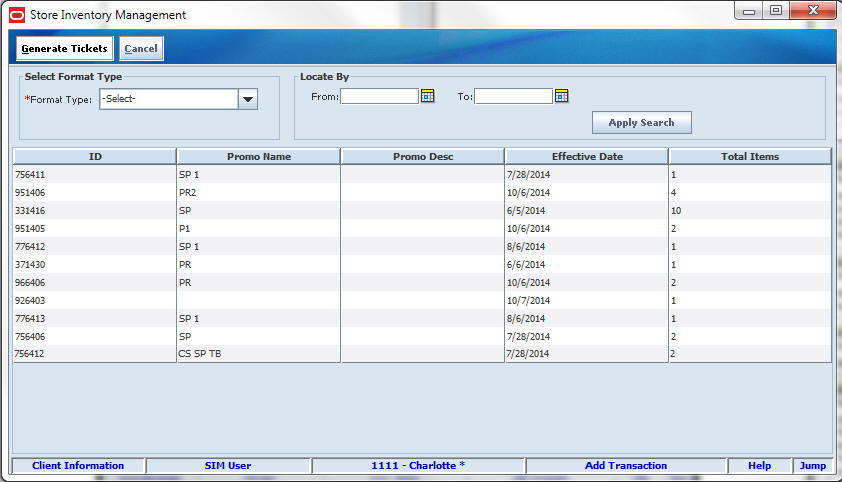
Select Format Type from drop down list.
Select a From and To Date.
Select a Transfer From location from the drop down list.
Click Apply Search.
Select one or more transactions.
Click Generate Tickets to create a new batch with this new ticket records based on the transactions selected.
Click Yes at the confirmation window. The Item Ticket Batch List window opens.
To update details for a ticket batch, follow these steps:
Navigate: Main Menu > Print > Item Ticket Batch. The Item Ticket Batch List window opens.
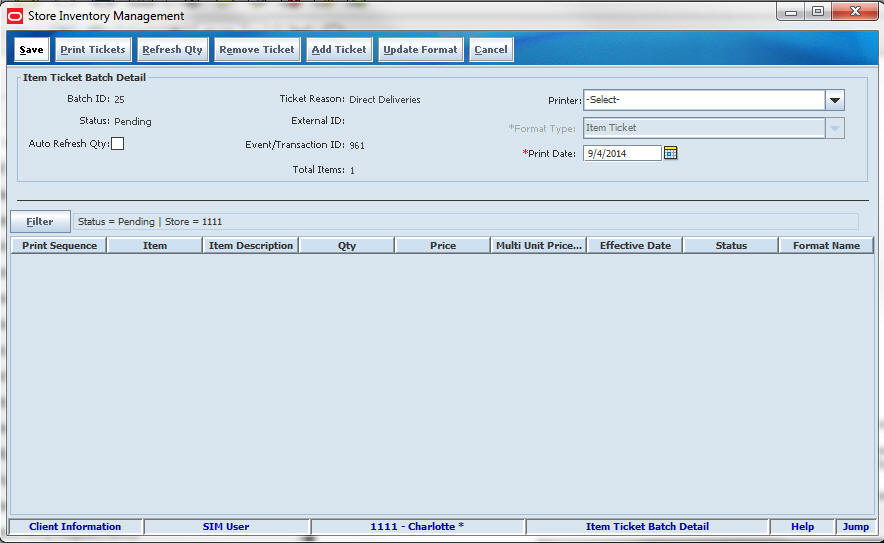
In the Item Ticket Batch List window, double-click the ticket batch you want to update. The Item Ticket Batch Detail window opens.
Update the following fields as needed:
Auto Refresh Qty - Select if you want the ticket quantity to refresh at the time of printing based on the current stock on hand.
Printer - Set the printer for the entire batch if desired, otherwise the printer will be selected when Print Tickets is selected.
Print Date - Enter a date the batch should be set to print.
Select Refresh Qty, if you want to update the ticket quantity based on current stock on hand, select the tickets to update.
Select Remove Ticket, if you want to remove one or more tickets from the batch, select the ticket to remove.
Select Add Ticket, if you want to add additional tickets to the batch. See "Item Ticket Detail" for more information.
To Update Tickets, double-click on a ticket to update it. See ”Update Tickets” for more information.
Select Update Format, if you want to update the format assigned to tickets in the batch. See "Update Ticket Format" for more information.
Select Print Tickets, you will need to select one or more tickets.
The Printer Selection window opens. Select a Printer.
Click OK. A message is displayed to tell you that the item tickets were printed.
Click OK to return to the Item Ticket Batch Detail.
To update a ticket format, follow these steps:
Select one or more tickets to update.
Click Update Format. The Format Selection window opens.
Select a Format Name from the drop down list.
Click OK. The format name is updated for the select tickets. You are returned to the Item Ticket Batch List window.
To update a ticket quantity, follow these steps:
Select a batch.
Click Refresh Qty.
Click Yes at the confirmation window.
To delete a ticket batch, follow these steps:
Select one or more batches.
Click Delete.
Select Yes at the confirmation screen. You are returned to the Item Ticket Batch List window.
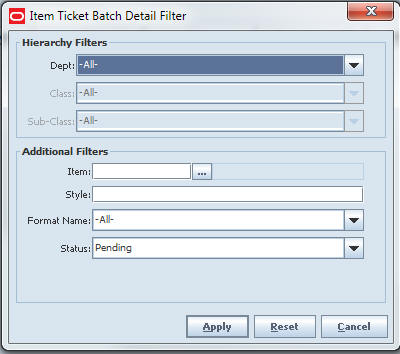
This window is accessed from the Create Batch window when the user selects Manual as a Select Item Ticket Reason.
To add detail to the item ticket batch:
Select a Printer from the drop down list.
Select a Ticket Type from the drop down list.
Enter a Print Date.
Select Auto Refresh Qty if the ticket quantity should be refreshed based on the current stock on hand when the ticket prints, if applicable.
Click Filter to filter the list. The Item Ticket Batch Filter window opens.
Select the Department from the drop down list.
Select the Class from the drop down list.
Select the Sub-Class from the drop down list.
Enter the Item or click Ellipses to search for the item to open the Item Lookup window.
Enter the Style.
Select the Format Name from the drop down list.
Select the Status from the drop down list.
Click Apply. The Item Ticket Batch Detail window opens.
Enter search criteria to limit the item tickets you want displayed, and click Apply. (See "Filter the Item Ticket List" for more information.) The Item Ticket List window opens.
Navigate: Main Menu > Print > Item Ticket. The Item Ticket Filter window opens.
|
Note: The user may also get to this screen through the Item Ticket Batch Detail window. |
To create a new item ticket, follow these steps:
Click Create. The Item Ticket Detail window opens.
In the Item field, enter the item number, or click the Ellipsis button to look up the item.
In the Item Lookup window, enter search criteria as needed to find the item you want. (See ”Item Lookup” in Chapter 20 for more information about item lookup criteria.) Select the item you want and click Apply to return to the Item Request Detail window. Or click Scanner to scan the item. See ”Scan an Item (Scanner Button)” in Chapter 2 for more information.
From the Format Type drop-down list, select Auto Generate SN, Shelf Label, or Item Ticket.
From the Format Name drop-down list, select the format you want to use, such as QR Code, Item Tickets, Shelf Label.
Select Auto Generate check box, if Format Type is Auto Generate SN and you want to generate serial numbers.
In the Quantity field, enter the number of labels or tickets you want to print.
If there is an override price for the item, enter the override price to be printed on the labels or tickets in the Override Ticket Price field.
Select the Country of Manufacture from the drop-down list.
Click Save to save your changes and return to the Item Ticket List window.
Click Select UIN if you want to select specific UINs to print. Do not select the Auto Generate check box if you want to select the UINs to print. This button is only available for the Format Type of Auto Generate SN. See "Select UINs" for the process and more information.
Click Remove UIN if you want to select a specific UIN to delete. See "Select UINs" for the process and more information.
Click Ticket UDA if you want to add or remove additional information to print on a ticket. See "Additional Attributes Entry" for more information.
To print labels or tickets for this item, click Print Tickets. The Printer Selection window opens.
- Select the Printer from a drop-down list.
- Click OK. A message is displayed to tell you that the item tickets were printed.
Click OK.
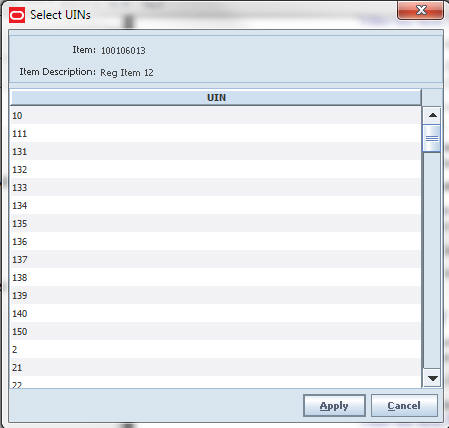
To select a UIN for an item, follow these steps:
If an auto generate number is not selected, or if automatic generation of serial numbers is not allowed for this item, click Select UIN. The Select UINs window opens.
|
Note: The user may also get to this screen through the Select UIN button or the Remove UIN button. |
Select the UINs for which you want to print tickets.
Click Apply. The selected UINs are listed in the Selected UINs list of the Item Ticket Detail window.
To remove UINs from the Selected UINs list, select the UINs and click Remove UIN.
To enter additional item attributes, follow these steps:
After clicking Ticket UDA in the Item Ticket Detail window, the Additional Attributes Entry window opens.
In the Attribute Name field, enter the attribute name.
In the Attribute Value field, enter the attribute value.
Click Add Attributes. The additional attribute field is populated with the information.
Repeat the steps to add additional attributes.
Click Remove Attributes after one or more items are selected to remove the attribute, if applicable.
Click Apply to save your changes and return to the Item Ticket Detail window. The updated attributes display in the Additional Information area.
For items that use automatically generated serial numbers (AGSN), you can either select the serial numbers for which you want to print tickets, or you can generate the serial numbers when the tickets are printed if it is allowed for the item.
|
Note: This function allows printing of tickets only for items that use AGSNs internally generated by SIM. This function does not allow printing of tickets for serial numbers or other unique identifiers created outside of SIM. |
To print tickets that contain AGSNs, follow these steps:
Double-click on an item in the Item Ticket List window. The Item Ticket Detail window opens. Or click Scanner to scan the item. See ”Scan an Item (Scanner Button)” in Chapter 2 for more information.
Select or enter values for the fields that are enabled.
Label Type - Select Item Auto Generate SN, Ticket, or Shelf Label.
Format - Select the format you want to use.
Auto Generate - If the item allows for automatic generation of serial numbers at printing, and you want to generate serial numbers, select this check box. If you want to select specific UINs to print, do not select this check box.
Quantity - Enter the number of tickets or labels you want to print.
Override Ticket Price - Enter an override ticket price for the item.
Country of Manufacture - Select country of manufacture.
Click Print Tickets.
A message is displayed to tell you that the item tickets were printed.
Click OK. You return to the Item Ticket List window.
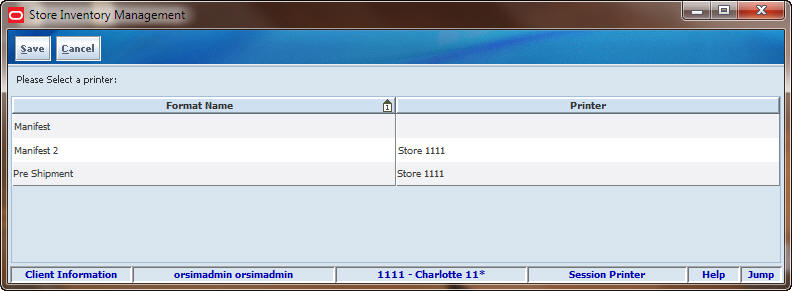
SIM can be setup to automatically print a manifest or pre-shipment ticket or label to a printer at another location.
Navigate: Main Menu > Print > Session Printer. The Session Printer window opens.
To change the printer location, select an location from the Printer drop-down list.
Click Save to save your changes and return to the Print Setup window.
SIM uses Oracle BI Publisher as the interface for SIM reports. SIM reports are custom-designed by your own organization. The BI Publisher interface is also customized to organize and present the reports available to SIM users.
Access SIM Reports
Navigate: Main Menu > Print > Reports. Oracle BI Publisher opens in your Web browser.
In SIM, the main menu remains displayed. You can use Oracle BI Publisher in your Web browser to view reports, and you can also continue to use SIM to perform other tasks.
For More Information
For information about using Oracle BI Publisher, see the Oracle Business Intelligence Publisher User's Guide.
The Oracle Retail Store Inventory Management Implementation Guide provides more information about reports for SIM system implementers and administrators.