| Oracle® Retail Warehouse Management System Radio Frequency User Guide Release 15.0 E66770-01 |
|


 Previous |
 Next |
| Oracle® Retail Warehouse Management System Radio Frequency User Guide Release 15.0 E66770-01 |
|
Previous |
Next |
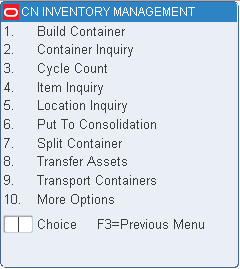
The RF Inventory Management module allows you to perform processes outside the normal picking and shipping processes. This includes activities such as: build containers (pallets), check the contents of a container or pallet, perform cycle counts, mark locations for cycle counts, move containers from receiving to shipping or internal picking locations, put away container/pallets to storage, confirm returns shipment, return containers to stock, store reassignment of outbound containers, and manage forward pick locations, and so forth.
From the Main Menu select Inventory Management. The Inventory Management main menu opens.
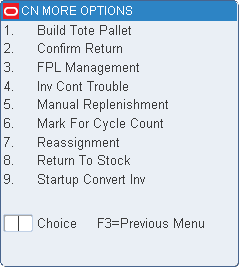
To view additional options available, select More Options from the Inventory Management main menu.
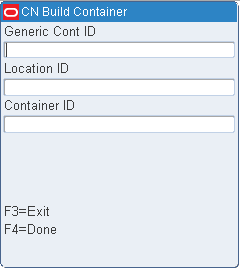
The Build Container (pallet) function allows you to build pallets of containers with same item and destination. You can exit the Build Container process at any time by pressing the F3 (Exit) key and return later to add more valid containers to the existing pallet.
The build container function also allows the contents of one pallet to be combined with the contents of another pallet for the purpose of consolidating pallets in the shipping area.
The following constraints apply to this functionality:
Both pallets must either be bulk or have no child labels; or both pallets must have cartons with child labels. It is not possible to mix a pallet with child labels with another pallet that has no child labels.
Both pallets must be distributed (this functionality applies only to outbound merchandise).
If the same item exists on both pallets, it must be the same case pack size. In addition, perishable items must have the same best before dates.
Both pallet must be destined for the same destination (for example, same store or same distribution center) and be routed on the same carrier/service/route.
All restrictions for Building Containers in receiving also apply to Building Containers in shipping.
|
Note: Once containers are added to a generic container ID (pallet), any movement through the system of that container will move all associated child containers. |
On the Main Menu screen, select Inventory Management. On the Inventory Management Menu screen, select Build Container. The Build Container screen opens.
In the Generic Cont ID field, scan or enter the ID of the generic container.
|
Note: If you scan any children from an existing pallet, the ID of the master pallet is displayed. |
In the Location ID field, scan or enter your current location.
|
Note: The location is displayed automatically if the container already exists. |
In the Container ID field, scan or enter the container ID being added to the generic container. This container must be valid on the system. An Information screen pops up, verifying the successful operation.
Most RF guns have an implied Enter after the container ID is scanned.
To continue adding containers to this pallet, repeat this step.
[Optional] Press the F4 (Done) key.
|
Note: If the F4 (Done) key is pressed when there is no container ID added, an error message is displayed. The F4 (Done) key must be used if there is no implied Enter occurring in the process of scanning a container ID being built. |
Press the F3 (Exit) key to exit the screen.
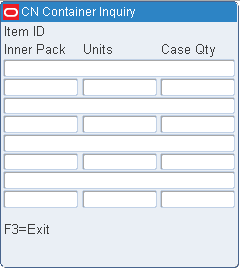
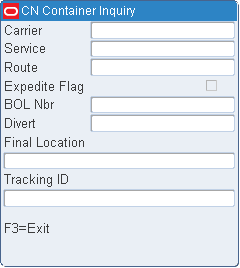
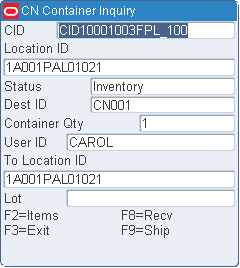
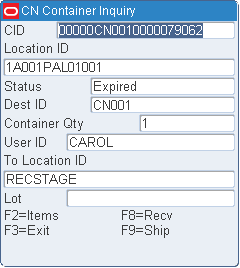
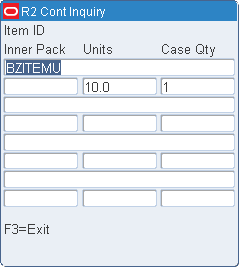
The Container Inquiry screen allows you to scan containers throughout the DC to view container details such as current location, current inventory status, final destination, container quantity, and user who created the container. The Items function key shows you the item ID, inner pack and casepack of the container. The Ship and Recv function keys display shipping and receiving information for the queried container.
On the Main Menu screen, select Inventory Management. On the Inventory Management Menu screen, select Cont Inquiry. The Cont Inquiry screen opens.
On the Cont Inquiry screen, enter the ID of the container to be investigated in the Container ID field. Press the Enter key to display the details.
Cycle counting is the process of counting the physical inventory in reserve (storage), Forward Case Picking (FCP), or Less Than Case (LTC) locations and comparing it to the system count. The frequency for counting an item is determined by the cycle count plan defined in the item master or value set in the cycle_count_period SCP parameter is taken as default. RWMS randomly selects locations for counting daily based on the number of uncounted locations and the number of days remaining in the cycle count period. Normal operations at the distribution center are not affected by the system-selected, cycle counting process.
RWMS supports four types of cycle counts:
System Selected based on random selection algorithm.
System Selected based on user selection.
Manual Marked which is marked manually when there is an inventory problem.
Audit Count which is system generated when SS or MM count is outside the defined tolerance levels.
Cycle counting can be interleaved with the putaway functionality to optimize productivity.
While cycle counting a location that includes a container that has not been picked and the Pick Not After Date has passed, you may see a message in a pop-up screen that states "Cycle count to 0." This occurs when the status of the container is set to Expired (X).
Manual marking renders all items in the marked location as unavailable.
When you select cycle counting from the menu, the system first checks for the security level associated with you. If you have sufficient privileges, RWMS allows you to perform the cycle count process.
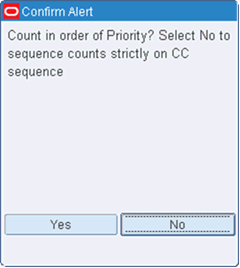
Upon starting cycle counting you need to choose whether you want to Cycle Count by Priority or by Cycle Count (CC) sequence.
Cycle Counting by Priority means that the highest Priority locations are presented first for counting. Priority is determined by the Cycle Count Status and Audit Count Required indicators. The Cycle Count Status must be MM or SS and the Audit Count Required must be Yes (Y) or No (N) for a location to be included during a cycle count. The priorities are as follows:
Location with Cycle Count Status = MM and Audit Count Required = Y are given the highest priority. Hence locations with this combination are presented for counting first. You must count all locations with Cycle Count Status = MM and Audit Count Required = Y combination.
Locations with Cycle Count Status = MM and Audit Count Required = N are the second or next priority. These locations are presented for counting after locations with Cycle Count Status = MM and Audit Count Required = Y are counted. You must count all locations with Cycle Count Status = MM and Audit Count Required = N combination.
Locations with Cycle Count Status = SS are given the third or last priority. These locations are presented after locations with Cycle Count Status = MM and Audit Count Required = N are counted. You may skip a location or locations to count wherein you are taken back to the beginning of the Cycle Count Status = Y locations.
Cycle Counting by Cycle Count (CC) sequence means that locations with the lowest Location Cycle Count sequence number are presented for counting in sequence order. The locations are presented in Location Cycle Count sequence regardless of the Cycle Count Status.
|
Note: The locations presented for cycle counting depend on the privileges assigned to you. You may not have privileges to count any/all of the location Cycle Count Status combinations above. |
On the Main Menu screen, select Inventory Management. On the Inventory Management Menu screen, select Cycle Count. The Confirm Alert screen is displayed depending on the user privileges associated.
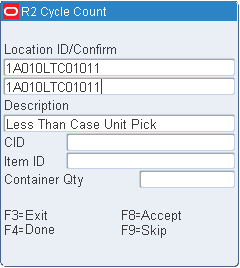
The Cycle Count screen displays the first location that is marked for cycle count. If the DISP_CC_TYPE attribute is applied to your user ID, the system displays the type of cycle count you are processing at the top of the screen. If this attribute is not applied, the cycle count type is not seen.
On the Cycle Count screen, enter the ID of the suggested or alternative unit pick location to be cycle counted in the Location ID/Confirm field.
|
Note: You can press the F9 (Skip) key in order to proceed to the next suggested location without processing the current location. The skipped location remains marked for cycle count. |
Press the Enter key to confirm the location and the Cycle Count details are displayed.
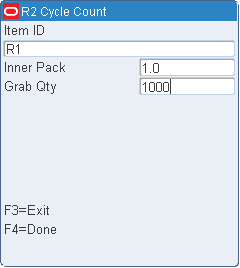
In the Item field, enter the ID of the first unique container. The number of units in an inner pack is displayed.
In the Grab Qty field, enter the number of grabs available. If the system displays a quantity mismatch error, count the number of grabs again and enter the quantity. The system requires two entries of the same quantity to successfully process the cycle count.
To accept an updated record:
Press the Enter key to save the item count. Enter the next item ID for the same location.
Press the F4 (Done) key to save the location count. The next location marked for cycle count opens.
The Cycle Count screen displays the first location that is marked for cycle count. If the DISP_CC_TYPE attribute is applied to your user id then the system will display the type of cycle count you are processing at the top of the screen. If this attribute is not applied you will not see the cycle count type.
On the Cycle Count screen, enter the ID of the suggested or alternative reserve location to be cycle counted in the Confirm field.
|
Note: You can press the F9 (Skip) key in order to proceed to the next suggested location without processing the current location. The skipped location remains marked for cycle count. |
Press the Enter key to confirm the location.
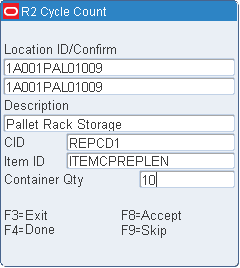
In the CID field, enter the ID of the first container.
In the Item field, enter the ID of the first unique item in the container.
In the Container Qty field, enter the number of containers on that pallet.
|
Note:
|
To accept an updated record:
Press the Enter key to save the item count. Enter the next item ID for the same container and location.
Press the F8 (Accept) key to save the container count. Enter the next container ID for the same location.
Press the F4 (Done) key to save the location count. The next location marked for cycle count opens.
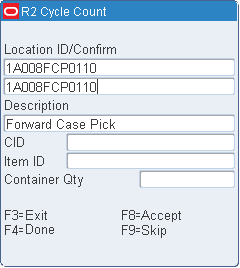
The Cycle Count screen displays the first location that is marked for cycle count. If the DISP CC TYPE attribute is applied to your user ID then the system displays the type of cycle count you are processing at the top of the screen. If this attribute is not applied, the cycle count type is not seen.
On the Cycle Count screen, enter the ID of the suggested or alternative case pick location to be cycle counted in the Confirm field.
|
Note: You can press the F9 (Skip) key in order to proceed to the next suggested location without processing the current location. The skipped location remains marked for cycle count. |
Press the Enter key to confirm the location and the Cycle Count (Detail) screen is displayed.
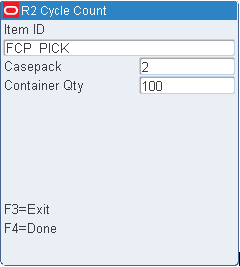
In the Item field, enter the ID of the first unique item. The number of units in a case pack opens.
In the Container Qty field, enter the number of containers available. If a warning opens regarding the quantity that you enter, enter the same quantity a second time. The system accepts the new quantity after the second entry.
To accept an updated record:
Press the Enter key to save the item count. Enter the next item ID for the same location.
Press the F4 (Done) key to save the location count. The next location marked for cycle count opens.
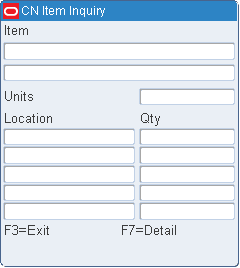
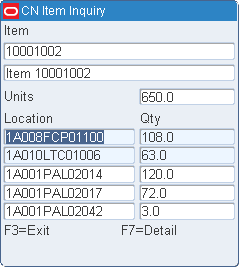
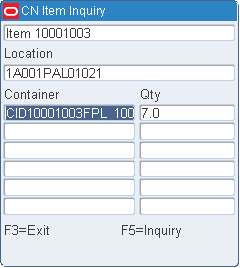
The Item Inquiry screen allows you to view the details of an item to provide better visibility of the inventory in the warehouse.
On the Main Menu screen, select Inventory Management. On the Inventory Management Menu screen, select Item Inquiry. The Item Inquiry screen opens.
On the Item Inquiry screen, enter or scan the Item ID in the Item field to display the item details on the screen.
To view additional information for the item in a particular location:
Select a location from the list and press F7 (Detail) key. The Item Inquiry screen is displayed with additional details.
Select a container from the list and press F5 (Inquiry) to view the details of the container. The Cont Inquiry screen opens.
Press F3 (Exit) key to return to the Inventory Management screen.
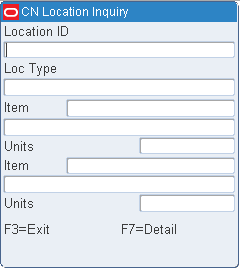
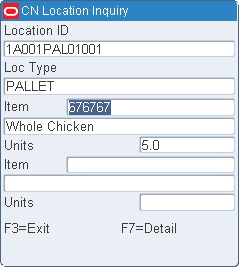
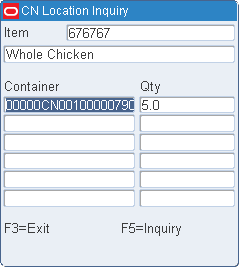
The Location Inquiry screen allows you to view the details of a location to provide better visibility of the inventory in the warehouse.
On the Main Menu screen, select Inventory Management. On the Inventory Management Menu screen, select Location Inquiry. The Location Inquiry screen opens.
On the Location Inquiry screen, enter or scan the Location ID in the Loc field to display the location details on the screen.
To view additional information for a particular item in the location:
Select an item from the list and press F7 (Detail) key. The Location Inquiry screen is displayed with additional details.
Select a container from the list and press F5 (Inquiry) to view the details of the container. The Cont Inquiry screen opens.
Press F3 (Exit) key to return to the Inventory Management screen.
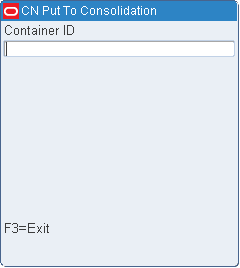
Consolidation allows the warehouse to consolidate the merchandise/containers requested on a single stock order (distro) into as few containers as possible. Fewer containers may reduce shipping costs for the order. Consolidation functionality is optional as indicated by the Consolidation flag on the Stock Order (Y or N). The cd_consolidate_flag SCP defaults the Stock Order Consolidate flag (Y or N). Consolidation can only occur if a Stock Order (distro) when picked has 2 or more containers. Consolidation only applies to consumer direct orders shipped directly to the customer.
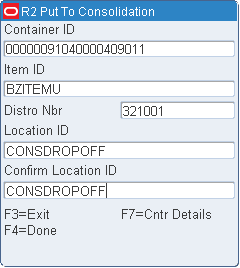
On the Main Menu screen, select Inventory Management. On the Inventory Management Menu screen, select Put to Consolidation. The Put to Consolidation screen opens.
On the Put to Consolidation screen, enter the container ID in the Container ID field. The location for the put to occur is displayed.
Confirm the location in the Confirm Location ID field.
Press F7 (Cntr Details) to view the details of the container.
Press F4 (Done) to consolidate the container.
Press F3 (Exit) to exit the Put to Consolidation screen.
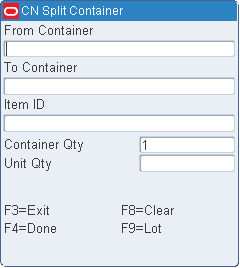
The Split Container screen allows you to split a container with more than one item ID into a new separate container. RWMS allows the user to split outbound containers, with the same destination ID, as well as received containers with undetected dye lot differences.
|
Note: If you attempt to split an item to a container that does not pass the product classification check, RWMS returns a hard stop message which says, ”Product Classification Error. Combining is not permitted.” |
On the Main Menu screen, select Inventory Management. On the Inventory Management Menu screen, select Split Container. The Split Container screen opens.
On the Split Container screen, enter the ID of the source container in the From Container field.
In the To Container field, enter the new container ID for the item.
In the Item field, enter the item ID that is to be moved to the new container.
In the Cont Qty field, enter the number of cases to be moved to the new container.
In the Unit Qty field, enter the number of units to be moved into the new container.
|
Note: The number of units must divide evenly into the container quantity. |
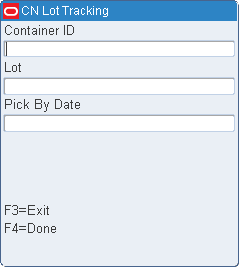
To associate the container with a dye lot:
Press the F9 (Lot) key. The ID of the new container is automatically filled in.
In the Lot field, enter the lot number provided by the manufacturer.
[Optional] In the Pick By Date field, enter the date that the item needs to be picked by.
Press the F4 (Done) key.
When prompted to acknowledge the action, press the Enter key.
Press the F4 (Done) key to save the new container. Enter the next container that you want to move an item into.
When done splitting the current container, press F8 (Clear) to clear all the fields or F3 (Exit) to exit the Split Container screen.
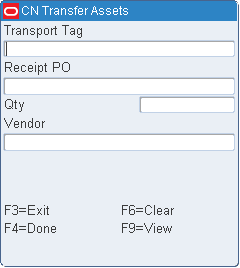
The RF Transfer Asset screen is used to send transport assets back to a vendor. When these assets are confirmed the system immediately reduces inventory in the distribution center and creates an inventory adjustment to upload record to the host.
On the Main Menu screen, select Inventory Management and then Transfer Assets. The Transfer Assets screen opens.
In the Transport Tag Filed, enter the transport item.
|
Note: Press the F9 (View) key to view a list of transport assets. |
In the Qty field, enter the quantity.
In the Vendor field, enter the vendor number.
|
Note: Press the F9 (View) key to view a list of vendors. |
Press the F4 (Done) key. The screen is cleared.
The Transport Containers screen move containers to their next destination as defined by the system. When a container/pallet is scanned the system determines if the container is supposed to be moved to shipping (crossdock), internal destinations (flowthrough), WIP processing, or reserve storage and directs you to the correct location. When using the transport screen you must consider the following system parameters, attributes, and conditions for clarity in your operation :
Override (System Control Parameter) and Override (User Attribute)
When the SCP Override is set to N and/or the user attribute Override is not applied, the Transport screen directs you to a specific storage location or hot replenishment location. It allows you to drop the pallet at a staging location but prevents the scanning of another storage location. When the pallet is scanned again in staging, the transport screen directs you to a specific location but not allow a different storage location to be selected.
When the SCP Override is set to Y and the user attribute Override is applied the Transport screen direct you to a specific storage location or hot replenishment location. It allows you to the pallet at a staging location or a different storage location. When the pallet is scanned again in staging, the transport screen directs them to a specific location but allow a different storage location to be selected if desired.
WIP Code
When you scan a container with only a WIP code, the transport screen displays the following message: CID has WIP, do you want to move to process area? Y or N.
If you select Y, the system displays the move screen and provide the location for WIP processing. If you override the location with a reserve location or staging location, then you must use WIP picking to get the container to the WIP processing area.
If you select N, the system directs you to a storage location or allow confirmation of a staging location. WIP picking must then be used to get the container to the WIP processing area.
Trouble Code
The transport screen first checks if the SCP parameter allow_trouble_putaway is set to Y or N. If it is set to Y then the transport screen displays the following message: CID has trouble. Do you want to Putaway? Y or N.
If you select Y, the system directs you to a valid storage location or allow drop-off at a valid staging location. You must also consider the Override SCP parameter and attribute to determine if you can override the suggested storage location.
If you select N, the transport screen displays the move screen and only allow valid staging locations to be scanned.
WIP and Trouble Codes
When you scan a container with a WIP Code and Trouble Code, the transport screen displays the following message: CID has WIP. Do you want to move to process area? Y or N.
If you select Y, the system displays the move screen and provide the location for WIP processing. You must confirm the processing location or a staging location but you are not allowed to confirm a storage location when Trouble Putaway parameter is set to N. If Trouble Putaway parameter is set to Y then you can confirm a storage location.
If you select N, the system displays the move screen and only allow a staging location to be scanned.
On the Main Menu screen, select Inventory Management. On the Inventory Management Menu screen, select Transport Containers. The Transport Containers screen opens.
Scan the container ID in the Container ID field.
If the scanned ID is a grandfather pallet ID and the receipt confirmation is already done, the system asks if you want to breakdown the pallets. If you select Yes, the FPR Pallet Breakdown screen opens. Refer to the Pallet Breakdown (Generic) section for more information.
If you select No, the system asks if you want to move the pallet. If Yes, depending on the final location of the container the Move screen or the Putaway screen opens.
Refer to the Move and Putaway sections for more information.
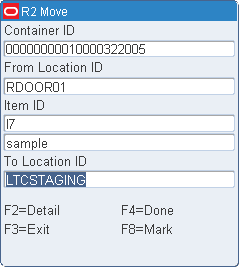
The Move function allows you to move merchandise between locations, view the contents of a container, and mark a location for cycle counts.
If you move a child container without moving the master/parent container, the child container is no longer associated with the master/parent container. The system updates the location and status of the child container when it is removed from the master/parent container. A labeled child container cannot be removed from a master container if, as a result of such an action, the unit quantity would be less than the distributed quantity.
On the Move screen, enter the ID of the container to be moved in the Container ID field. The first item ID and a suggested to-location are displayed.
In the To Location field, edit the suggested to-location as necessary.
If the scanned container ID is a master with sub-pallets the system informs you that sub-pallets exist and ask if you wish to continue. If you select Yes, the system only allows entry of a staging location since the sub-pallets still exist.
If you select No, the system takes you back to the Transport Container screen to scan a sub-pallet. The system alerts you that this is a child container and asks if you wish to continue. If you select Yes, the system directs you to the final destination of the container.
The Move screen is called from the Transport screen when a scanned container has a final destination other than reserve storage. The move screen directs the containers to shipping or flowthrough locations when containers are allocated upon receipt and also allows you to move merchandise from one storage location to another storage location.
If the container ID scanned is a master container with sub-pallets the system only allows you to move the master to a staging location. You must then scan each sub-pallet so the system can direct these container IDs to their final destination.
Press the F4 (Done) key.
When prompted to acknowledge the action, press the Enter key.
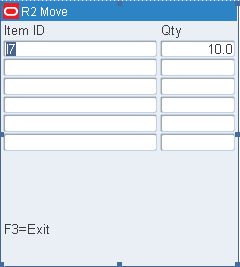
On the Move screen, press the F2 (Detail) key. The contents of the container are displayed on the Item ID screen.
Press the F3 (Exit) key to return to the Move screen.
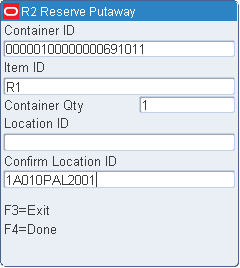
Putaway screen is called from the Transport screen when a scanned container has a final destination of reserve storage. The Putaway function directs you to valid storage locations based on defined putaway plans. The following transport methods are available:
Reserve putaway: Put away pallets or containers into storage locations
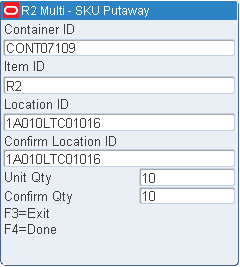
Multi-SKU putaway: Break down a single container that has multiple SKUs into Less Than Case (LTC) locations.
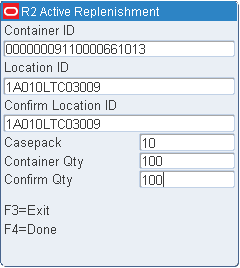
Active replenishment: Transport cases that have been picked for replenishment from a Forward Case Pick (FCP) location to a Less Than Case (LTC) location.
Replenishment: Transport cases or pallets that have been marked for replenishment during distribution or hot replenishment.
In the Confirm Location ID field, enter the ID of the location or enter an alternative putaway location. An alternate location may be entered if the system is set up to allow overrides. Valid alternate locations include all storage and staging locations.
Press the F4 (Done) key.
When prompted to acknowledge the action, press the Enter key.
If the container contains multiple SKUs, the Multi SKU Putaway screen opens.
In the Confirm Location ID field, enter the ID of the location.
In the Confirm Qty field, enter the number of units to be put away at the designated location.
Press the F4 (Done) key. You are directed to the next location until no containers remain on the pallet or the remaining items are not associated with a forward case location.
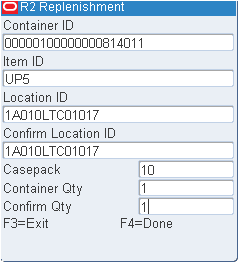
If the container is designated for active replenishment. The Active Replen screen opens.
In the Confirm Location field, enter the ID of the suggested location.
In the Confirm Qty field, enter the number of cases to be put away at the designated location.
Press the F4 (Done) key. You are directed to the next location until no containers remain on the pallet or the remaining items are not associated with a forward case location.
If the container has not previously been designated for replenishment, but the container is eligible for hot replenishment, you are prompted to create a hot replenishment. Enter N (No) if you want the system to suggest a storage location. Enter Y (Yes) if you want to continue with the hot replenishment. If you enter Y, the Replenishment screen opens.
In the Confirm Location field, enter the ID of the suggested location.
In the Confirm Qty field, enter the number of cases to be put away at the designated location.
If the quantity entered differs from the expected quantity, you are prompted to reenter the quantity. If the quantity is greater than the expected quantity, an error message appears.
If the quantity is less than expected quantity and the cases on the pallet are labeled, you are prompted to scan the label from each of the containers that you put away.
Press the F4 (Done) key. If the pallet is not empty, the Reserve Putaway screen opens. Locations are suggested for the remaining quantity.
On the Main Menu screen, select Inventory Management. On the Inventory Management Menu screen, select More options. The Inventory More options screen opens.
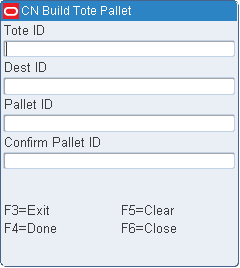
On the More Options screen, select Build Tote Pallet. The Build Tote Pallet screen opens.
On the Build Tote Pallet screen, enter the tote ID in the Tote ID field, destination ID in the Dest ID field, pallet ID in the Pallet ID field.
Confirm the pallet ID in the Confirm Pallet ID field.
Press F6 (Close) to close.
Press F4 (Done) when complete.
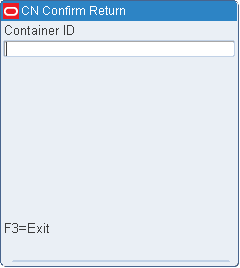
The Confirm Return screen is used when the DC wants to confirm an outbound return shipment. The return can be used for various reasons (damaged, expired, wrong item, etc).
On the More Options screen select Confirm Return screen opens.
On the Confirm Return screen, enter the container ID in the CID field and press the Enter key. If the container is past its pick date or marked for return or refusal, it is deleted from the system.
When prompted to acknowledge the action, press the Enter key.
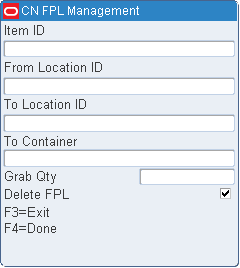
The Forward Pick Location Management option allows you to move inventory from one forward pick location to another or to a staging location without deactivating the forward pick location.
The following restrictions apply:
The items in the From Forward Pick Location must match the items in the To FPL, or the To FPL must be empty.
Inventory adjustments are sent to the host system.
The From Loc must be a forward pick location and the To Location must be another forward pick location, a staging location, or a new forward pick location.
On the Main Menu screen, select Inventory Management. On the Inventory Management Menu screen, select More options and on the Inventory More Options screen, select FPL Management. The FPL Management screen opens.
On the FPL Management screen, enter the ID or UPC of the item to be moved in the Item field.
In the From Loc field, enter the ID of the item's current location.
In the To Location field, enter the ID of the item's new location. The new location must be a staging location, another FPL, or create a new FPL here.
If the new location is a staging location, enter the ID of the new container in the To Container field. The container is not needed for a bulk item.
In the Grab Qty field, enter the number of items to be moved.
In the Delete FPL field, enter Y (Yes) or N (No) to indicate whether the From Location should be deleted.
|
Note: The Delete FPL field indicates whether or not the forward pick location must be deleted after all of the items are removed from the location. The Delete FPL field is controlled by the SCP delete_fpl. If the Delete FPL option is checked, the FPL will be deleted. You may override this option. However, if the Delete FPL option is not checked upon entering the screen, you cannot override the option. |
Press the F4 (Done) key.
Press the F3 (Exit) key to leave the Move FPL Inv screen.
You can mark a container as troubled if merchandise is damaged or other trouble is discovered.
On the Main Menu screen, select Inventory Management. On the Inventory Management Menu screen, select More options and on the Inventory More Options screen, select Inv Cont Trouble. The Inv Cont Trouble screen opens.
On the Inv Cont Trouble screen, enter ID of a troubled container in the Container ID field.
In the Enter Trouble Code field, enter the trouble code that you want to apply to the container.
To view a list of trouble codes, press the F9 (View) key. Select a trouble code from the list and press the Enter key. The Enter Trouble Code field is automatically filled in.
Press the F4 (Save) key.
When prompted to acknowledge the action, press the Enter key.
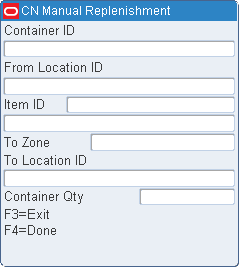
The Manual Replenishment screen allows you to select items from a storage location for manual replenishment. An Inventory Inquiry by item must be done using the existing RWMS screens to determine if the inventory is eligible before the replenishment. The inventory in the reserve location must be available, not have a trouble code, and not have an unfinished WIP Code.
On the Main Menu screen, select Inventory Management. On the Inventory Management Menu screen, select More options and on the Inventory More Options screen, select Manual Replen. The Manual Replen screen opens.
On the Manual Replen screen, enter the container ID in the Container ID field. The From Location, Item, and Description fields are automatically filled in.
|
Note: The Idem Id and Description will not be automatically filled if the container is a master container ID. |
In the To Zone field, enter the ID of the zone to pick to. The To Location field is automatically filled in with the forward pick location in the specified zone for the current item ID.
In the Cont Qty field, enter the number of containers to be moved to the designated location.
Press the F4 (Done) key to complete the move.
|
Note: The number of units on hand in the destination unit pick bin is incremented when the transaction is complete. Neither the inbound nor the distributed quantities are affected. |
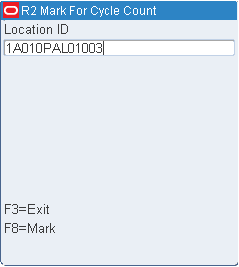
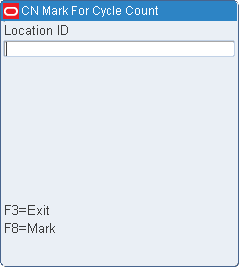
The Mark for Cycle Count screen permits you to manually mark locations for cycle counting.
On the Main Menu screen, select Inventory Management. On the Inventory Management Menu screen, select More options and on the Inventory More Options screen, select Mark for Cycle Cnt. The Mark for Cycle Cnt screen opens.
On the Mark for Cycle Cnt screen, enter the location ID in the Location ID field.
Press the F8 (Mark) key to manually mark the location for a cycle count.
|
Note: The error message ”Insufficient privilege to perform this operation” is displayed, if the privilege level is less than the current value of the mm_sec_level_rf. In other words the user should have the sufficient privilege to Mark Cycle count. |
When prompted to acknowledge the action, press the Enter key.
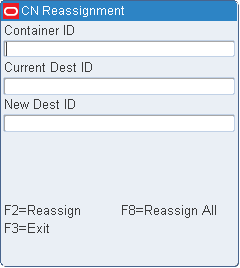
The Reassignment screen allows you to reassign containers placed in a Pack and Hold area to different outbound destinations. You may reassign a single container or all containers destined for a specific destination.
On the Main Menu screen, select Inventory Management. On the Inventory Management Menu screen, select More options and on the Inventory More Options screen, select Reassignment. The Reassignment screen opens.
On the Reassignment screen, enter the ID of the container to be reassigned in the Container ID field. The current destination opens.
In the New Dest ID field, enter the ID of the container's new destination.
Press the F2 (Reassign) key. The reassignment is saved and you can reassign another container.
Press the F3 (Exit) key to exit the Reassignment screen.
The Reassignment WIP code must first be applied to all the containers that are to be reassigned to a new destination. The containers must all be traveling to the same outbound destination.
On the Main Menu screen, select Inventory Management. On the Inventory Management Menu screen, select More options and on the Inventory More Options screen, select Reassignment. The Reassignment screen opens.
On the Reassignment screen, skip to the Current Dest ID field and enter the current destination for the group of containers.
In the New Dest ID field, enter the new destination ID to which the containers must be reassigned.
Press the F8 (Reassign All) key. The reassignments are saved and you can reassign another container or group of containers.
Press the F3 (Exit) key to exit the Reassignment screen.
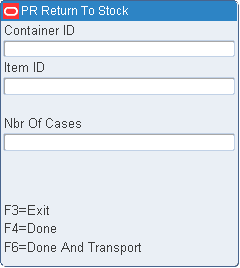
The Return to Stock screens allows you to delete the store assignment on an outbound container and return the container to an inventory state allowing the container to then be put to a reserve storage location.
On the Main Menu screen, select Inventory Management. On the Inventory Management Menu screen, select More options and on the Inventory More Options screen, select Return to Stock. The Return to Stock screen opens.
On the Return to Stock screen, enter the ID of the container to be returned to stock in the CID field.
If this screen is accessed using the F6 (Return to Stock) key on the Case Put to Store screen, the Container ID and Item ID fields are pre-populated.
|
Note: Master Containers with children are not eligible for stock return. |
Enter the Item ID in the Item ID field.
Enter the number of cases in the Nbr of Cases field.
If the quantity entered is different from the expected quantity, "Quantity mismatch, re-enter" message is displayed. Re-enter the quantity in the Nbr of Cases field. If the same value is entered again, the Reason Code choice pop up is displayed. Select the correct reason code from the list.
Press the F4 (Done) key. The container is returned to the DC inventory in its entirety and the container status is reset to Inventory (I).
|
Note: Use the Putaway screen to physically move the merchandise back to a reserve area. |
Press F6 (Done and Transport) to access the Transport Containers screen. For more information, see the Transport Containers section.
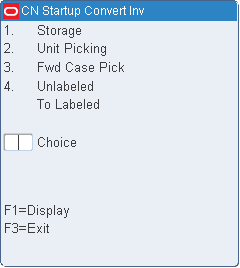
The Startup Convert screen allows you to convert existing inventory into RWMS inventory before the initial startup of the system. You can identify merchandise in reserve storage and forward pick locations, as well as convert unlabeled inventory to labeled inventory.
On the Main Menu screen, select Inventory Management. On the Inventory Management Menu screen, select More options and on the Inventory More Options screen, select Startup Convert. The Startup Convert Inv screen opens.
A system parameter, Labeled_Reserve, governs which Startup Convert Inv screen opens.
If Labeled_Reserve = N, you can view Item details through the use of the F2 (Detail) key.
If Labeled_Reserve = Y, then you can add child containers to a master container by using the F2 (Child) key.
On the Startup Convert Inv screen, enter 1 in the Choice field; then press the F1 (Display) key.
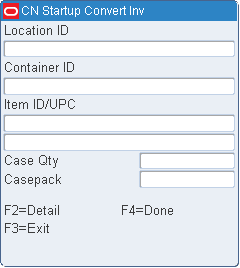
In the Location ID field, enter a valid location ID.
In the Container ID field, enter a container ID.
In the Item field, enter the item ID or UPC. The item ID/UPC must already be defined in the system.
In the Case Qty field, enter the number of cases associated with the container ID.
In the Casepack field, enter the number of units that make up a casepack.
[Optional] To view item details:
Press the F2 (Detail) key to view the details.
Press the F3 (Exit) key to return to the previous screen.
Press the F4 (Done) key to complete the conversion.
When prompted to confirm the request, enter Y; then press the Enter key.
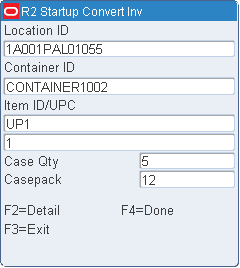
On the Startup Convert screen, enter 1 in the Choice field; then press the F1 (Display) key. The Startup Convert (Storage) screen opens.
In the Location ID field, enter a valid location ID.
In the Container ID field, enter the container ID.
In the Item field, enter the item ID or UPC. The item ID/UPC must already be defined in the system.
If prompted to enter a best before date and weight:
In the Best Before Date field, enter the expiration date.
In the Weight field, enter the weight of a standard unit.
In the Case Qty field, enter the number of cases holding the specified item and associated with the container ID.
In the Casepack field, enter the number of units that make up a casepack.
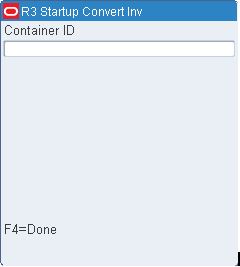
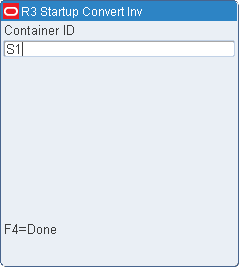
To add child containers:
Press the F2 (Detail) key. The Startup Convert (Child Container) screen opens.
In the Container ID field, enter the ID of the child container.
Press the Enter key to save the child container. Enter the next container for the same master container.
Or
Press the F4 (Done) key to save the child container and return to the previous screen.
Press the F4 (Done) key to complete the conversion.
When prompted to confirm the request, enter Y; then press the Enter key.
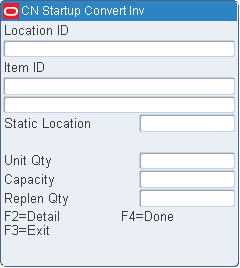
On the Startup Convert screen, enter 2 in the Choice field; then press the F1 (Display) key. The Startup Convert (Unit Picking) screen opens.
In the Location ID field, enter a valid location ID.
In the Item field, enter the item ID or UPC. The item ID/UPC must already be defined in the system.
In the Unit Qty field, enter the number of units to be moved into the location.
In the Capacity field, enter the maximum number of units the location can hold.
In the Replen Qty field, enter the number of units which would trigger reorder point replenishment.
[Optional] To view item details:
Press the F2 (Detail) key. The details are displayed.
Press the F3 (Exit) key to return to the Startup Convert (Unit Picking) screen.
Press the F4 (Done) key to complete the conversion.
When prompted to confirm the request, enter Y; then press the Enter key.
On the Startup Convert screen, enter 3 in the Choice field; then press the F1 (Display) key. The Startup Convert (Forward Case Picking) screen opens.
In the Location ID field, enter a valid location ID.
In the Item field, enter the item ID or UPC. The item ID/UPC must already be defined in the system.
In the Cntr Qty field, enter the number of cases to be moved into the location.
In the Capacity field, enter the maximum number of cases the location can hold.
In the Replen Qty field, enter the number of cases which would trigger reorder point replenishment.
[Optional] To view item details:
Press the F2 (Detail) key. The details are displayed.
Press the F3 (Exit) key to return to the Startup Convert (Forward Case Picking) screen.
Press the F4 (Done) key to complete the convert operation.
When prompted to confirm the request, enter Y; then press the Enter key.
On the Startup Convert screen, enter 4 in the Choice field; then press the F1 (Display) key. The Startup Convert (Unlabeled to Labeled) screen opens.
|
Note: The Labeled_Reserve parameter must be set to Y in order to use this feature. |
In the Location ID field, enter a valid location ID.
In the Container ID field, enter the ID of the container that is to be converted. The remaining details are automatically filled in.
To add child containers:
Press the F2 (Child) key. The Startup Convert (Child Container) screen opens.
In the Container ID field, enter the ID of the child container.
Press the Enter key to save the child container. Enter the next container for the same master container, or press the F4 (Done) key to save the child container and return to the previous screen.
Press the F4 (Done) key to complete the convert operation.
When prompted to confirm the request, enter Y; then press the Enter key.