| Oracle® Retail Warehouse Management System UI User Guide Release 15.0 E66766-01 |
|


 Previous |
 Next |
| Oracle® Retail Warehouse Management System UI User Guide Release 15.0 E66766-01 |
|
Previous |
Next |
When retailers or consumers return merchandise to the warehouse, a process must be in place to handle those returns. There are two basic steps for processing returns:
Receiving the merchandise into the DC
Processing the return with disposition codes
Business Process
The host system notifies RWMS of pending returns. You can view the pending returns order to gauge the number of returns that are expected to arrive on a particular date.When the merchandise is received it is moved to the returns area for processing.
Returned merchandise is processed at the item level. For Electronic Returns, the reason codes are pre-assigned and cannot be modified. For Paper Returns, you assign the reason codes during processing. Furthermore, the Disposition Code is assigned during processing. You may assign a WIP code using the link in the left column of the window.
Reason codes indicate why the merchandise was returned. Action codes indicate how the merchandise should be handled. For example, an item may be returned to inventory, replaced with another item, or returned to vendor. The disposition code indicates the status of the returned item. The merchandise in the container may be marked as saleable or non-saleable. When an item is marked as saleable, it must be moved from the original container to a saleable container.
This chapter contains the following topics:
The Electronic Return Processing Editor is used to process the containers returned against an RMA. When processing the return, you confirm the inventory in the returned container. Also, based on the state of the inventory (and/or special instructions/business practices), You can determine what needs to be done next with the returned goods.
From the main menu, select Returns > Electronic Return Processing. The Electronic Returns window opens.
Display Returned Containers
If any return details are displayed, click Clear.
Click Query.
Enter either the Container ID or RMA Nbr or both. You can use the LOV button to select the values.
|
Note: If you choose a valid RMA nbr, you can select any unprocessed container against the RMA by clicking the LOV button next to the Container ID field.If you select a container ID first, and this container does not have any RMA nbr associated with it, you are prompted to associate an RMA nbr with the container. If the container scanned has its Receipt Date past the expected delivery date of the RMA, a soft warning message displays. |
Click Search. The return details that match the criteria are displayed.
The detail block on the window is divided into two sections:
RMA Section: This section displays the details of the RMA selected. These details are irrespective of whether the items may have been processed on some other container. The section includes following information:
Select: This check box can be used to select one or more records for mass processing.
Line Nbr: The line number of the item on the RMA.
Item ID: The item present on the RMA.
Description: Description of the item.
Reason Code: Reason for returning an item, usually provided by the customer and downloaded into RWMS from OMS.
Expected Qty: The units of the item expected to be returned by the customer.
Processed Qty: The quantity processed as part of the returns so far, which is in turn added to RWMS inventory as either sellable or non-sellable, based on the disposition.
Container Section: this section displays the details of the container scanned in the header. This section also holds data temporarily for the session, even if the RMA is being processed into another container. The section includes following information:
Line Nbr: The line nbr of the item on the RMA.
Item ID: The item present on the RMA.
Unit Qty: Number of units processed into the container.
Disposition: State of the inventory after processing - can be either sellable or non-sellable.
Container ID: Container into which the item was processed.
Action Code: Action taken (or to be taken) on the line item for processing.
Reason Code: Reason for which the item was returned to the retailer.
Processed Date: Date when the return was processed in RWMS.
Comments: Comments added by you while processing the item.
Receive Container
You can return a new container by scanning a generic container ID with a mandatory RMA nbr. The container is assumed to be received at the location for the Return WIP. Once received, the container and its associated RMA nbr and other details are populated in the header block.
On the Electronic Return Processing window, click Receive Container. The Receive Container window opens.
Enter the container ID in the Container ID field.
Enter the RMA number in the RMA Nbr field or select from the LOV button.
Click Save.
Manage Instructions
If any instructions have been downloaded against the pending return (RMA), the Instructions link is enabled.
On the Electronic Return Processing window, click Instructions. Any instructions available are displayed
Process Item
This link is enabled only when the Select check boxes are clear.
On the Electronic Return Processing window, click the Process Item link. The Process Item window opens.
Enter the enabled fields:
Line Nbr/Item ID: Pre-populated details of the selected line number and item ID.
Unit Qty: You can enter a valid value to set the number of units of the item being processed.
Disposition: You can select the disposition of the inventory once processed - either sellable or non-sellable. This determines the status of the container into which the merchandise is processed - I or N, respectively. Two items cannot be added to the same container, if they are non-saleable but have a different disposition.
Description: Description of the selected disposition code.
Container ID: You can scan the return received container (only if the selected disposition is non-sellable). Or you can choose to scan a generic container to receive the merchandise as either non-sellable or sellable. In case you scan an existing I status container, it is not required to be the same RMA nbr. however, it is required that in the case of multiple items on the same container, each of the items should have a forward unit pick.
Reason Code: Pre-populated field with the reasons for the return downloaded from OMS. In the case of more than one reason, the word Multiple displays but you can click the LOV button next to the field to view all the individual reasons.
Action Code: You must select only one action code from the Action Code LOV button. It is mandatory and signifies the action taken (or to be taken) against the line item being processed. If the business chooses to have no action code, a dummy value such as NONE may be created for an action code, to be used whenever desired.
Comment: You can choose to enter free-form text as comments in this field.
Click Save. The records are processed and published to OMS using the RETURNS_UPLOAD table.
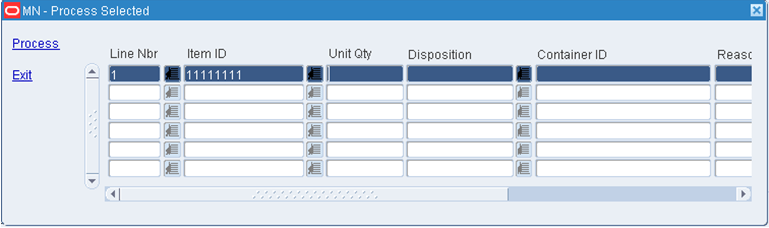
Process Selected
Select a minimum of one check box from the RMA block and click the Process Selected link to process all the selected items in a single instance.
The Process Selected window opens with all the selected details pre-populated.
Enter the unit quantity in the Unit Quantity field.
Select a disposition using the LOV button in the Disposition field.
Scan the container ID in the Container ID field.
Select the Reason Code, Action Code and insert a Comment.
Click Process.
Container Complete
On the Electronic Return Processing window, click Container Complete.
This signals completion of the processing of container, by an implicit processing of the Return WIP on the container. Once processed, the container can no longer be processed through the Paper Return Processing window.
Apply WIP Code
On the Electronic Return Processing window, click Apply WIP Code. The Apply WIP Code window opens with the container details pre-populated.
For more information, see Apply WIP Code.
Exit the Electronic Return Processing Window
Click Exit to close the window.
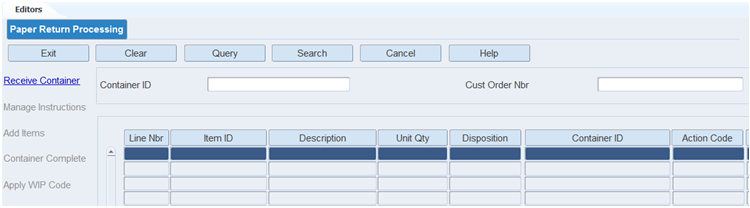
The Paper Returns Processing window is used to process container returns against a customer order number when an RMA number is not provided. The item and quantity details are not pre-populated in RWMS for a paper return. The Paper Returns processing window is used to enter the information for a paper return in RWMS and publish it to the Order Management System.
From the main menu, select Returns > Paper Return Processing. The Paper Return Processing window opens.
Display Returned Containers
If any return details are displayed, click Clear.
Click Query.
Enter either the Container ID or Cust Order Nbr or both. You can use the LOV button to select the values.
|
Note: If you scan a container ID, which has been received through the Return Receiving window but has neither a Customer Order Nbr nor an RMA Nbr associated with it, you are prompted to associate a customer order number with the container, when the container ID is scanned on the window. |
Click Search. The return details that match the criteria are displayed.
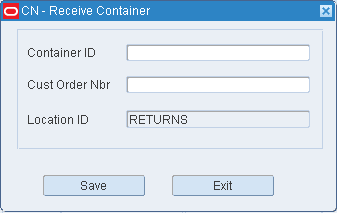
Receive Container
On the Paper Return Processing window, click Receive Container. The Receive Container window opens.
Enter the container ID in the Container ID field.
Enter the customer order number in the Cust Order Nbr field.
Click Save.
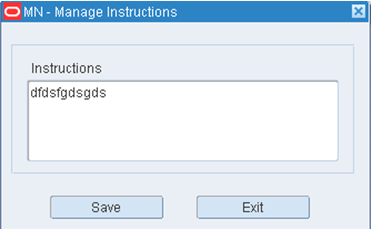
Manage Instructions
If any instructions have been downloaded against the pending return, the Instructions link is enabled.
On the Paper Return Processing window, click Instructions. Any instructions available are displayed
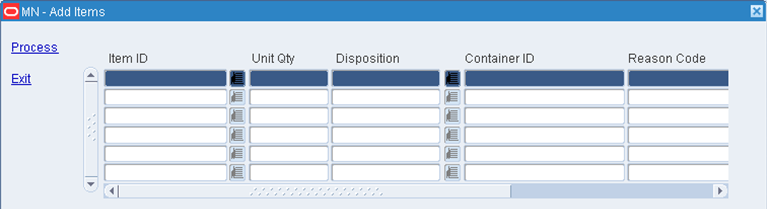
Add Items
On the Paper Return Processing window, click Add Items. The Add Items window opens.
Enter the following information:
Item ID: Scan any item ID present in RWMS. If the item has not been marked as Returnable in the item master, a warning message displays while adding the item on the window. The message can be overridden.
Unit Qty: Enter the unit quantity of the item to be processed against a certain disposition/reason/action code.
Disposition: Select a code which determines whether the item will be processed as Inventory or Non-saleable. Two items cannot be added to the same container, if they are non-saleable, but have different disposition.
Container ID: You must scan a container ID. It can either be the N status return received container for the same customer order number or a generic container. If you scan an existing I status container, it is not required to be of the same customer order number. However, it is required that in the case of multiple items on the same container, each of the items should have a forward unit picking location associated with it.
Reason Code: You can click the LOV button next to the field, and select one or more reason codes, which describe the reasons for the return of the line item.
Action Code: You must select only one action code from the LOV button. The Action Code is mandatory and signifies the action taken (or to be taken) against the line item being processed. If the business chooses to have no action code, a dummy value such as NONE may be created for an action code, to be used whenever desired.
Comment: You can choose to enter free-form text as comments in this field.
Click Process. The records are processed and published to OMS.
Click Exit to roll back the changes.
Container Complete
On the Paper Return Processing window, click Container Complete.
This signals completion of the processing of container, by an implicit processing of the Return WIP on the container. Once processed, the container can no longer be processed through the Paper Return Processing window.
Apply WIP Code
On the Paper Return Processing window, click Apply WIP Code. The Apply WIP Code window opens with the container details pre-populated.
For more information, see Apply WIP Code.
Exit the Paper Return Processing Window
Click Exit to close the window.
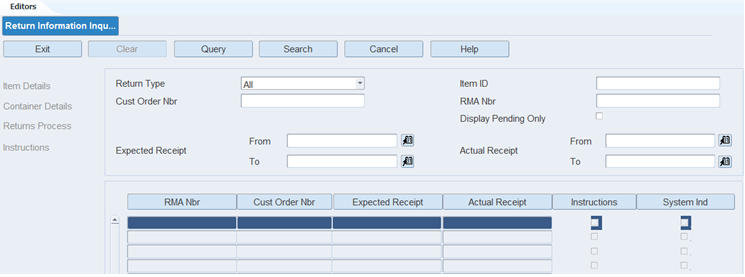
The Return Information Inquiry window shows the return details for both Electronic and Paper Returns. The window provides you with the ability to see returns in both pending and processed statuses.
From the main menu, select Returns > Return Information Inquiry. The Return Information Inquiry window opens.
Display All Returns
On the Return Information Inquiry window, click Search.
Display a Subset of Returns
On the Return Information Inquiry window, if any data displays click Clear.
Click Query.
Enter one or all the search criteria:
Return Type: From the drop-down list, you can select paper, Electronic, or All. The default is All.
Item ID: The resulting data displays all the RMAs/Cust Order Nbrs which include the entered Item ID. However, on querying for the details of the resulting RMAs/Cust Order Nbrs, all the items associated with the RMA/Cust Order Nbr are displayed.
Cust Order Nbr: You can enter partial or complete cust_order_nbr. This is validated with the existing cust_order_nbr records in the pending_returns table.
RMA Nbr: You can enter partial or complete RMA Nbr and query the data.
Display Pending Only (Check box): This check box is automatically selected unless Electronic is the selected Return Type. If the Display Pending Only field is selected, then only those RMA records are displayed which have at least one line item record where the expected unit quantity is greater than the processed unit quantity. If the field is clear, then all the records are displayed.
|
Note: This is specific to electronic returns only. For paper returns, such a scenario will never be encountered. |
Expected receipt:
From date
To date
To receipt:
From date
To date
Click Search. The details matching the selected criteria displays:
RMA Nbr: If the displayed record is for an electronic return, this field is populated. Otherwise, it is set to None.
Customer Order Nbr: If the displayed record is for a paper return, this field is populated. Otherwise, it is set to None.
Expected Receipt: The expected receipt date for the Return.
Actual Receipt: The date on which the last container was received for that return.
Instructions: The field is selected if there are any instructions for the return processing (which can be viewed through the Instructions link on the left toolbar of the window).
System Indicator: Selected for electronic returns.
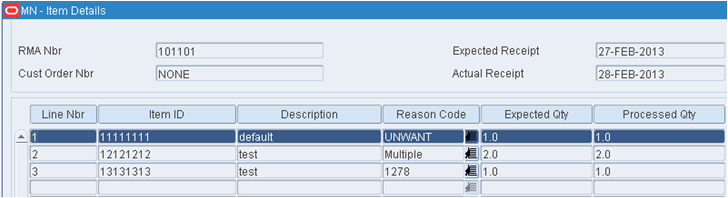
Item Detail
On the Return Information Inquiry window, click Item Details. The detailed information about all the items expected to be returned are displayed on the Item Detail window.
Following information displays:
Header block
RMA_nbr (populated for electronic returns, otherwise NONE)
Customer Order Number (populated for paper returns, otherwise NONE)
Expected and actual receipt
Detail block
Line Number: The sequence number of the item on the return.
Item ID: Item ID of the item on the return.
Description: Description of the item on the return.
Reason Code: Reason for the return of the item. If multiple reasons have been selected, the word Multiple displays. You can click the LOV button next to the reason code field to view all the reason codes associated with the item return.
Expected Unit Qty: The number of units of the item expected against the return.
Processed Unit Qty: The number of units of the item which have been processed in RWMS (either as non-saleable, or saleable) and are part of the DC's inventory (available or non-available).
Click Exit to close the window and return to the Return Information Inquiry window.
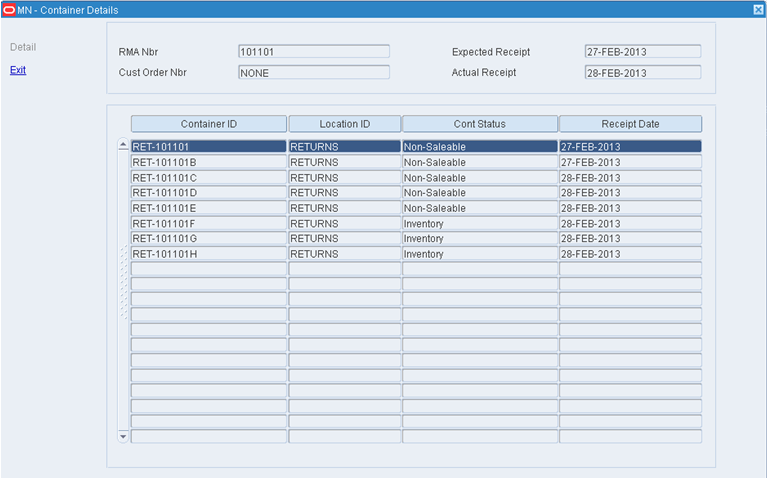
Container Detail
On the Return Information Inquiry window, click Container Details. The Container Details window opens with detailed information about all the containers (processed or non-processed) against the selected return.
The Container Details window has the following information:
Header block
RMA_nbr (populated for electronic returns, otherwise NONE)
Customer Order Number (populated for paper returns, otherwise NONE)
Expected and actual receipt
Detail block
Container ID: All of the container IDs associated with the selected return are displayed.
Location ID: Current location of the container.
Container Status: The current container status. It can either be Inventory or Non-saleable.
Receipt Date: The date the container was received at the return receiving window or in the case of an Inventory container, when the items were processed into a generic I status container.
You can view details of each container by using the Detail link on the window. This link is enabled only for containers which have at least one item associated to them through return processing. For containers which have no item associated with them, the link is disabled.
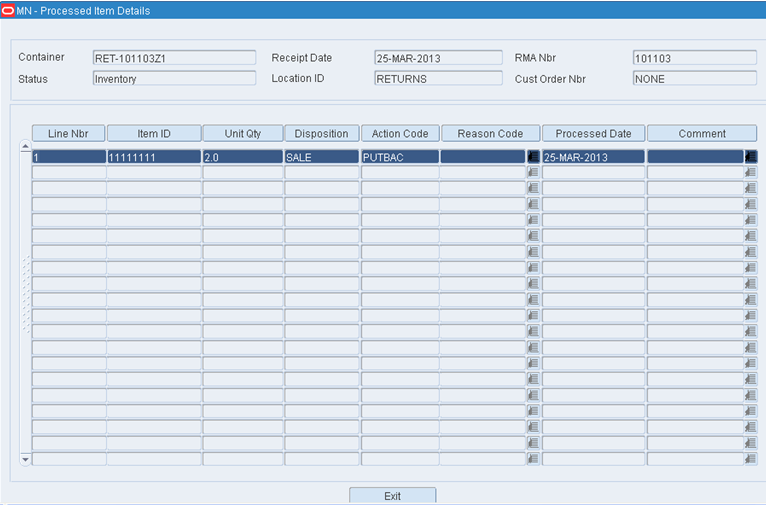
Select a container with item details associated with it, and click the Detail link. The Processed Item Details window opens with a header and detail block.
The header block has the following information:
Container: The selected container ID.
Status: Status of the container.
Receipt Date: Receipt date of the container.
Location ID: Current location of the container.
RMA_nbr/cust_order_nbr: RMA_nbr/cust_order_nbr against which the container was received/processed.
The detail block has the following information:
Line Nbr: The sequence number of the item on the selected return.
Item ID: This displays the items present in the selected container.
Unit Qty: Unit quantity of the item present in the container.
Disposition: Disposition of the inventory selected at the time of processing. If the container is in N status after processing, there can only be one disposition across items.
Action Code: Action code added to the line item record while processing the return. There can be multiple records for the same item on the container with different action codes.
Reason Code: Reason for the return of the item. If multiple reasons have been selected, the word Multiple displays. Click the LOV button next to the reason code field to view all the reason codes associated with the item return.
Processed Date: The date when the item was associated to the container through the Return processing operation.
Comments: Displayed, if you add any comments while processing the item into the container.
Click Exit to return to the previous window.
Returns Process
On the Return Information Inquiry window, select a record and click Returns Process.
If you select a paper return record, the Paper Return Processing window opens with the relevant details populated. If you select an electronic return record, the Electronic Returns Processing window opens.
Manage Instructions
If the selected record has the Instructions field selected, the Instructions link is enabled
On the Return Information Inquiry window, click Instructions. Any instructions available are displayed
Exit the Return Information Inquiry Window
Click Exit to close the window.
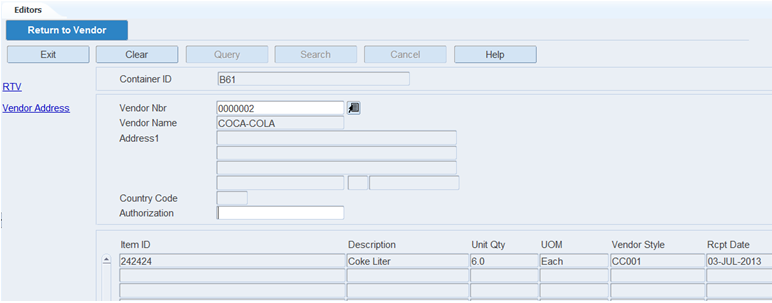
The Return to Vendor window allows you to process a return to vendor (RTV). If the default address for the vendor is not the desired address, you can choose or enter another address.
When you process the RTV, the Return to Vendor Advice report is generated. It contains the vendor, vendor address, and authorization number. It lists the items to be returned as well as their vendor styles, container quantities, and unit quantities.
You can also generate the Return to Vendor report. It lists the RTV IDs and container IDs that are associated with a vendor number and authorization number.
From the main menu, select Returns > Return to Vendor. The Return to Vendor window opens.
|
Note: You can also access this window from the Inventory Inquiry by Vendor window. |
Display a Return to Vendor
Click Query.
In the Container ID field, enter the ID of the container, or click the LOV button and select the container.
Click Search. The details of the return to vendor appear.
Process a Return to Vendor
On the Return to Vendor window, enter the vendor number in the Vendor Nbr field.
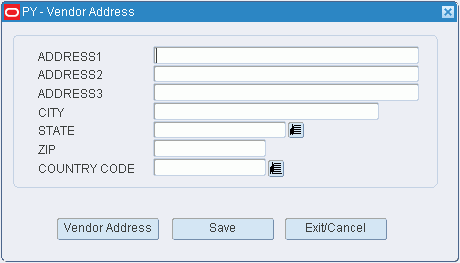
To enter an address for the vendor:
Click Vendor Address. The Vendor Address window opens.
Enter the ship-to address of the vendor or click Vendor Address and select the address.
Click Save to save any changes and close the Vendor Address window.
In the Authorization field, enter the authorization number from the vendor.
Click RTV.
When prompted to confirm the return to vendor, click Yes.
When prompted to select a reason for the inventory adjustment, select the reason and click OK. The report is sent to the destination that is set for printing.
Exit the Return to Vendor Window
Click Exit to close the window.