| Oracle® Retail Demand Forecasting Implementation Guide Release 16.0 |
|

 Previous |
 Next |
Curve is an RPAS solution that is used to generate ratios from historical data at user-specified intersections. The profiles generated by Curve can be used for various purposes:
To convert the organization-level assortment plans into base level weekly sales forecasts
For generating seasonal forecasts, daily forecasts, or new product forecasting using lifecycle profiles
RDF requires profiles (created by Curve) to determine how a source level forecast (for instance, Item/Chain/Week) is spread down to the execution or final level (for instance, Item/Store/Day). Profiles are generated using historical data and phase definitions that are based on the system configuration. Using the Curve Plug-In, profiles are defined to support the Curve solution.
|
Note: For information on building the Curve domain, refer to the Oracle Retail Predictive Application Server Installation Guide. |
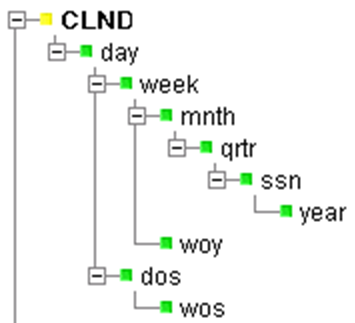
The following dimensions are required to support different seasonal profiles. If the following defined types of profiles are not required, these hierarchy dimensions may not be necessary:
dos (day of season) - A dimension off day, dos is used to support seasonal profiles that are normalized to day. This profile should use the Daily Seasonal profile type.
wos (week of season) - A dimension off day or dos, wos is used to support seasonal profiles normalized to week. This profile can use the Store Contribution, Product Profile, or User Defined profile types.
woy (week of year) - A dimension off week or year, woy is used to support weekly seasonal profiles normalized to year. This profile can use the Store Contribution, Product Profile, or User Defined profile types.
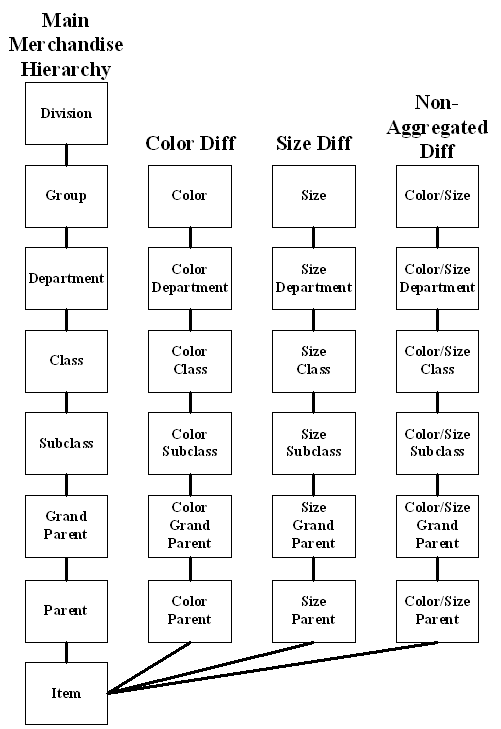
Configuring Differentiator dimensions (also referred to as Diff dimensions) within the merchandise hierarchy is optional. Differentiator dimensions allow the merchandise dimensions to be distinguished based on an alternative attribute property such as Color, Size, Flavor, or other attributes properties that are required to support your merchandising needs.
Differentiator dimensions are the combination of each Differentiator and a dimension that is created off of the lowest dimension in the merchandise hierarchy (item). This only goes up as high as Department. The mock install configuration released with Curve is configured with an example of a Differentiator branch along the merchandise hierarchy; however, up to 10 Differentiator branches may be configured. The following diagram provides an example of how a Differentiator branch may be configured.
If Curve is to be integrated with RMS /Allocation, the Diff dimensions configured in the RPAS Configuration Tools must map to the same Diff dimensions that are or will be configured in the RMS/ Allocation hierarchies. Allocation also requires Non-Aggregated Differentiator dimensions. These dimensions allow for Diff Dimensions to be combined (as shown in the diagram above) and allow for Curve to generate profiles to support Allocation. Within Allocation, these Non-Aggregated Differentiators are represented by Diffs with Aggregation Indicators set to No.
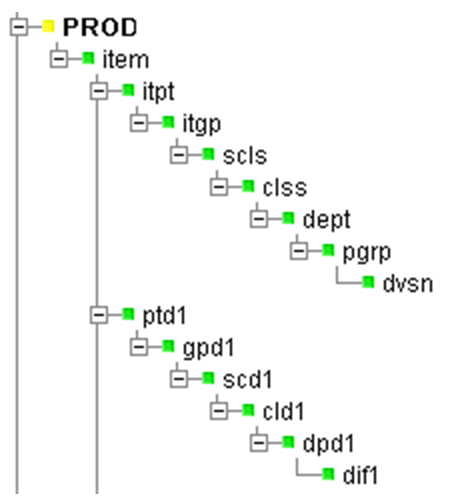
Within the merchandise hierarchy, which is also required to support RMS / Allocation, is the itpt (Item Parent) dimension off the item (Item) dimension. And off of the itpt dimension, add itgp (Item Grandparent) dimension. The other aggregate dimensions above item, should be dimensions beginning off of itgp. Figure G-3 illustrates the GA configuration of the merchandise hierarchies that is configured using Item Parent and Item Grandparent in addition to a Differentiator branch:
In addition to the above example, profiles 30 through 43 in the mock installations provided in the release packages are diff profile configurations that may be used to support the generation of spreading ratios for RMS / Allocation.
To create a Curve solution:
Open an existing configuration in which hierarchies (for example, product, location, and calendar) have already been defined.
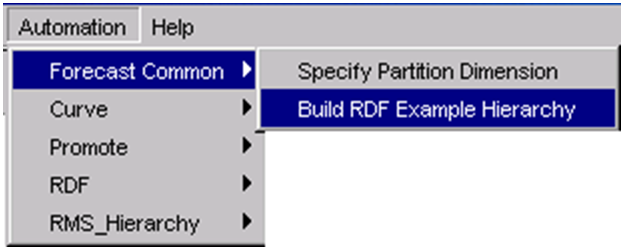
From the Configuration Tools toolbar, select the Automation menu. If installing a Global Domain environment, go on to Step 3. If installing a Simple Domain environment, go on to Step 4.
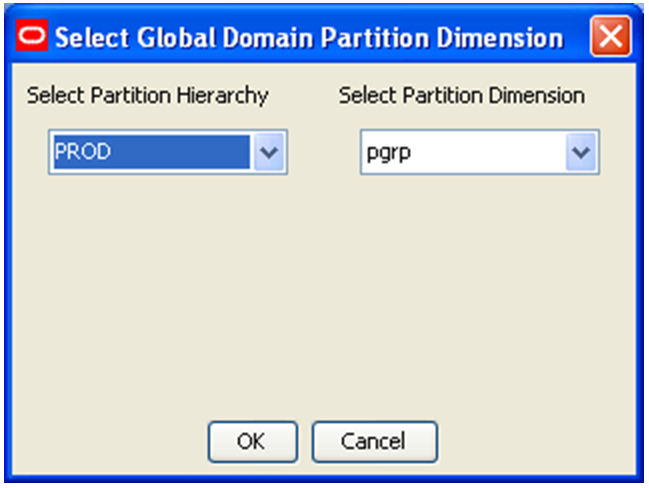
Select Forecast Common, and then select Specify Partition Dimension. The Select Global Domain Partition Dimension dialog box opens.
|
Note: To access this dialog, the configuration must already be defined as a Global Domain environment. This is performed by selecting Workspace Properties from the File menu and selecting the GlobalDomain option. |
Perform the following:
From the Select Partition Hierarchy list, select the hierarchy in which the domains will be partitioned.
From the Select Partition Dimension list, select the appropriate partition dimension.
Select OK.
Optional: The Forecast Common plug-in may also be used to create an example hierarchy configuration. Select Forecast Common - Build RDF Example Hierarchy. The resulting hierarchy configuration is the same hierarchy that is used for the mock installation configurations provided in the release packages.
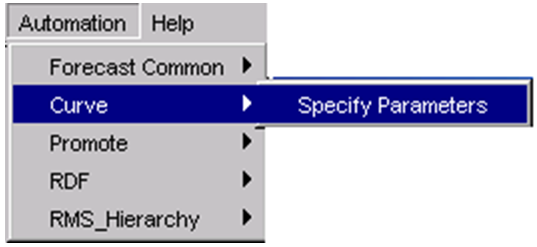
From the Automation menu, select Curve - Specify Parameters.
The following sections provide information on configuring profiles:
Configuring Source Level Attributes
To create a final profile:
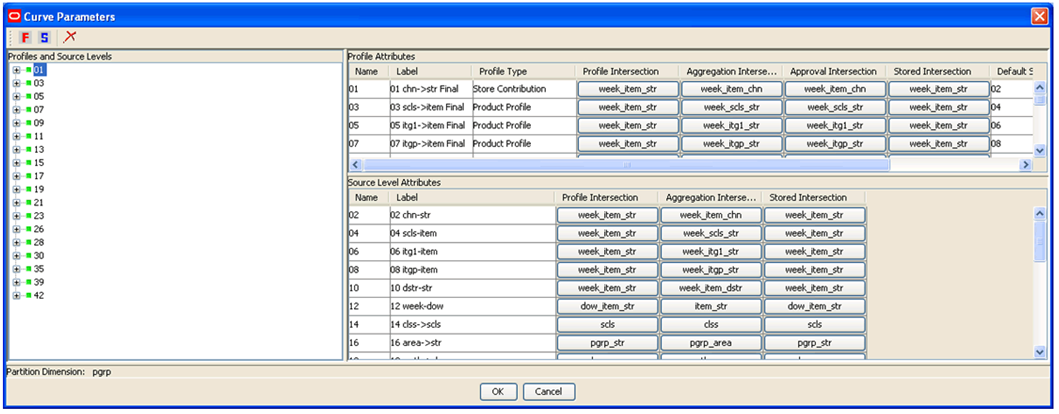
On the Curve Parameters utility, click the F icon.
A new final profile is added and is assigned the next consecutive number starting with 01.
Specify the properties for the final profile. See Editing Profile Properties for details.
To create a source level:
On the Profile and Source Level window, highlight the final profile number in which a source will be created.
Click the S icon. A new source profile is added and is assigned the next consecutive number.
Specify the properties for the Source Level. See Editing Profile Properties for details.
The following sections describe how to edit profile properties.
The Profile Name is the system-assigned level number when a Final Profile or Source Level is created. This is a read-only field.
The Profile Label is the profile description that will be viewed by the user once the domain is created.
Level Labels may not exceed forty characters.
It is recommended (but not required) that Profile Labels include the Profile Name, which is the system-assigned profile number. There are two reasons for this:
The Profile Name is referenced in the RDF configuration to specify Spreading Profiles. Curve requires that profiles 1 through 9 be referenced as 01, 02,…, 09 when being specified as a Spreading Profile in the RDF configuration.
The Default Source Profile parameter in the Profile Administration workbook is a pick-list that is populated with the Profile Name of each source level configured for the final profile being viewed in the workbook. If the Default Source Profile set within this configuration, it not expected to change within the domain(s). This recommendation may not be necessary for consideration.
RPAS automatically puts ( ) around Profile Labels. The configuration specialist should not include these in their level label configuration, or the installer will fail. An example of a Profile Label that would violate this requirement is (01 - chn->str-Final). It is acceptable as 01 - chn->str-Final.
'-' should not be used before or after the Profile Label. An example of a Profile Label that would violate this requirement is -01-chn->str-Final-. It is acceptable as 01 - chn->str-Final.
':' should not be used at all in the Profile Label. An example of a Profile Label that would violate this requirement is 01: chn->str Final.
Assigned on the final profile, the Profile Type is a pick-list of profile types that are used to determine the profile algorithm and validation required by the profile level. Profile Types are represented with pre-defined configuration information.
The following Profile Types share the same profile algorithm. The rationale for providing different types that have the same behavior is strictly to remind the user of the intent of the profile while using the Profile Administration workbook:
| Profile Types | Description |
|---|---|
| Store Contribution Profile | The Store Contribution Profile is used to determine the data relationship between stores to aggregate dimensions in the location hierarchy. |
| Hourly Profile | The Hourly Profile is used to determine the spreading ratios from aggregate dimensions to the hour, hour of day, or hour of week dimensions.
To configure Hourly Profile, you must set the following:
|
| Daily Profile | The Daily Profile is used to determine the data relationship between a given day to the week in which it belongs. |
| Product Profile | The Product Profile is used to determine the data relationship between any two dimensions along the product hierarchy. |
| Size Profile | The Size Profile is used to determine the data relationship between any dimension in the size hierarchy and any dimension in the product hierarchy. A size hierarchy must be defined to use this profile type. |
| User Defined Profile | The User Defined Profile may be used to support any profile configuration. |
The following Profile Types have unique behavior:
| Profile Types | Description |
|---|---|
| Diff Profile | Diff Profiles are used to determine spreading ratios from aggregate dimensions in the Product hierarchy to diff dimensions. Used to support the spreading of data in RMAS Allocation, Diff Profiles exhibit the same behavior as the previous profile types. However, unique to Diff Profiles is special validation of the relationship between the defined diff dimensions to dimensions along the main branch of the Product hierarchy. See the Oracle Retail Demand Forecasting Implementation Guide for more information on validation criteria. |
| Daily Seasonal Profile | The Daily Seasonal Profile is used to determine the data relationship between a given day of the week to aggregate dimensions in the calendar hierarchy. This profile type uses training window data to compute the profile. The resulting profile is then clipped to fit within the defined phase window. |
| Life Cycle Profile | The Life Cycle Profile uses data along a user-defined training window, and then stretches or shrinks data to fit a user-defined phase window. |
| Profile Intersection | The Profile Intersection is the intersection at which an intermediate profile is calculated. This intermediate profile is then replicated down or aggregated up to the Stored Intersection. If the Store Intersection is the same as the Profile Intersection, the values in intermediate profile are copied to the Stored Intersection. The Profile Intersection must be lower than the Aggregation Intersection. If the profile is being used as the Spreading Profile in RDF, this Profile Intersection should be the same as the Final Forecast Level.
Once the Profile Intersection is entered at the Final Profile level, the Stored Intersection for both the Final and Source (if created) will populate with the same value. These may be overwritten if necessary. Note: If installing a Global Domain environment, all intersections configured to support a profile MUST include a dimension at or below the partition dimension. |
| Aggregation Intersection | The Aggregation Intersection is the intersection at which the profile will sum to one (or 100%). If the profile is being used as the Spreading Profile in RDF, this Aggregation Intersection should be the same as the Source Forecast Level.
Once the Aggregating Intersection is entered, the Approval Intersection will populate with the same value for both the Final and Source (if created). This may be overwritten if necessary. Note: If installing a Global Domain environment, all intersections configured to support a profile MUST include a dimension at or below the partition dimension. |
| Approval Intersection | Assigned only at the Final Profile, the Approval Intersection is the intersection at which the profile is approved. Approval Intersection should be above or equal to the Aggregation Intersection. If the profile is being used as the Spreading Profile in RDF, this Approval Intersection should be the same as the Aggregation Intersection.
The Approval Intersection may be pre-populated with the value set for the Aggregation Intersection. This may be overwritten if necessary. Note: If installing a Global Domain environment, all intersections configured to support a profile MUST include a dimension at or below the partition dimension. |
| Stored Intersection | The Stored Intersection is the destination intersection of the profile. The intermediate profile produced at the Profile Intersection is either replicated down to or aggregated up to the Stored Intersection. If the Store Intersection is the same as the Profile Intersection, the values in intermediate profile are copied to the Stored Intersection. The Stored Intersection should not be greater than the Aggregation Intersection. If the profile is being used as the Spreading Profile in RDF, this Stored Intersection should be the same as the Profile Intersection.
The Stored Intersection may be pre-populated with the value set for the Profile Intersection. This may be overwritten if necessary. Note: If installing a Global Domain environment, all intersections configured to support a profile MUST include a dimension at or below the partition dimension. |
| Default Source | Assigned only at the Final Profile, the Default Source is the primary Source Level that will be used in the calculation of the Final Profile. The desired Source Level must be created before it is an option in this pick-list. |
| Source Data | Assigned only at the Final Profile, the Source Data is the measure to be used as the input data (for example, POS) for the generation of profiles. The values in this pick-list are populated with all measures configured external to the RDF, Curve, and Promote solution extensions.
If the profile is to be used to support the dynamic generation of spreading ratios (Spreading Profile) in the RDF batch forecast process, no value in Source Data should be specified. |
The autogeneration process creates hierarchies, measures, rules, and workbook templates that are required to support the essential Curve functionality. This base configuration is referred to as the GA Configuration. Certain changes to the GA Configuration are allowed. Once edits to the GA Configuration are made and the autogeneration process occurs again, valid changes to the configuration will be preserved. There is nothing in the RPAS Configuration Tools to prevent invalid changes from being made.
|
Note: When a custom taskflow exists in the configuration, the plug-in automation may cause the workbook template field to be blank. If this occurs, save the configuration and then re-open the configuration and the workbook template field is populated. |
The following outlines acceptable changes and restrictions:
| Item | Description |
|---|---|
| Curve Solution Extension Name | The name assigned to the resulting Curve solution after autogeneration occurs cannot be edited. |
| Major and Minor Classes | Additional Major components may be added to the Curve. Additional minor components can only be added under the new Major components. The Major and Minor components that are part of the GA Configuration may not be edited. This restriction also applies to Measure Names and Measure Labels. Adding minor components to GA major components is forbidden. |
| Rules | Additional Rule Sets, Rule Groups, and Rules may be added to the Curve GA Configuration.
This includes support for adding new Rules to existing GA Configuration Rule Groups. It is recommended that new Rules that are added to the GA Configuration Rule Groups include cust (represents Custom) in the Rule Name. This allows for easy identification of Rules that are not part of the GA Configuration. Rule Sets, Rule Groups, and Rules that are part of the GA Configuration may not be renamed. Existing Rules that are part of the GA Configuration may not be modified in any way. |
| Workbook Templates | Additional Workbook Templates may be added to the Curve GA Configuration. As well, new Measures and Rules may be added to the GA Configuration Workbook Templates.
This is done by adding new Major and Minor classes, and adding new Rules to existing Rule Groups in the GA Configuration. |
Deletion of a profile level will cause the system-assigned enumerated values in the Profile Name to renumber such that levels are in consecutive order starting with profile level 01. Deleting a profile level may impact any solution configuration that uses a specific profile level. For example, the following parameters within an RDF Solution configuration may be affected if profile levels are deleted or renumbered:
Seasonal Profile
Spreading Profile
If the domain using the configuration has been previously installed, there is potential to lose data associated to a level that has been deleted or renumbered.
To delete a level:
On the Profiles and Source Level window, highlight the number of the profile you want to delete.
Click the X icon. The profile is deleted. If you delete a final profile, any source profiles that are associated with it will also be deleted.
Select OK to regenerate the solution with the changes to the cluster configuration.