| Oracle® Retail Predictive Application Server Administration Guide for the Classic Client Release 14.1 E59120-01 |
|

 Previous |
 Next |
| Oracle® Retail Predictive Application Server Administration Guide for the Classic Client Release 14.1 E59120-01 |
|
Previous |
Next |
This chapter describes domain administration tasks such as configuring the Classic Client and using the DomainDaemon. It contains the following sections:
This section provides instructions for configuring the RPAS Classic Client with the eConfigure utility on a local computer using a Microsoft Windows operating system.
The eConfigure utility is a Windows application that configures the client-server communication for RPAS. The eConfigure utility lets you specify communication parameters and produces a file that is used as input to the client. These files must be in the FCF (Foundation Configuration File) format/extension. The files contain the necessary information for the client to start up the communication with the server. These files can be stored on the client machine or on the network.
When the client is executed, a file named Foundation.FCF is expected in the same directory. If the file has a different name or if it is stored somewhere on the network, the path to this file must be passed in as an argument to the client.
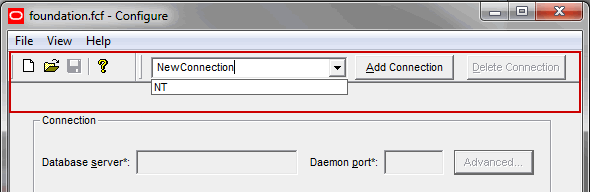
The eConfigure utility consists of a menu bar, a main view, and the advanced settings dialog window. Passwords saved in the FCF file are encrypted. To launch eConfigure, double-click the eConfigure.exe file, which is by default located in the root directory of the RPAS Classic Client.
The files produced by eConfigure may contain multiple connections. Each connection is specific for a server with certain communication settings. Connections need to have unique descriptions, and they can be added and deleted using the menu bar.
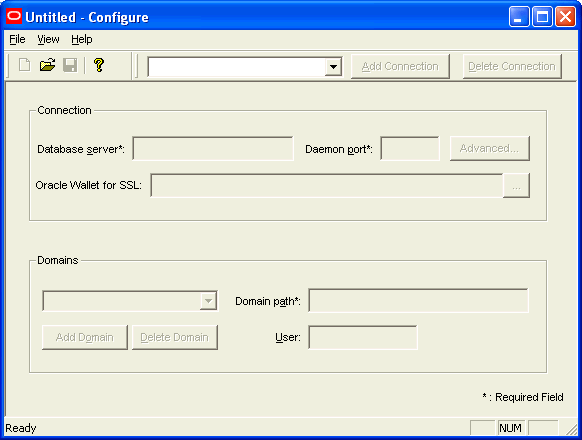
The main view has the basic connection parameters, as shown in Figure 3-2.
Database Server: The hostname or the IP address of the server, for example, atldev03 or 10.2.1.23. This value must be localhost when running the RPAS Server on a Windows machine.
Daemon Port: The port number on which the domain daemon is listening. This must be an integer between 1025 and 65535 (for example, 55278).
Oracle Wallet for SSL: The Oracle Wallet stores the SSL credentials. You must provide the path where the wallet is stored. This information is only required if one-way SSL is used. If SSL is disabled or if anonymous SSL is being used, then the wallet is not required. For more information, see Chapter 4, "SSL."
Domain: The name of the domain that is displayed to the user when logging in. Select a domain from the list or type the name of a new domain and click Add Domain. You can delete a domain from the list by selecting it and then clicking Delete Domain.
Domain Path: The full path to the directory containing the domain, for example, /root/testenv/domain/Sample_Project
User: Provide the user ID if you do not want to force the user to provide it when logging in. The user ID must be defined in the associated domain. Note that the password cannot be entered here. The user must enter the password manually each time the RPAS client starts the connection.
Click the Advanced button shown in Figure 3-3 to access the Advanced Settings dialog window.
User: The database user that is used by the client if a domain-specific user has not been entered, for example, adm.
Database Port Range Start and End: Port range is used to specify the range of ports on which the RPAS Server processes is started by the DomainDaemon (the rpasDbServer processes). The port Start and port End fields are the lower and upper limits of this range, respectively.
These fields must be integers between 1025 and 65535, which are also the default values if values are not specified, for example, Start: 40000, End: 45000.
Compression Threshold: The number of bytes above which client and server are using compression. Only advanced users should manipulate this number.
Web Tunneling: The configuration of Web tunneling.
Proxy Settings: The configuration of the RPAS Classic Client to support a proxy server is not completed in this utility.
The RPAS DomainDaemon is a process that is used to enable the communication channel between RPAS Clients and RPAS domains.
The DomainDaemon runs on the server side and waits for requests from RPAS Clients on a given port. Once the DomainDaemon receives a request from a client, it starts a server process that the client connects to. From this point, the client and server communicate directly. The system administrators may choose to have one single DomainDaemon process for all of the users, or they may choose to have separate processes per domain, per enterprise, and so on.
The DomainDaemon is installed in the [RPASDIR]/bin directory. [RPASDIR] represents the full path to the directory where the RPAS Server is installed.
|
Note: On rare occasions, the Domain Daemon can throw the following exception when SSL is enabled: Failed to initialize Oracle SSL environment (nzerror 43120: NZERROR_LX_ERROR).This is caused by an unmatched language setting of the operating system. Setting the environment variable NLS_LANG using the following command before starting the Domain Daemon resolves this problem. export NLS_LANG=AMERICAN |
Table 3-1 provides descriptions of the arguments used by the DomainDaemon utility.
|
Note: DomainDaemon commands that talk to a running DomainDaemon (stop, ping, stopActiveServers, and so on) now need to specify the wallet information. This applies to SSL types 1, 2, and 4, but not 3. This can be set in the environment variableRPAS_SSL_WALLET to avoid having to pass it on the command line. |
Table 3-1 DomainDaemon Arguments
| Argument | Description |
|---|---|
|
-version |
Prints the RPAS version, revision, and build information of the utility. |
|
-start |
Starts a DomainDaemon on the specified port. |
|
-port portNum |
Defines the portNum, which must be between 1025 and 65535 (inclusive). If portNum is set to auto, it will find any free port. |
|
-loglevel |
Enables additional logging. Note: The -debug option has been deprecated. Instead of using -debug, use -loglevel to add additional logging. |
|
-timeout milliseconds |
Specifies the number of milliseconds to wait for the server to start. A value of -1 means no timeout. |
|
-server serverProgramName |
Specifies the name of the RPAS database server program. Defaults to RpasDbServer. |
|
-no_auto_add |
Disables the registering of domains in response to client requests to start a RPAS database server. |
|
-stop |
Stops the DomainDaemon on the specified port. |
|
-ping |
Reports the status of a DomainDaemon process. |
|
-showDomains |
Shows all domains managed by this daemon. |
|
-add pathToDomain |
Adds the specified domain to the list of domains managed by a DomainDaemon. |
|
-activate pathToDomain |
Reactivates a previously deactivated domain. Specify the port number and the complete path to the domain. |
|
-deactivate pathToDomain |
Marks a domain as temporarily unavailable. Deactivating a domain also terminates all user sessions in that domain. A message will be displayed in the client to notify users when this occurs. Domains are most commonly deactivated before beginning a routine nightly or weekly batch process. This ensures that no users make updates to the system during these processes. Specify the port number and the complete path to the domain. |
|
-remove pathToDomain |
Removes the specified domain from the list of domains managed by a DomainDaemon. |
|
-showActiveServers |
Shows all active server processes. Specifying a port number is required.For each active server, the DomainDaemon shows the process ID, domain, and user ID. |
|
-stopActiveServers |
Stops all active servers. Specify a port number and a process ID. |
|
-stopServer processId |
Stops the server using the specified processed. |
|
-stopUser userId |
Stops the server using the specified userId. |
|
-ssl |
Specifies whether the messages exchanged between the Classic Client and the RPAS database server are encrypted using a password generated during the initial SSL handshake. Here are the options for SSL: 1: This option provides one-way authentication and encrypted data transfer. 3: This options provides encrypted data transfer without authentication. |
|
-CipherSuite |
Specifies the encryption algorithms used by SSL with the -cipherSuite field. A cipher suite consists of three components: - Asynchronous: The asynchronous algorithm is used in the SSL handshake to validate the client/server certificates and exchange the session key. - Synchronous: The synchronous algorithm uses the session key to encrypt data transfers between the client and server. - MAC: The MAC is a hash of the message contents appended to the end of the message to validate that the contents of the message were not altered. Because cryptography requirements evolve over time, this list of supported algorithms will change from release to release. o see which cipher suites are supported by your version of RPAS, use the -listCipherSuites option. If -cipherSuite is not specified, a default suite will be provided. The default suite will be whichever one is considered the most secure at the time of release. Conversely, if at the time of release a supported cipher suite is considered insecure, RPAS will deprecate it. Using a deprecated cipher suite will result in a warning being logged when starting DomainDaemon |
|
-listCipherSuites |
Lists the cipher suites supported by the current version of RPAS. Deprecated cipher suites are marked with a (X), and the default suite is marked with a (*). Because the list of available cipher suites can vary based what type of SSL you are using, you must specify the -ssl argument. |
|
-wallet |
-wallet Specifies the location of the server wallet folder. The wallet contains the RPAS server's private key and certificate and the client's certificate. Format: -wallet file:<path to the server wallet folder> Example: -wallet file:d:\wallets\server [on Windows] on Unix: -wallet file:/u00/admin/wallets/server The RPAS_SSL_WALLET environment variable can be used to specify the wallet location in place of this argument. |
To start the DomainDaemon, execute the DomainDaemon utility. The port number where the DomainDaemon is running must be passed in as an argument. The port number must be between 1025 and 65535. If auto is specified instead of a number, the DomainDaemon is started on any available port.
Issuing the following command from a UNIX shell starts a DomainDaemon on port 55278:
DomainDaemon -port 55278 -start
If the command is successful, the DomainDaemon returns the following message:
Daemon listening on port '55278'.
|
Note: The proper environment variables must be set in order to execute the DomainDaemon. See the "Verify the Environment Variable Settings" for more information about setting RPAS_HOME and updating the PATH variable. |
The -ping argument can be used to see whether a DomainDaemon is active. The port number must also be passed as an argument. If the DomainDaemon is active on the port, a message will be printed and the script will return true. Otherwise, the script will return false.
DomainDaemon -port 55278 -ping
DomainDaemon on port 55278 is alive.
The connection between the RPAS Client and the RPAS Server can be lost for any number of reasons, but occurs most commonly when the user's computer crashes or the network connection is lost.
If an RPAS Client-Server connection is lost, the user's work is guaranteed to be saved up to the last calculation; all deferred calculations are lost. Upon subsequent login, the user can access either the last version of the original workbook explicitly saved by the user or the auto-saved version of the workbook that was being worked on when the connection was lost.
If the user tries to log in after recently losing the connection or from a different instance of the RPAS client, the user is prompted to either terminate all existing sessions and start a new session, or start a new concurrent user session. If the user chooses to terminate the existing session, the RPAS server gracefully terminates the existing session and then logs the user in and starts up a new session.
If a connection has been lost and the previous session has not timed out or a session for the user is running from a different instance of the RPAS client, the user can use the RPAS client to gracefully terminate the existing session and log into a new session. Graceful termination includes the completion of any pending processes and custom menu or rule group processing in the existing session, followed by an auto-save of the workbook and subsequent termination of the server process.Graceful termination of an existing session can take an arbitrarily long time. This time is equal to the sum of the time taken to complete any running calculations and the time taken to save the workbook.
When the RPAS server times out waiting on a request from the RPAS Client, it gracefully terminates, irrespective of whether the user tried to log in again.
If for any reason the client server connection is lost before the new login occurs, RPAS asks users if they want to resume the previous session or terminate it and start a new one. However, it will not start another session for the user until the user regains connectivity and tries to log in again.
There is a limit on the number of login sessions per user. By default, the maximum number of concurrent login sessions per user is five. This limit can be altered by an administrator using the Security Administration workbook.
When an RPAS Server session terminates automatically, either due to re-login or a server timeout, it auto-saves the workbook that is currently open by the session. An auto-saved workbook includes all of the user's work up to the last calculation. If the user had some pending calculations, that is, edits were made in the client but calculation was not performed, all the edits are lost.
When a workbook is auto-saved, the original workbook is kept in the same state it was in the last time it was explicitly saved by the user. A new workbook is created for the user with the name of the original workbook suffixed with '_autosave' and added to the user's Most Recently Used list. Upon subsequent login, the user can view both the original workbook and the auto-saved workbook in the workbook list.
RPAS administrators can impose a limit on the number of workbooks a user can create for a particular workbook template. When such a limit has been imposed, the auto-save feature allows the user to exceed that limit by one. This allows the user to operate at the limit without the fear of losing any work because of a connection failure or computer crash. However, when the limit is exceeded due to an auto-save, the auto-save feature is disabled for the user for the workbook template on which the limit has been imposed. The auto-save feature is disabled until the user deletes one or more of the workbooks for that template in order to bring the user at or below the limit. It is not required that the user delete the original or the auto-saved workbook. After the user is back at or below the limit, the auto-save feature is automatically enabled. Note that if a user exceeds the limit, the RPAS Client will inform the user of this situation every time the user attempts to open a workbook for the given template.